

In a prior blog post, we looked at Amplify Central integration webhooks and an external application that detects when a new version of an API is discovered by a discovery agent and emails any subscribers to the API so that they can be aware of this new revision in case it can impact their use of the API.
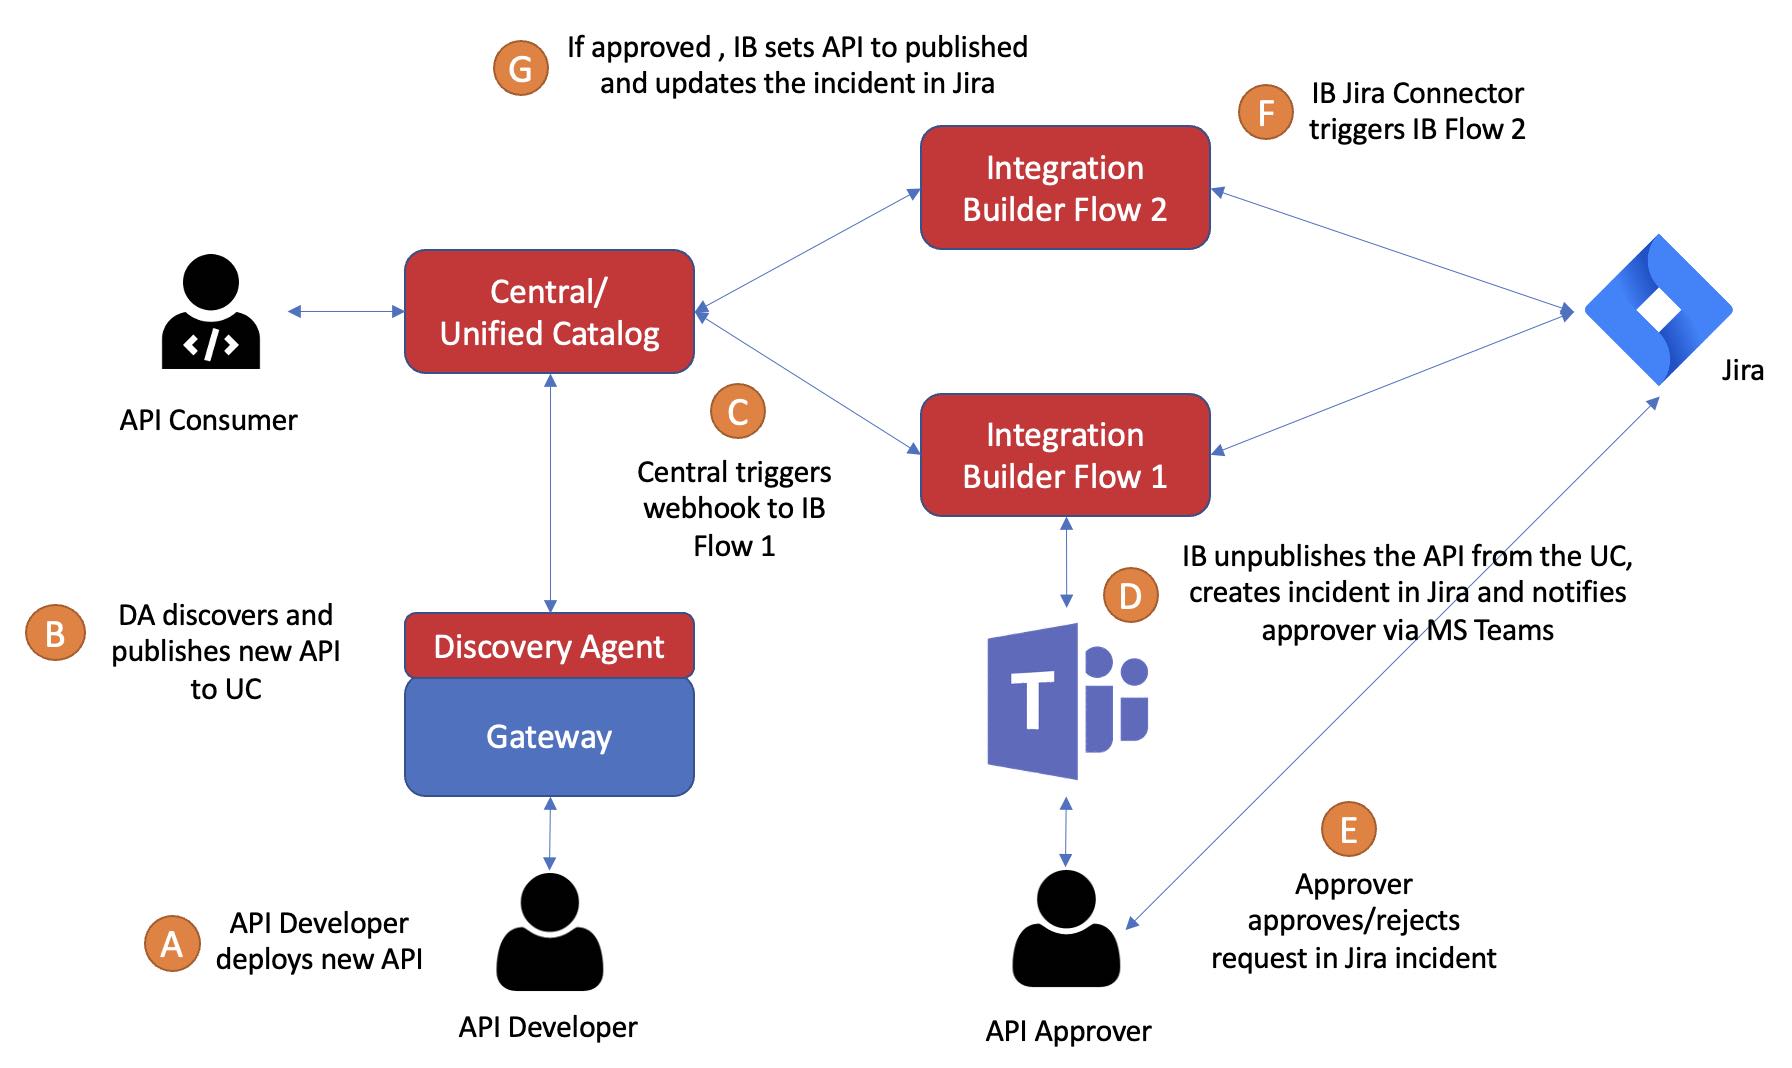
In this blog post, we’ll take a look at another example of an external application that will detect when a new API is discovered by a discovery agent and implement an approval workflow in Jira. If approved, the API will be published to the Unified Catalog. This helps enforce governance policies around publishing APIs.
The application is built using Axway Amplify Integration Builder and includes two Flows. The first will be triggered by the Amplify Central integration webhook that is configured to trigger whenever a new API is discovered.
The second will be triggered when a Jira incident is closed. The approval or rejection is handled in the Jira incident itself when an IT stakeholder sets the custom approval field to approve or reject and closes the incident.
Note that Jira custom fields were described in a prior blog post. Refer to that blog post for details.
The application will work as follows:
- The discovery agents are configured to publish to both the Environment and Catalog (e.g.
CENTRAL_MODE=publishToEnvironmentAndCatalogin the agent environment file) - An [Amplify Central Integration Webhook](https://docs.axway.com/bundle/axway-open-docs/page/docs/central/integrate_with_webhooks/index.html) will be configured to trigger when a *ConsumerInstance* is created (i.e. when an API is published to the Unified Catalog)
- The Integration Webhook will trigger one Integration Builder Flow that will do the following:
- Unpublish the API in the Unified Catalog
- Create a Jira incident requesting approval to publish the API
- Store data in the incident (in a custom field) that will be required later by a second Integration Builder flow in order to publish the API
- Send a notification to MS Teams to let the API Approval team know that there is a new API Publish request/incident
- An API Approver clicks on a link in the MS Teams message and reviews the Jira incident
- If the API is approved for publishing, then the API Approver selects *Approve* in a custom field in the Jira incident and closes the incident
- This triggers another Integration Builder Flow that approves the API and adds a comment to the incident indicating that the API was published
This is illustrated in the diagram below:
We’ll review how to set up the integration webhook and how to create the Integration Builder flows.
Note that before you create your integration webhook, you should create a manually triggered Integration Builder Flow and flow instance (for Flow #1) and make sure you can trigger it via API call. You will need the API URL and Headers for creating your integration webhook. For example, my Integration Builder flow is invoked as follows:
curl -X POST "https://staging.cloud-elements.com/elements/api-v2/formulas/instances/469913/executions" -H "accept: application/json" -H "Authorization: User IPJGvi.........v869NW4==, Organization 79eb3.........c2a05" -H "Content-Type: application/json" -d "{}"
Agent Setup
Make sure that your discovery agent is configured to publish to both the environment and Unified Catalog by setting the following variable in your environment variable file:
CENTRAL_MODE=publishToEnvironmentAndCatalog
Create an Integration Webhook
Integration Webhooks can be configured using the Axway CLI or via API calls. In this blog post series I’ll be using APIs.
In the following API calls, {{apiCentralUrl}} is the Amplify Central base address for API calls. By default, it is https://apicentral.axway.com but could be different based on your region. Also, in all the API calls below, you need to pass in the following headers as described here:
'Authorization': `Bearer <YOUR ACCESS_TOKEN>`,
'Content-Type': 'application/json'
Create the Integration
Use the following API call to create an integration called newconsumerinstanceintegration.
POST {{apiCentralUrl}}/apis/management/v1alpha1/integrations
Body:
{
    "name": "newconsumerinstanceintegration",
    "title": "New Consumer Instance Integration",
    "tags": [
        "cloud"
    ],
    "attributes": {},
    "spec": {
        "description": "This is an integration for approving new Consumer Instances"
    }
}
Create a Webhook Secret
Use the following API call to create a webhook secret for the Integration Builder API call Authorization header.
POST {{apiCentralUrl}}/apis/management/v1alpha1/integrations/newconsumerinstanceintegration/secrets
Body:
{
    "name": "webhooksecretib",
    "title": "API Key Secret for Webhook for IB",
    "tags": [
        "saas",
        "axway"
    ],
    "attributes": {
    },
    "spec": {
        "data": {
            "apikey": "User IPJGv......v869NW4=,Organization 79eb34a.......ac2a05"
        }
    }
}
Note that in this example, my Integration named newconsumerinstanceintegration is part of the API path (
/apis/management/v1alpha1/integrations/{{IntegrationName}}/secrets). This is the name given to the Integration in the prior API call. We’ll see this in the following two API calls below.
Create a Webhook
Let’s create a webhook in this integration. The webhook will make a POST to my first (manually triggered) Integration Builder flow using the url specified in the body: https://staging.cloud-elements.com/elements/api-v2/formulas/instances/469913/executions. Note that my URL is for my staging environment and my flow instance. You should replace this URL with the URL that triggers your Integration Builder Flow instance.
The webhook will use the webhook secret to send the specified Authorization Header, "User IPJGv......v869NW4=,Organization 79eb34a.......ac2a05, as described above. Obviously, my Integration Builder flow has already been created and instantiated in order to be able to trigger it via API call prior to creating the Webhook below.
POST /apis/management/v1alpha1/integrations/newconsumerinstanceintegration/webhooks
Body:
{
    "name": "webhookib",
    "title": "Webhook to invoke IB Flow",
    "tags": [
        "prod",
        "saas",
        "axway"
    ],
    "attributes": {
        "release": "1.0.0"
    },
    "spec": {
        "enabled": true,
        "url": "https://staging.cloud-elements.com/elements/api-v2/formulas/instances/469913/executions",
        "auth": {
            "secret": {
                "name": "webhooksecretib",
                "key": "apikey"
            }
        }
    }
}
Create a Resource Hook
The resource hook will tell the integration when to invoke the webhook. In this case, we will generate a webhook call whenever there is a new ConsumerInstance in my aws environment (i.e. an API published to the Unified Catalog).
POST /apis/management/v1alpha1/integrations/newconsumerinstanceintegration/resourcehooks/
Body:
{
   "group": "management",
   "apiVersion": "v1alpha1",
   "kind": "ResourceHook",
   "name": "aws-consumerinstance-hook",
   "title": "Monitor Environment aws for a new ConsumerInstance",
   "metadata": {
      "scope": {
         "kind": "Integration",
         "name": "newconsumerinstanceintegration"
      }
   },
   "spec": {
      "triggers": [
         {
            "group": "management",
            "kind": "ConsumerInstance",
            "name": "*",
            "type": [
               "created"
            ],
            "scope": {
               "kind": "Environment",
               "name": "aws"
            }
         }
      ],
      "webhooks": [
         "webhookib"
      ]
   }
}
Webhook Payloads
Based on the Integration Webhook setup above, when the discovery agent discovered an API (FarmStore) and published it to the Environment and Unified Catalog, Central triggered a webhook to my Integration Builder flow with the following payload (body):
{
  "product": "AmplifyCentral",
  "payload": {
    "finalizers": [],
    "metadata": {
      "references": [
        {
          "id": "8a2e8c85779860f90177a6991c1e045d",
          "kind": "ConsumerSubscriptionDefinition",
          "name": "aws.authsubscription",
          "selfLink": "/management/v1alpha1/environments/aws/consumersubscriptiondefs/aws.authsubscription",
          "type": "soft"
        },
        {
          "id": "8a2e8f7378b3c12d0178d74c9afe45e3",
          "kind": "APIServiceInstance",
          "name": "3395d432-9e2c-11eb-97e3-0242ac110002-prod.1",
          "selfLink": "/management/v1alpha1/environments/aws/apiserviceinstances/3395d432-9e2c-11eb-97e3-0242ac110002-prod.1",
          "type": "hard"
        }
      ],
      "audit": {
        "modifyUserId": "DOSA_50e7481fc643403cbc031315cfa013ab",
        "createUserId": "DOSA_50e7481fc643403cbc031315cfa013ab",
        "createTimestamp": "2021-04-15T20:50:25.382+0000",
        "modifyTimestamp": "2021-04-15T20:50:25.382+0000"
      },
      "resourceVersion": "344294",
      "scope": {
        "name": "aws",
        "id": "8a2e862d779860e20177a6888d450233",
        "kind": "Environment",
        "selfLink": "/management/v1alpha1/environments/aws"
      },
      "id": "8a2e8afc78b3c1350178d74c9be64774",
      "selfLink": "/management/v1alpha1/environments/aws/consumerinstances/3395d432-9e2c-11eb-97e3-0242ac110002-prod"
    },
    "kind": "ConsumerInstance",
    "title": "FarmStore (Stage: Prod)",
    "spec": {
      "visibility": "RESTRICTED",
      "owningTeam": "Default Team",
      "documentation": "Based on Petstore",
      "description": "API From AWS API Gateway (RestApiId: rrsprqdux3), StageName: Prod",
      "subscription": {
        "autoSubscribe": false,
        "enabled": true,
        "subscriptionDefinition": "aws.authsubscription"
      },
      "version": "1.0.0",
      "tags": [
        "SHOULD_DISCOVER"
      ],
      "unstructuredDataProperties": {
        "type": "",
        "contentType": ""
      },
      "additionalDataProperties": {
        "data": "",
        "type": "",
        "contentType": ""
      },
      "name": "FarmStore (Stage: Prod)",
      "state": "PUBLISHED",
      "apiServiceInstance": "3395d432-9e2c-11eb-97e3-0242ac110002-prod.1",
      "status": "PUBLISHED"
    },
    "tags": [
      "SHOULD_DISCOVER"
    ],
    "apiVersion": "v1alpha1",
    "name": "3395d432-9e2c-11eb-97e3-0242ac110002-prod",
    "attributes": {
      "ProdHash": "796074314614668795",
      "createdBy": "AWSDiscoveryAgent",
      "externalAPIID": "rrsprqdux3",
      "externalAPIName": "FarmStore",
      "GatewayType": "AWS",
      "externalAPIStage": "Prod"
    },
    "group": "management"
  },
  "organization": {
    "id": "100000142"
  },
  "correlationId": "a9f18c2e-e648-448f-b59e-057049057d4b",
  "id": "b27be94a-3e35-4ba6-adc1-0c05392f2f31",
  "time": "2021-04-15T20:50:25.710+0000",
  "type": "ResourceCreated",
  "version": "v1"
}
Note that in the webhook payload above, API FarmStore has a state of PUBLISHED. The Integration Builder Flow #1 will set the state to UNPUBLISHED.
Now let’s look at the first Integration Builder flow.
Integration Builder Flow #1
The Integration Builder manual triggered flow will be triggered by this webhook call and do the following:
- Unpublish the API in the Unified Catalog
- Create a Jira incident requesting approval to publish the API
- Store some data in the incident that will be required later in order to publish the API
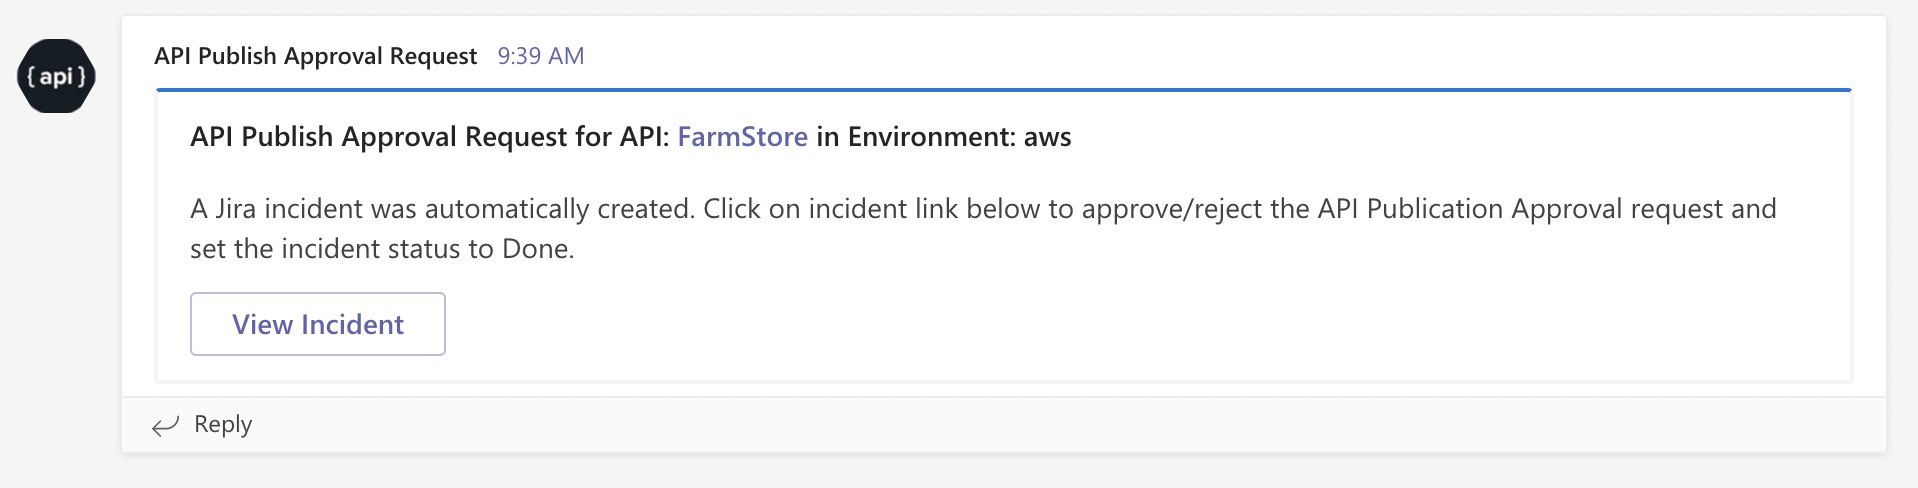
- Send a notification to MS Teams to let the API Approval team know that there is a new request/incident. The Teams message will contain a link to the Jira incident
A sample MS Teams message for an AWS API Gateway API, FarmStore, in my Central Environment, aws, is shown below:
The corresponding Jira incident is shown below:
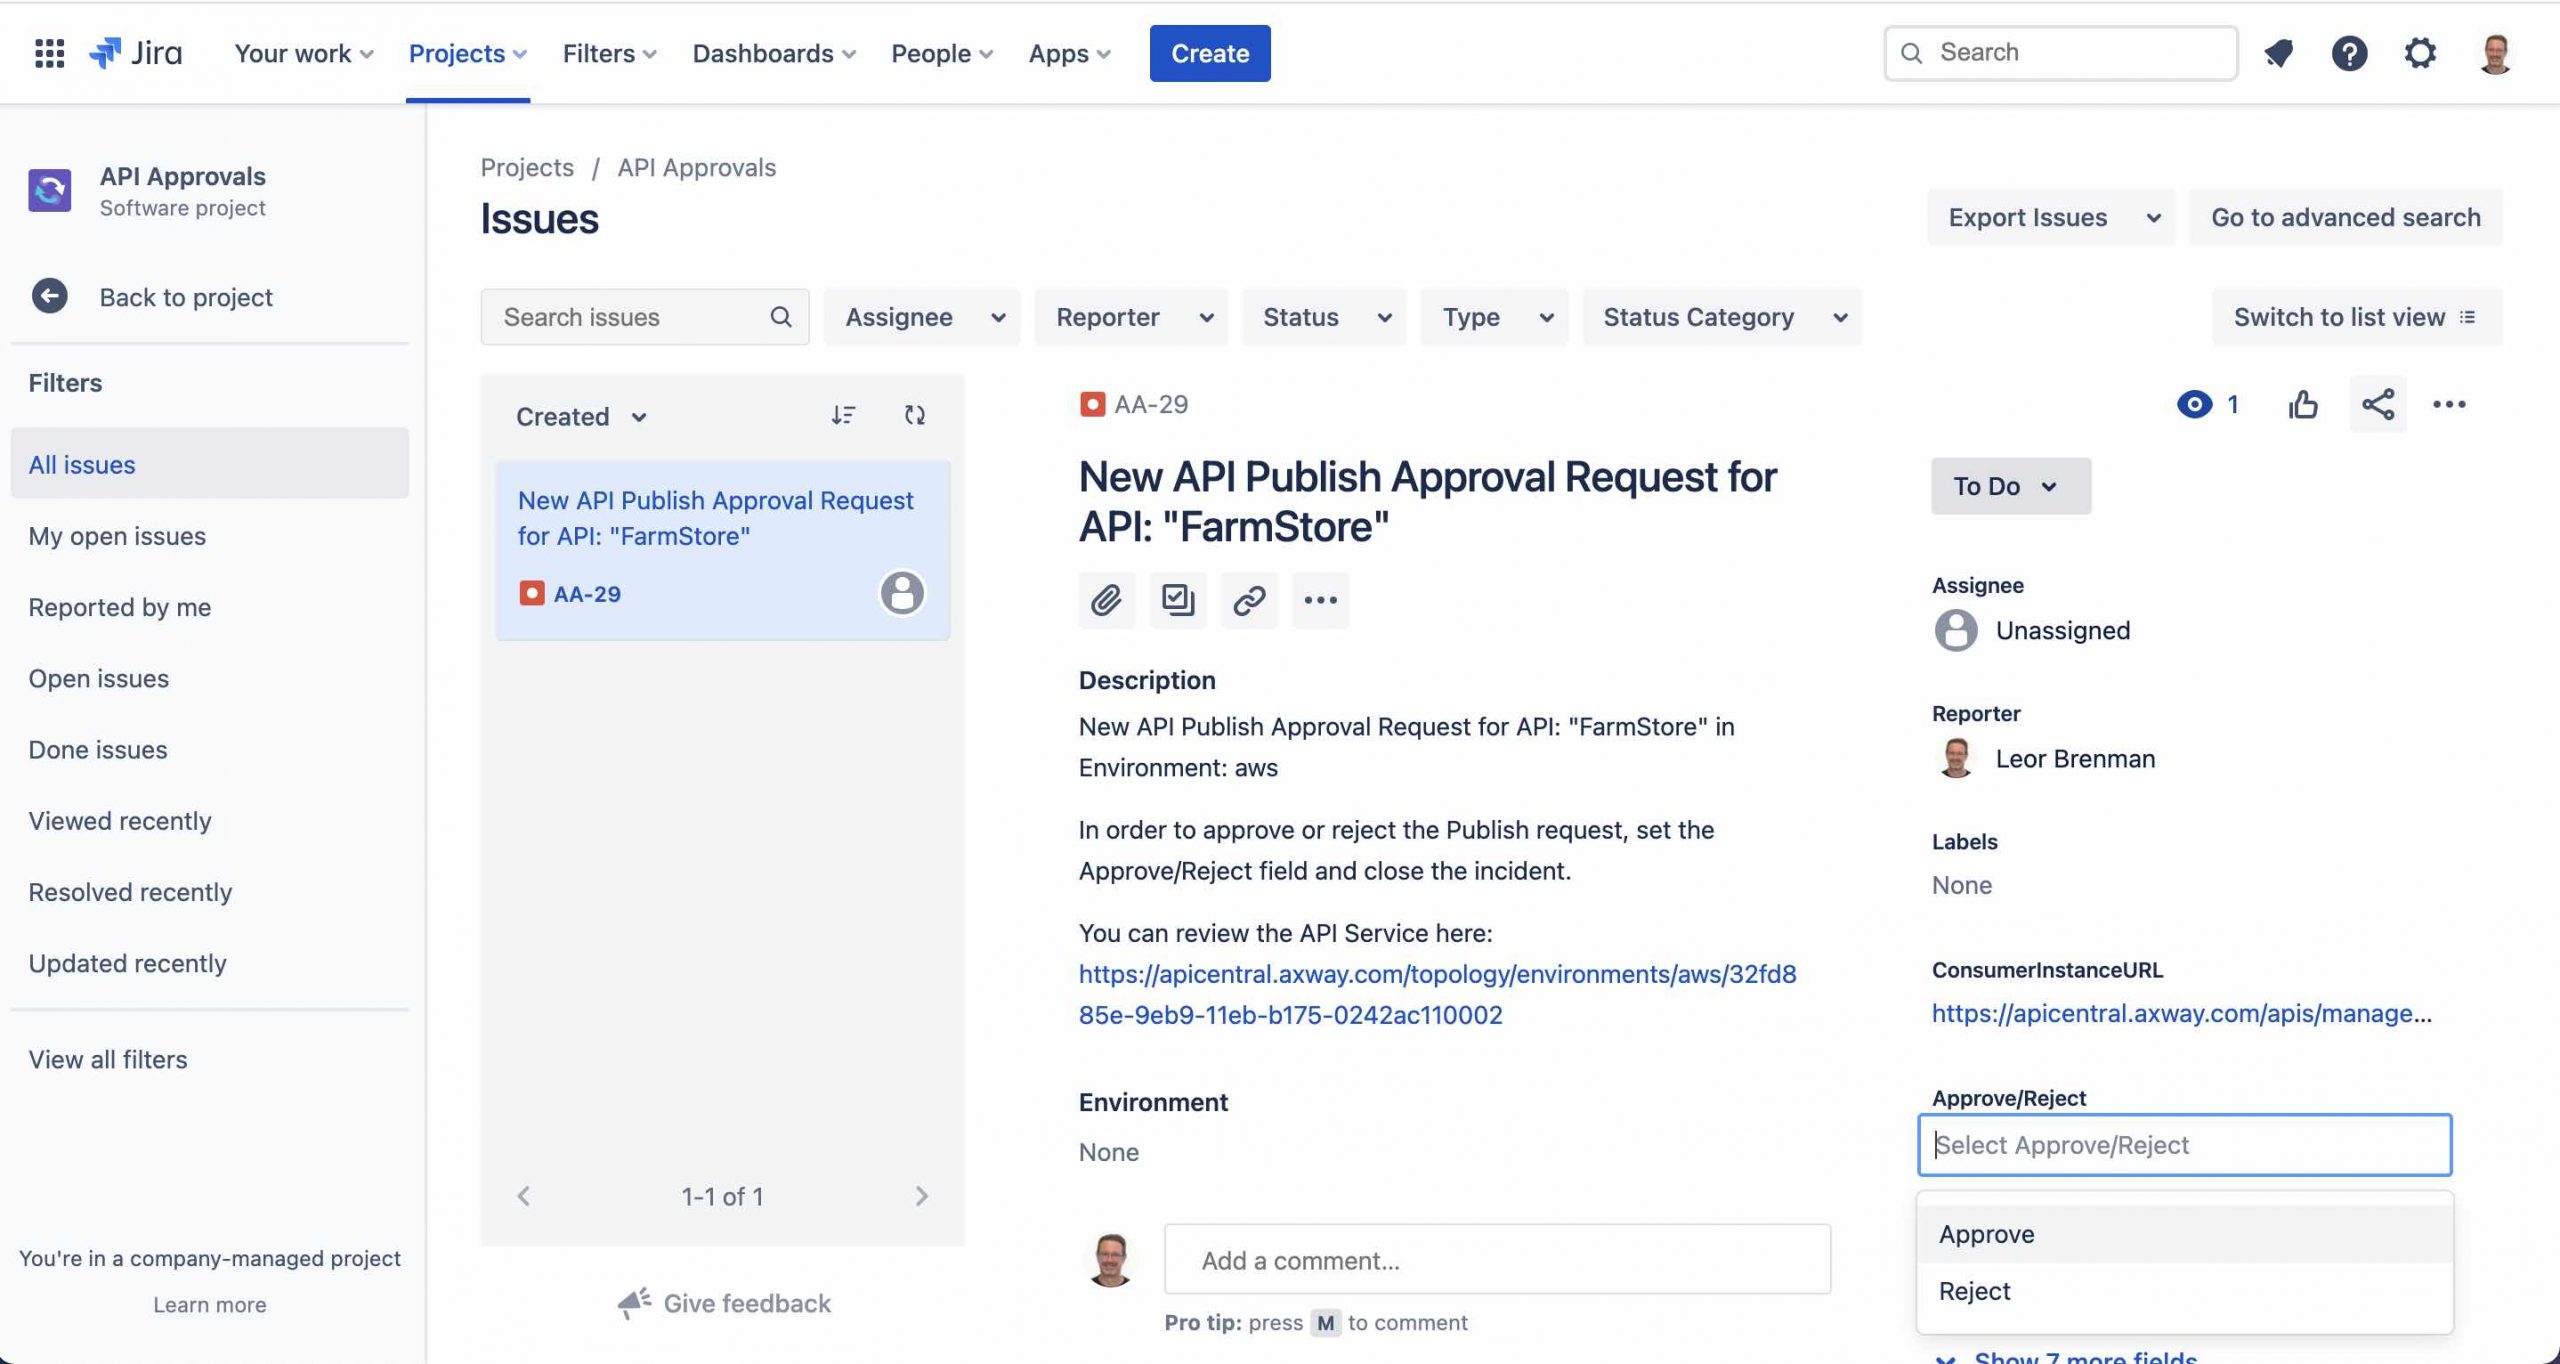
Note the Approve/Reject Picker custom field
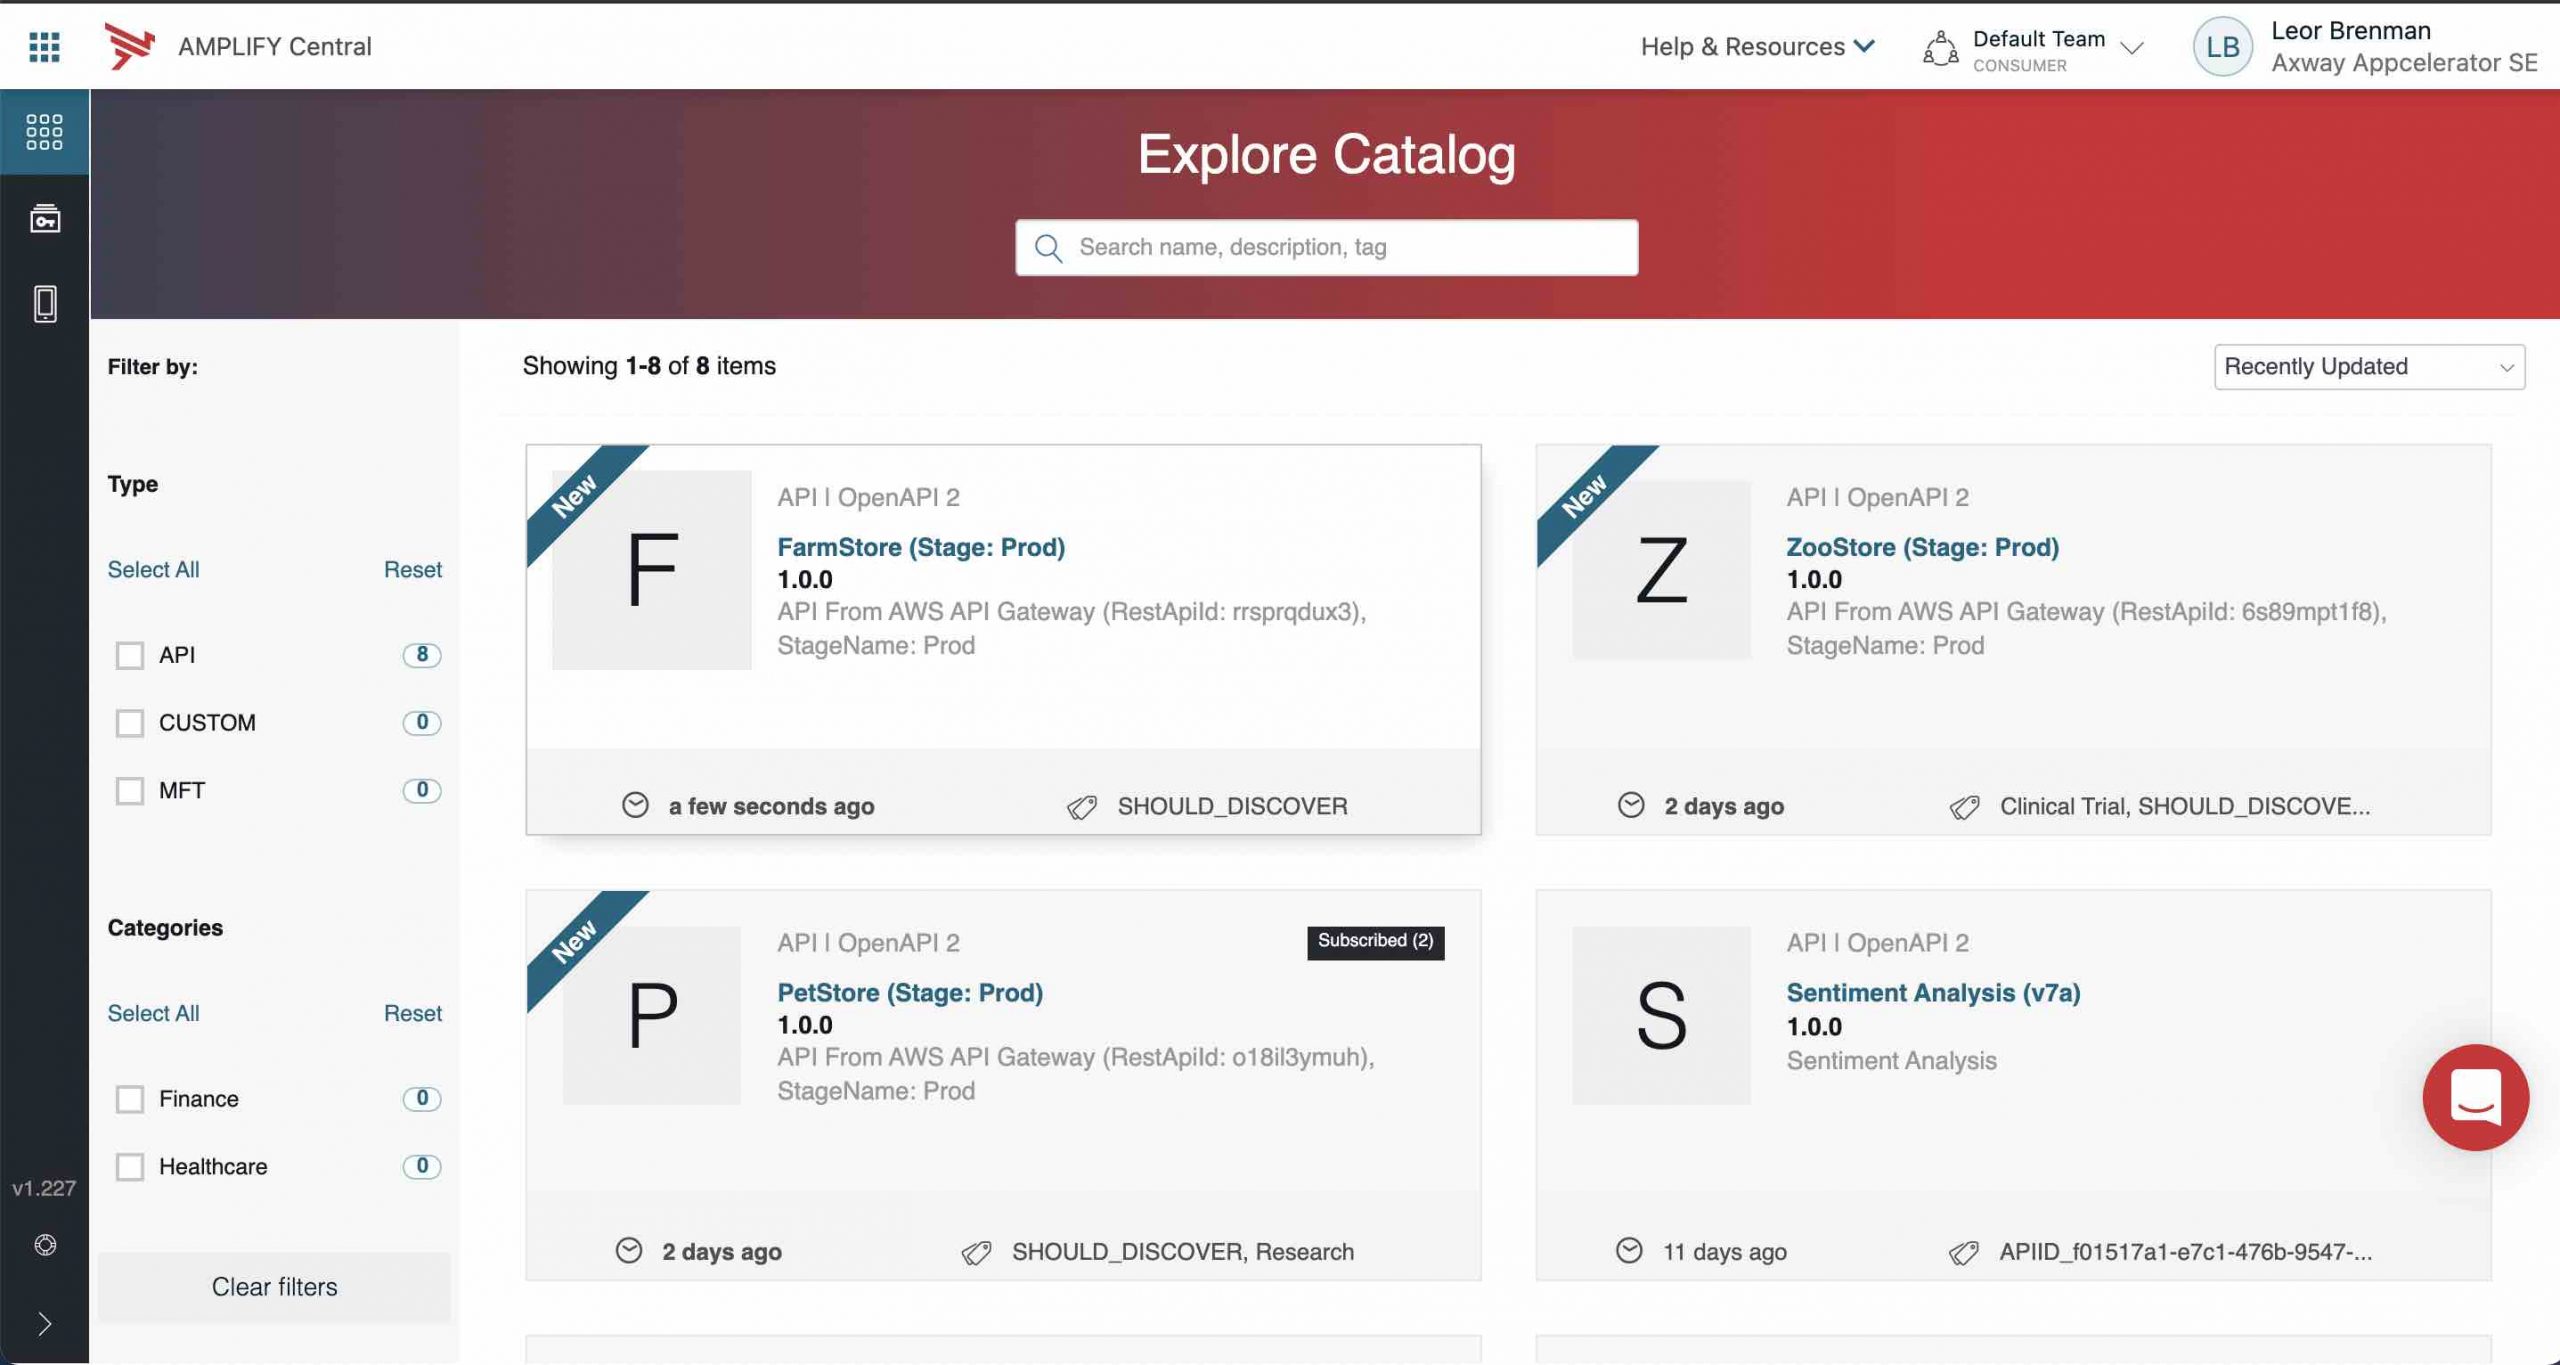
At this stage, the API is not visible to API Consumers since the Integration Builder Flow has unpublished the API that was published by the discovery agent as shown below:
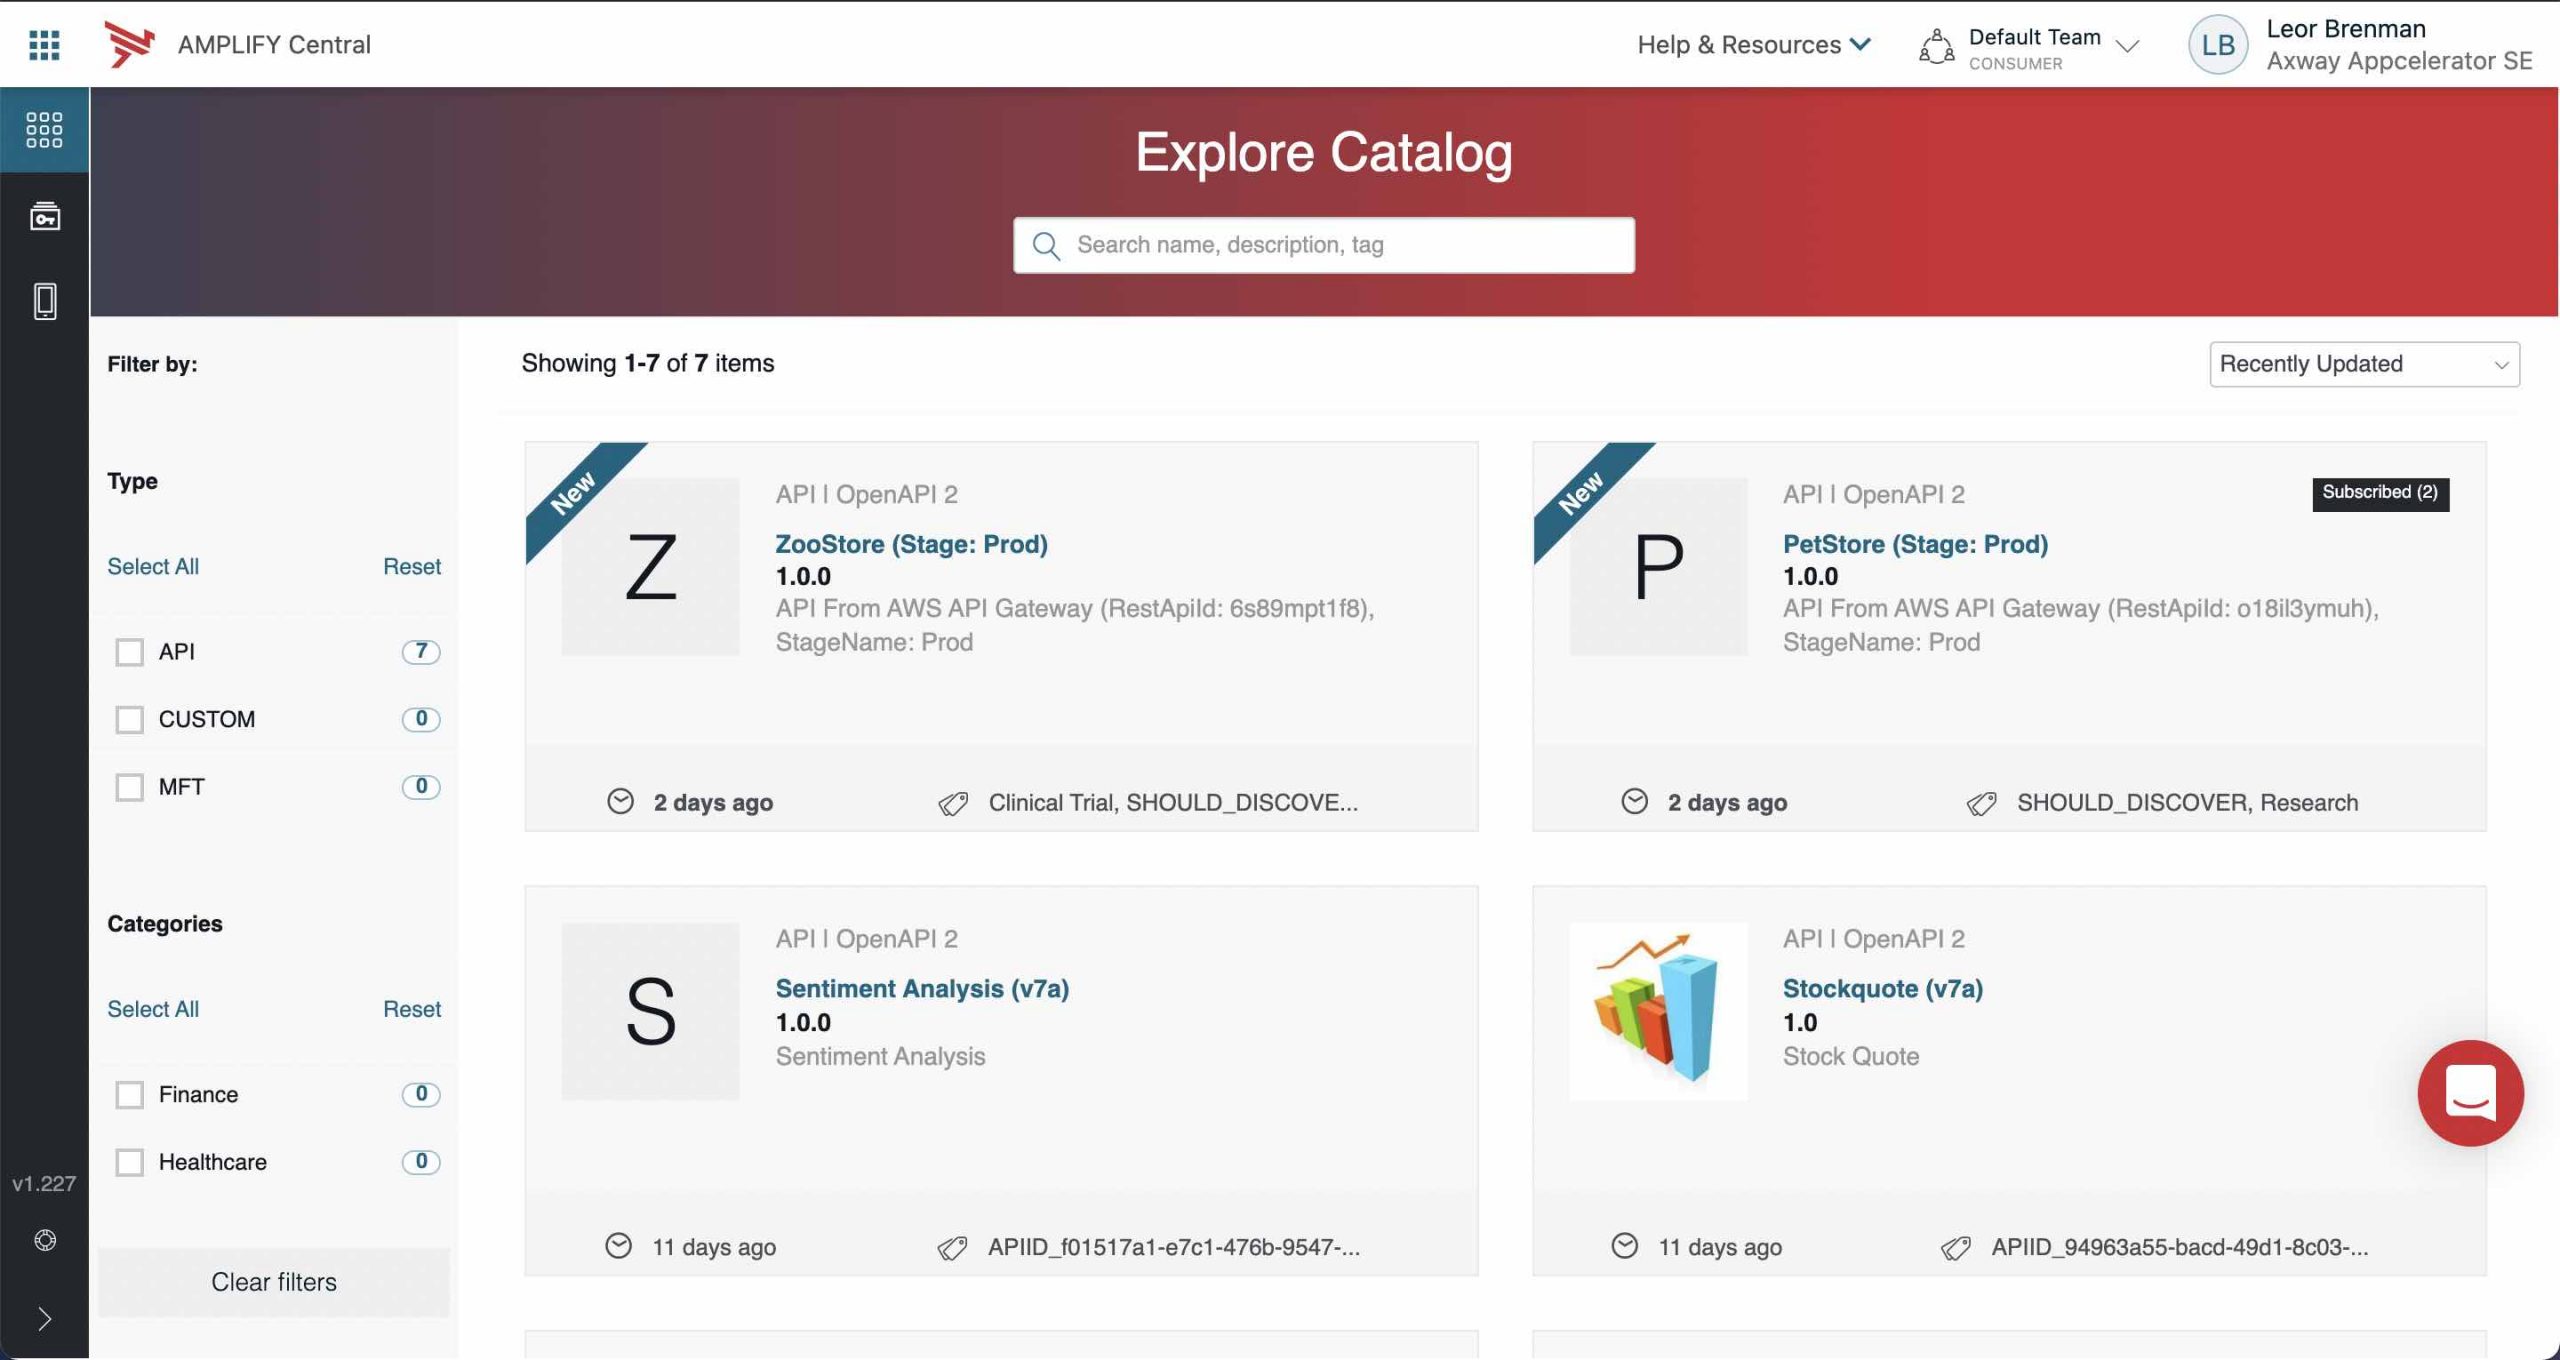
Note that API FarmStore is not visible. API’s PetStore and ZooStore are visible since they were discovered and approved prior and hence are in the PUBLISHED state.
The Integration Builder flow is shown below:

Note that I named the Flow template AMPLIFY Central New API Approval Processor.
The flow instance is shown below:
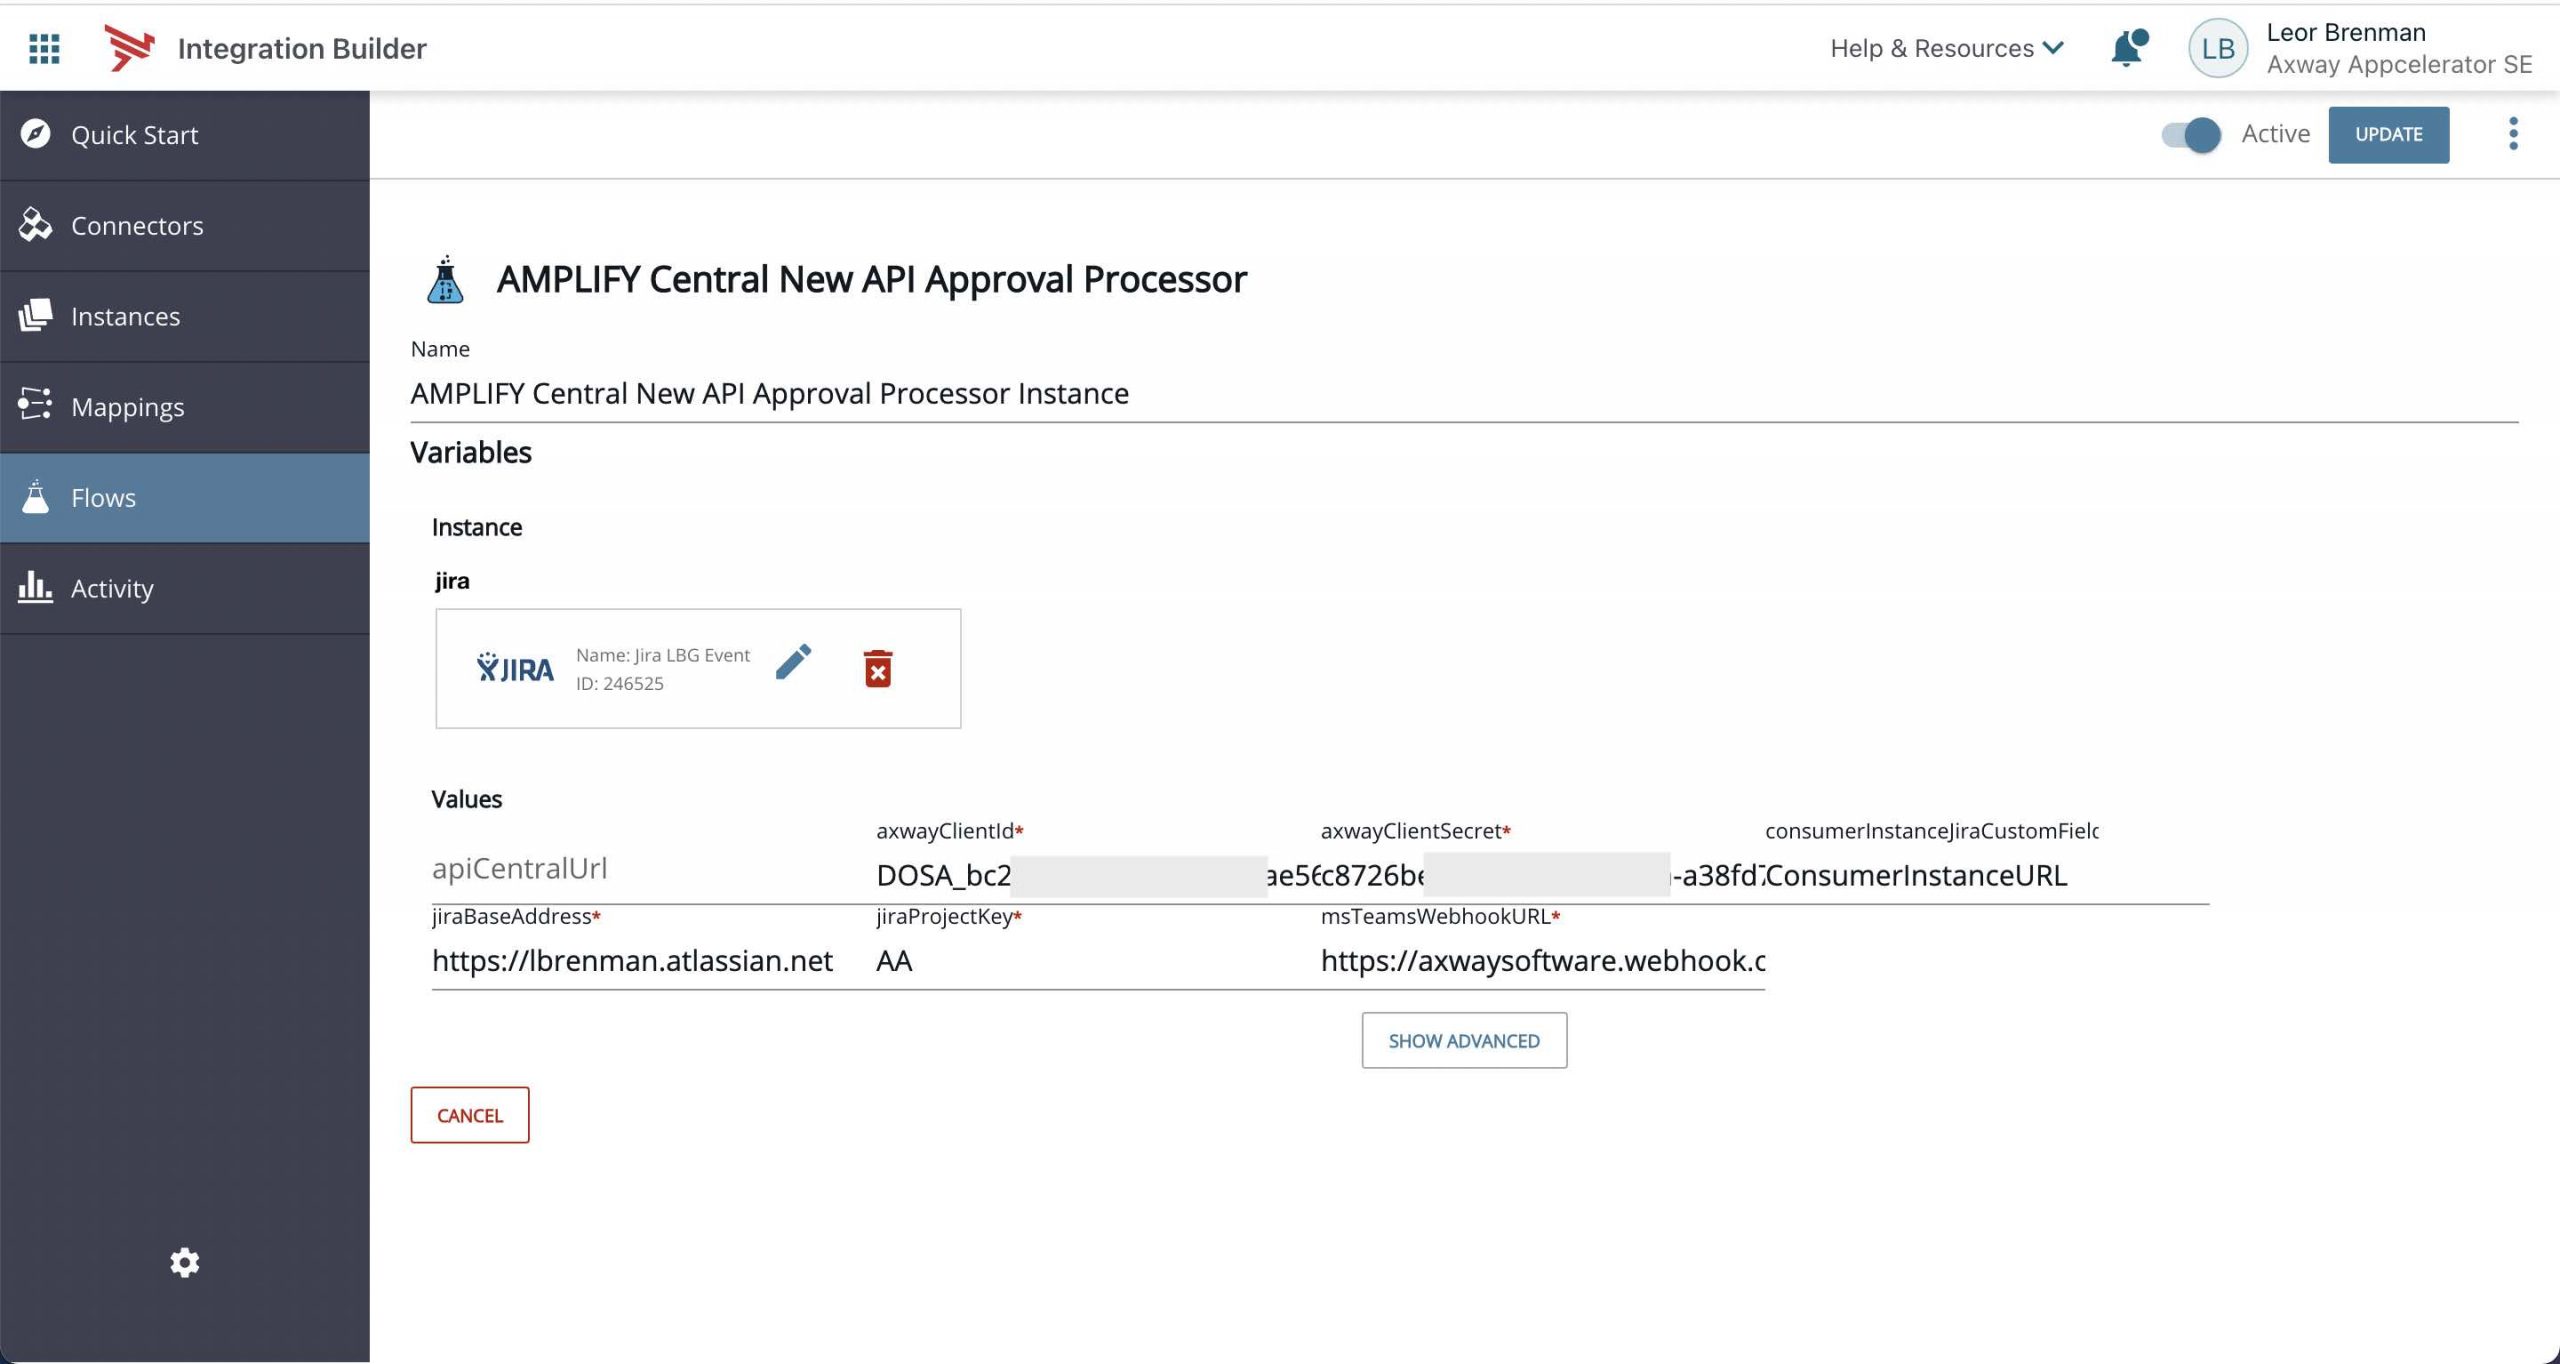
Note that I named the Flow Instance AMPLIFY Central New API Approval Processor Instance.
You can see the following instance variables:
- Jira connector for creating an incident
- apiCentralUrl for overriding the default base address of Amplify Central (https://apicentral.axway.com) for different regions
- clientId and clientSecret as described here
- jiraBaseAddress for providing a link to the incident in the MS Teams message
- jiraProjectKey for the Jira project used for incidents related to API Approvals
- consumerInstanceJiraCustomFieldName for the name of the Jira custom field added to store the URL to the Central Consumer Instance. The second Integration Builder Flow needs this URL in order to publish the API once approved
- msTeamsWebhookURL is the URL of the MS Teams webhook used to send notification messages to MS Teams
Let’s go through the steps.
Should Process
The first step in the flow, shouldProcess, is a JS Filter Step to make sure that the trigger relates an ConsumerInstance (Unified Catalog API) event by checking the kind property of the webhook payload. I am also making sure that this relates to a newly discovered API by checking that type is ResourceCreated.
done(trigger.args.payload.kind === 'ConsumerInstance' && trigger.args.type === 'ResourceCreated');
Define Utilities
In the defineUtils JS Step I am defining methods that will be reused in several other steps. In this case, there is only one method, findObjectByKey, for finding a javascript object in an array of javascript objects as follows:
function findObjectByKey(array, key, value){
  for (var i = 0; i < array.length; i++) {
      if (array[i][key] === value) {
          return array[i];
      }
  }
  return null;
}

let utils = {
  findObjectByKey: findObjectByKey
}

done({utils});
Get Axway Access Token
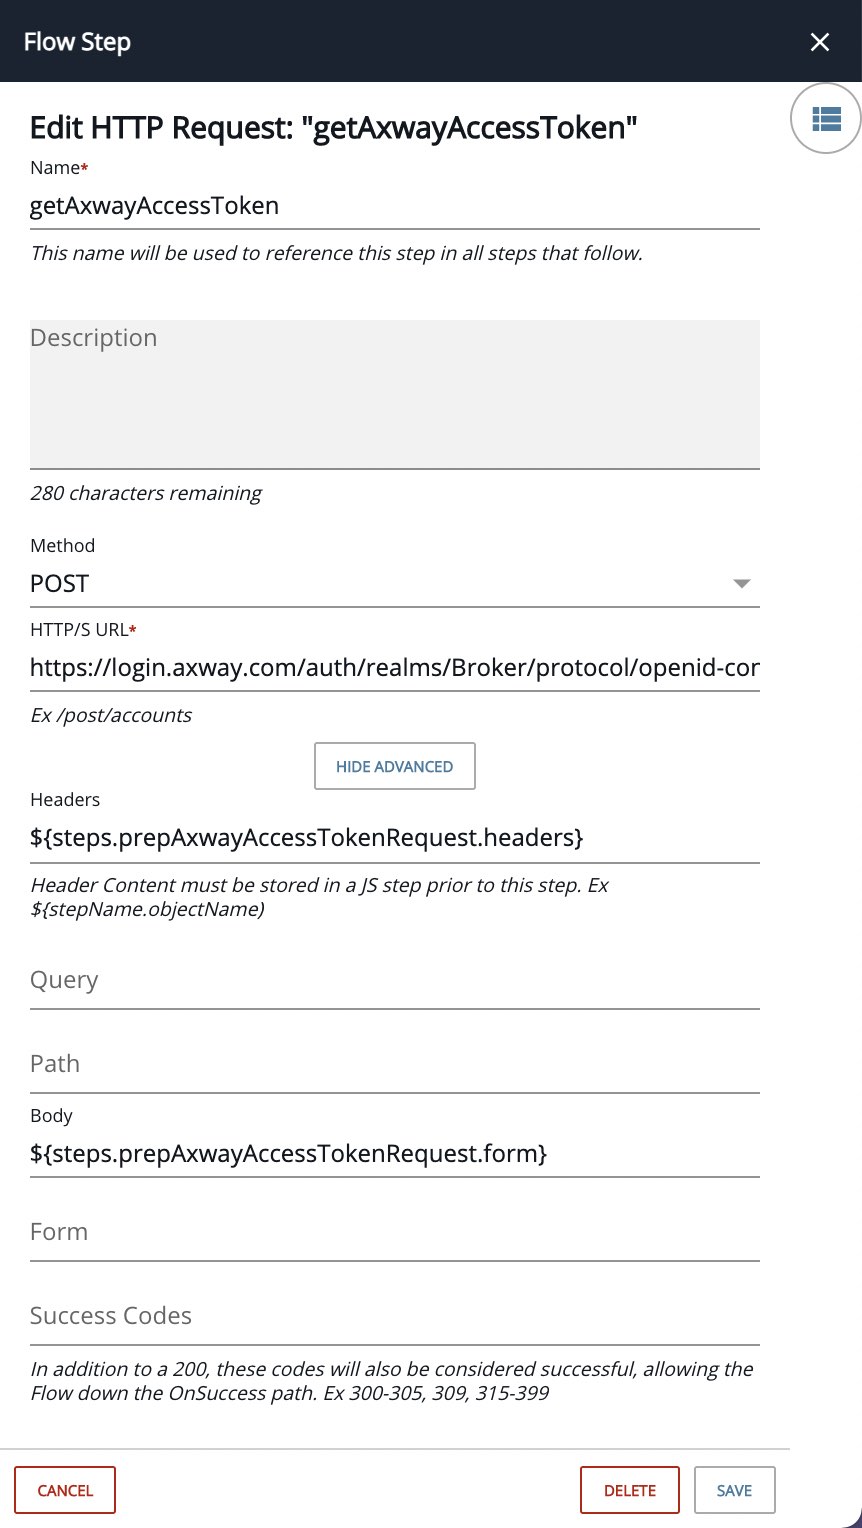
The next pair of steps: prepAxwayAccessTokenRequest and getAxwayAccessToken retrieve an access token for subsequent Amplify Central API calls. This was covered in a prior post
- prepAxwayAccessTokenRequest is a JS Script Step with the following content that outputs headers and form for the getAxwayAccessToken HTTP Request Step.
done({
  'headers': {
      Authorization: 'Basic ' + CE.b64(config.axwayClientId + ':' + config.axwayClientSecret),
      'Content-Type': 'application/x-www-form-urlencoded'
  },
  form: 'grant_type=client_credentials'
});- getAxwayAccessToken is an HTTP Request Step to url
https://login.axway.com/auth/realms/Broker/protocol/openid-connect/tokenas follows:
Set Global Variables
The access token and Amplify Central API base address are stored as global variables in the setGlobals JS Script Step:
let apiServerHeaders = {
  'Authorization': `Bearer ${steps.getAxwayAccessToken.response.body.access_token}`,
  'Content-Type': 'application/json'
}

let apicentralUrl = config.apiCentralUrl ? config.apiCentralUrl : 'https://apicentral.axway.com';

let globals = {
  apicentralUrl: apicentralUrl,
  apiServerHeaders: apiServerHeaders
}

done({globals});
Update Consumer Instance
The next four of steps: prepareGetConsumerInstance, getConsumerInstance, prepareUnpublishConsumerInstance and unpublishConsumerInstance retrieve the Consumer Instance and set it’s state to UNPUBLISHED.
- prepareGetConsumerInstance is a JS Script Step with the following contents:
const url = steps.setGlobals.globals.apicentralUrl + '/apis'+trigger.args.payload.metadata.selfLink;

done({url:url});
This step constructs the URL to retrieve the Consumer Instance, for example:
https://apicentral.axway.com/apis/management/v1alpha1/environments/aws/consumerinstances/3395d432-9e2c-11eb-97e3-0242ac110002-prod
Note that the webhook payload property payload.metadata contains a property called selfLink which contains the link to the Consumer Instance.
- getConsumerInstance is an HTTP Request Step as follows:
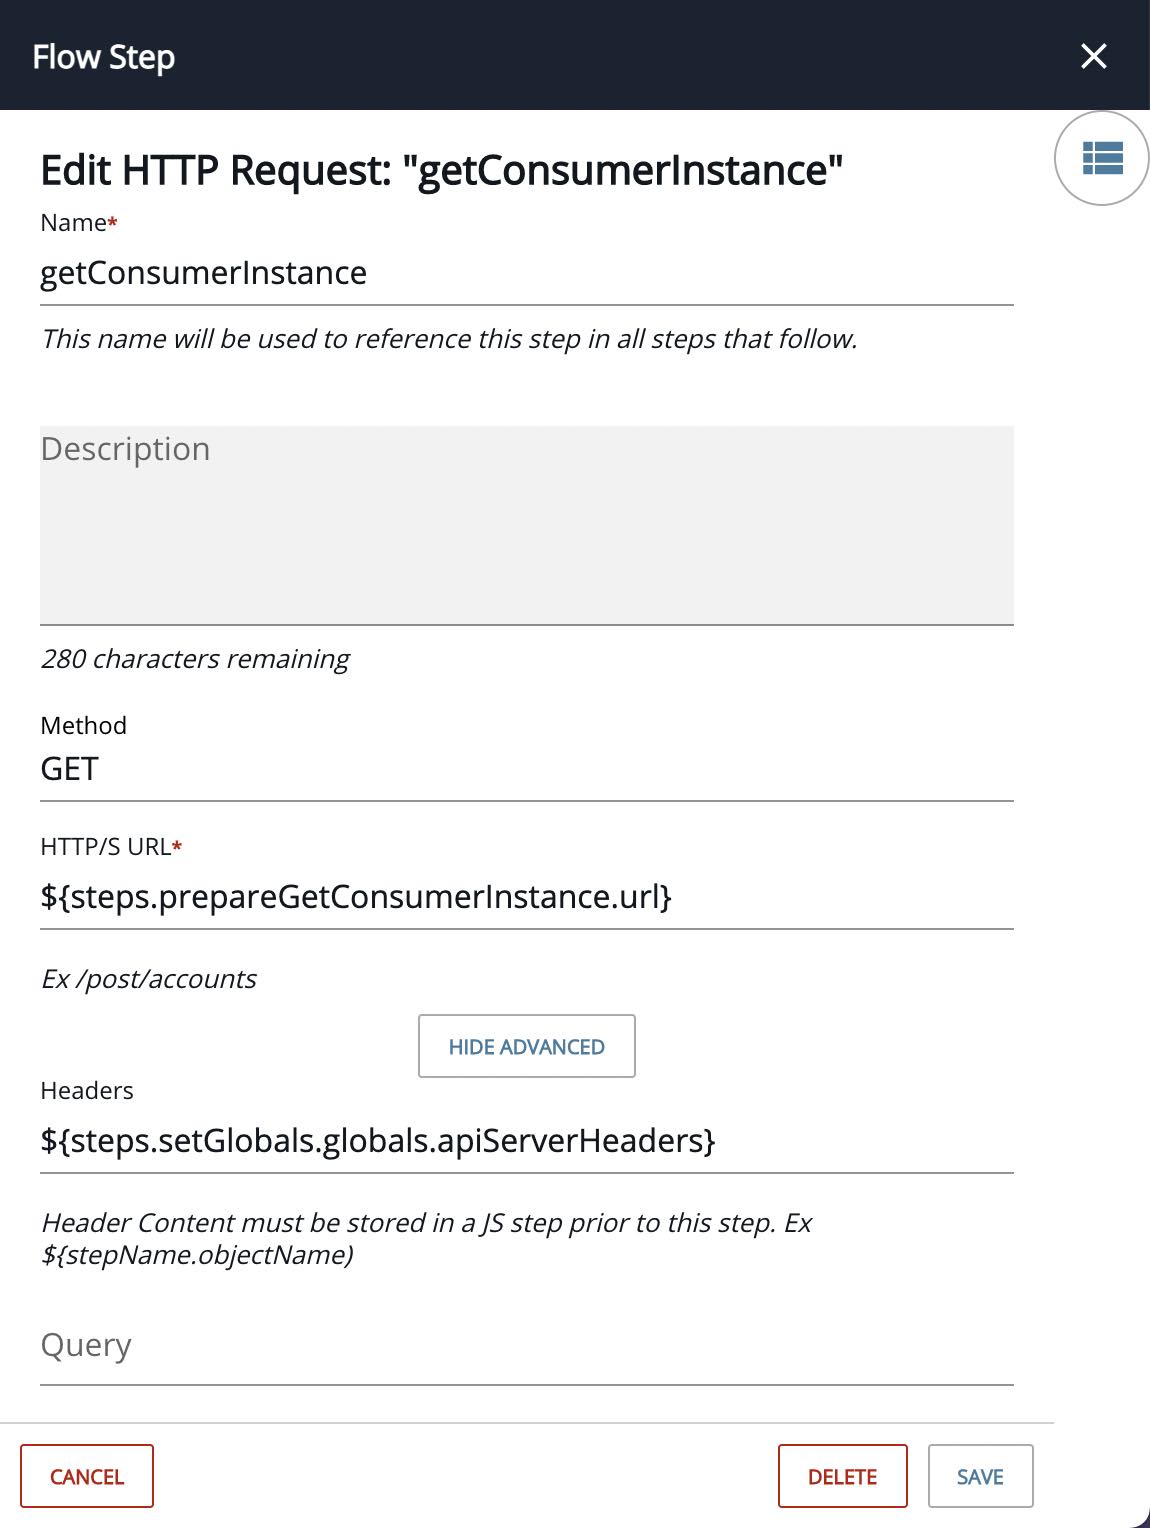
It returns the Consumer Instance.
A portion of a response is shown below:
{
  "group": "management",
  "apiVersion": "v1alpha1",
  "kind": "ConsumerInstance",
  "name": "3869b73f-9ec6-11eb-a38f-0242ac110002-prod",
  "title": "FarmStore (Stage: Prod)",
  "metadata": {
    "id": "8a2e87ad78b3c0300178db3dfc4f52d9",
    .
    .
    .
    "scope": {
      "id": "8a2e862d779860e20177a6888d450233",
      "kind": "Environment",
      "name": "aws",
      "selfLink": "/management/v1alpha1/environments/aws"
    },
    "resourceVersion": "349569",
    "references": [
      {
        "id": "8a2e8c85779860f90177a6991c1e045d",
        "kind": "ConsumerSubscriptionDefinition",
        "name": "aws.authsubscription",
        "scopeKind": "Environment",
        "scopeName": "aws",
        "selfLink": "/management/v1alpha1/environments/aws/consumersubscriptiondefs/aws.authsubscription",
        "type": "soft",
        "group": "management"
      },
      {
        "id": "8a2e936f78b3c0280178db3dfbe94fec",
        "kind": "APIServiceInstance",
        "name": "3869b73f-9ec6-11eb-a38f-0242ac110002-prod.1",
        "scopeKind": "Environment",
        "scopeName": "aws",
        "selfLink": "/management/v1alpha1/environments/aws/apiserviceinstances/3869b73f-9ec6-11eb-a38f-0242ac110002-prod.1",
        "type": "hard",
        "group": "management"
      }
    ],
    "selfLink": "/management/v1alpha1/environments/aws/consumerinstances/3869b73f-9ec6-11eb-a38f-0242ac110002-prod"
  },
  .
  .
  .
  "status": {
    "phase": {
      "name": "Create",
      "level": "info",
      "message": "Catalog Item created in Unified Catalog",
      "transitionTime": "2021-04-16T15:12:56.488+0000"
    }
  }
}
Note the metadata.references array property in the response above. The second array element is a reference and link to the related APIServiceInstance for this Consumer Instance. We’ll refer to this in the Get API Service section below.
- prepareUnpublishConsumerInstance is a JS Script Step with the following contents:
let body = steps.getConsumerInstance.response.body;

body.spec.state = 'UNPUBLISHED'

done({body:body})
This step modifies the Consumer Instance object and sets the state property to UNPUBLISHED.
- unpublishConsumerInstance is an HTTP Request Step as follows:
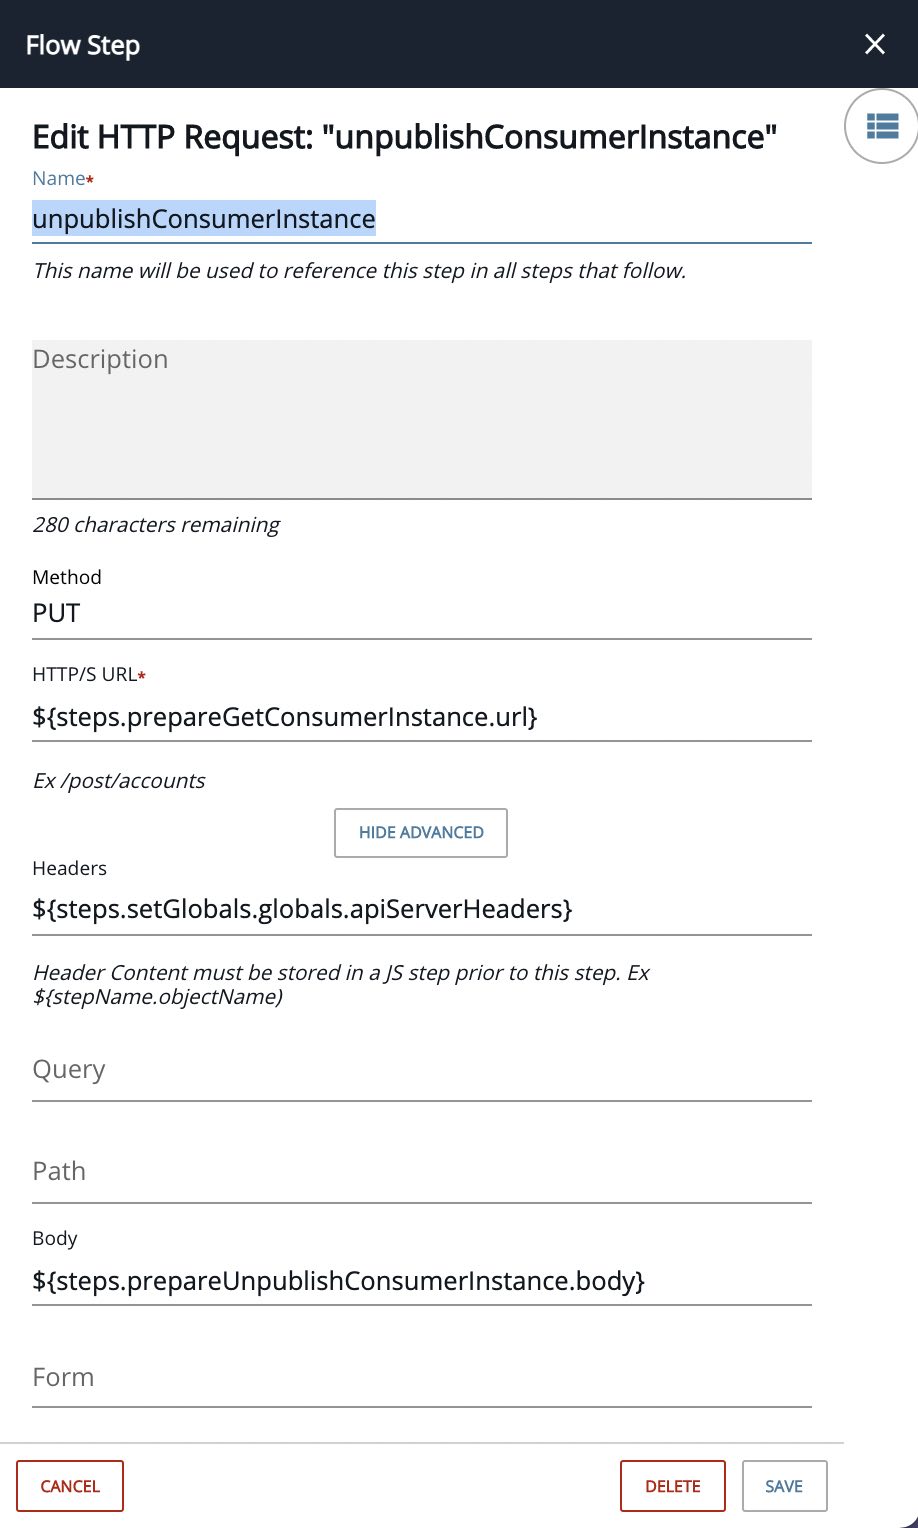
It modifies the Consumer Instance by settings it’s state to UNPUBLISHED.
Get API Service
The next six steps retrieve the API Service details so we can provide information and a link to the API Service in the MS Teams message and Jira incident.
We get the API Service by starting from Consumer Instance we just retrieved above and then retrieving the related API Service Instance and then retrieving the related API Service Revision and then retrieving the related API Service.
- prepareGetApiServiceInstance is a JS Script Step with the following contents:
let reference = steps.defineUtils.utils.findObjectByKey(steps.getConsumerInstance.response.body.metadata.references, 'kind', 'APIServiceInstance');

const url = steps.setGlobals.globals.apicentralUrl + '/apis'+reference.selfLink;

done({url:url});
This step creates the URL to the APIServiceInstance by retrieving it from the Consumer Instance response in the metadata.references array. For example:
https://apicentral.axway.com/apis/management/v1alpha1/environments/aws/apiserviceinstances/3869b73f-9ec6-11eb-a38f-0242ac110002-prod.1
- getApiServiceInstance is an HTTP Request Step as follows:
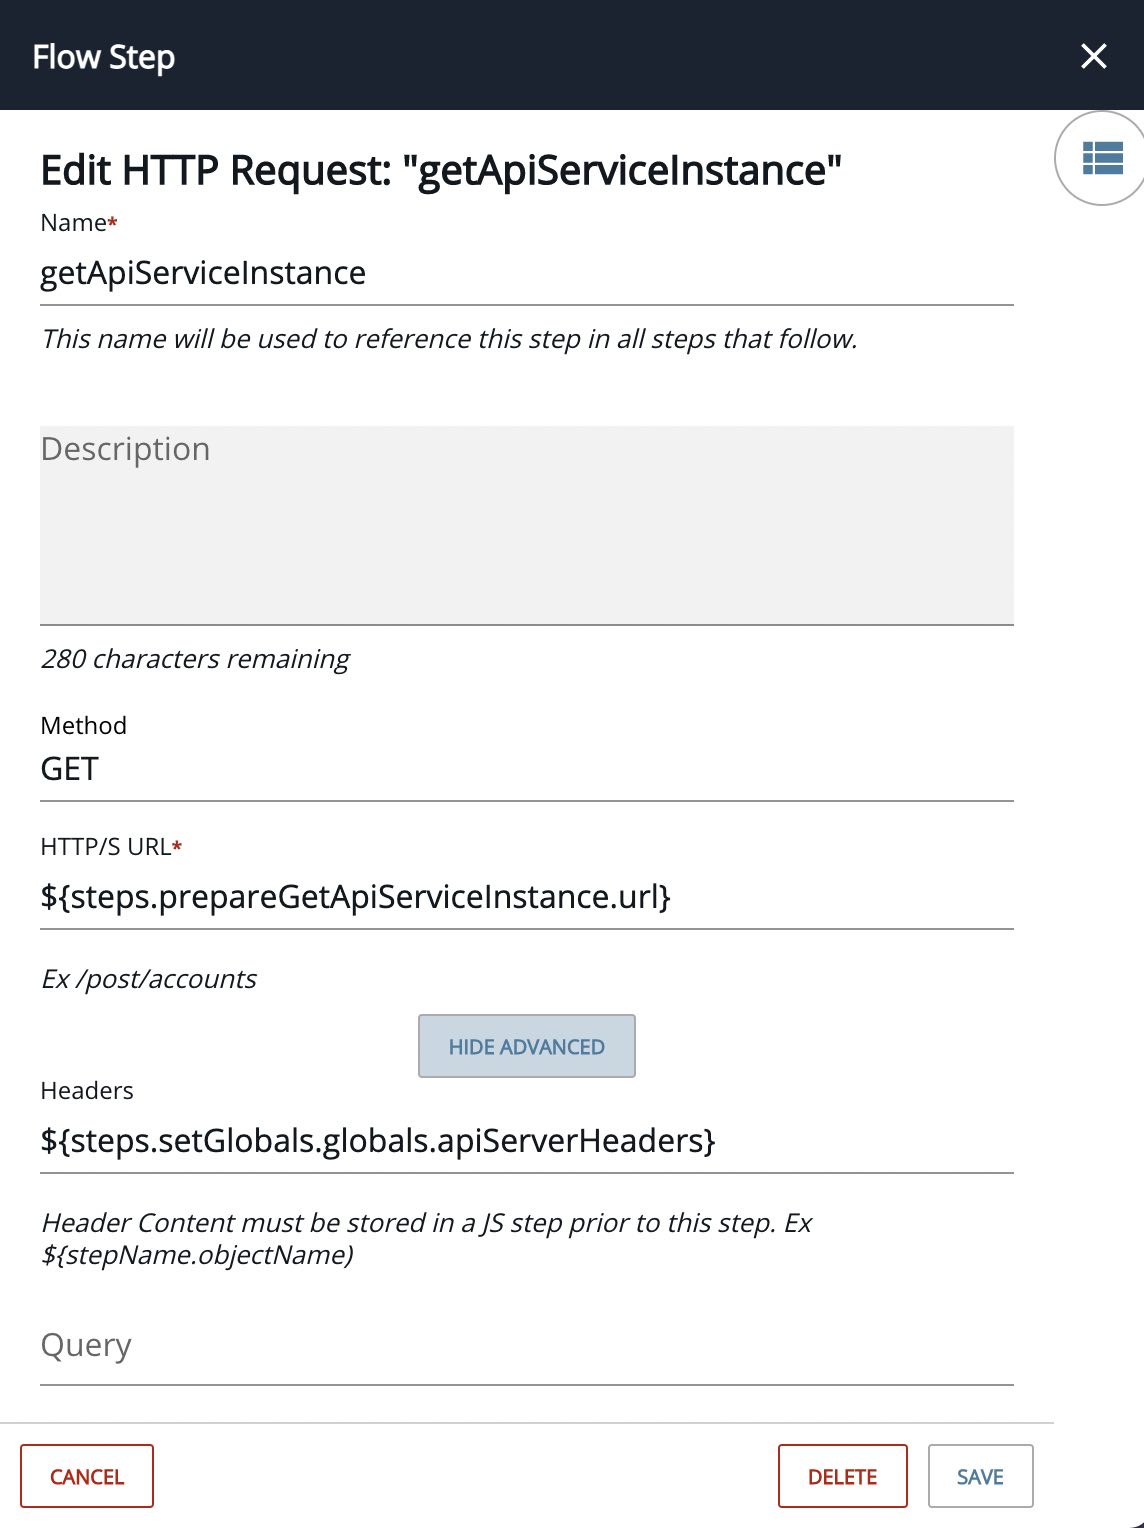
The response to getApiServiceInstance also contains a metadata.references array with a reference to APIServiceRevision. We’ll use that in the next step.
- prepareGetApiServiceRevision is a JS Script Step with the following contents:
let reference = steps.defineUtils.utils.findObjectByKey(steps.getApiServiceInstance.response.body.metadata.references, 'kind', 'APIServiceRevision');

const url = steps.setGlobals.globals.apicentralUrl + '/apis'+reference.selfLink;

done({url:url});
This step creates the URL to the APIServiceRevision by retrieving it from the ApiServiceInstance response in the metadata.references array. For example:
https://apicentral.axway.com/apis/management/v1alpha1/environments/aws/apiservicerevisions/ff79b69d-9ece-11eb-ac38-0242ac110002-prod.1
- getApiServiceRevision is an HTTP Request Step as follows:
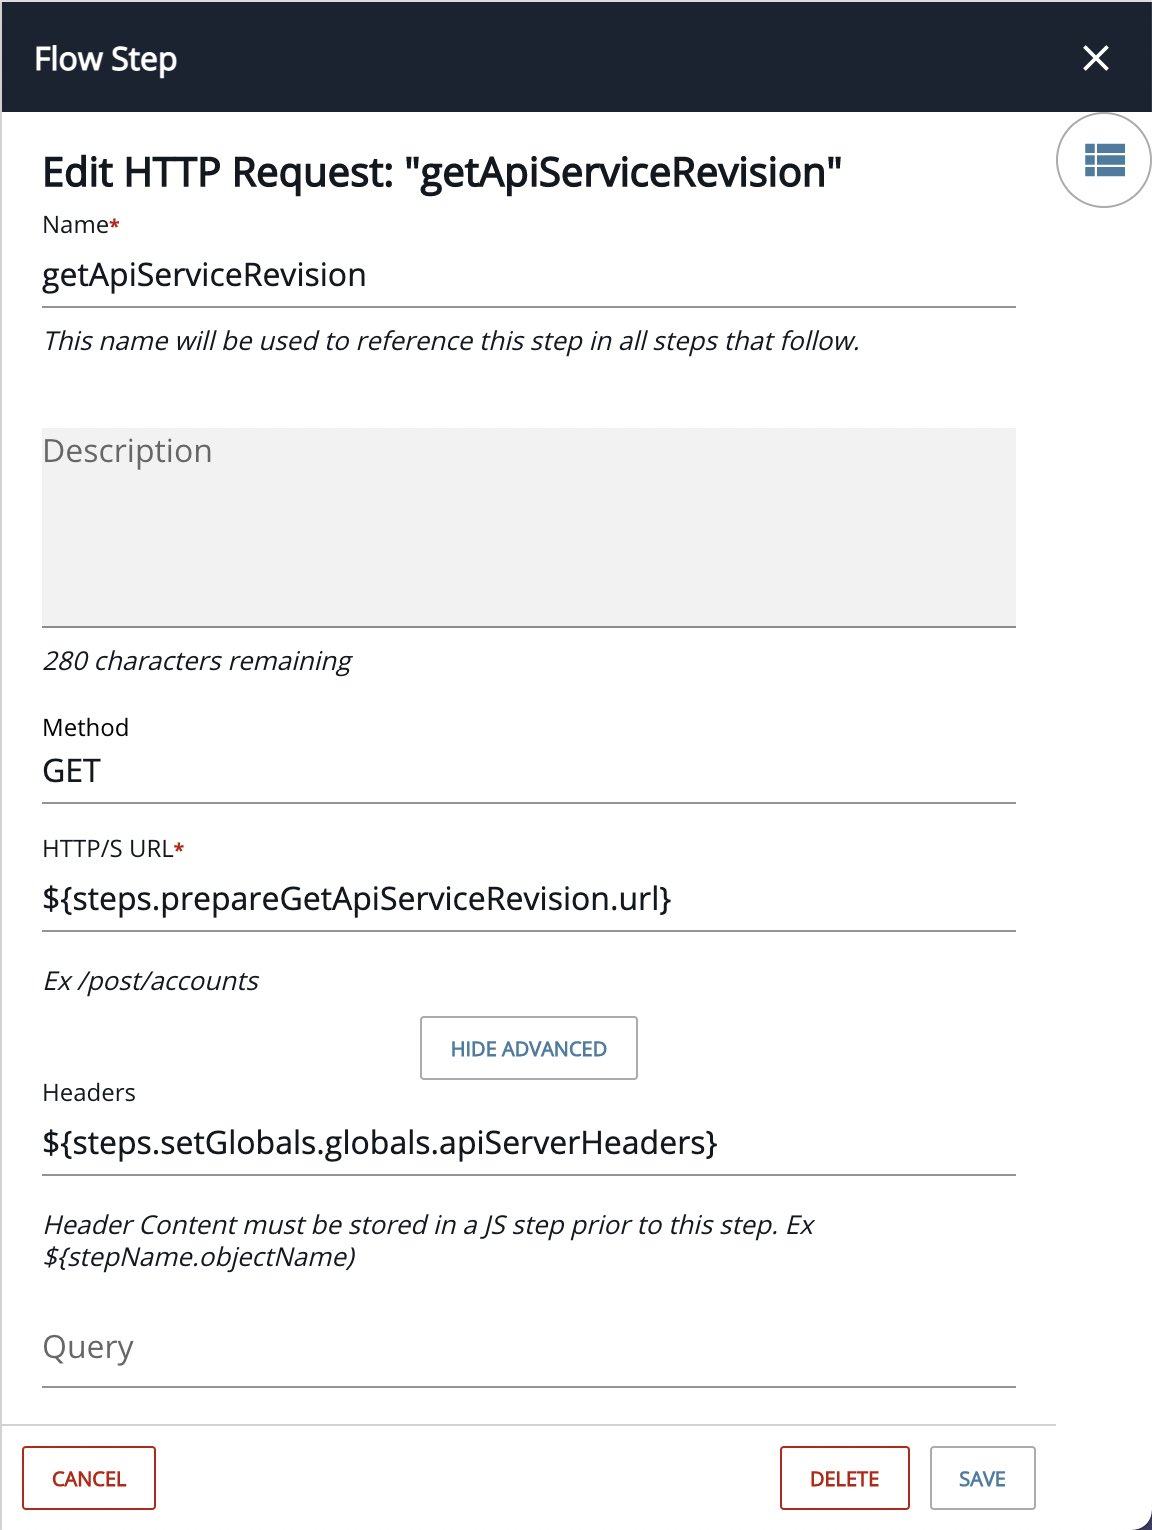
The response to getApiServiceRevision also contains a metadata.references array with a reference to APIService. We’ll use that in the next step.
- prepareGetApiService is a JS Script Step with the following contents:
let reference = steps.defineUtils.utils.findObjectByKey(steps.getApiServiceRevision.response.body.metadata.references, 'kind', 'APIService');

const url = steps.setGlobals.globals.apicentralUrl + '/apis'+reference.selfLink;

done({url:url});
This step creates the URL to the APIService by retrieving it from the ApiServiceRevision response in the metadata.references array. For example:
https://apicentral.axway.com/apis/management/v1alpha1/environments/aws/apiservices/ff79b69d-9ece-11eb-ac38-0242ac110002
- getApiService is an HTTP Request Step as follows:
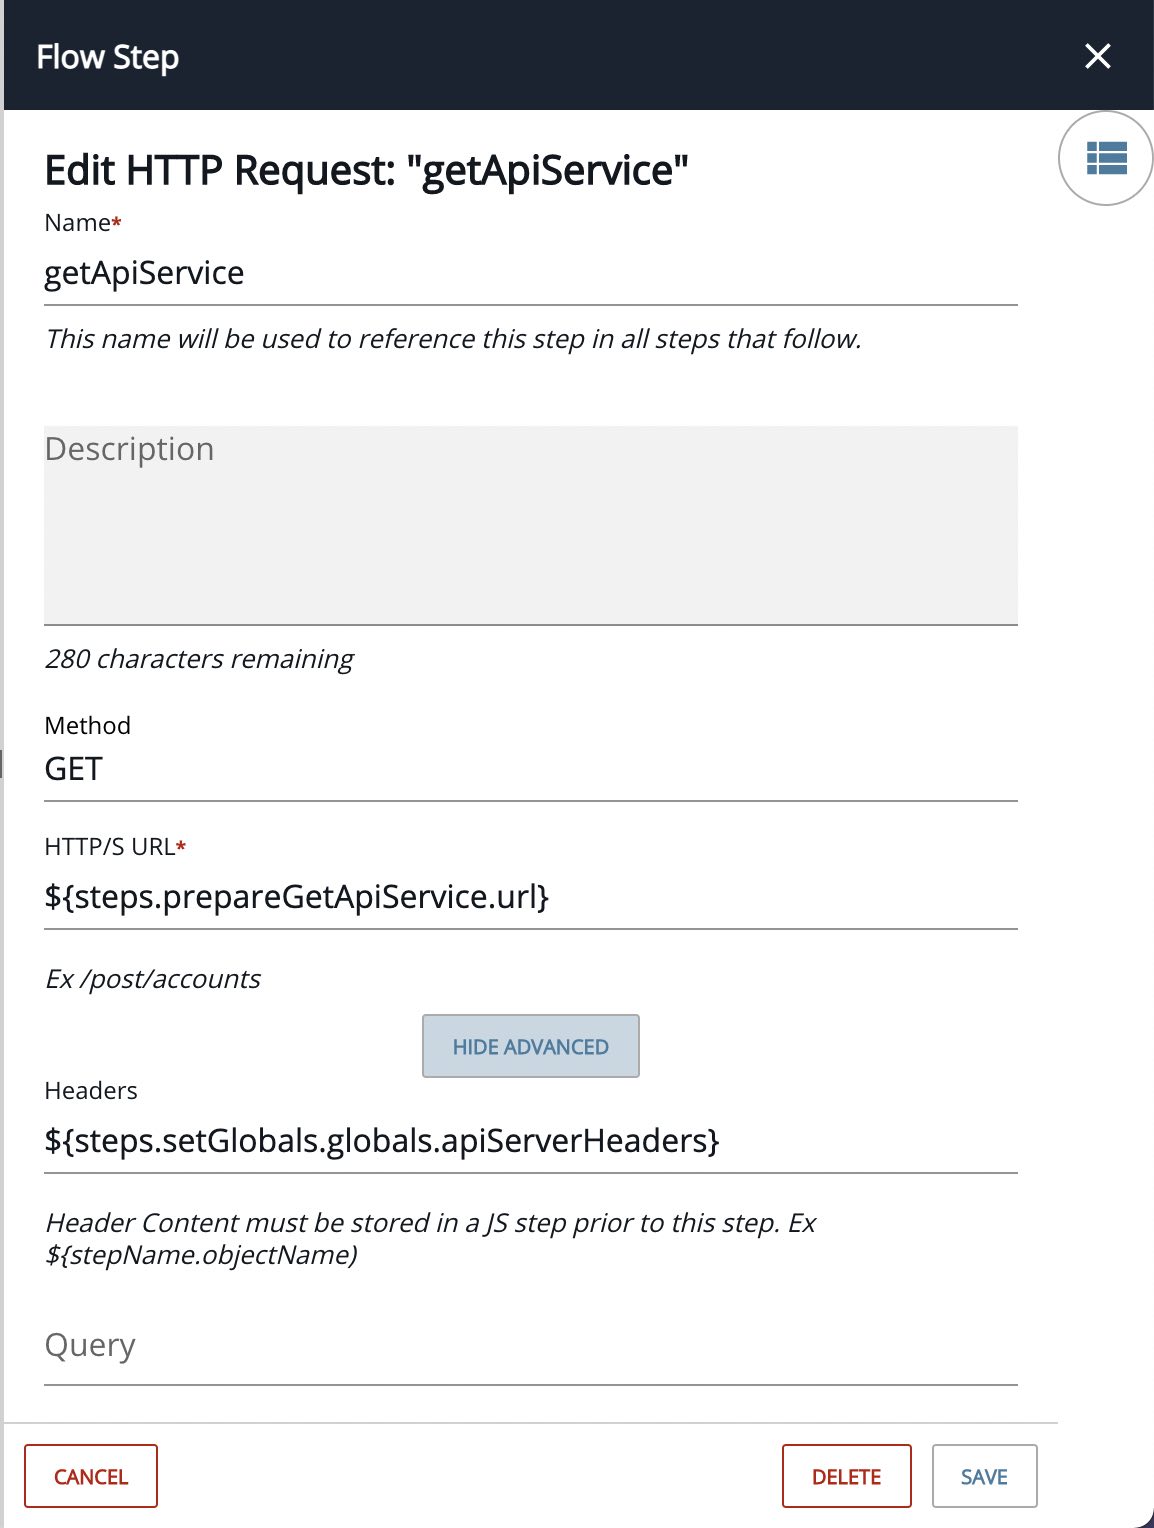
The response to getApiService contains the information needed to create the MS Teams message and the Jira incident. We’ll use that in the next steps.
Create Jira Incident
The next three steps create an incident in Jira.
- getFieldNames is a Connector API Request as follows:
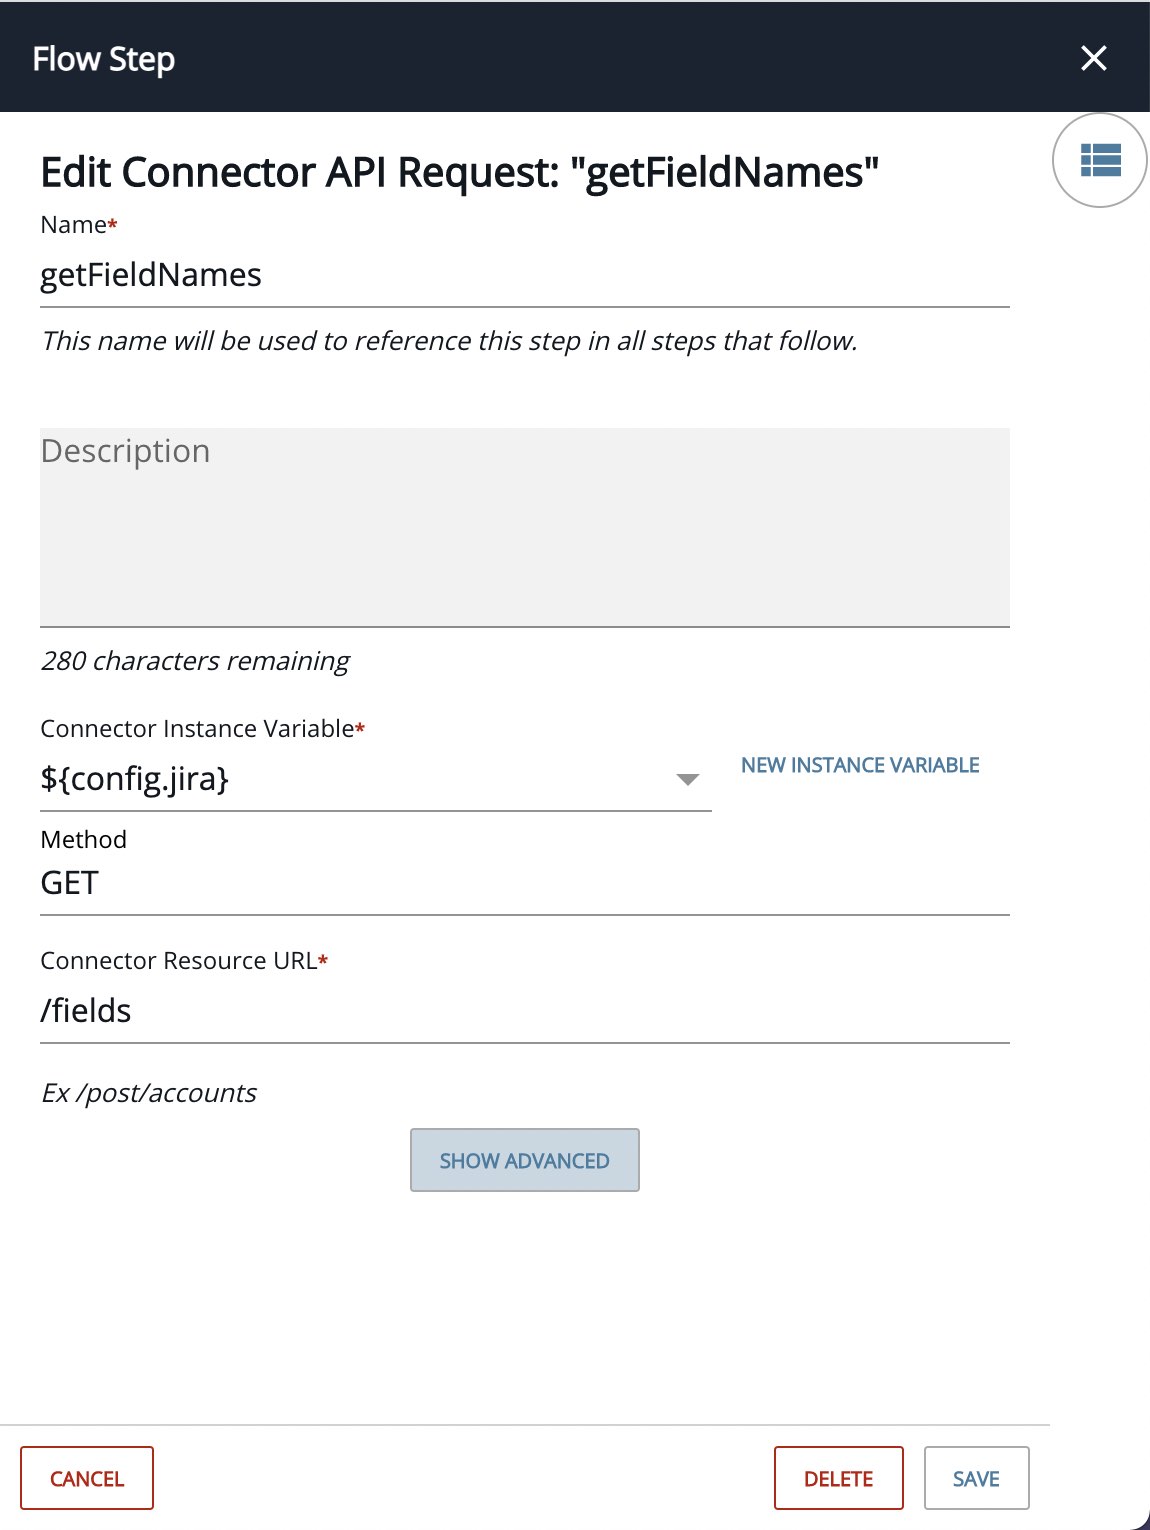
We need this in order to determine the custom field name that we added to our Jira project for the Approve/Reject Selector.
- prepareCreateIncident is a JS Script Step with the following contents:
let ApiServiceURL = steps.setGlobals.globals.apicentralUrl+'/topology/environments/'+steps.getApiService.response.body.metadata.scope.name+'/'+steps.getApiService.response.body.name;

let consumerInstanceField = steps.defineUtils.utils.findObjectByKey(steps.getFieldNames.response.body, 'name', config.consumerInstanceJiraCustomFieldName);

let consumerInstanceURL = steps.setGlobals.globals.apicentralUrl+'/apis'+trigger.args.payload.metadata.selfLink;

let summary = 'New API Publish Approval Request for API: "'+steps.getApiService.response.body.title+'"';

let description = summary+" in Environment: "+steps.getApiService.response.body.metadata.scope.name+"\n\n";

description += "In order to approve or reject the Publish request, set the Approve/Reject field and close the incident.\n\n";

description += "You can review the API Service here:\n"+ApiServiceURL+"\n\n";

let body = {
  "fields": {
    "issuetype": {
      "name": "Bug"
    },
    "priority": {
      "name": "Highest"
    },
    "project": {
      "key": config.jiraProjectKey
    },
    "summary": summary,
    "description": description
  }
};

body.fields[consumerInstanceField.key] = consumerInstanceURL;

done({body:body});
This step creates the Jira incident body.
- createIncident is a Connector API Request as follows:
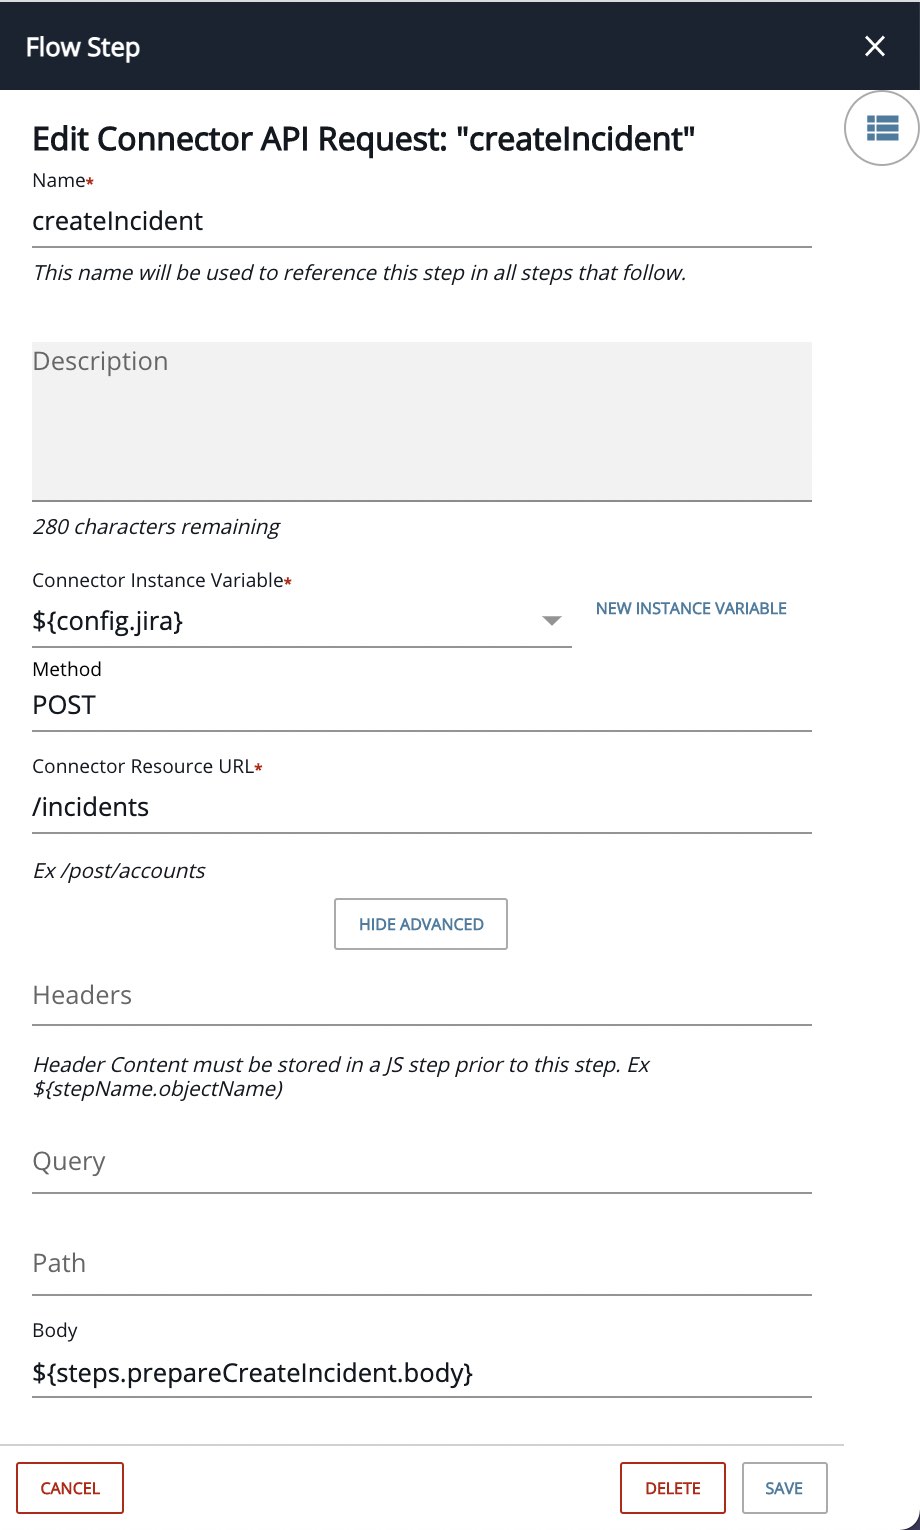
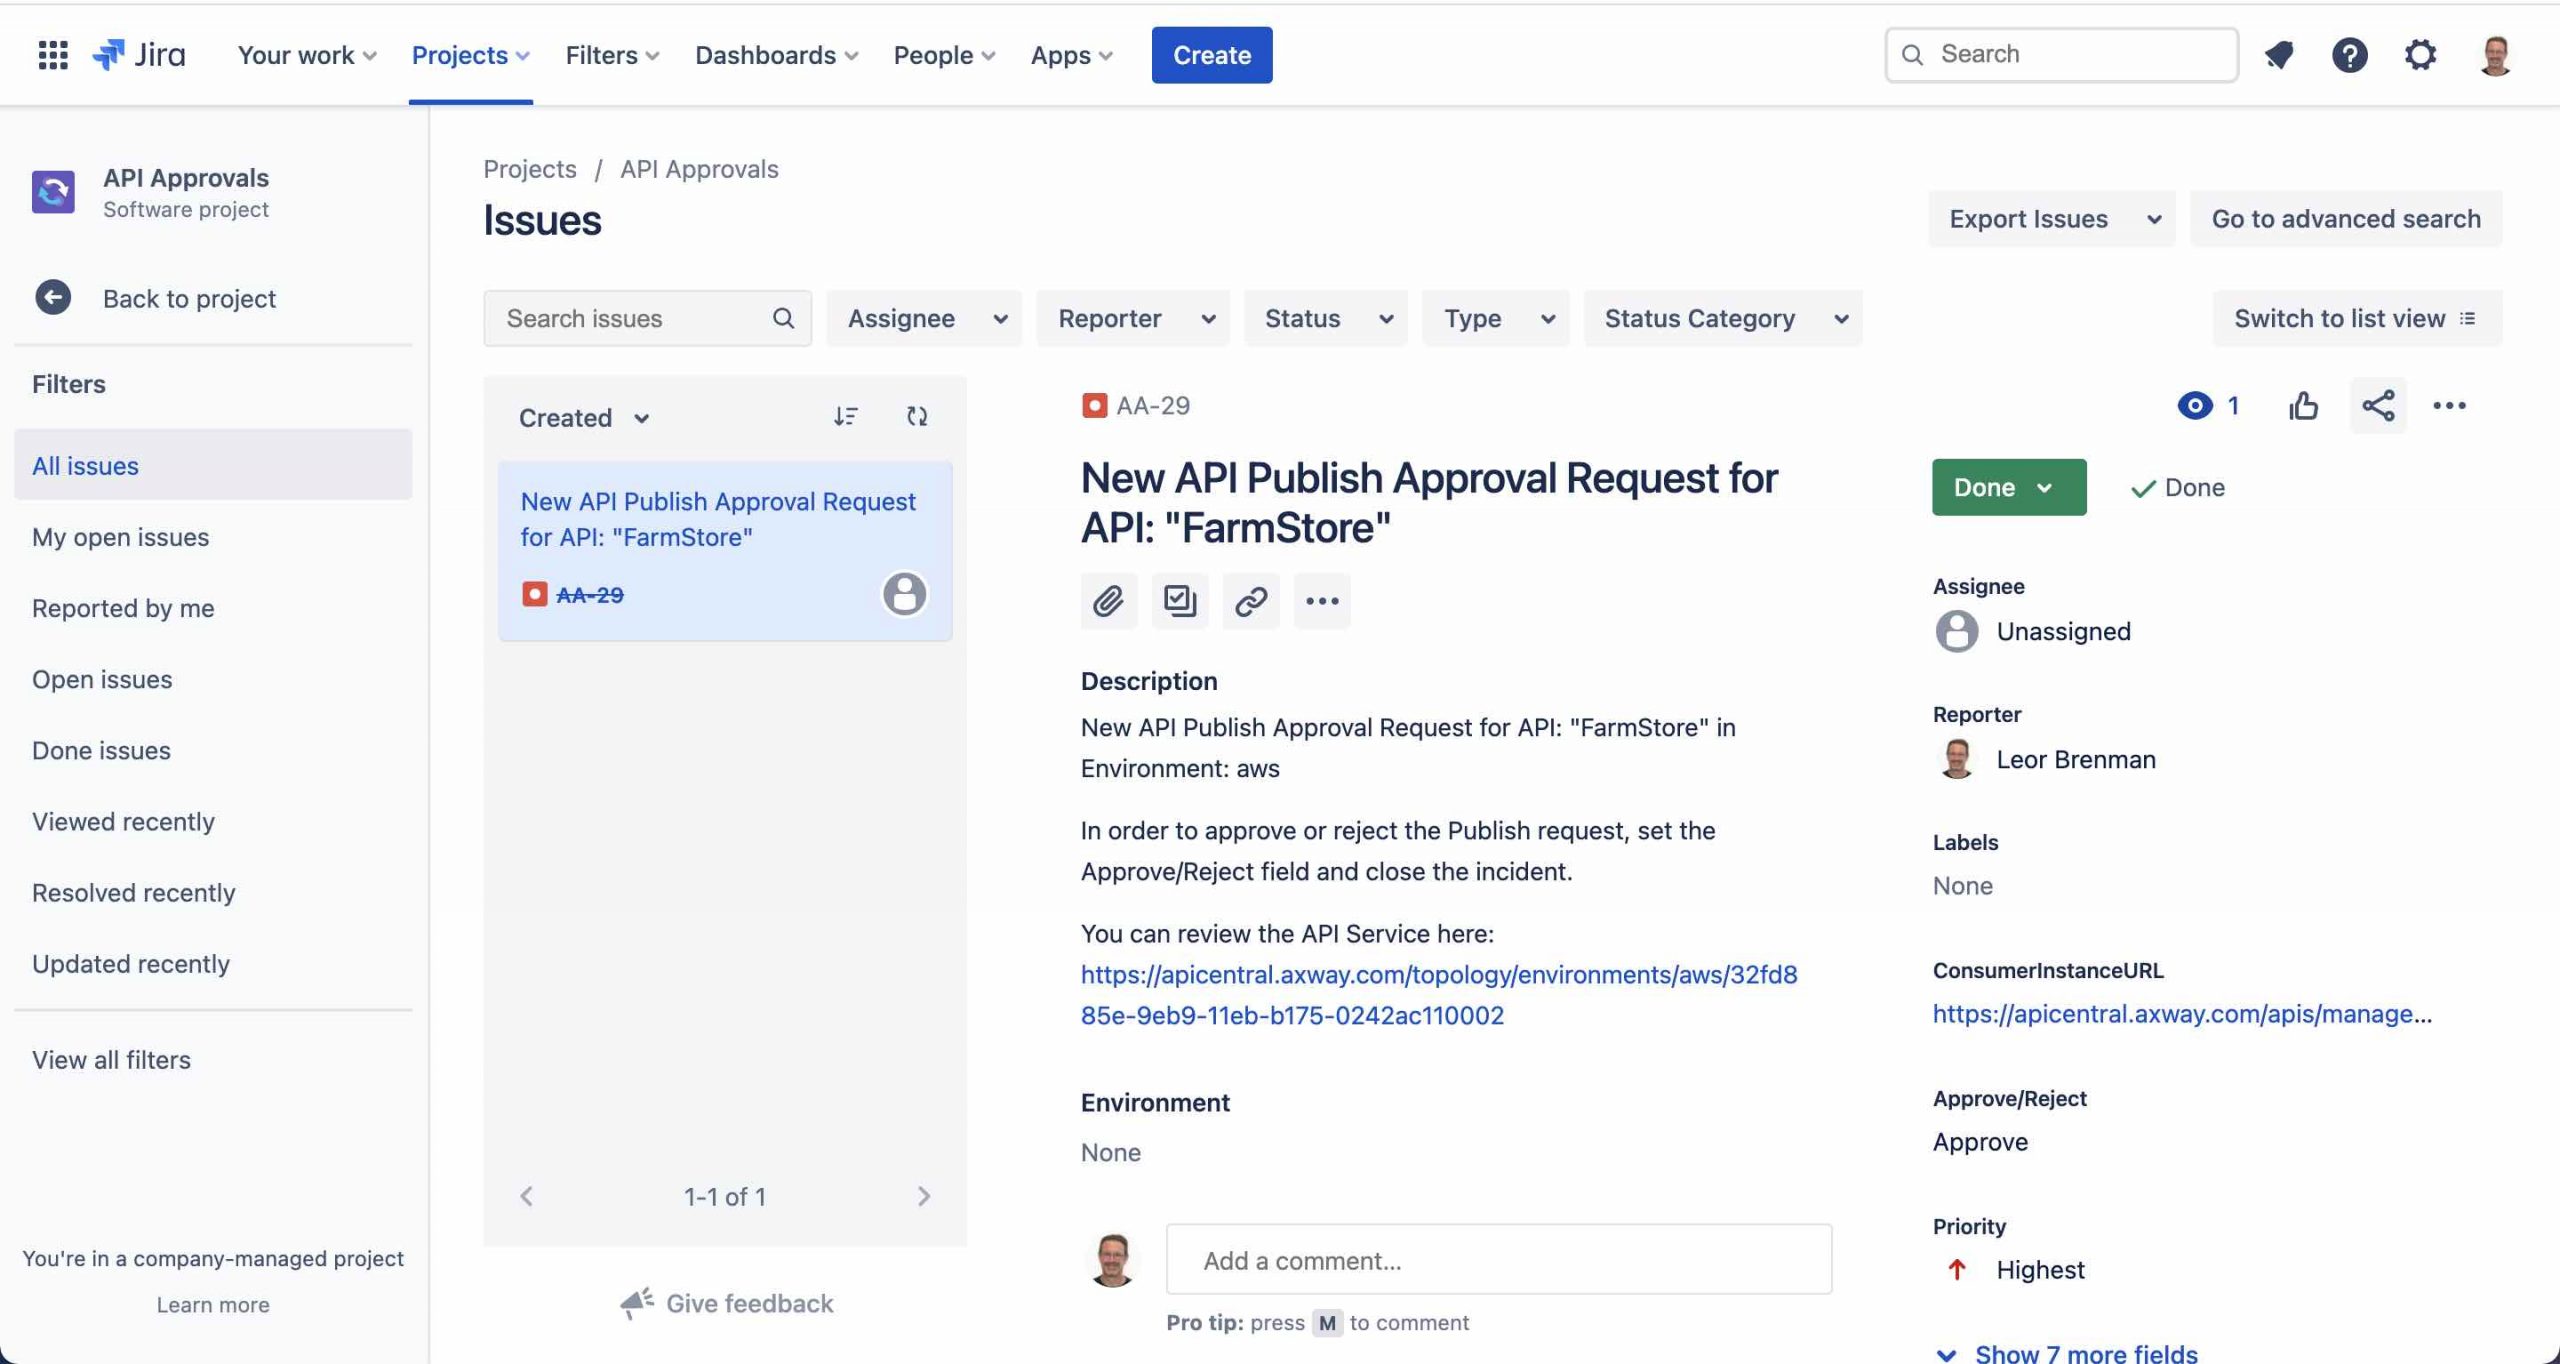
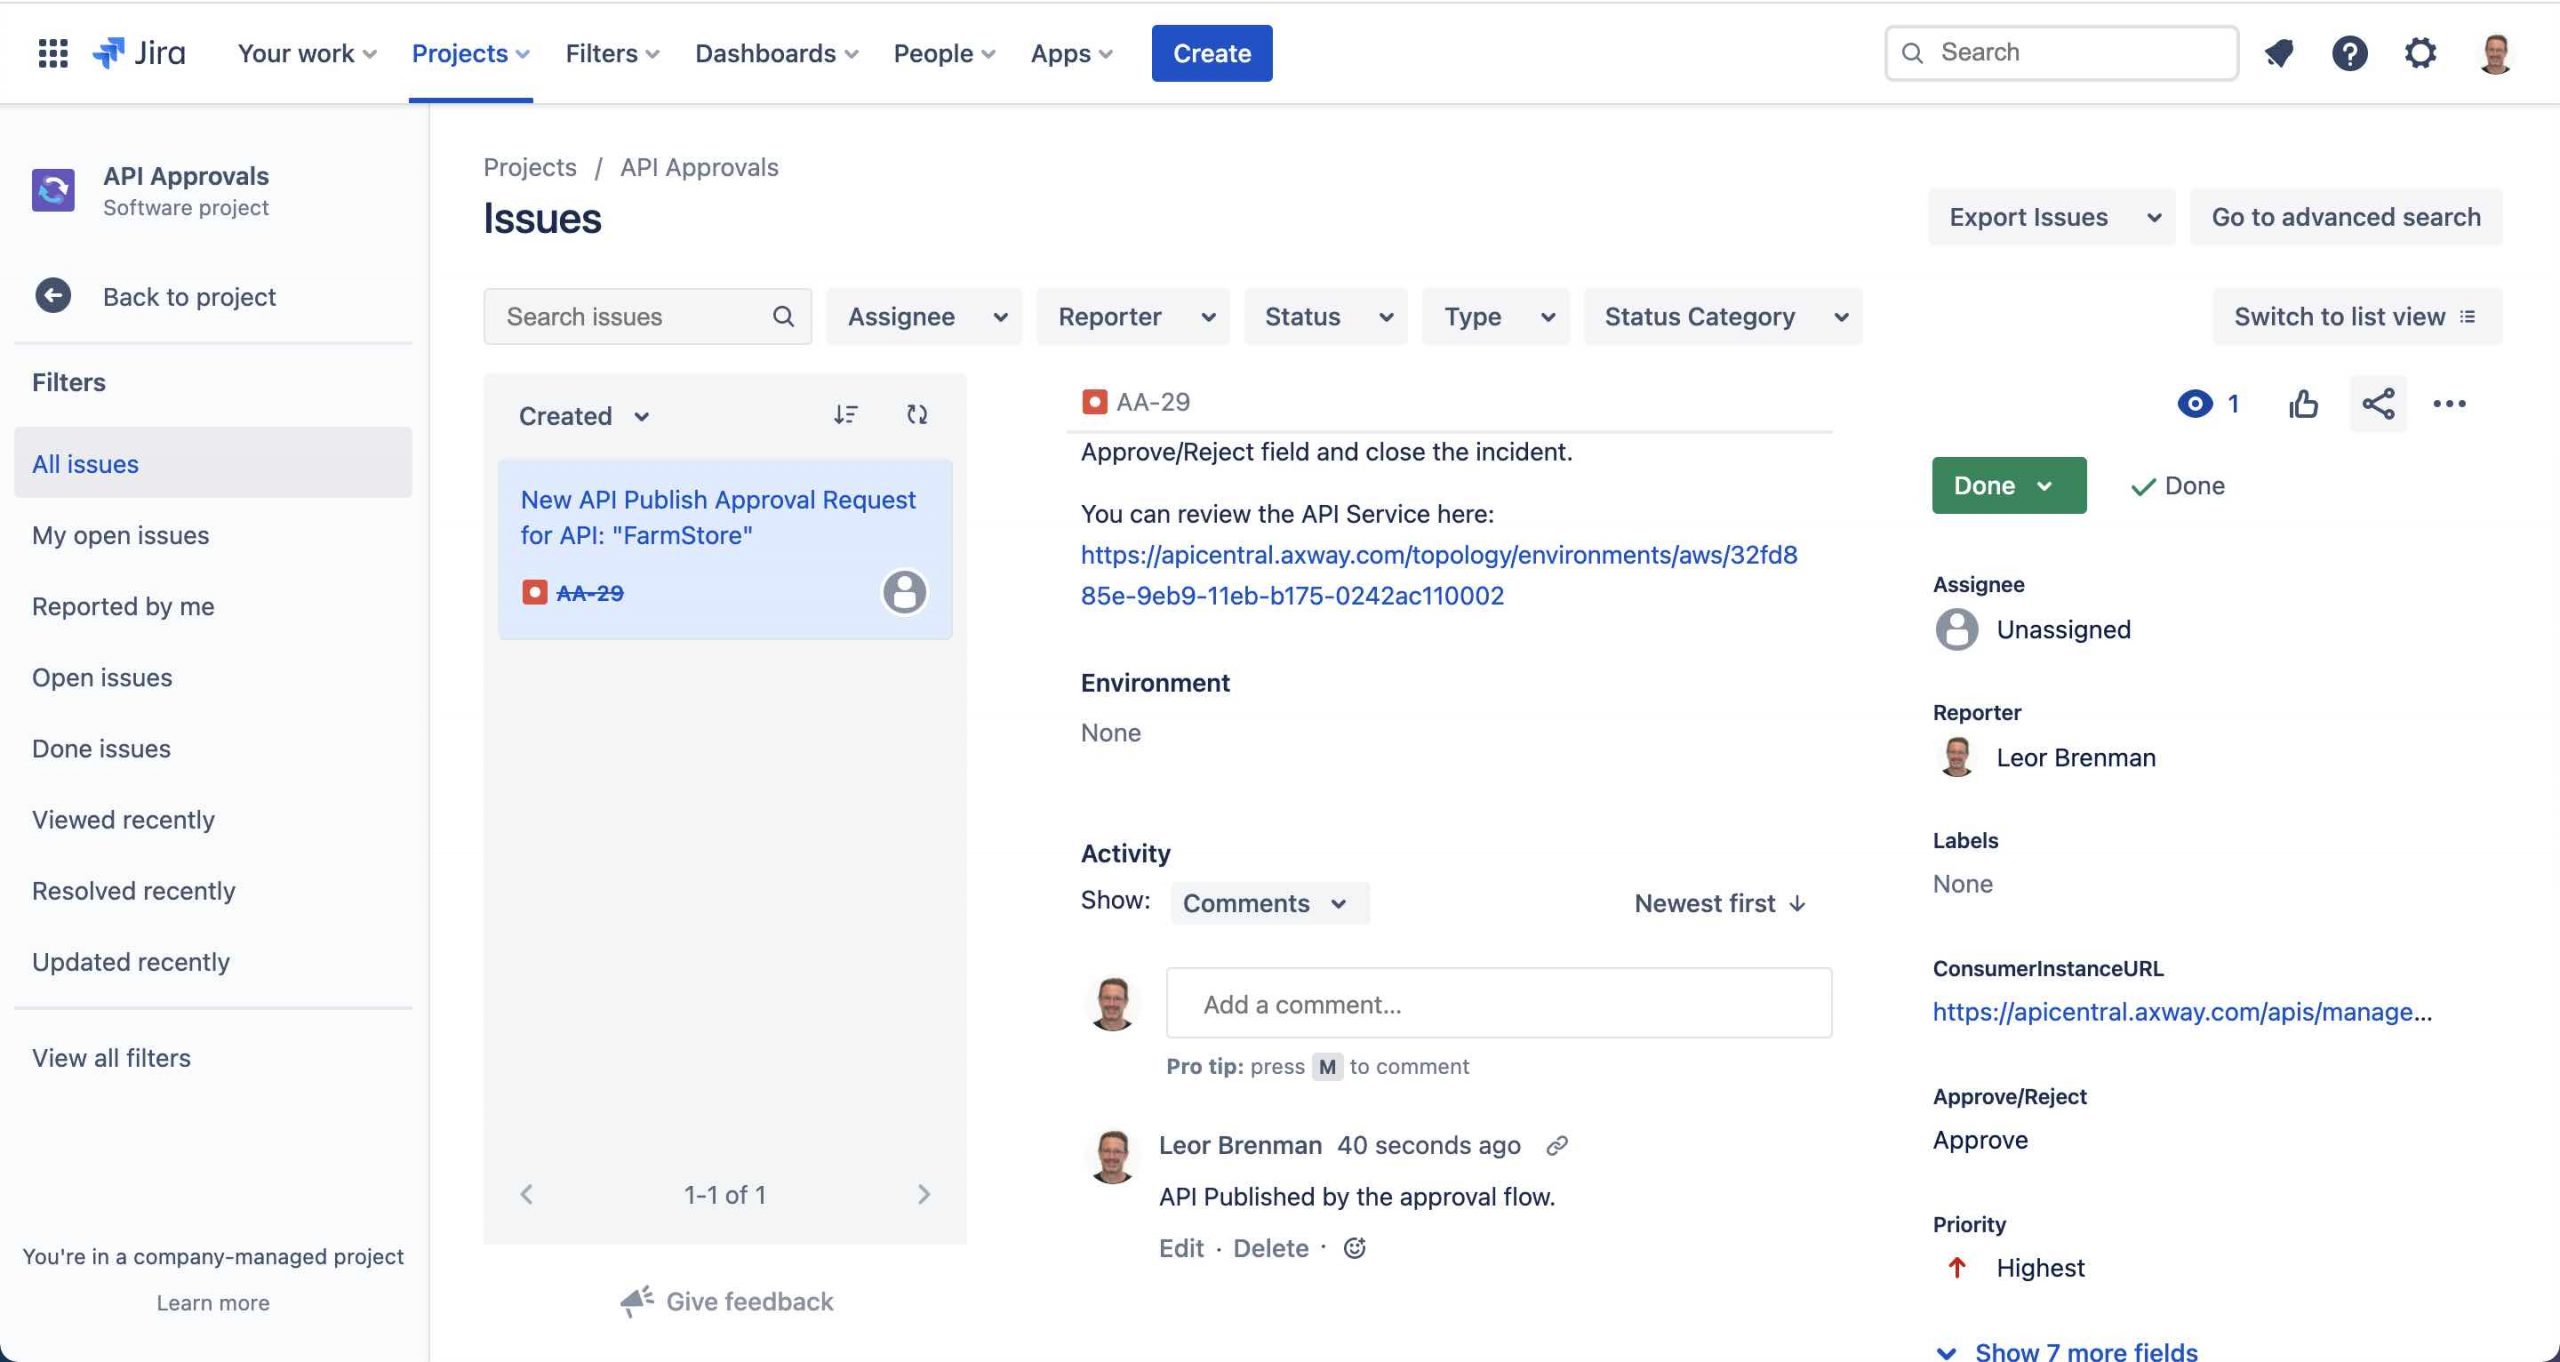
This step creates the Jira incident. As an example, see the Jira incident below:
The incident contains the API Service name and environment name and a link to the API Service. It also contains the Approve/Reject Picker custom field as well as the Consumer Incident URL. The Consumer Incident URL will be required by Flow #2 below in order to set the API to the PUBLISHED state.
Send Notification to MS Teams
The next two steps send a notification to MS Teams to let the API Approval team know that there’s a new API Publish Approval request in Jira.
- prepareSendToTeams is a JS Script Step with the following contents:
let url = config.msTeamsWebhookURL;

let ApiServiceURL = steps.setGlobals.globals.apicentralUrl+'/topology/environments/'+steps.getApiService.response.body.metadata.scope.name+'/'+steps.getApiService.response.body.name;

let incidentUrl = config.jiraBaseAddress + '/jira/software/c/projects/' + config.jiraProjectKey + '/issues/' + steps.createIncident.response.body.key;

let body = {
    "@type": "MessageCard",
    "@context": "http://schema.org/extensions",
    "themeColor": "0076D7",
    "summary": "API Publication Approval Request",
    "sections": [{
        "activityTitle": "API Publish Approval Request for API: ["+steps.getApiService.response.body.title+"]("+ApiServiceURL+") in Environment: "+steps.getApiService.response.body.metadata.scope.name,
        "text": "A Jira incident was automatically created. Click on incident link below to approve/reject the API Publication Approval request and set the incident status to Done.",
        "markdown": true
    }],
    "potentialAction": [
      {
            "@type": "OpenUri",
            "name": "View Incident",
            "targets": [
                {
                    "os": "default",
                    "uri": incidentUrl
                }
            ]
        }
    ]
};

done({body: body, url: url});
This step creates the message body for the MS Teams message.
- sendToTeams is an HTTP Request Step as follows:
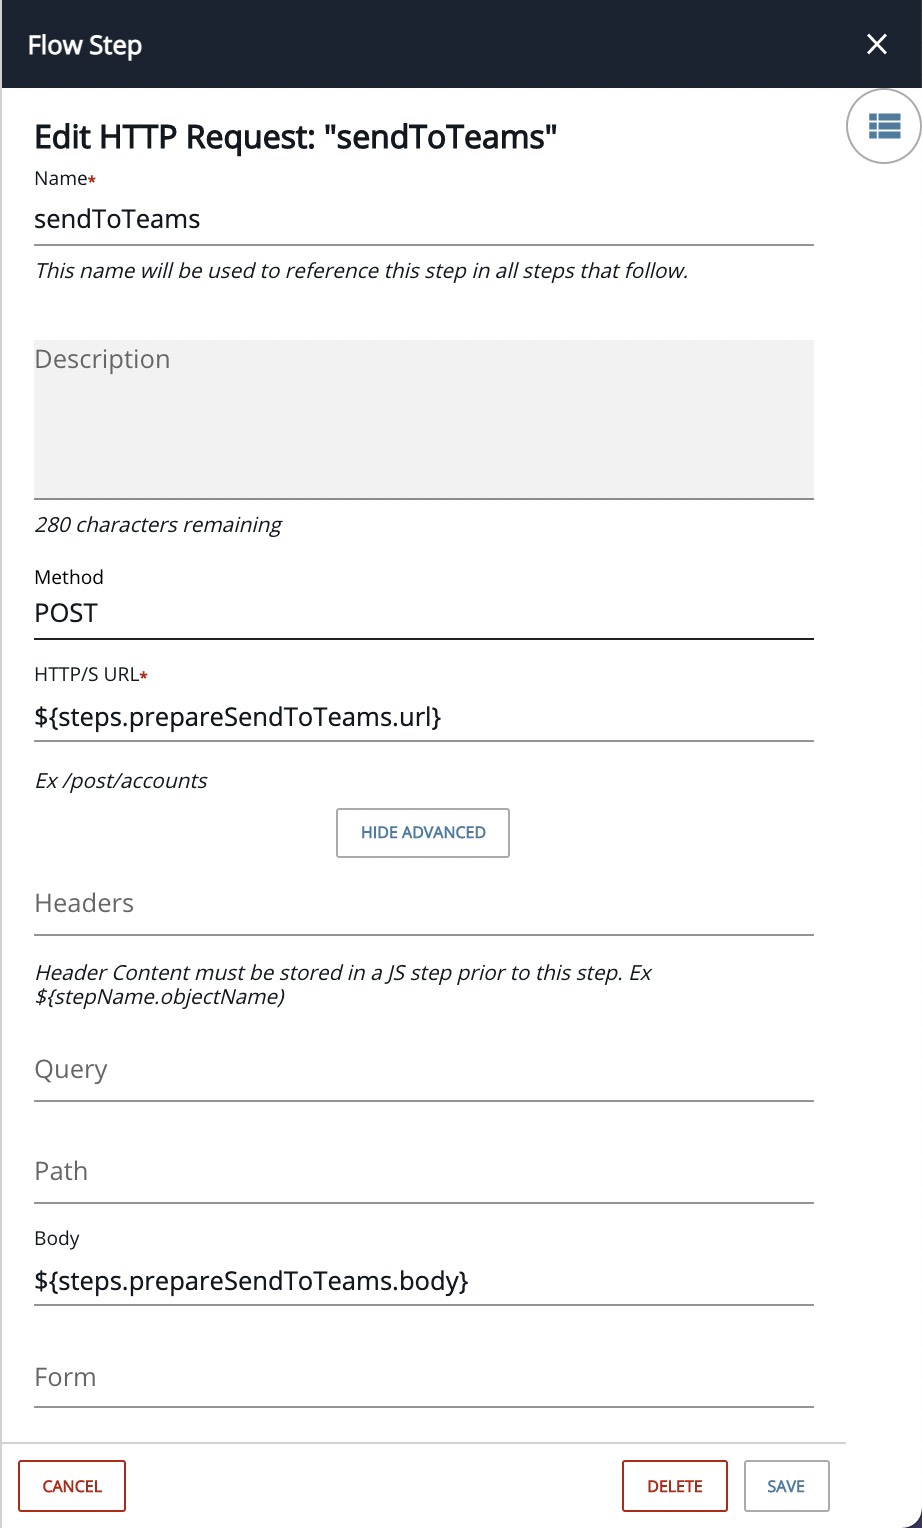
A sample MS Teams notification is shown below:
It contains the API Service name and environment name as well as a link to the API Service and the Jira Incident.
Integration Builder Flow #2
The Integration Builder connector event triggered flow will be triggered by Jira events and do the following:
- Check to see if the incident approval is set to Approve AND the incident is closed
- If so, set the consumer instance to PUBLISHED and add a comment to the incident
In the screenshot below, you can see that the API Approver set the Jira incident Approve/Reject custom field to Approve and closed the incident (set status to Done):
The Integration Builder flow is shown below:
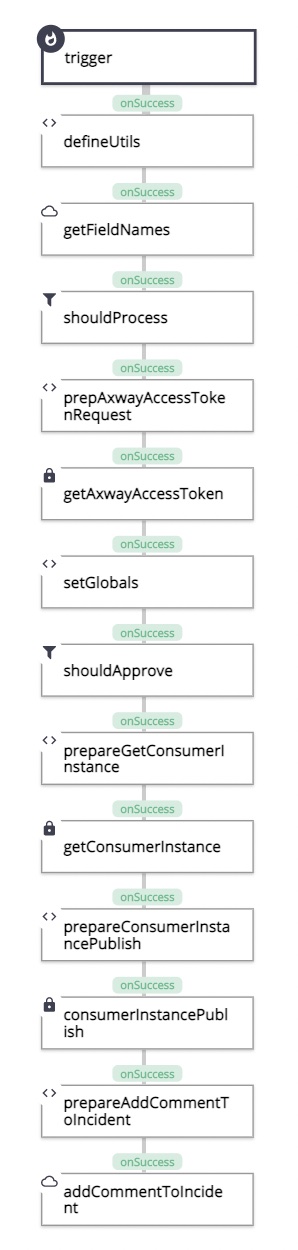
Note that I named the Flow template AMPLIFY Central New API Approval Processor 2.
The flow instance is shown below:
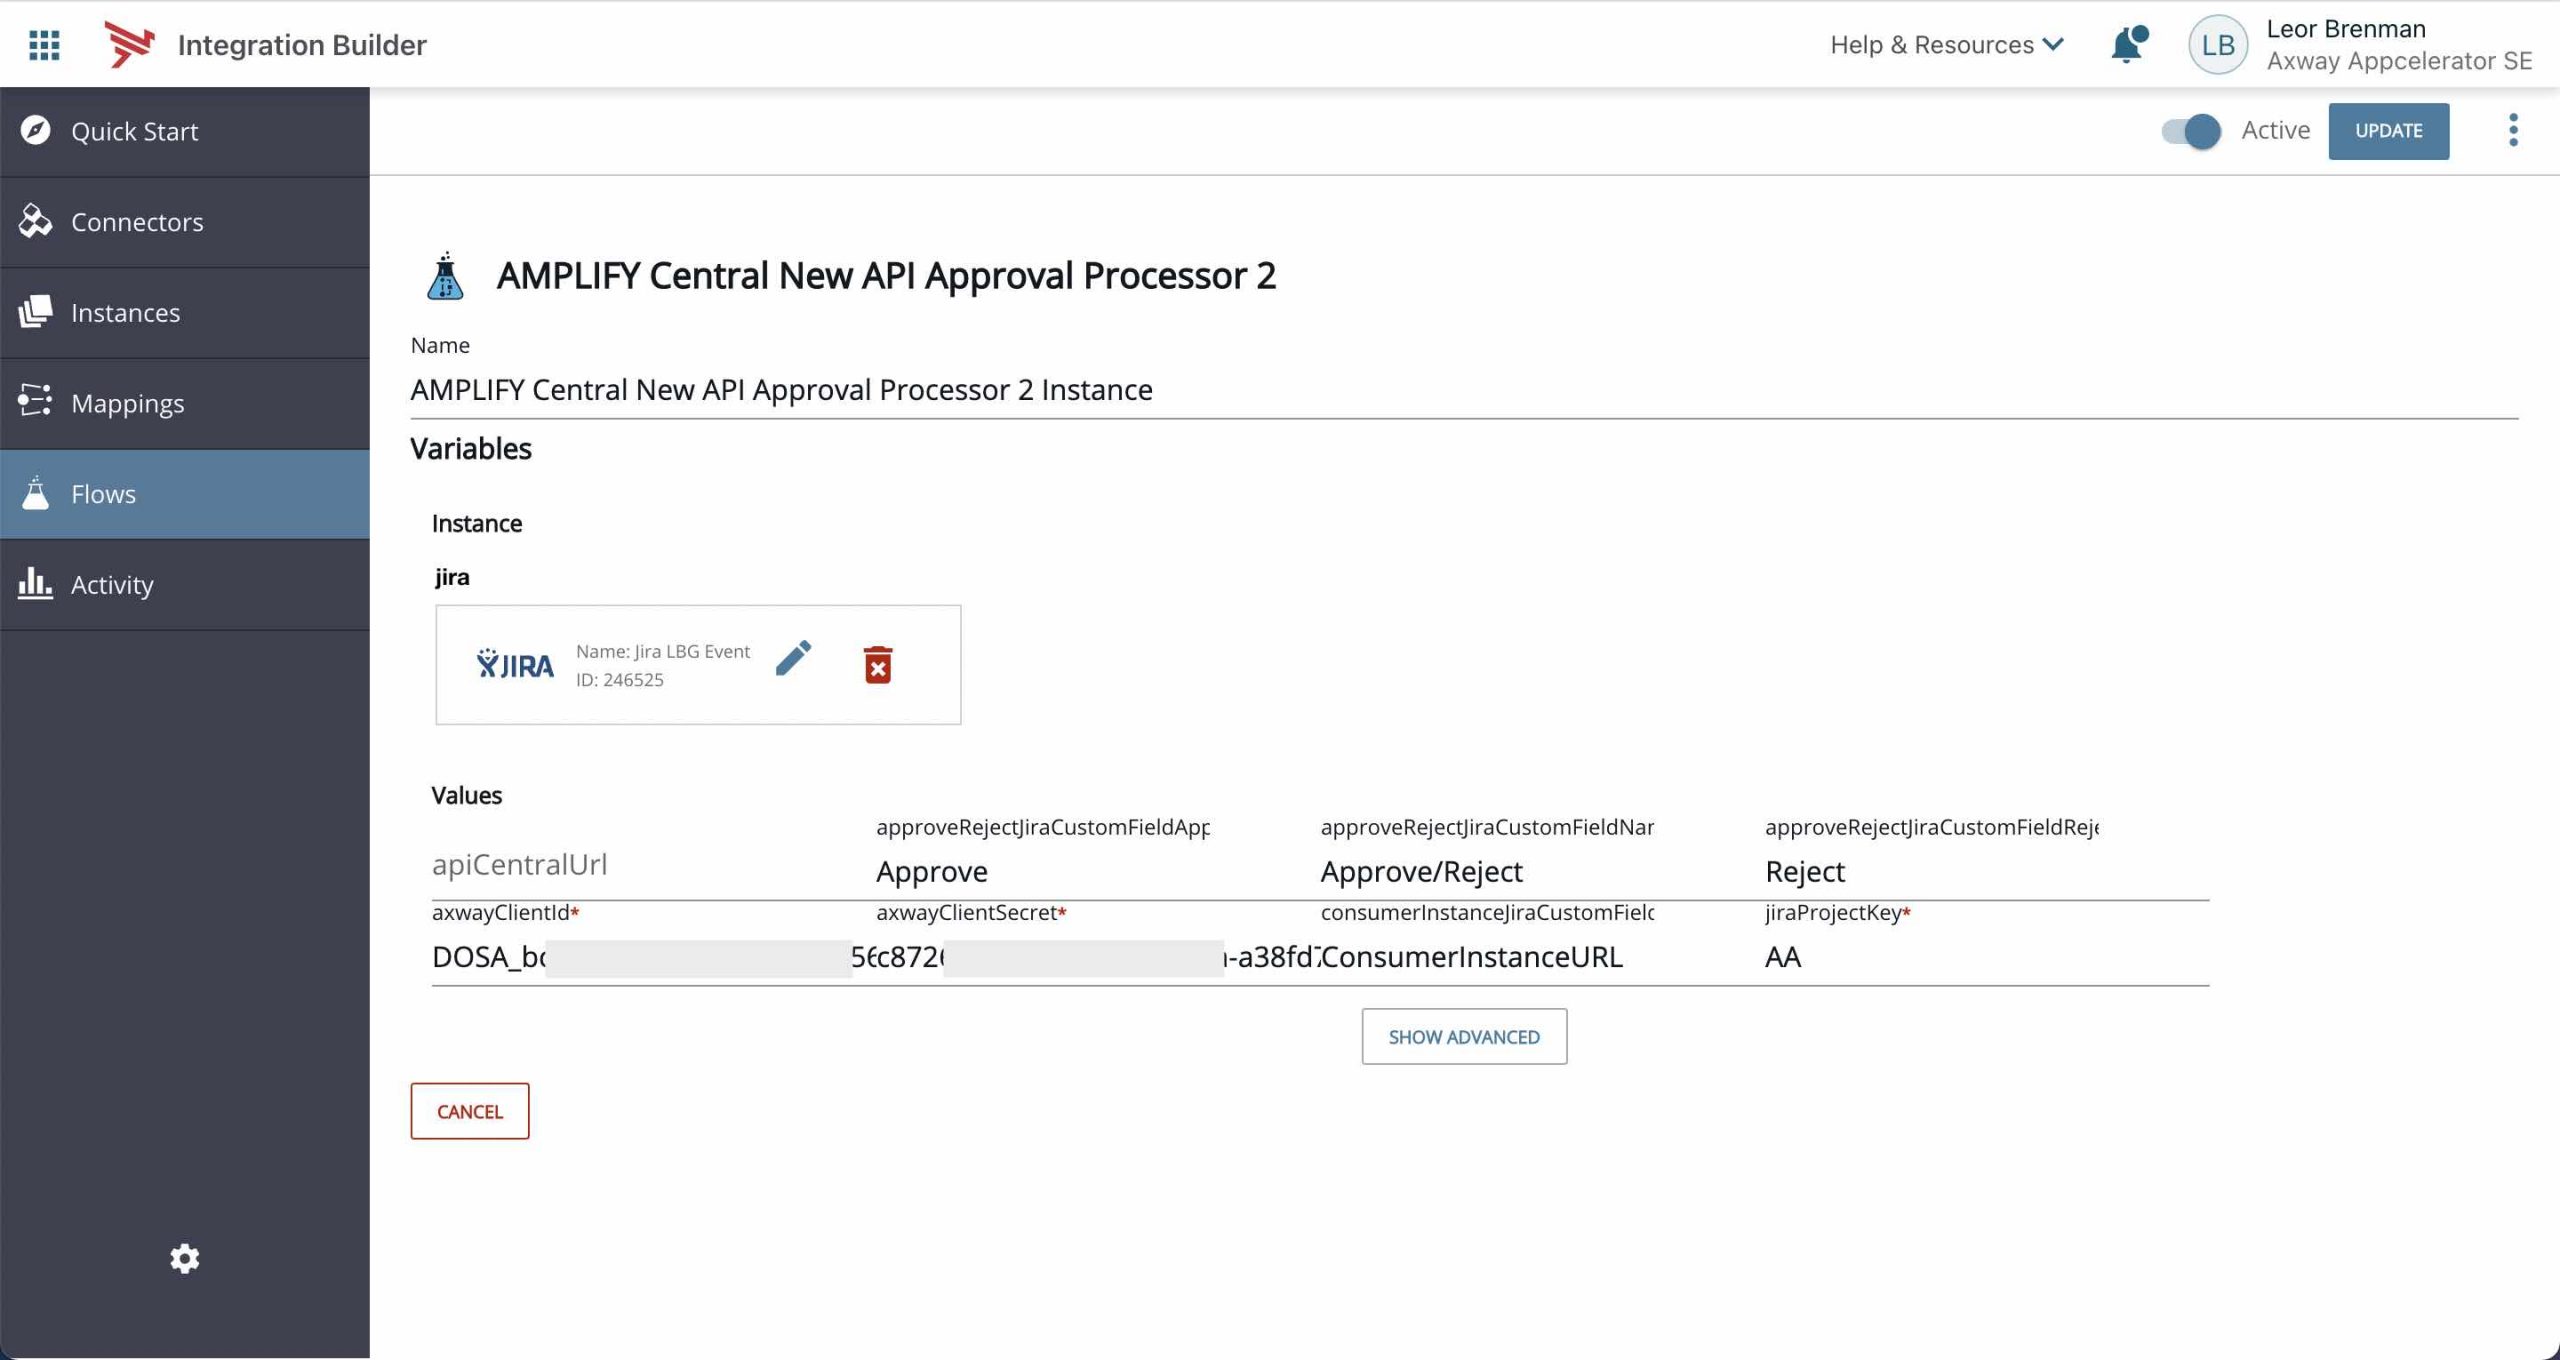
Note that I named the Flow Instance AMPLIFY Central New API Approval Processor 2 Instance.
You can see the following instance variables:
- Jira connector for receiving Jira connector events and retrieving Jira incident field names
- apiCentralUrl for overriding the default base address of Amplify Central (https://apicentral.axway.com) for different regions
- clientId and clientSecret as described here
- jiraProjectKey for the Jira project used for incidents related to API Approvals
- consumerInstanceJiraCustomFieldName for the name of the Jira custom field added to retrieve the URL to the Central Consumer Instance (populated by Flow #1)
- approveRejectJiraCustomFieldName for the name of the Approve/Reject picker Jira custom field
- approveRejectJiraCustomFieldApproveValue and approveRejectJiraCustomFieldRejectValue are the values for approve and reject
It’s worth noting that many of the flow steps and variables are the same, or similar, to Flow #1 so I’ll mainly focus on the differences.
For example, the first two steps, defineUtils and getFieldNames are identical to those in Flow #1.
Should Process
shouldProcess, is a JS Filter Step to make sure that the modified Jira incident corresponds to the Jira project we are monitoring for approvals AND the incident is closed (status is Done) AND the Approve/Reject Jira custom field is set.
let approveRejectField = steps.defineUtils.utils.findObjectByKey(steps.getFieldNames.response.body, 'name', config.approveRejectJiraCustomFieldName).key;

let projectKey = trigger.body.message.raw.issue.fields.project.key;

done((projectKey === config.jiraProjectKey) && (trigger.body.message.raw.issue.fields.status.name === 'Done') && trigger.body.message.raw.issue.fields[approveRejectField].hasOwnProperty('value'));
prepAxwayAccessTokenRequest, getAxwayAccessToken and setGlobals are the same as in Flow #1.
Should Approve
shouldApprove is a JS Filter Step to determine if the Approve/Reject Jira custom field is set to Approve as follows:
let approveRejectField = steps.defineUtils.utils.findObjectByKey(steps.getFieldNames.response.body, 'name', config.approveRejectJiraCustomFieldName).key;

done(trigger.body.message.raw.issue.fields[approveRejectField].value === config.approveRejectJiraCustomFieldApproveValue);
Note that I could have combined this with the shouldProcess step but I left it separate in case I want to do something if the field is set to Reject. Currently, I am not doing anything in that case.
Update Consumer Instance
The next four of steps: prepareGetConsumerInstance, getConsumerInstance, prepareConsumerInstancePublish and consumerInstancePublish retrieve the Consumer Instance and set it’s state to PUBLISHED.
- prepareGetConsumerInstance is a JS Script Step with the following contents:
let consumerInstanceUrlField = steps.defineUtils.utils.findObjectByKey(steps.getFieldNames.response.body, 'name', config.consumerInstanceJiraCustomFieldName).key;

let url = trigger.body.message.raw.issue.fields[consumerInstanceUrlField]

done({url:url})
This step retrieves the Consumer Instance URL from the Jira incident custom field referenced by the flow instance variable, consumerInstanceJiraCustomFieldName. This was populated by Flow #1.
- getConsumerInstance is the same as in FLow #1.
prepareConsumerInstancePublish is a JS Script Step with the following contents:
let body = steps.getConsumerInstance.response.body;

body.spec.state = 'PUBLISHED'

done({body:body})
This step modifies the Consumer Instance object and sets the state property to PUBLISHED.
- consumerInstancePublish is an HTTP Request Step as follows:
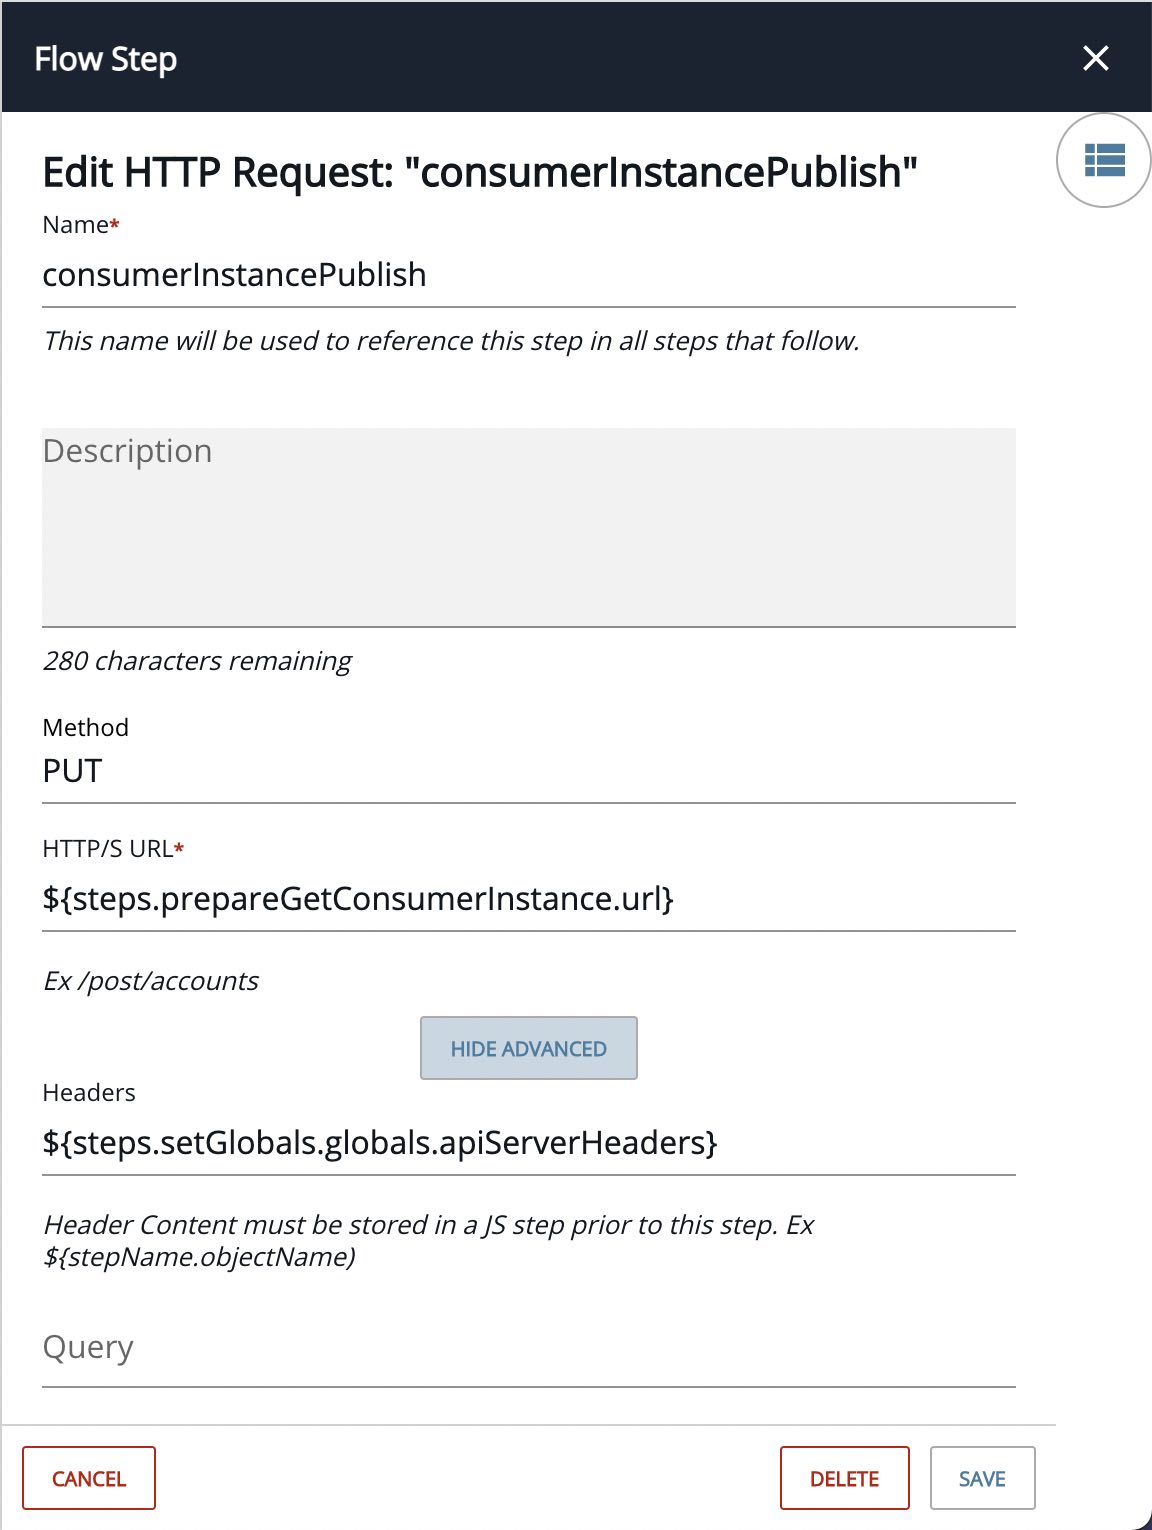
It modifies the Consumer Instance by settings its state to PUBLISHED.
At this stage the API will be visible to API Consumers as shown below:
Add Comment to Jira Incident
The last two steps, prepareAddCommentToIncident and addCommentToIncident add a note to the Jira incident indicating that the API was published.
- prepareAddCommentToIncident is a JS Script Step with the following contents:
let url = 'incidents/'+trigger.body.message.raw.issue.key+'/comments';

let body = {
  "body": "API Published by the approval flow."
}

done({url:url, body:body});
This step creates the Jira incident comment body and URL.
- addCommentToIncident is a Connector API Request as follows:

It adds the comment to the incident as shown below:
Both Integration Builder flows can be downloaded here.
Summary
In this blog post, we looked at an example application, created with Amplify’s Integration Builder, that leverages Amplify Central Integration Webhooks to extend platform functionality.
We created an Integration and an application that detects when new APIs are discovered and published to Amplify Central and the Unified Catalog (using the discovery agents) and initiates a Jira-based approval flow so that the API can be governed according to your API approval process.
Learn more about Amplify Central.