

The last post presented some features of Riot.js, a UI micro-library. Now, let’s code a simple application. The final application looks like this:

An input, a button and a « Hello » text to display when we click on the button. Amazing, isn’t it? Let’s start!
To manage our dependencies and the build phases, we will use npm (only…). If you don’t have npm yet, I advice you to install it with nvm, a really nice tool that can manage several npm versions. Really sweet!
Then, create the following files hierarchy:
your-app/
 ├── app/
 |    ├── index.html
 |    └── hello-world.tag
 └── dist/
Initiate a npm package.json:
npm initInstall Riot.js as a dependency:
npm install riot --saveAs we’ve seen in the previous post, Riot.js is based on a compiler that transforms a Riot.js file into a javascript file. In addition, Riot.js supports Ecmascript6, sorry, Javascript 2015 thanks to Babel.js, the popular transpiler. As you can guess we need to install it too, or its babel-core package to be more precise:
npm install babel-core --saveIn its latest version (6 at the moment I’m writing this article), Babel uses plugins, which can be grouped in presets, for compilation. Riot.js has its own preset but still needs an external-helper plugin. Both can be installed this way:
npm install babel-preset-es2015-riot --save
npm install babel-plugin-external-helpers-2 --save-dev
Once this is done, we still need to tell Babel to actually use thoses plugins by adding a .babelrc file at the root of our project:
{
  "presets": ["es2015-riot"],
  "plugins": ["external-helpers-2"]
}
Now that everything is properly configured, let’s add the Riot.js commands to compile our Riot.js files. Open the package.json and modify the scripts section:
{
  "name": "hello-world",
  "version": "1.0.0",
  "description": "riot.js Hello Word sample with npm and es6",
  "scripts": {
    "compile": "riot --type es6 app dist",
    "watch": "riot -w --type es6 app dist",
  },
 "dependencies": {
    "babel-core": "^6.18.2",
    "babel-preset-es2015-riot": "^1.1.0",
    "riot": "^3.0.1"
  },
  "devDependencies": {
    "babel-plugin-external-helpers-2": "^6.3.13"
}
We have two tasks:
- npm run compile to compile the Riot.js tag files that resides in the app directory into javascript files that will be generated into the dist directory,
- npm run watch to watch directories and automatically transform files when they are changed.
We’ll then install some tools that we will use for the development. I chose BrowserSync for the live-reload in the browser: whenever you make a code change, the browser is automatically updated with the modifications. I have also used parallelshell for executing Riot.js compilation and BrowserSync execution at the same time (thanks to Hans Christian Reinl for its nice article!).
npm install browser-sync parallelshell --save-devOnce again, modify the package.json to add new tasks:
{
  "name": "hello-world",
  "version": "1.0.0",
  "description": "riot.js Hello Word sample with npm and es6",
  "scripts": {
    "compile": "riot --type es6 app dist",
    "watch": "riot -w --type es6 app dist",
    "browsersync": "browser-sync start --server --files 'dist/*.js, app/*.html' --startPath app",
    "serve": "parallelshell 'npm run watch' 'npm run browsersync'"
  },
 "dependencies": {
    "babel-core": "^6.18.2",
    "babel-preset-es2015-riot": "^1.1.0",
    "riot": "^3.0.1"
  },
  "devDependencies": {
    "babel-plugin-external-helpers-2": "^6.3.13",
    "browser-sync": "^2.18.2",
    "parallelshell": "^2.0.0"
  }
So, here are our npm commands to run:
- npm run browsersync to automatically update code modifications into the browser,
- npm run serve to call watch and browsersync tasks at the same time, thanks to parallelshell. Everytime a Riot.js file will be modified, it will be automatically compiled and the browser will be updated too. Nice!
Now, let’s create our custom tag. By default, Riot.js files have the extension .tag. but you can change it by adding –ext <your extension> to the riot commands. For instance, riot –type es6 –ext html -w app dist if you prefer to deal with the .html extension (I’ve seen some people doing that to ease code completion in their favorite IDE).
Edit the hello-world.tag file:
<hello-world>
  <h3>{opts.title}</h3> <!-- this div uses the object we pass to mount the tag -->

  <input ref="helloInput" placeholder="Enter your name">
  <button class="myButton" onclick="{sayHello}">Say Hello</button>
  <h4>{message}</h4>

  <script type='es6'>
    this.message = '';

    this.sayHello = (e) => {
      var value = this.refs.helloInput.value;
      if (value) {
        this.message = 'Hello ' + value + '!';
      } else {
        this.message = '';
      }
    };
  </script>
  <style>
    .myButton {
      background-color:#44c767;
      -moz-border-radius:18px;
      -webkit-border-radius:18px;
      border-radius:18px;
      border:1px solid #18ab29;
      display:inline-block;
      cursor:pointer;
      color:#ffffff;
      font-family:Arial;
      font-size:17px;
      padding:6px 21px;
      text-decoration:none;
      text-shadow:0px 1px 0px #2f6627;
    }
    .myButton:hover {
      background-color:#5cbf2a;
    }
    .myButton:active:enabled {
      position:relative;
      top:1px;
      cursor: pointer;
    }
  </style>
</hello-world>
That’s it! Our first custom-tag <hello-world>!
Note that usually I would tend to declare the style into a separate css. This was just to demonstrate that we can declare our custom-tag with its own style embedded.
The <h3> tag is fed with the Riot.js opts object. As we will see later, we can instanciate (mount) Riot.js tags with a special object that is called opts in the custom tag.
Note the use of the moustaches {} to bind properties (this.message) or function (sayHello()).
Note also that the html elements (such as the <input>) are accessed within the javascript code through either their names or their id. Thus, in the sayHello() function, we access the <input> value via this.helloInput.value because the <input> has been declared with a name « helloInput »: <input name=”helloInput”>.
Now, let’s use our custom-tag. Declare an index.html:
<!doctype html>
<html lang="en">
<head>
  <meta charset="utf-8">
  <title>Hello World</title>

</head>
  <body>
    <!-- mount point -->
    <hello-world></hello-world>

    <!-- include riot.js -->
    <script src="../node_modules/riot/riot.min.js"></script>
    <script src="../dist/hello-world.js"></script>

    <!-- mount normally -->
    <script>
    riot.mount('*', {title: 'Say hello!'});
    </script>
  </body>
</html>
The instruction riot.mount(‘*’, {title: ‘Say hello!’}); mounts our custom tag . The second argument {title: ‘Say hello!’} is the opts object we use in our custom-tag.
Pretty simple, isn’t it? Now let’s run the app:
npm run serveThis should open a browser at http://localhost:3000/app (if not, open your browser with this url. Sometimes the browser opens with a blank page: in this case, reload the page) and you should get this amazing app:
The take away:
One more thing… Update the index.html with:
<!doctype html>
<html lang="en">
<head>
  <meta charset="utf-8">
  <title>Hello World</title>

</head>
  <body>
    <!-- mount point -->
    <div id="hello"></div>
    <div id="bonjour"></div>

    <!-- include riot.js and the compiler -->
    <script src="../node_modules/riot/riot.min.js"></script>
    <script src="../dist/hello-world.js"></script>

    <!-- mount normally -->
    <script>
    var sayHello = function(name) {
      return 'Hello ' + name + '!!!';
    };

    var sayBonjour = function(name) {
      return 'Bonjour ' + name + '!!!';
    };

    riot.mount('div#hello', 'hello-world', {title: 'Hello', say: sayHello});
    riot.mount('div#bonjour', 'hello-world', {title: 'Bonjour', say: sayBonjour});
    </script>
  </body>
</html>
… and modify the hello-word.tag:
<hello-world>
  ...

  <script type='es6'>
    // <script> tag is required if we provide style too
    this.message = '';

    this.sayHello = (e) => {
      if (this.helloInput.value) {
        this.message = this.opts.say(this.helloInput.value);
      } else {
        this.message = '';
      }
    };
  </script>
  <style>
    ...
  </style>
</hello-world>
… and look at the result in your browser:
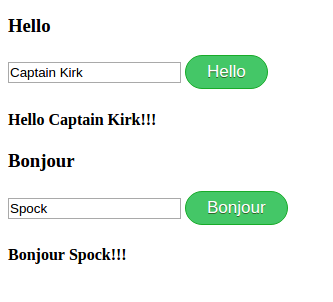
Nice, isn’t it? So, that’s all for the traditional «Hello World» example. If you want to have a look at the code, it can be found on our GitHub (getYourHandsDirty branch).
Want more ?
Exploring Riot.js – Event-driven app (Step1)
Exploring Riot.js – Event-driven app (Step2)
Exploring Riot.js – Event-driven app (Step3)
Exploring Riot.js – En route to…
Exploring Riot.js – Route 66 (Takeaway)