

In my previous blog Setting up Bulk Sync with Integration Builder, I talked about how to set up bulk sync in between HubSpot and Salesforce application. Both of these connectors are provided out of the box by the Integration Builder. Even though the Integration Builder provides 200+ out of the box application connectors, we may still need to connect with Internal applications via APIs for various reasons.
In this blog, I will walk you through how to enable Bulk sync and set up jobs for these Internal APIs. We will be able to demonstrate the following capabilities of Integration Builder:
- Creating a connector from Internal APIs
- Enable Bulk Functionality
- Bulk Job Creation
- Bulk Download/Upload
- Stream file
Prerequisites
You’ll need the following for this tutorial:
- Axway AMPLIFY account – register for free on the Axway Platform.
- Specifications for Internal APIs.
- Internal APIs should support pagination for Bulk to work properly.
- URL/Credentials for Internal APIs and Internal APIs either be accessible from the internet or use something like ngrok to open up internal services.
- For Bulk Sync to work, APIs need to support pagination.
- Must have completed the Bulk Sync blog and Create an Integration Builder Connector blog.
Overview of Steps
- Create Connectors for your Internal APIs
- Enable Bulk Sync.
- Configure your connector instances to use the mapping
- Build Two flow templates. One to query source API and initiate Bulk Job, second to download the bulk file, and upload to destination API.
- Create Flow instance, which schedules the first flow template as per the cron time.
- Monitor flow in Bulk Job logs.
Create Connectors
- Follow the Create an Integration Builder Connector blog to create a connector using Internal APIs specifications.
- Setup Authentication\Authorization as per API specifications.
Enable Bulk Sync
Go to Connectors à Private tab and hover over the Connector created in the previous step and click on Overview.
Click on the Resources tab.
A screen like below will be shown, you will see all the resources/method which is in your API.

Click on the Bulk tab on the right-hand side. This screen shows up.
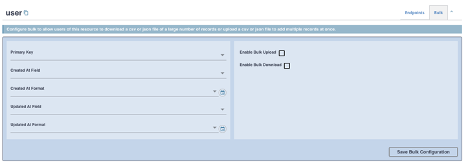
Click on Enable Bulk Upload/Download Checkbox.
On the left-hand side, if you want to then you can define Primary key (refer to your JSON schema) and other fields such as Created At Field, etc. these fields then can be used by platform when creating Bulk Jobs.

Notice that as soon as you check to enable upload/download box, the icon for Bulk ![]() will show up next to the name of a resource.
will show up next to the name of a resource.
Click on the Save Bulk Configuration.
Click on the Save button on the top right-hand side of the page.
You have successfully enabled the Bulk feature for your API.
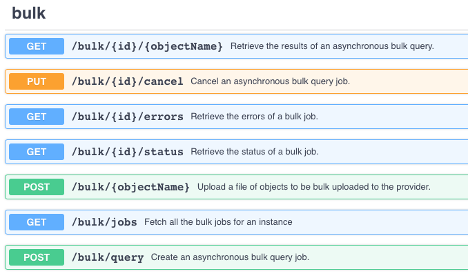
Next, go to the API DOCS tab while in the connector overview page. If everything went through fine, then you will see that a new resource bulk is created for your connector API.
Once your connector API has the bulk feature enabled, you can follow the previous blog Setting up Bulk Sync with Integration Builder to set up Bulk Job and start making use of platform functionality to set up sync jobs between your Internal APIs or between SaaS application and Internal APIs.
In this blog post, we showed how quickly and easily we can enable the Bulk Sync feature for Internal APIs. I didn’t have to write massive code or any transformations. The platform could take off everything for us.
I hope this blog helps you get started on solving some use cases. Please don’t hesitate to comment or reach out in case you have any questions.
Happy Learning!
Read more about Integration Builder: Graceful troubleshooting.