When fetching large numbers of records from a data source using an Integration Builder Connector, you may find that you need to use pagination. It could be that the backend doesn’t support such large data sets or that you are exceeding the maximum API response payload size as described here.
You can control the pagination for a connector request using the pageSize and nextPage query parameters on a resource that returns multiple records.
Let’s review how to do this with the Syncplicity connector’s GET /folders/contents API.
The principles apply to any connector, so if you don’t have a Syncplicity account or connector, use another.
Use Pagination Via the API Docs
Let’s start with the API docs to see how pagination works and then we’ll show how to implement pagination in a test flow. Log into Integration Builder and go to the API docs for your connector.
Below is the GET /folders/contents API for the Syncplicity connector:
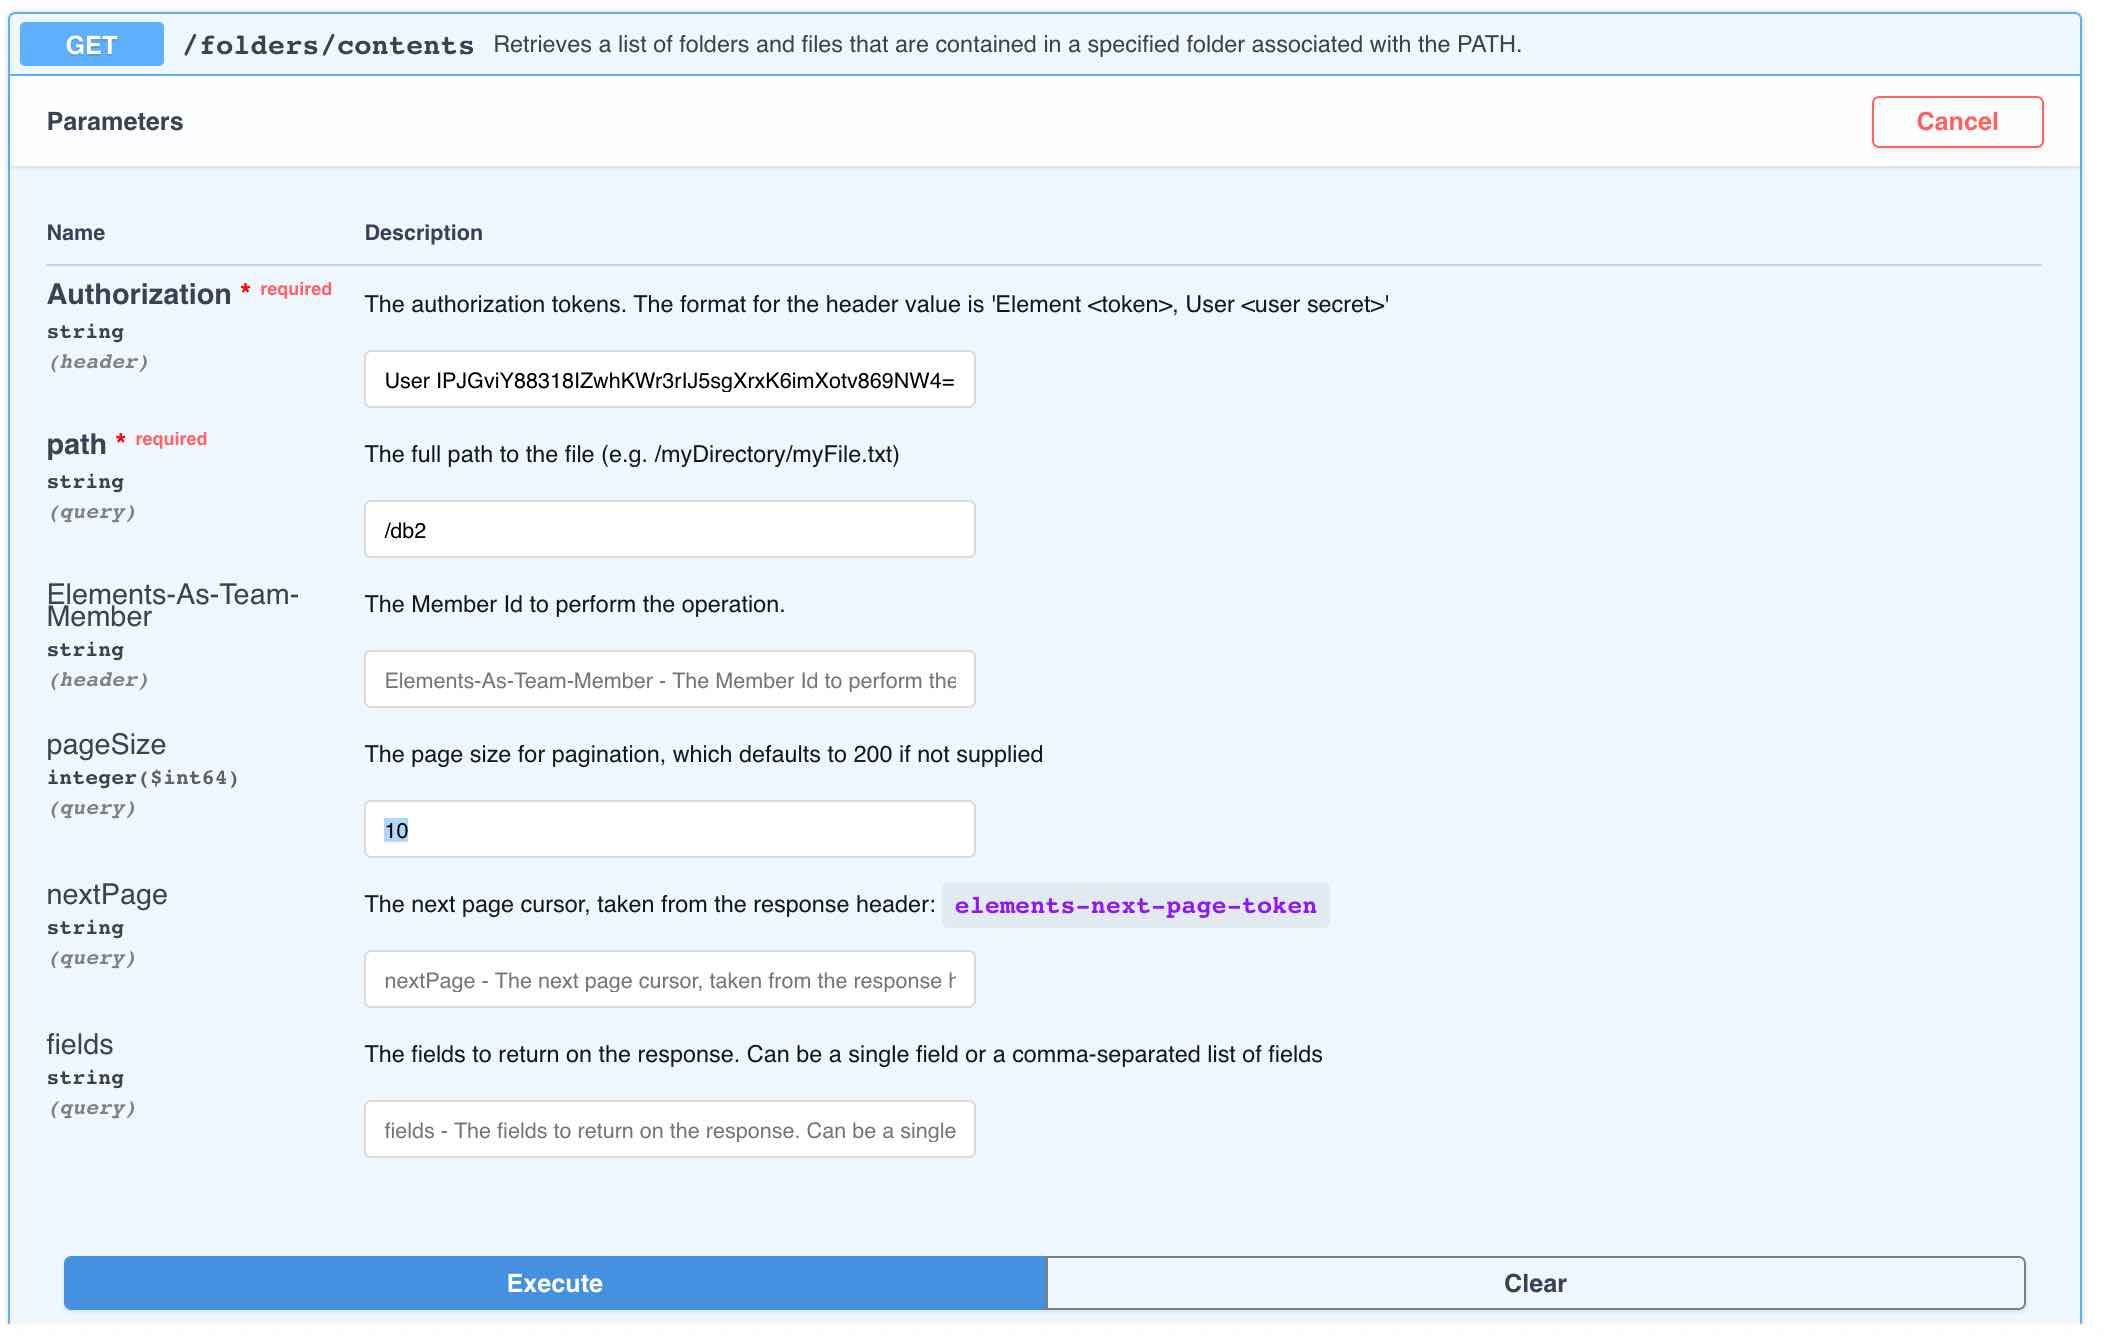
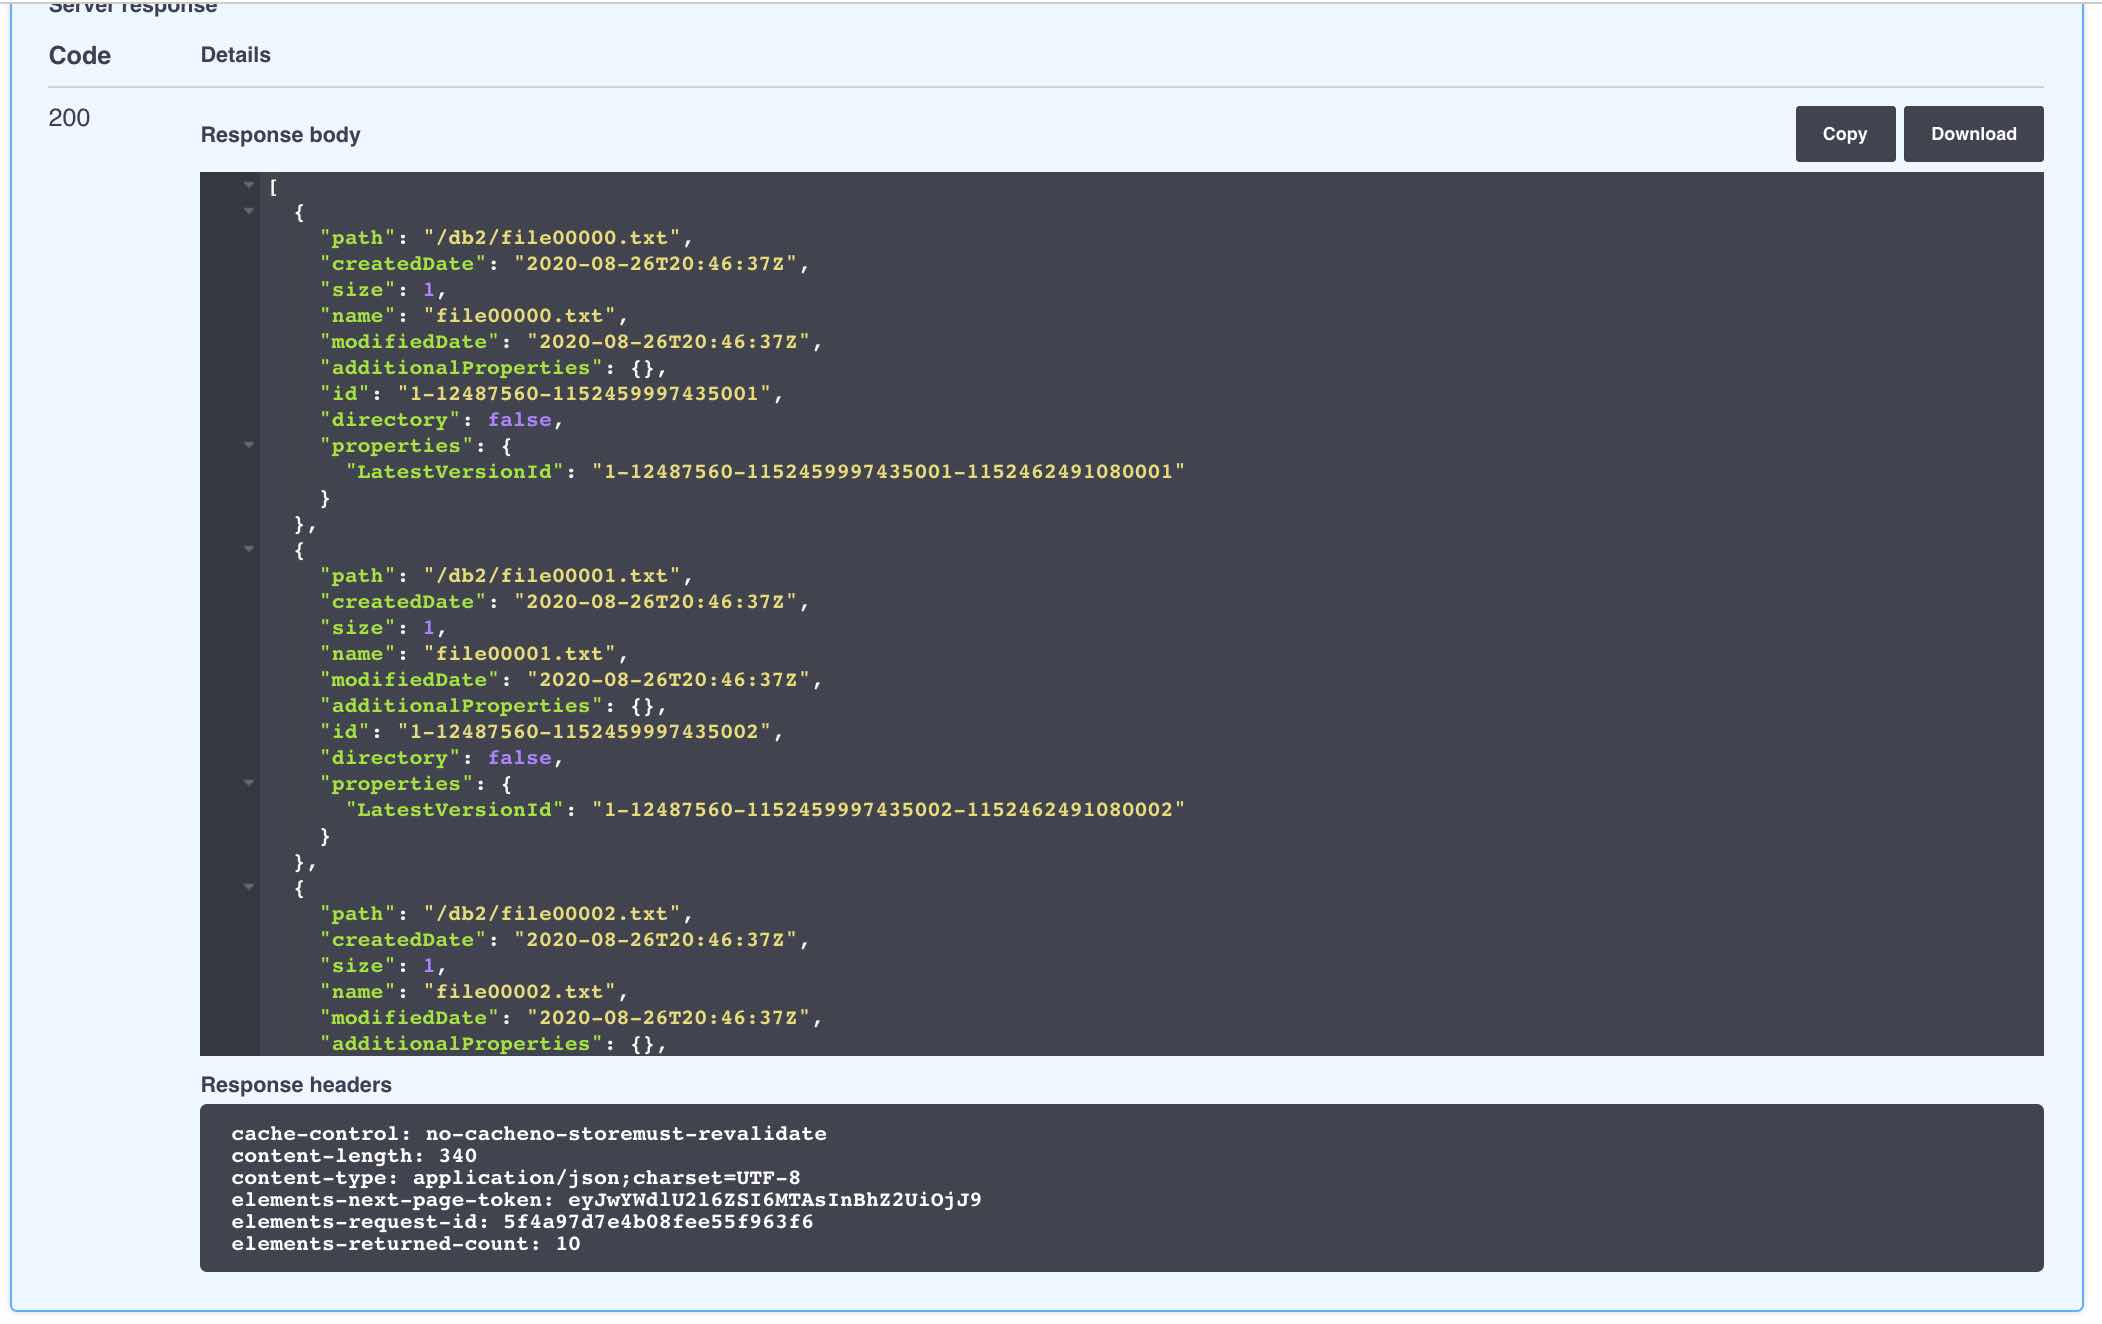
In the screenshots above, you can see that I set the pageSize to 10 and I retrieved 10 records as expected. Take a look at the response headers just below the response body:
cache-control: no-cacheno-storemust-revalidate
content-length: 340
content-type: application/json;charset=UTF-8
elements-next-page-token: eyJwYWdlU2l6ZSI6MTAsInBhZ2UiOjJ9
elements-request-id: 5f4a97d7e4b08fee55f963f6
elements-returned-count: 10
There are two items worth discussing here.
- The *elements-next-page-token* header. We can set the *nextPage* query parameter to this in a subsequent call to retrieve the next set of records.
- The *content-length* header. This tells you the response size in bytes. You can use this to determine the pagination requirements as they relate to the usage limits described above.
In the screenshots below, I set the nextPage query parameters to the elements-next-page-token response header value from the prior call above.
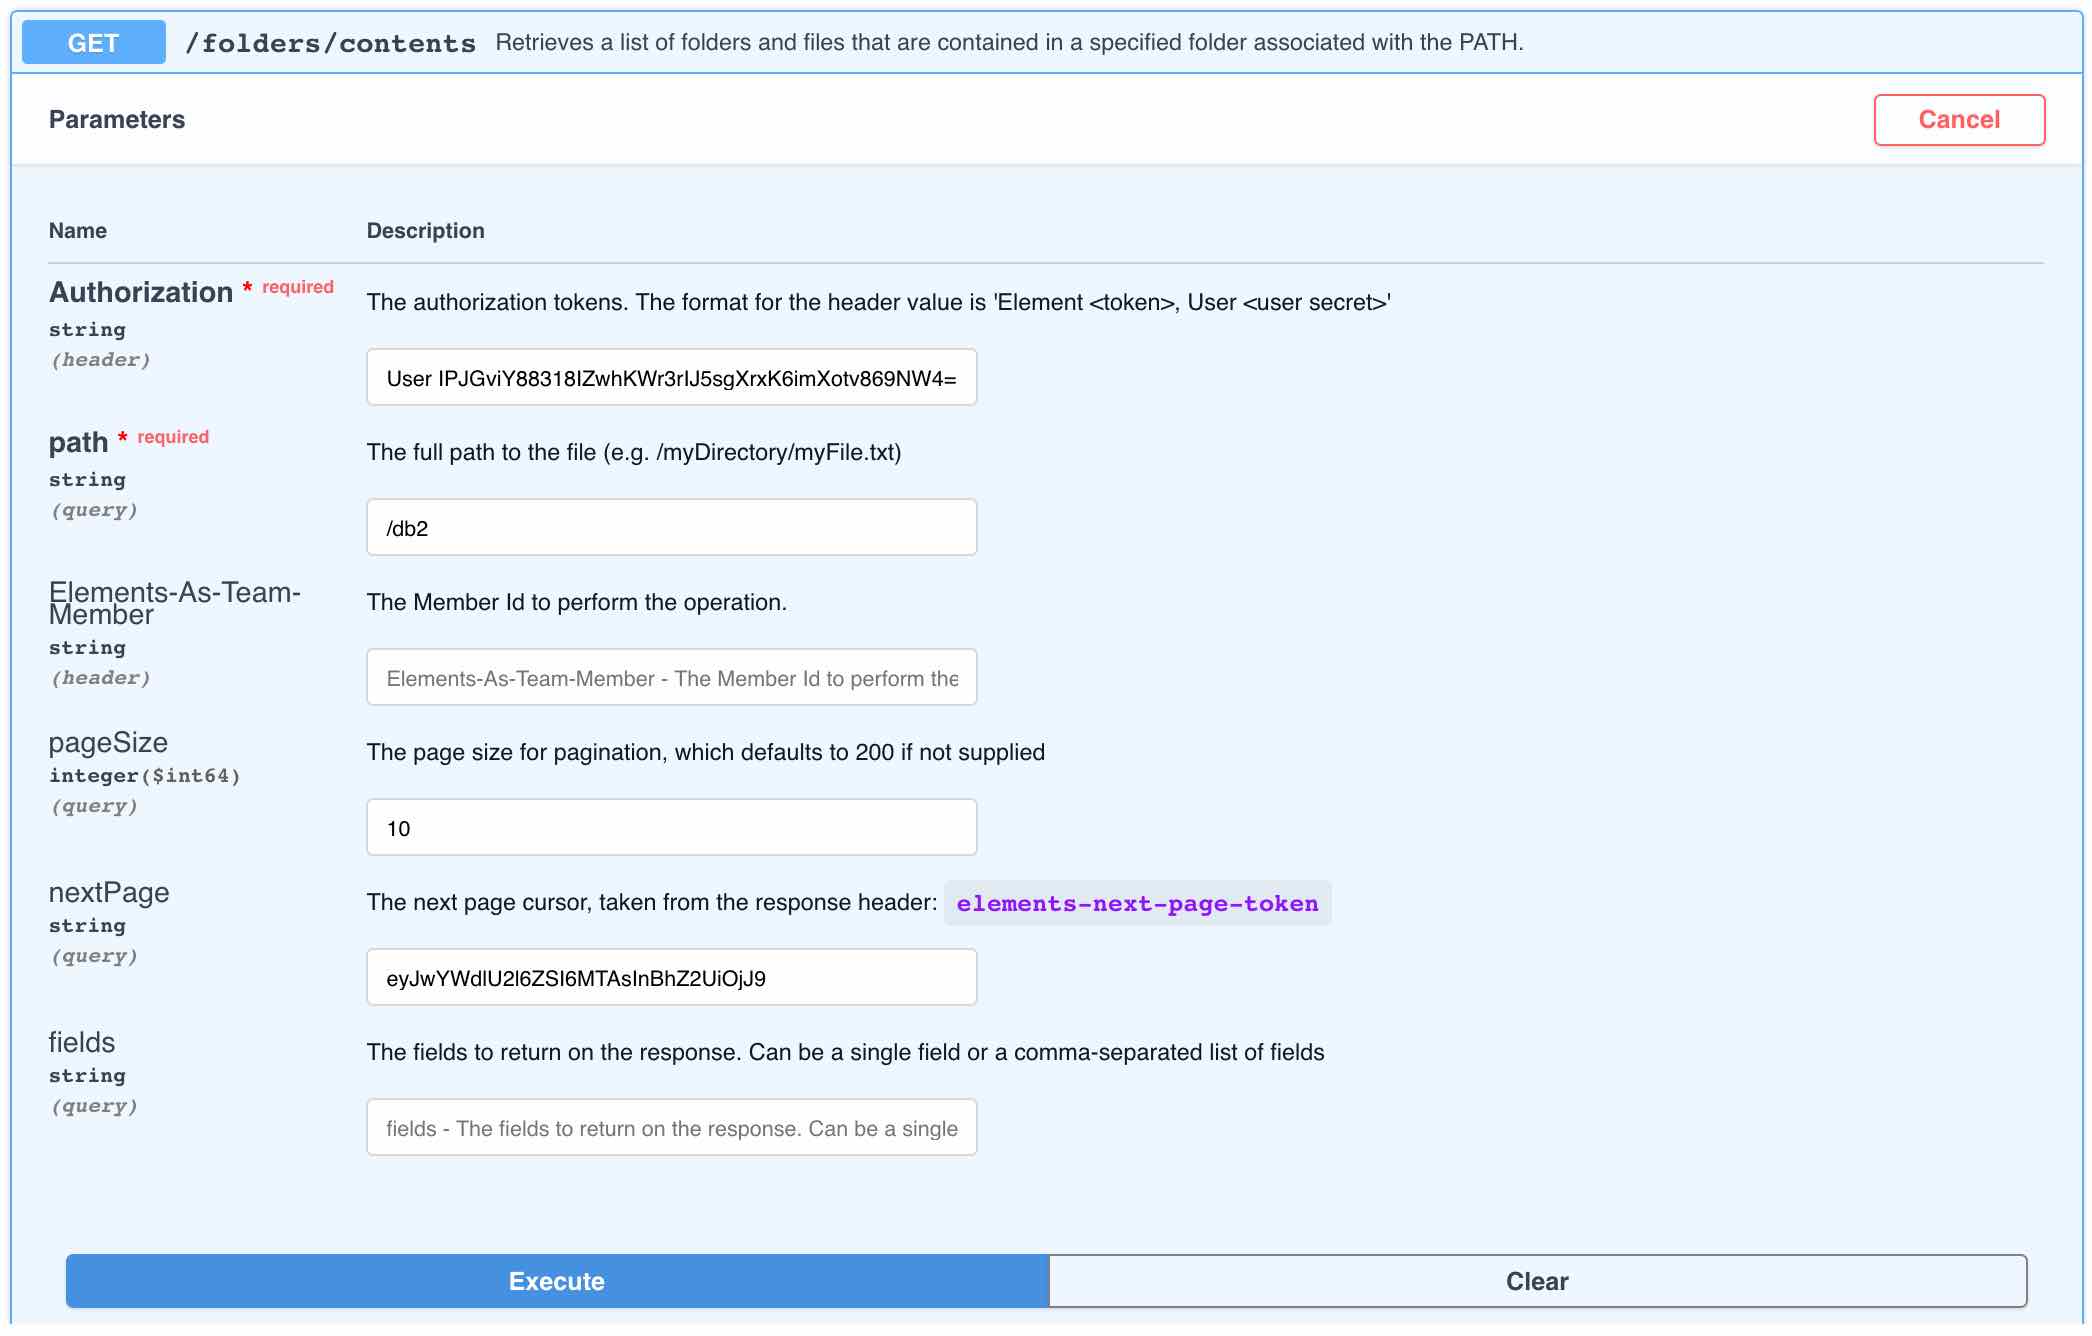
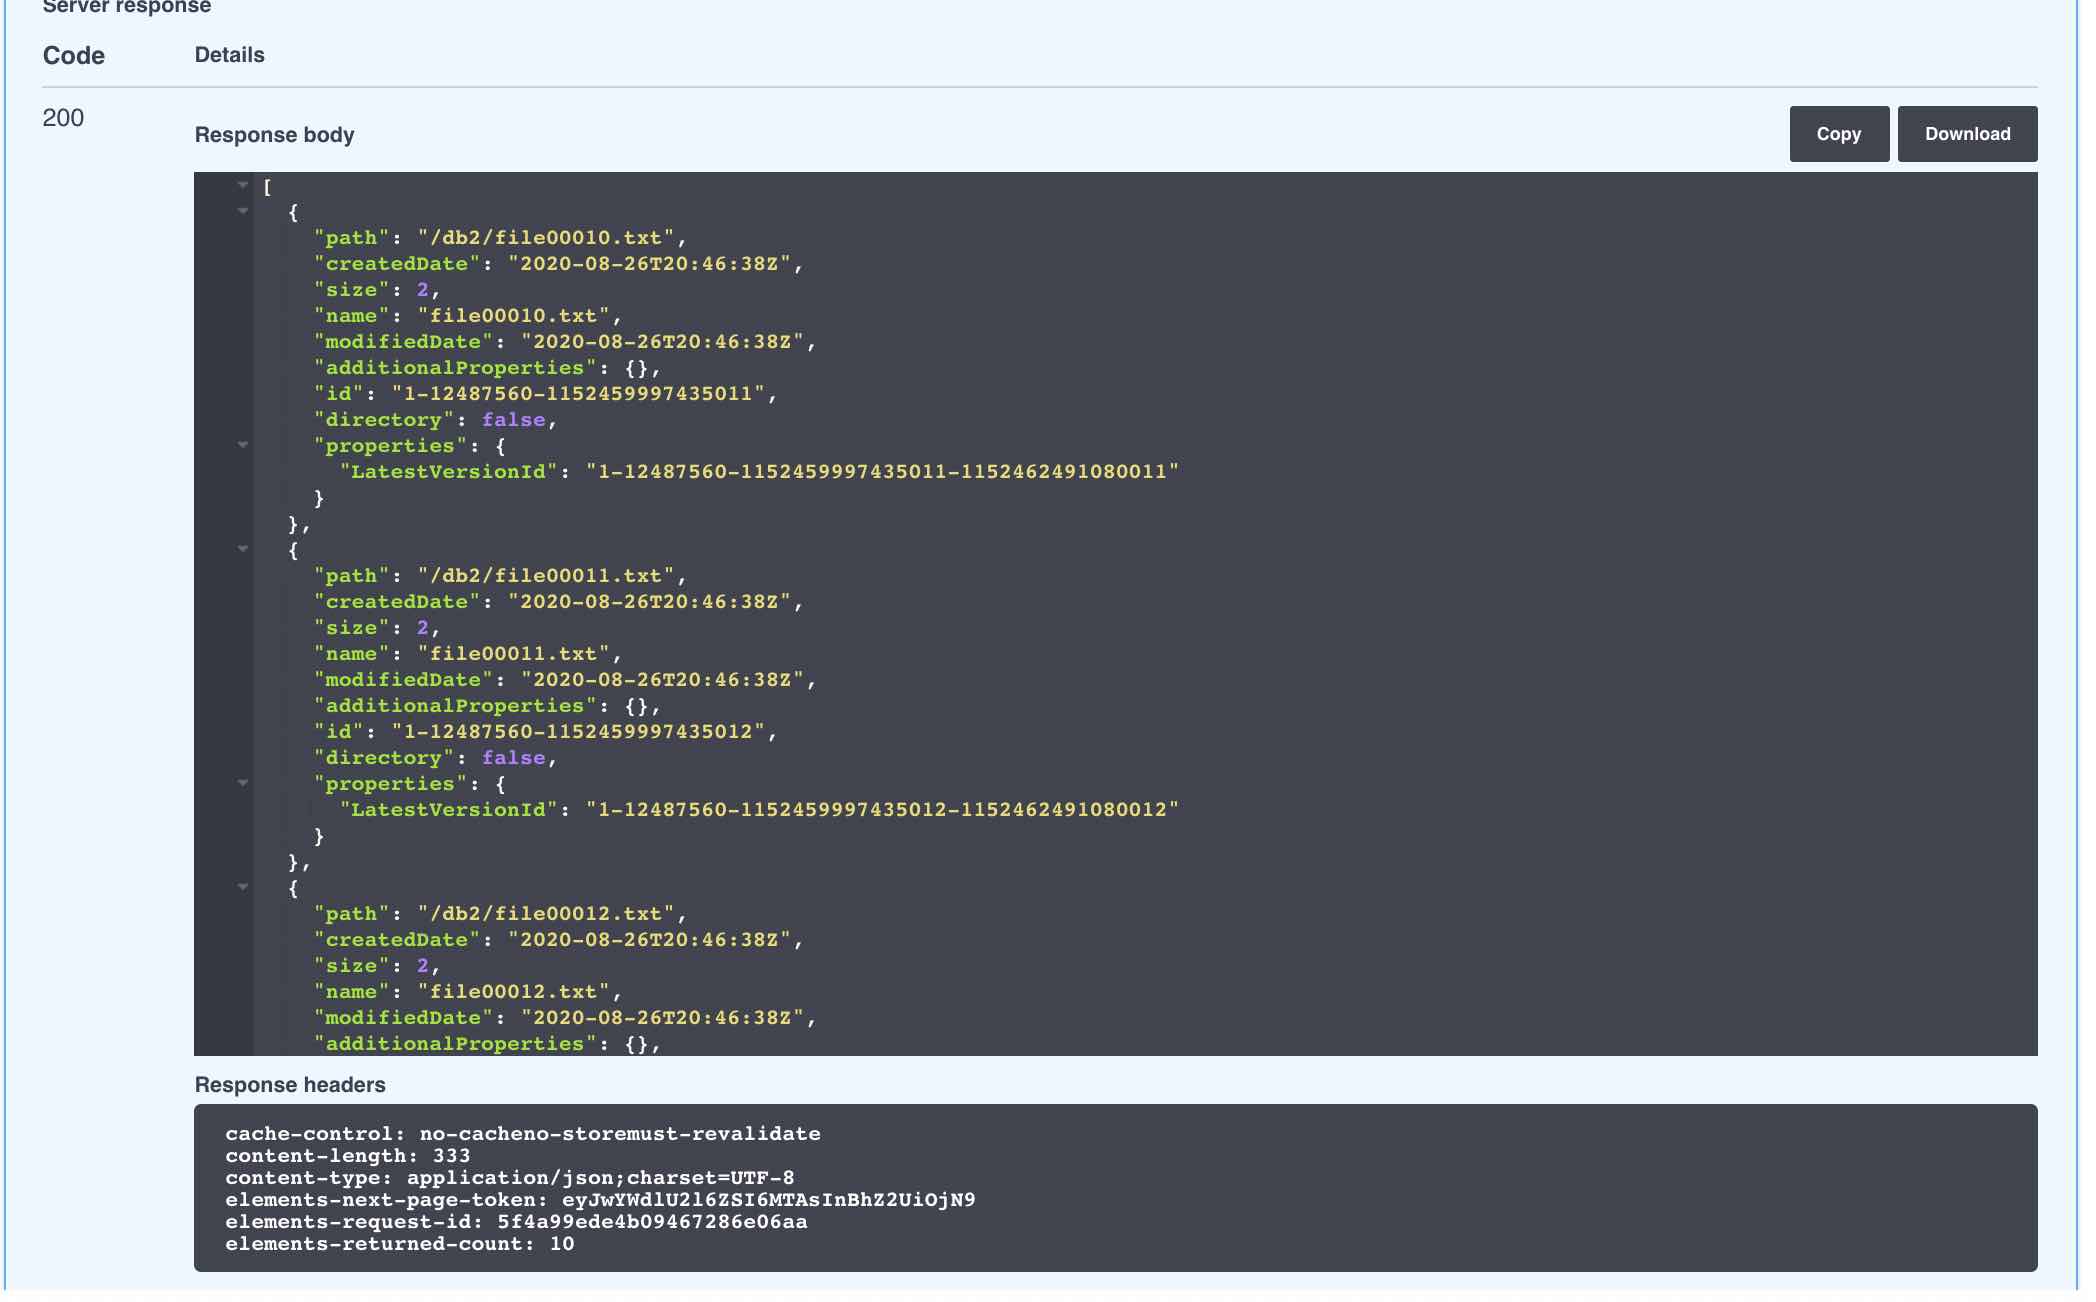
You can see from the screenshots above how I retrieved the second set of 10 records and a new elements-next-page-token header value.
Now that we can see how easy it is to implement pagination in the API docs, let’s try it in a flow.
Pagination in a Flow
The basic steps for implementing pagination in a flow are:
- Use a JS Script step to prepare for your Connector API Request step with the desired pageSize query parameter, and check if the Connector API Request step exists already in the step history, if so, set the *nextPage* query parameter to the *elements-next-page-token* header value
- Use the Connector API Request step to get the data using the query parameters from step #1
- Use retrieved data as desired
- When done, use a JS Filter step to check if the response to the Connector API Request step is non-empty (i.e. more data needs to be fetched)
- If non-empty, directly call the JS Script preparation step (#1 above) to prepare again to fetch the next page of data
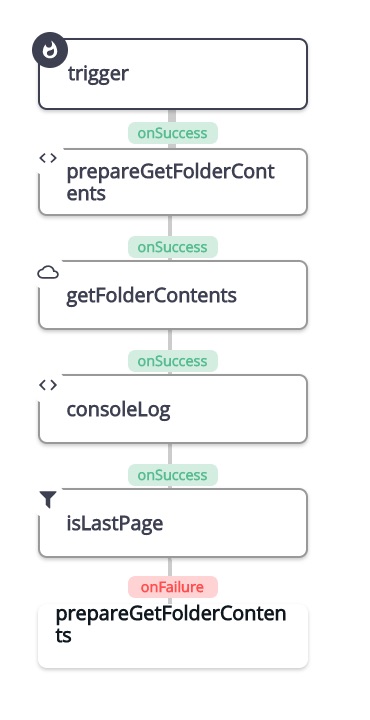
The test flow shown below implements the steps above:
You can download the flow here.
Step 1: prepareGetFolderContents JS Script Step
In this step we are preparing for the API Connector Request step by doing the following:
- Setting the URL
- Preparing the query parameters:
- Setting *pageSize* to 25
- Optionally setting *nextPage* to the *elements-next-page-token* header value IF *getFolderContents* had already been executed
- Setting the *path* value to the folder I want to get the contents of. Note that this is a required parameter of the Syncplicity /folders/contents API and has nothing to do with pagination).
The code is shown below:
let url = '/folders/contents';
let query = {};
query.pageSize = 25;
if (steps.getFolderContents) {
  query.nextPage = steps.getFolderContents.response.headers["elements-next-page-token"] || steps.getInvoices.response.headers["Elements-Next-Page-Token"];
}
query.path = '/db2'
done({url:url, query:query});
Step 2: getFolderContents Connector API Request Step
The getFolderContents Connector API Request step is shown below:
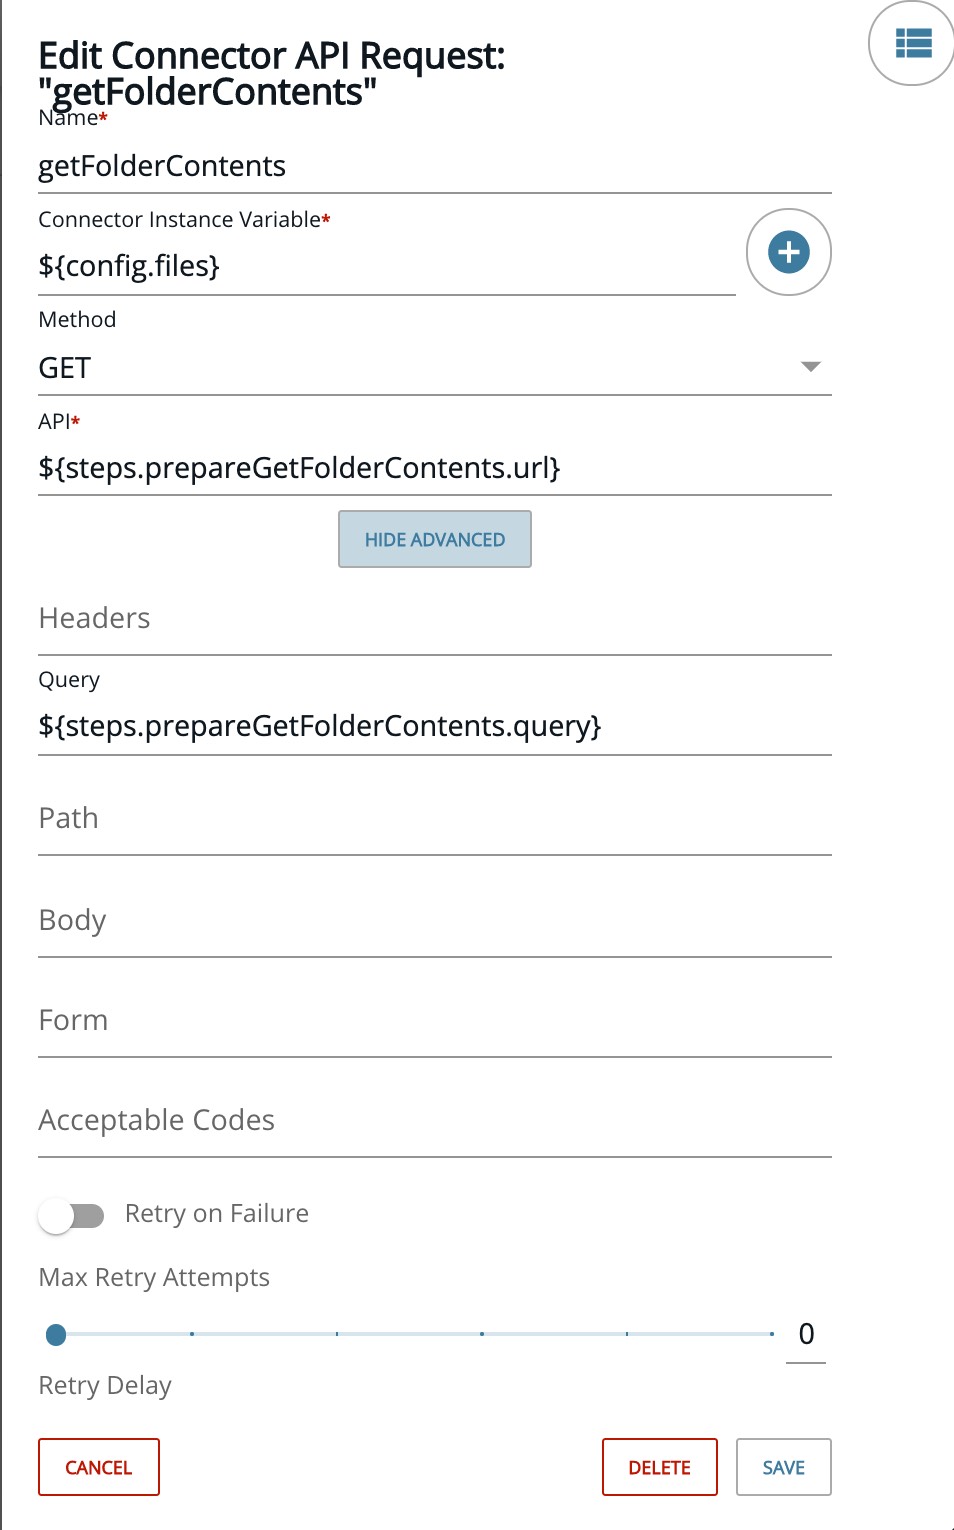
You can see that we are using the url and query from the prepareGetFolderContents step.
Step 3: Process Data
I am showing a consoleLog JS Script step, but here you would do something with the response data.
Step 4: isLastPage JS Filter (true/false) Step
When we are done processing the response data, we then use the isLastPage JS Filter step to check if the response to the Connector API Request is non-empty (i.e. more data needs to be fetched) as follows:
done(steps.getFolderContents.response.body.length === 0);
Step 5: Get the Next Page of Data
If the response to the Connector API Request is non-empty, we go back to the prepareGetFolderContents step to fetch the next page of data and repeat the entire process. We do this by adding prepareGetFolderContents to the On Failure output of the isLastPage step. This will repeat until you have retrieved all the data, one page at a time.
Note: If the response to the Connector API Request is empty we can continue on in the flow.
Trigger Your Flow
Trigger your flow and view the executions to see the pagination in action as shown below:

Summary
In this blog post, we showed how to use the pagination features of the Integration Builder Connectors. We performed pagination via the API docs to understand how the pageSize and nextPage query parameters are used together with the elements-next-page-token response header value. Then we implemented this programmatically in a simple flow.
Learn how to authenticate a Gmail connector with the Integration Builder.

