

As mentioned in part two of this blog series, modernizing legacy applications to integrate with a modern Event-Driven architecture can be difficult. Digital Evolution by its very nature is disruptive, but working better together, Axway and Solace can help. In part two we explored enhancing a message to integrate with Solace via the REST Client. In this article, we will look at integrating with the JMS Client, which may be a more widely adopted flow in enterprises today.
Currently, I plan for this to a five-part blog series covering the following topics:
- Getting Started with Solace’s REST Client
- Enhancing Legacy Messages – Axway API Gateway and Solace REST Client
- Enhancing Legacy Messages – Axway API Gateway and Solace JMS Client
- Integrating 3rd Party Cloud Apps – Axway Application Integration and Solace
- Evolving Request/Response APIs to Events – Axway Streams and Solace
Axway APIM + the Solace MQ Client Overview
In this portion of the blog post, we will be looking at taking a standard request message and transforming it so it can be integrated into the Solace Event Broker in the API Gateway via JMS. Previously I showed how we could do this with their REST Client, but more customers are using message queue type integrations with Solace today. To do this, we will use Postman as a client to POST a JSON message to the API Gateway. The API Gateway will parse the message to extract a key-value pair that can be used as the Topic. The API Gateway will then dynamically publish the message to the appropriate Solace Event JMS topic queue.
Prerequisite Knowledge
- A basic understanding of creating policies in the API Gateway Policy Studio.
- A basic understanding of using Postman, or a similar client.
Configure Solace to Listen for Your JMS Message
- Log into Solace:https://console.solace.cloud/
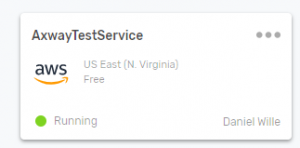
- Navigate to “Messaging Services” on the left-hand menu bar and select your instance.
- Go to “Connect” on the top menu and expand Solace Messaging. You will need to capture your Username, Password, Message VPN and SMF Host.
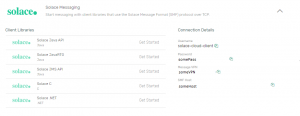
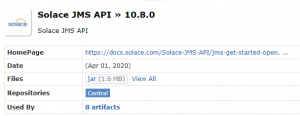
- Select “Get Started” next to the Solace JMS API. Click the “Download” button in the top right-hand corner of the new dialog. This will take you to the Solace JMS repo. Click the version you wish to use (my testing was with 10.8.0), then download the JAR file on the next screen. We will add this to the APIGW later to connect to the Solace JMS.
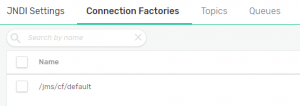
- Select “Manage Service” from the top right-hand menu in the Solace Console. Click on “JMS JNDI” on the left-hand side, then navigate to “Connection Factories” using the top menu. Listed here should be your JNDI factory name. Note this for later use.
- Select a Topic name you will use for testing. Capture this Topic Namefor later use.
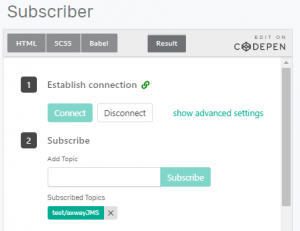
- Navigate to “Try Me” on the top menu bar. Select “Connect” on the Subscriber. Add a Topic which you want to monitor. Remember the Greater Than (>) sign can be used to capture everything. For this demo, I wanted to limit the Topics being monitored to ensure everything worked as intended. I choose “test/axwayJMS” as my Topic and select the “Subscribe” button.
You should now be Subscribed to a queue which will display messages in real-time as they are delivered to the Solace Event Broker. You should have captured your SMF Host, VPN, Username, Password, JNDI factory, and Topic Name for use in the next section. You should also have downloaded the Solace JMS JAR.
Configure the API Gateway
- Construct a sample message that will be used later to POST a request to the API Gateway from the Postman client. For my testing, I used the following JSON message.
Sample JSON Message
| { “content”: “body”, “topic”: “test/axwayJMS” } |
- Install your JMS JAR file in the APIGW/ext/lib folder. More information on this can be found in the “Configure Messaging” topic of the API Gateway docs (Configure messaging services).
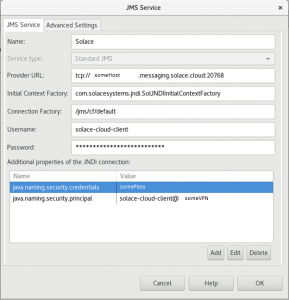
- Open your project in Policy Studio. Navigate to Environment Configuration –> External Connections –> JMS Services. Right Click and choose to “Add a JMS Service”. Aside from the standard Axway JMS configuration, you will need to add a few custom JNDI properties for the Solace to consume as well. Configure as follows:
- Name: Alias, your choice. I used “Solace”.
- Service Type: Standard JMS
- Provider URL: Use your SMF hostname here. The format should be – tcp://host:port
- Initial Context Factory: com.solacesystems.jndi.SolJNDIInitialContextFactory
- Connection Factory: This is your JNDI Factory from earlier. Default is /jms/cf/default.
- Username: Your Solace Username. The default is solace-cloud-client.
- Password: The password you captured earlier.
- Additional JNDI Properties – to connect to Solace you must add two properties.
- Name: java.naming.security.credentials, Value: Your Password.
- Name java.naming.security.principal, Value: username@VPN
- Ensure your JMS Service setup looks similar to mine. Note: While the standard password field is obfuscated, the properties fields are not. You may be able to environmentalize these fields in env.conf for a more secure and dynamic configuration.
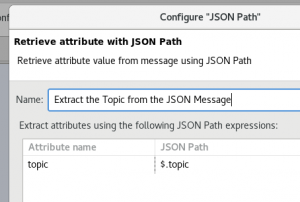
- Create a new policy. Drag and drop a “JSON Path” filter. We will use this to extract the topic from our sample message. Configure it to extract the appropriate value from the message. For my sample, I use the JSON Path “$.topic” and store it to the variable “topic”. This will dynamically parse any inbound message to this policy with that JSON path and assign that value to the topic variable. In my sample message, this is “text/axwayJMS”, which also corresponds to the Topic I subscribed to in the Solace console.
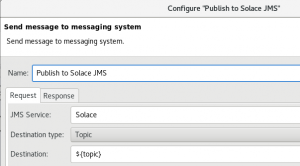
- Drag a “Send to JMS” filter onto the work area as a successful step in the flow. Set it up as follows:
- Name: Up to you. I called mine “Solace”.
- Destination Type: Topic
- Destination: We will use the “topic” variable we extracted from the JSON message as described above.
- All other fields can remain with their default values.
- Ensure your Send to JMS filter looks similar to mine:
- Drag a “Send to JMS” filter onto the work area as a successful step in the flow. Set it up as follows:
- Ensure your policy looks similar to mine:
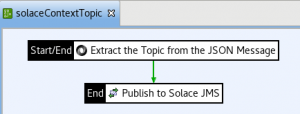
- Add a relative path to the policy and deploy it to your API Gateway instance. I used “/solace/jms”.
At this point, you should have a basic APIGW policy that can extract a topic from an inbound message and dynamically route it to the appropriate Solace JMS queue. Instead of extracting it from the message, you could get it from a query parameter, HTTP Header, or even look at the message context (e.g. app name, organization, API endpoint, etc.) and maintain a topic mapping list to use. This is just a basic example of one way this could work.
Test the policy with Postman
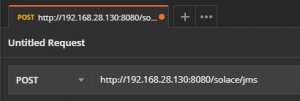
- Open Postman and create a new request. Set it to POST and add your APIGW URL with relative path information for routing that you set up in the last step of the last section.
- Navigate to the Body tab. Add your sample JSON message and change the content-type to JSON.
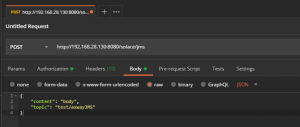
- Click the Send button to POST your message to the API Gateway, which should parse the message for the topic (text/axwayJMS), and route it to the appropriate Solace JMS queue.
- Check the API Gateway Manager JMS Server Traffic. You should see your message has been successfully processed.

- Navigate back to the Solace Console “Try Me!” tab. Your message should be displayed here in the Subscribed Topic queue:

Conclusion
This post showed how we can enhance and transform a message to integrate with the Solace Event Broker via JMS. A similar policy could be used as a Routing or perhaps Response policy in API Manager to easily enhance an existing API to work with the Solace Event Broker.
In my next post, I plan to take a third-party application (Service Now), enable Event Polling with the Axway Integration Builder iPaaS, and Publish new Incident Events to a Solace Event Queue, to which an application could then Subscribe. Similar flows could be used forth third-party applications like Salesforce on new leads for example, or any other such Webhook or Event Polling type scenario.
Learn how to Get Started with Solace’s REST Client.