TIBCO Cloud Mashery provides a complete set of tools that covers the entire API lifecycle to manage efficiently your digital business strategy. The API creation will help you connect your APIs to any on-premise or cloud data source and provide you with a powerful routing and transformation tool to define flows with API choreography. The API portal will assist you in your API monetization providing the ability to define API packages and offering while removing barriers to adoption of your API ecosystem including developers and partners. The API Gateway will enable flexible deployment options: Cloud, On-premise or Hybrid without compromise on security. If you want to know more, please visit the site.
Streamdata.io provides a Proxy-as-a-Service, which turns any API into a real-time experience, without requiring server-side code. Streamdata.io’s proxy polls APIs, caches responses and pushes incremental updates to servers, applications and devices, allowing the focus to be on user experience as well as reducing the server load and preventing scalability issues.
This blog post provides you with a step-by-step tutorial to guide you through the steps of streaming an API hosted by TIBCO Cloud Mashery using Streamdata.io.
1. Create a new API
If you are not a TIBCO Cloud Mashery user yet, you can subscribe to a free trial here.
Let’s start by creating an API in Mashery. In Mashery Control Center, click on Design > APIs
You should see some default APIs listed as below.
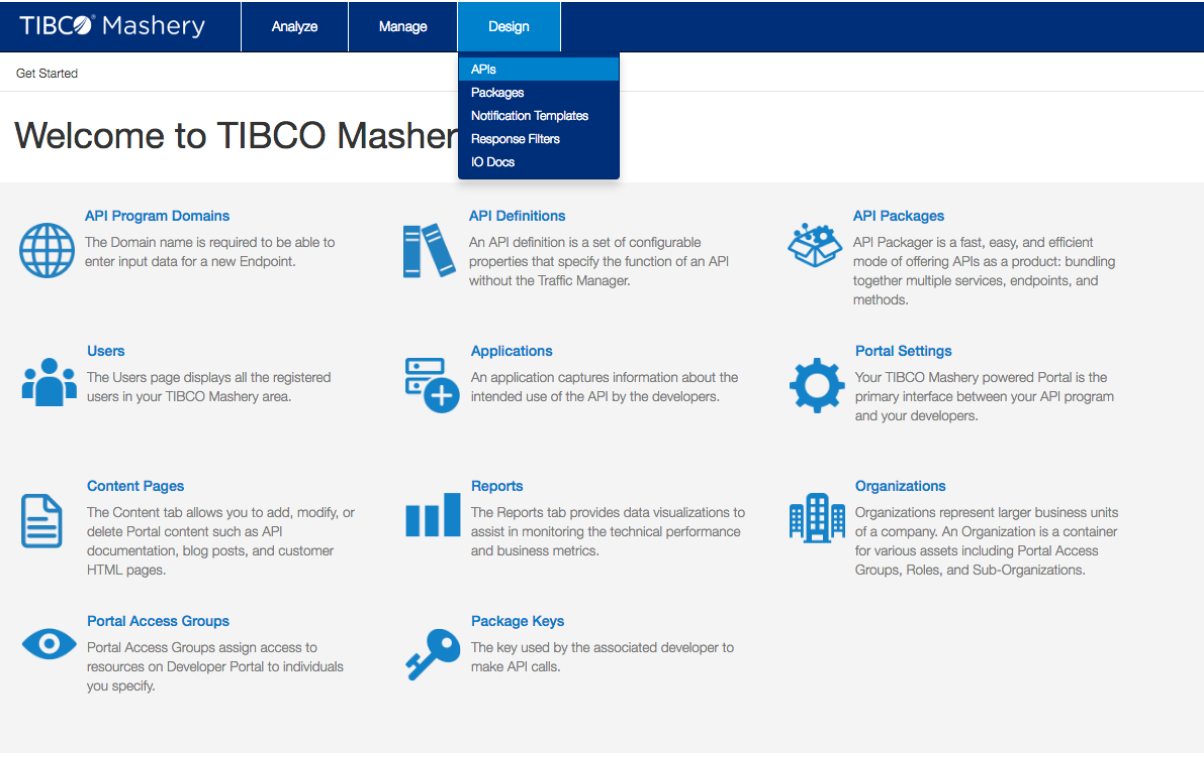

Let’s now create a new entry by clicking on the plus button on the top right corner. This will bring you to a simple creation form.
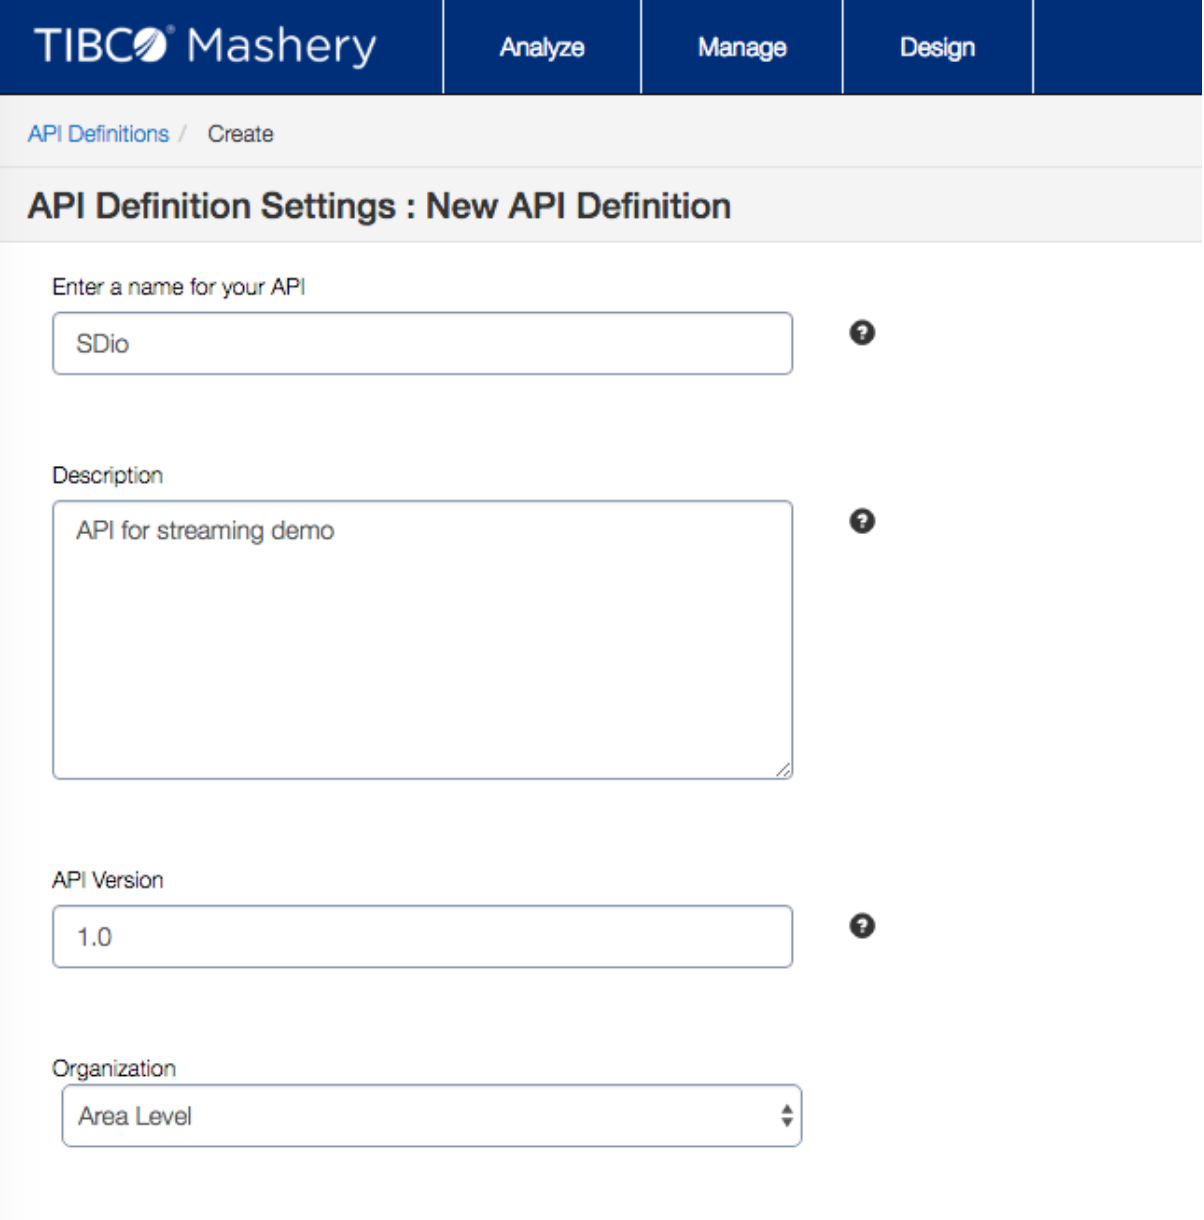
Fill up the form with the required information as above, then click Create.
Note: If your API is going to be updated or modified, versioning ensures a clear distinction between the old and new versions. This is useful to help developers efficiently migrate from one version to the other.
If you have organizational management enabled…
2. Create Your First Resource Endpoint
Once your API is successfully created, you will be invited to create your first Resource Endpoint

Click on “Create your First Resource Endpoint.”
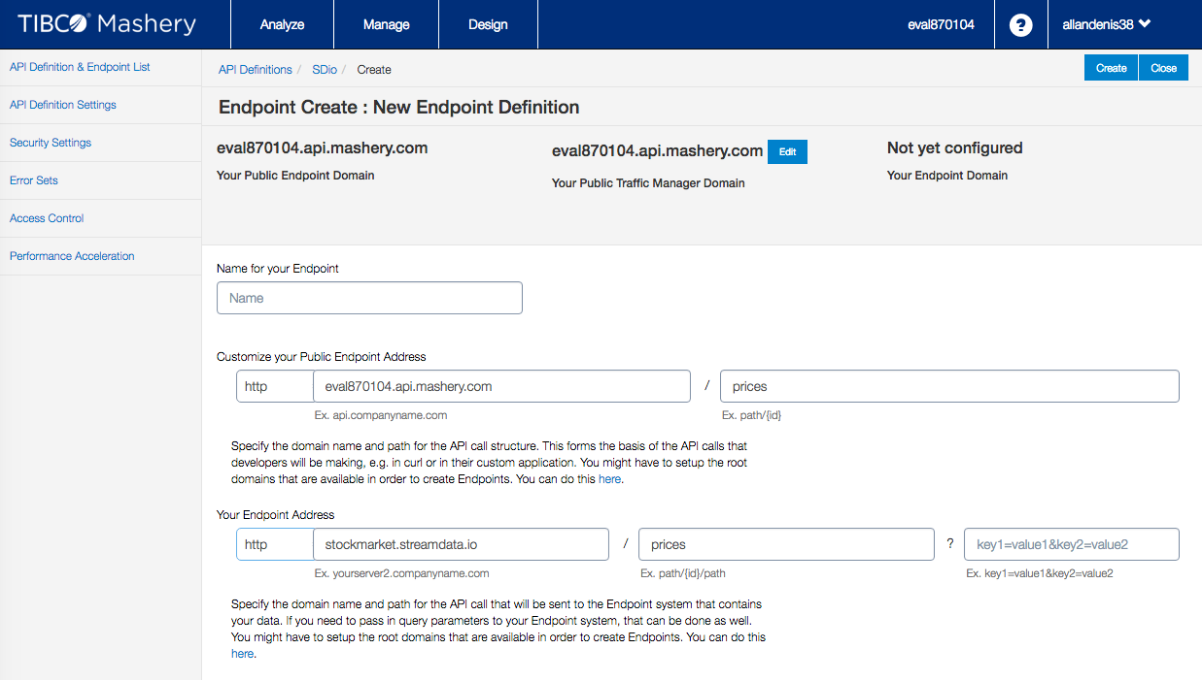
The form will allow you to customize both the Public Endpoint (the one requested by developers) and the Endpoint address (the one containing the data to be exposed).
Important: The domains used to reach your endpoints must be whitelisted. Make sure to add your domain to the Mashery Domain list (Menu Manage > Domains). Once added, your domain will appear with status “pending.” Wait until Mashery’s support team activate it. If your domain is not whitelisted, the creation process will end with error Domain “stockmarket.streamdata.io” is not whitelisted.
For this tutorial, we will be using a public API hosted by Streamdata.io which randomly generates data each time it is called. This API can be reached using the following URL:
You can test it using a browser or a simple cURL command:
You should get a response like this.
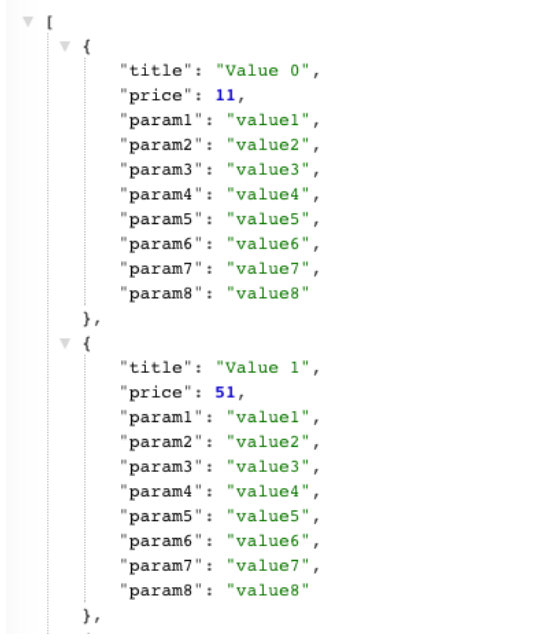
If not, feel free to contact: support@streamdata.io.
Once your Resource is successfully created, you should see it listed under API Endpoint Definition as below.
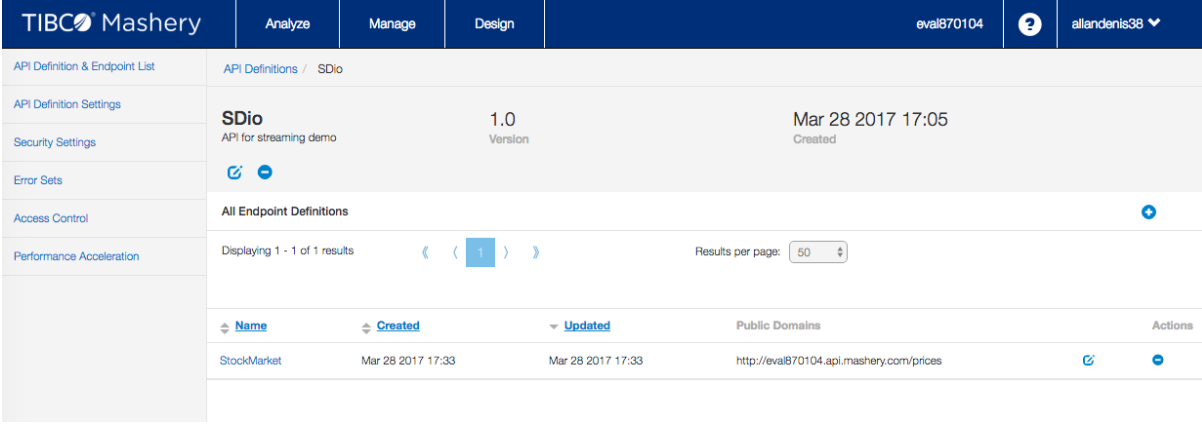
Now, try to test your newly created API using its Public Domain, you should get a HTTP 403 (Forbidden) with an error of type Developer Inactive. At this point, this is the expected behavior because our API is not part of any plan yet and we did not provide any API Key upon request.
3. Different Configuration Options
Let’s go through the different configuration options. First click on “Key & Method Detection” in the left menu. We will configure our endpoint to be REST and support GET only.
We will use an API Key to identify the incoming requests. The developers will have to provide it either as a query parameter or within the request body using API key field. Once setup is done, click Save.
Mashery provides multiple methods and a layer of authentication and authorization for the protection of published APIs. These include standards like SSL-TLS, Oauth2, JWT, XML signatures, WS-I, HMAC and more, plus flexibility for rules and context-based authorization.
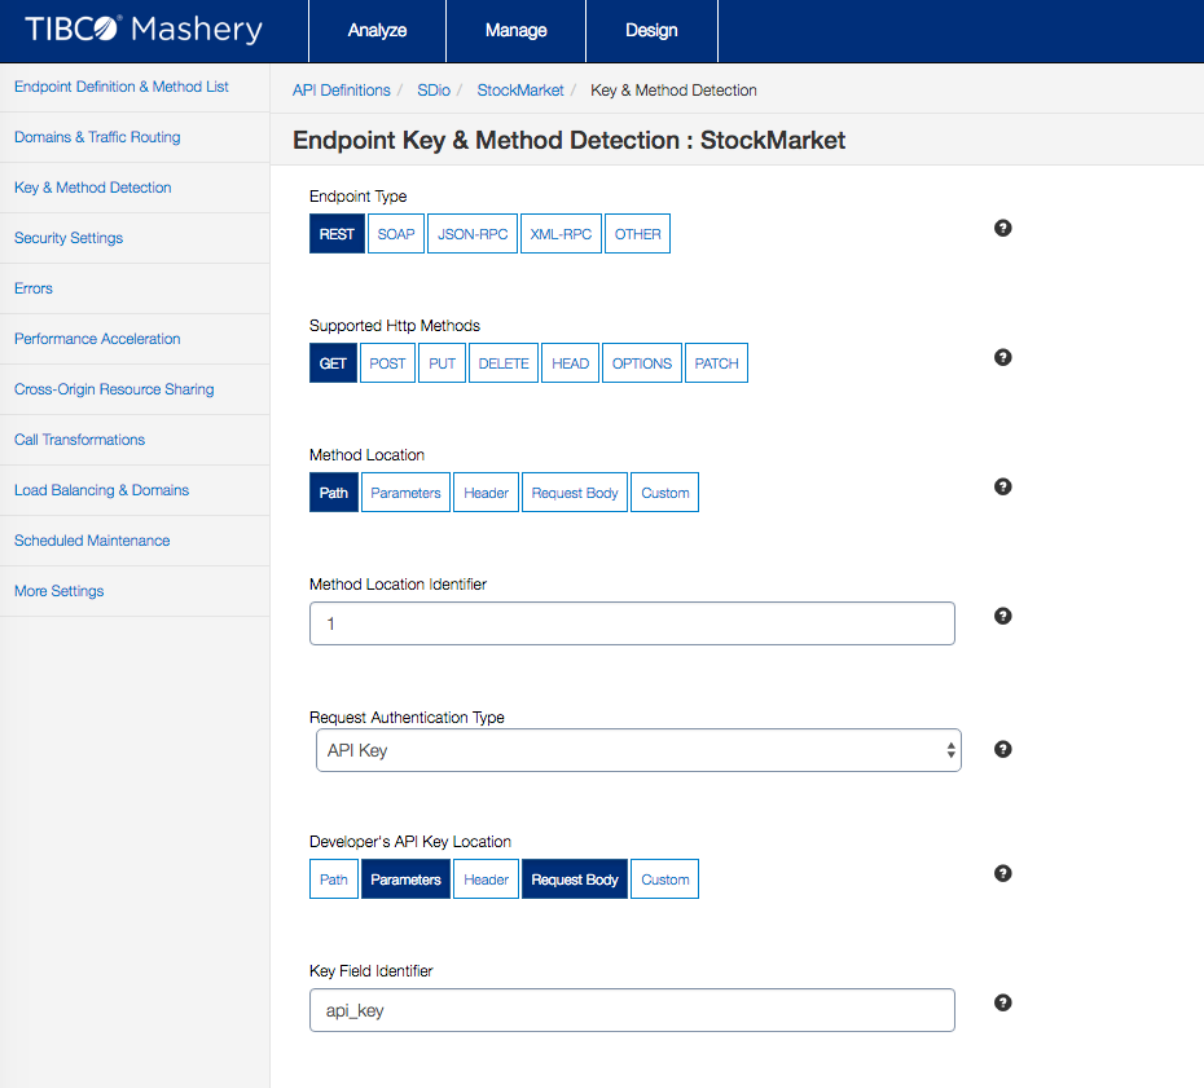
Have a look at the other sub-menu entries to get an idea about the different configuration options offered by Mashery. For this tutorial, we will keep the other options in their default settings.
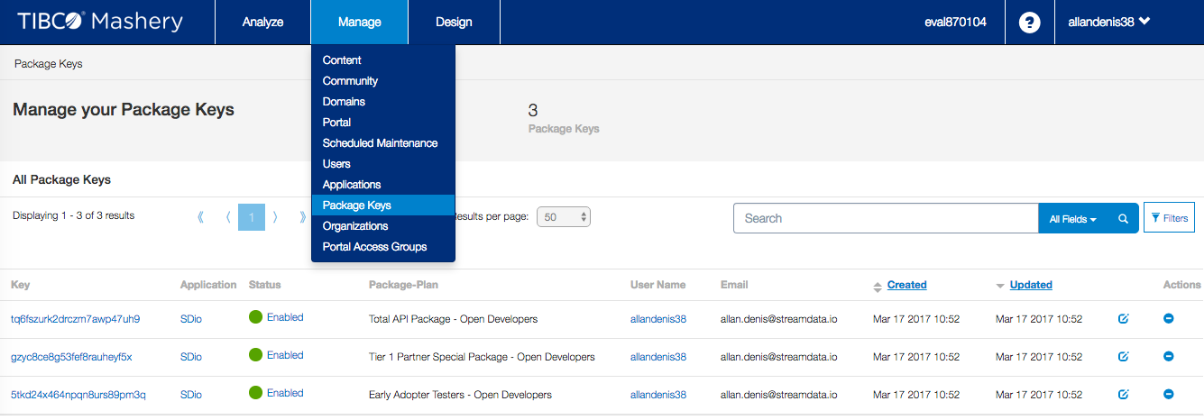
We are reaching the last step of your API configuration. We need now to include our API into a package to enable access. Go to Manage > Package Keys. You should see the default package listed below representing different Plan each associated with a key.
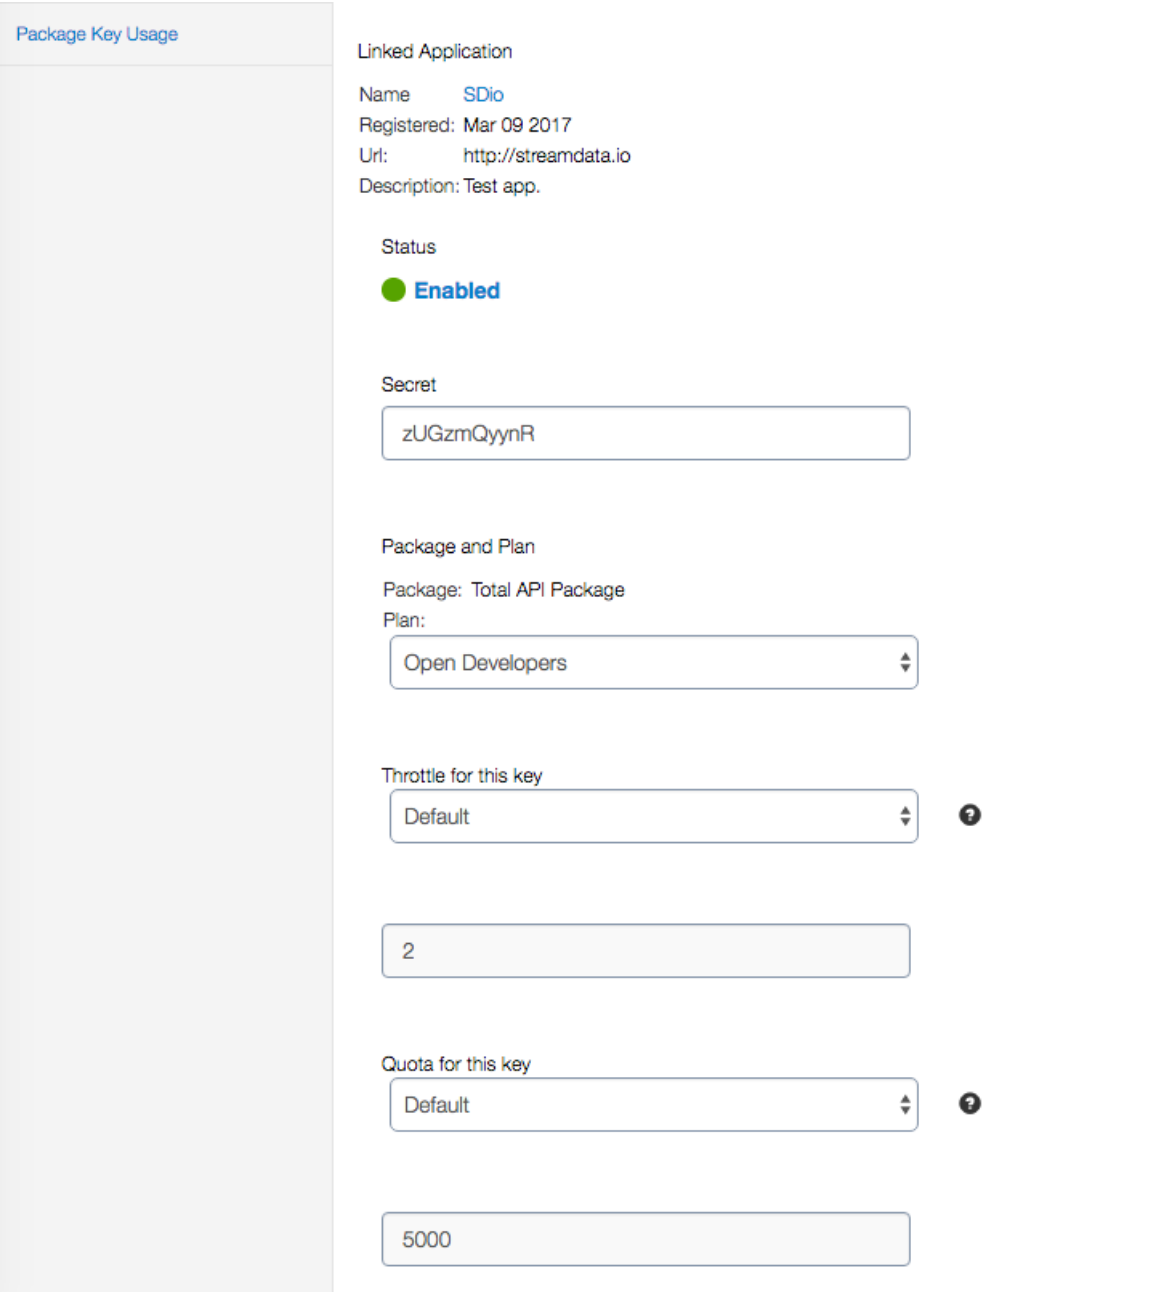
Click on a key to display the detailed information. This will bring you to a form where you can specify the throttling option and the Quota. You can keep the configuration as-is.
4. Add Your Newly Created API to the Plan
We must now add our newly created API to the plan. To do so, go to Design > Packages.
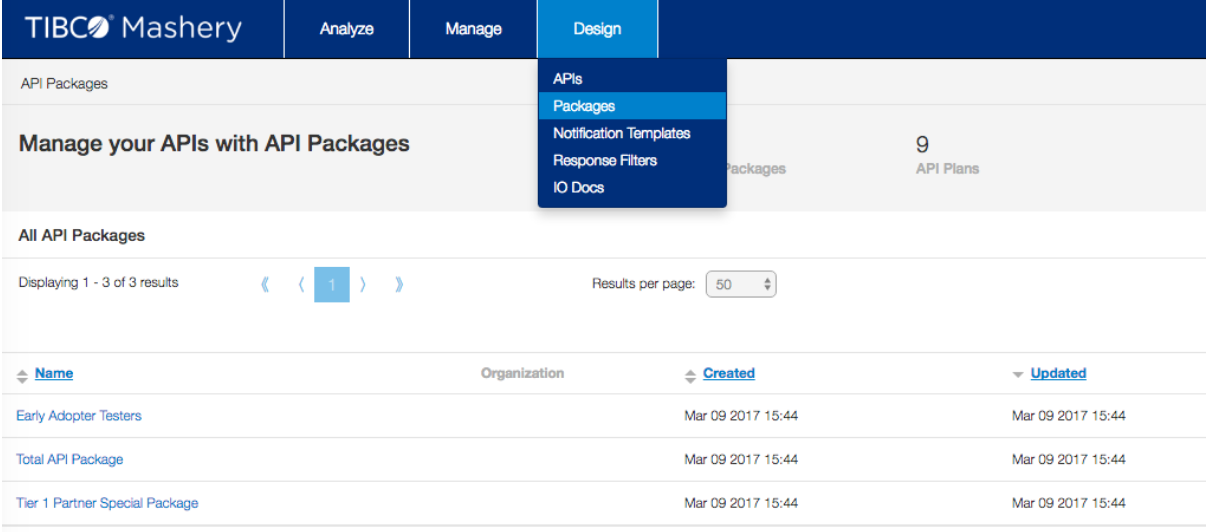
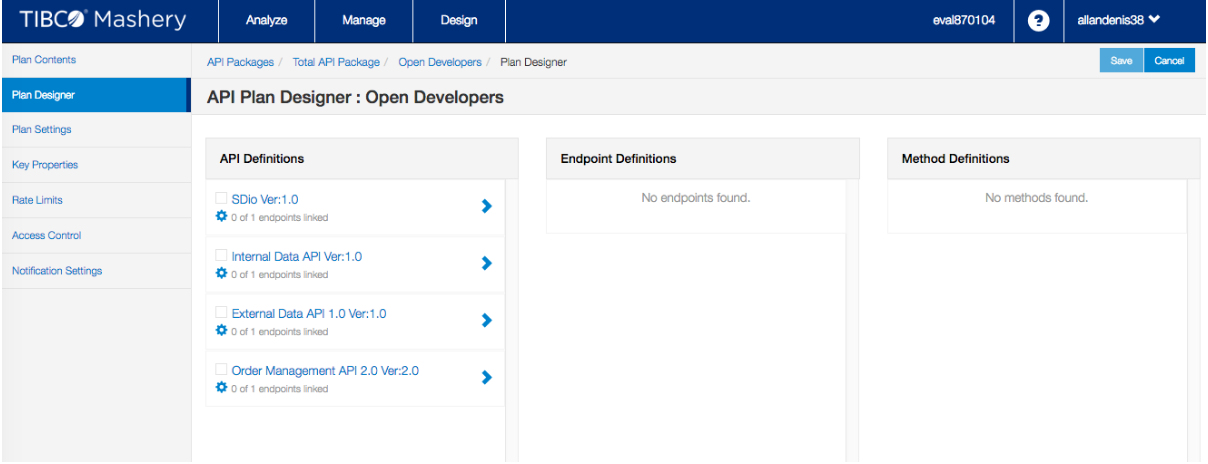
Click on an API packages (e.g. Total API Package), then click on one of the Plans (e.g. Open Developers) and finally select Plan Designer menu entry on the left panel. This will bring you to the following configuration dashboard:
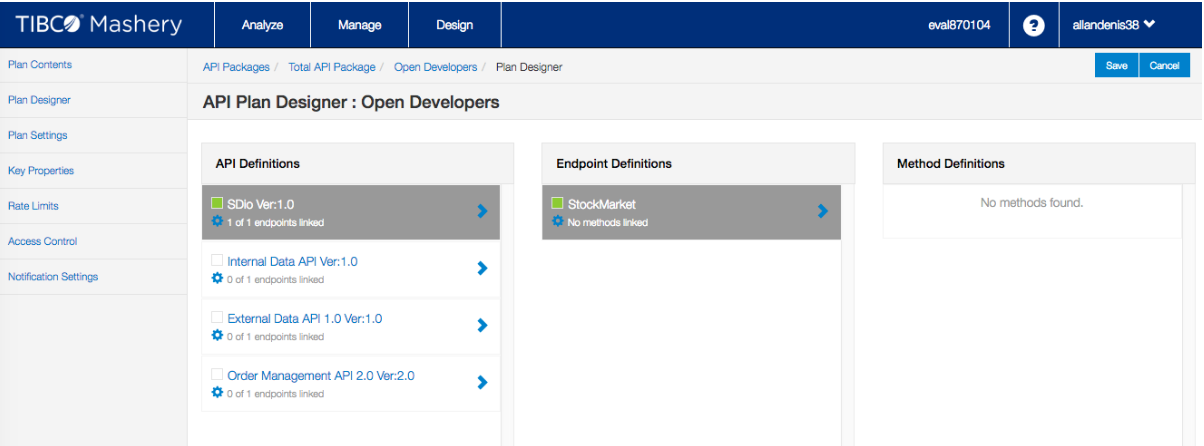
Click on your API listed in the API definitions tab and make sure your endpoint is listed in Endpoint Definitions tab, both should appear checked in green as below:
You can now test your API. Make sure to use the correct key. You can double-check the key corresponding to the Package-plan you have just configured in menu Manage > Package Key.
curl http://<your-eval-subdomain>.api.mashery.com/prices?api_key=<YOUR-KEY>
It works! You should now receive the same kind of randomly generated Json-content seen previously.
5. Stream Your API
Now that we have a working API let’s stream it using Streamdata.io. If you are not a streamdata.io user yet, you can quickly create a free account here.
Once successfully registered, you will have access to your dashboard provisioned with a default app.
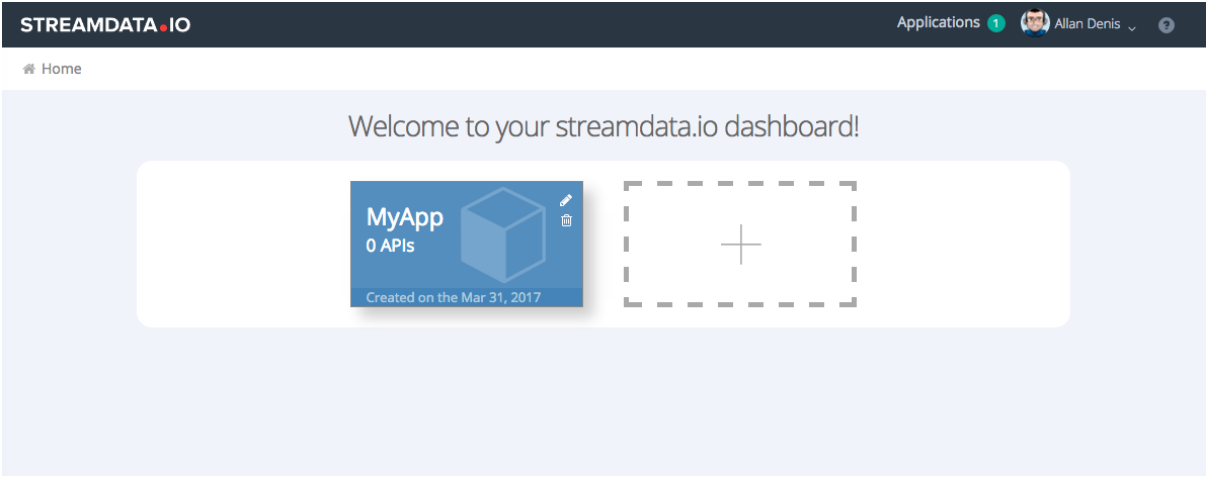
Click on the MyApp card. It will take you to a getting started page where you can make a first test using cURL and that provides you a quick access to the different client libraries & demo to integrate real-time streaming in your application.
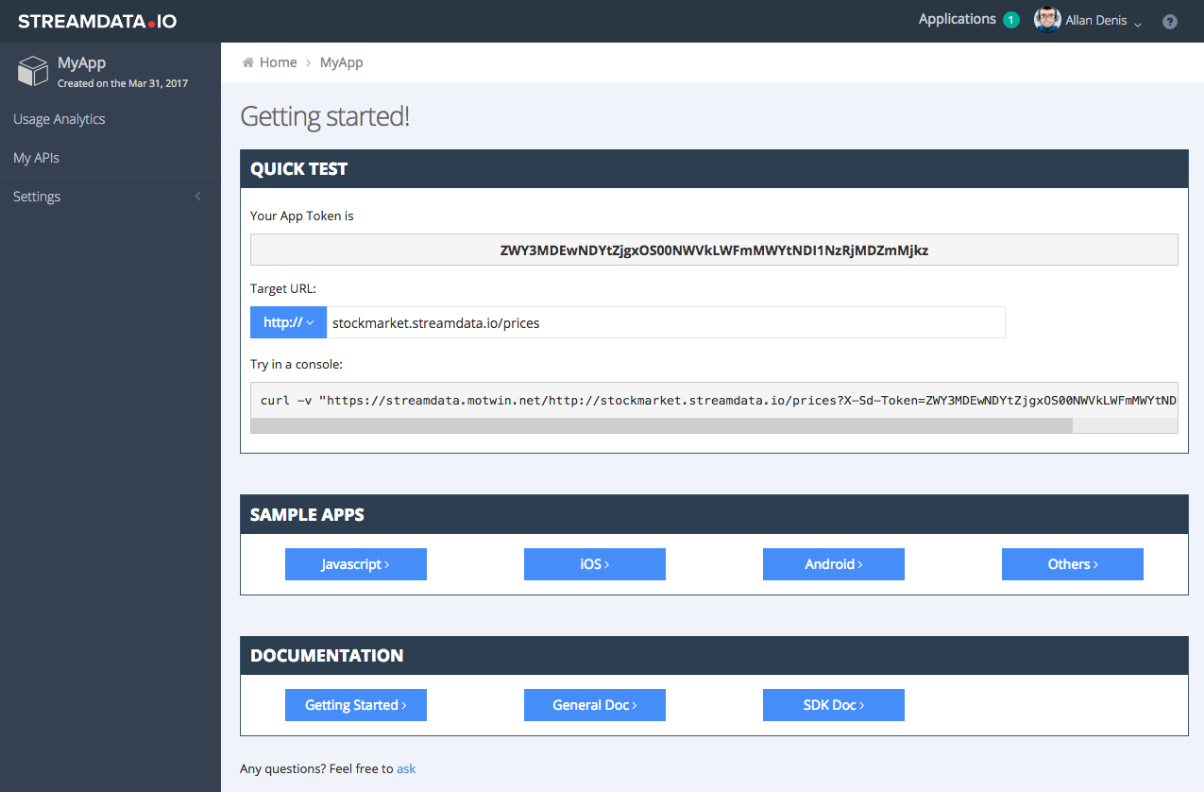
Go to My APIs by clicking on the left menu entry. It should be empty, so let’s auto-provision an API by running the cURL request provided in the getting started guide.
Once done, you should see a first entry like this:
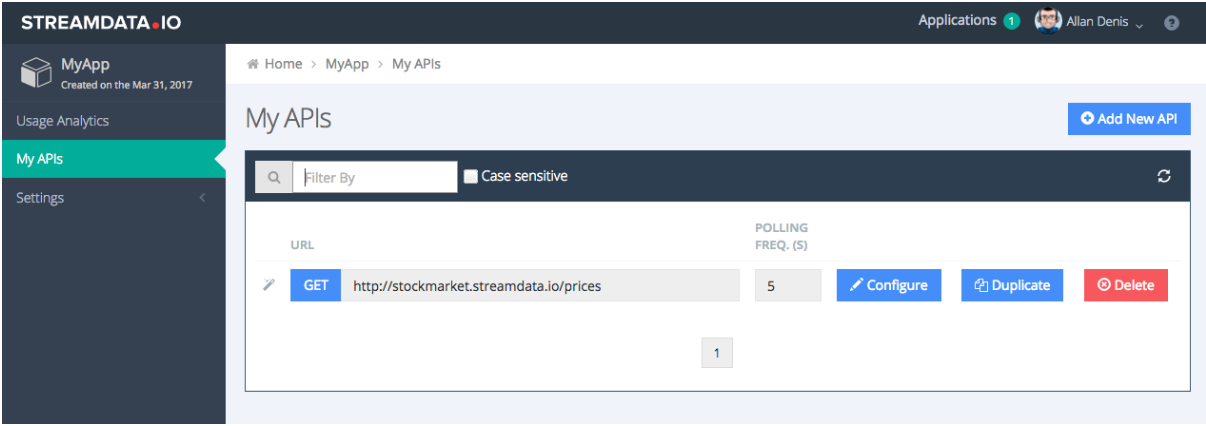
Click on Configure.
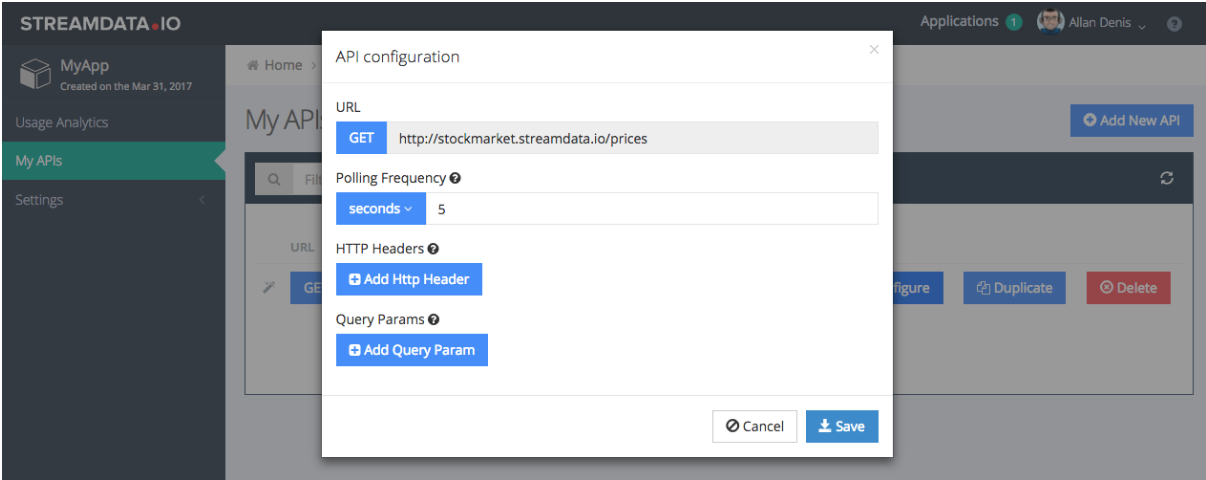
A form is displayed that allows you to configure the polling frequency that Streamdata.io will apply to fetch data from target endpoint. You can also inject specific query params and headers to be added to the polling requests.
6. Now Let’s Try to Stream Your API Hosted by Tibco Cloud Mashery API
curl “https://streamdata.motwin.net/<YOUR-TIBCO-EVAL-SUB-DOMAIN>.api.mashery.com/prices?api_key=<YOUR-TIBCO-DEV-KEY>&X-Sd-Token=<YOUR-SD-APP-TOKEN>”
Note: Make sure to keep the “https://streamdata.motwin.net/” as a prefix and do not forget to replace <YOUR-TIBCO-EVAL-SUB-DOMAIN>, <YOUR-TIBCO-DEV-KEY> and <YOUR-SD-APP-TOKEN> by the appropriate values.
You should now receive a first snapshot of your content followed by JSON patch updates whenever a change is happening.
id:62e31b51-eaf8-404c-964e-c311439b2e02
event:data
data:[{“title”:”Value 0″,”price”:56,”param1″:”value1″,”param2″:”value2″,”param3″:”value3″,”param4″:”value4″,”param5″:”value5″,”param6″:”value6″,”param7″:”value7″,”param8″:”value8″},{“title”:”Value 1″,”price”:1,”param1″:”value1″,”param2″:”value2″,”param3″:”value3″,”param4″:”value4″,”param5″:”value5″,”param6″:”value6″,”param7″:”value7″,”param8″:”value8″},{“title”:”Value 2″,”price”:91,”param1″:”value1″,”param2″:”value2″,”param3″:”value3″,”param4″:”value4″,”param5″:”value5″,”param6″:”value6″,”param7″:”value7″,”param8″:”value8″},{“title”:”Value 3″,”price”:14,”param1″:”value1″,”param2″:”value2″,”param3″:”value3″,”param4″:”value4″,”param5″:”value5″,”param6″:”value6″,”param7″:”value7″,”param8″:”value8″},{“title”:”Value 4″,”price”:20,”param1″:”value1″,”param2″:”value2″,”param3″:”value3″,”param4″:”value4″,”param5″:”value5″,”param6″:”value6″,”param7″:”value7″,”param8″:”value8″},{“title”:”Value 5″,”price”:94,”param1″:”value1″,”param2″:”value2″,”param3″:”value3″,”param4″:”value4″,”param5″:”value5″,”param6″:”value6″,”param7″:”value7″,”param8″:”value8″},{“title”:”Value 6″,”price”:81,”param1″:”value1″,”param2″:”value2″,”param3″:”value3″,”param4″:”value4″,”param5″:”value5″,”param6″:”value6″,”param7″:”value7″,”param8″:”value8″},{“title”:”Value 7″,”price”:59,”param1″:”value1″,”param2″:”value2″,”param3″:”value3″,”param4″:”value4″,”param5″:”value5″,”param6″:”value6″,”param7″:”value7″,”param8″:”value8″},{“title”:”Value 8″,”price”:7,”param1″:”value1″,”param2″:”value2″,”param3″:”value3″,”param4″:”value4″,”param5″:”value5″,”param6″:”value6″,”param7″:”value7″,”param8″:”value8″},{“title”:”Value 9″,”price”:27,”param1″:”value1″,”param2″:”value2″,”param3″:”value3″,”param4″:”value4″,”param5″:”value5″,”param6″:”value6″,”param7″:”value7″,”param8″:”value8″},{“title”:”Value 10″,”price”:61,”param1″:”value1″,”param2″:”value2″,”param3″:”value3″,”param4″:”value4″,”param5″:”value5″,”param6″:”value6″,”param7″:”value7″,”param8″:”value8″},{“title”:”Value 11″,”price”:91,”param1″:”value1″,”param2″:”value2″,”param3″:”value3″,”param4″:”value4″,”param5″:”value5″,”param6″:”value6″,”param7″:”value7″,”param8″:”value8″},{“title”:”Value 12″,”price”:69,”param1″:”value1″,”param2″:”value2″,”param3″:”value3″,”param4″:”value4″,”param5″:”value5″,”param6″:”value6″,”param7″:”value7″,”param8″:”value8″},{“title”:”Value 13″,”price”:98,”param1″:”value1″,”param2″:”value2″,”param3″:”value3″,”param4″:”value4″,”param5″:”value5″,”param6″:”value6″,”param7″:”value7″,”param8″:”value8″},{“title”:”Value 14″,”price”:89,”param1″:”value1″,”param2″:”value2″,”param3″:”value3″,”param4″:”value4″,”param5″:”value5″,”param6″:”value6″,”param7″:”value7″,”param8″:”value8″}]
id:f1db4130-387b-4a3d-826a-a1715b608b8a
event:patch
data:[{“op”:”replace”,”path”:”/6/price”,”value”:70},{“op”:”replace”,”path”:”/9/price”,”value”:51},{“op”:”replace”,”path”:”/10/price”,”value”:48}]
If you change the polling frequency in the Portal while the curl is running, you will see that the rate of push updates will dynamically adapt.
Hope you have enjoyed! If you want to know more about Streamdata.io, read our How it works page.

