

The purpose of this post is to guide you through the steps and help you create a JavaScript even-driven app using Riot.js (a React-like user interface micro-library) and Streamdata.io to display exchange rates provided by Xignite API in real-time.
Riot.js will be helpful not only to create reusable web components but also to develop an application based on an event-driven architecture, thanks to its Observable feature. All of this packaged in a 12.75 KB library!
If you are completely new to Riot.js, this blog post might not be the best entry point. I encourage you to take a look at this excellent blog post series first.
Let’s have a quick look at the final result to have a better idea of what we will build in this step-by-step tutorial:
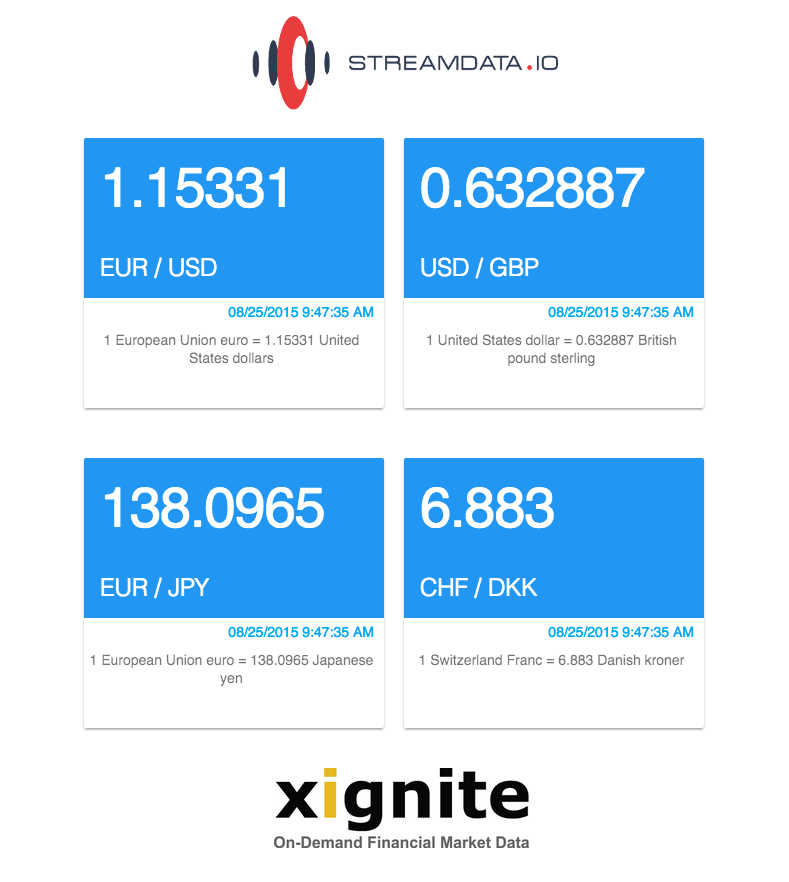
The User Interface will be based on cards, each card displays a currency rate updated in realtime. User is notified about rate changes with green or red flash animation. When passing the mouse over a card, it flips in order to display detailed information on the back of the card.
Prerequisites
Before starting you will need to:
- Create a free Streamdata.io account to get your app token here.
- Create an Xignite developer account here. Please note that this demo uses XigniteGlobalCurrencies API. If you are using an Xignite trial account, please set appropriate permission for this API and that the maximum hits limit has not been reached. See this link for more details.
Now that we are finished with the prerequisites, we will first focus on the application architecture.
Step#1 – Set up your Project hierarchy
We will use following file hierarchy (pretty self-explanatory):
your-app/
  |__ app/
  |    |__css/
  |    |__img/
  |    |__js/
  |__ index.html
Step#2 – Backbone for our event-drive app
As evoked earlier, Riot.js includes a nice feature called Observables which are components that can send and receive events. These enable to get a loose-coupled architecture and promote the modularity and reusability of an app.
First, we create an observable that we will call “bus”. This observable will be used as the main bus of events for our application. Thus, service in charge of fetching data will publish events into the bus in order to notify web components in charge of displaying data.
So, in the index.html, we have:
var bus = riot.observable();
That’s it! Now that we have our backbone, let’s create some muscles around it.
Step#3 – Service to fetch data
We will create a service in charge of fetching data from Xignite API and publish events when new data is available. As we rely on Streamdata.io to stream Xignite API, it is pretty straightforward.
Create an app/js/streamdata-service.js:
'use strict';
function StreamdataService(streamdataAppToken, xigniteToken, bus) {
  var eventSources = {};

  function fetchJson(currency) {
    var xigniteURL = "https://globalcurrencies.xignite.com/xGlobalCurrencies.json/GetRealTimeRate";
    //Build URL with proper params
    xigniteURL = xigniteURL + "?Symbol=" + currency + "&_token=" + xigniteToken;

    var eventSource = new Streamdata(xigniteURL, streamdataAppToken, currency);
    eventSources[currency] = eventSource;
    eventSource.open();
  }

  function stopFetchJson(currency) {
    eventSources[currency].close();
  }

  return {
    fetchJson: fetchJson,
    stopFetchJson: stopFetchJson
  }
}
The service offers two methods fetchJson(currency) and stopFetchJson(currency) in order to start and stop listening to Xignite API.
Note that we pass a currency parameter as we want to be able to fetch data for different currencies.
We keep track of the different EventSources, created through the fetchJson(.) method, in a hashmap called eventSources and use the currency as the key to be able to perform a lookup in the stopFetchJson(.).
We also use a helper function named Streamdata(.) to wrap the logic related to the EventSource subscription. Let’s have a look at its implementation:
function Streamdata(xigniteURL, streamdataAppToken, currency) {
  var data;
  var eventSource = streamdataio.createEventSource(xigniteURL, streamdataAppToken);

  eventSource.onOpen(function() {
    data = [];
    bus.trigger('connectionOpenEvent');

  }).onData(function(snapshot) {
    data = snapshot;
    bus.trigger(currency, data);

  }).onPatch(function(patches) {
    jsonpatch.apply(data, patches);
    bus.trigger(currency, data);

  }).onError(function(error) {
    bus.trigger('errorQuoteEvent', error);
    eventSource.close();
  });

  return eventSource;
}
This function creates a streamdata object by calling streamdataio.createEventSource(.). Once this object is created, it registers different callbacks. The most important callbacks to register to are onData(.) and onPatch(.):
- onData(.) enables to register a callback to receive the first set of data
- onPatch(.) enables to register a callback to receive the patch operations (i.e., what has changed compared to the initial set of data). In the onPatch(.) Function, we also call the JSON-Patch library to apply the patches.
Once the received data has been formatted, we send it through the bus. Note that we are using the currency as an identifier of the event to allow our web-components (views) to register only to the currency for which they are interested in.
The streamdata object is opened in the fetchJson(.) function. When the stream is opened correctly, we send an event in the bus ‘connectionOpenEvent’ to warn any component interested at this event.
Now that our service in charge of fetching data is done, let’s build our reusable web-component.
Step#4 – Reusable web component
To display an exchange rate, we create a Riot.js component that will be loaded in our index.html. Riotjs’ custom tag is the building blocks for our user interface, it will listen to the bus for new data. Note that the bus is passed as argument when mounting the component (more details in next step).
So let’s start by creating a file named js/xignite-card.tag with the following content:
<xignite-card>

  {rate.Symbol}
  {rate.Bid}
  {rate.Mid}
  {rate.Ask}
  {rate.Date}
  {rate.Time}

  <script>
    var self = this;

    opts.bus.on(opts.currency, function(rate) {
      self.rate = rate;
      self.update();
    });
  </script>
</xignite-card>
At the reception of the event, we set the “rate” (value published in the bus by StreamdataService) as an internal field of the component and use riot.js expressions “{myExpression}” to display the information related to a new exchange rate. Note also that the call to the update() function which is a Riot.js component function that tells the component to update its UI.
Now that we have all our building blocks, let’s create our event-driven app.
Step#5 Glue your building blocks
Create an index.html:
<!doctype html>
<html lang="en">
  <head>
    <meta charset="utf-8">
    <title>Xignite Riot.js Demo</title>
  </head>
  <body>

     <!-- mount point -->
    <xignite-card/>

    <!-- <inner-tag/> is specified on external file -->
    <script src="./app/js/xignite-card.tag" type="riot/tag"></script>

    <!-- dependencies -->
    <script src="./vendor/streamdataio.min.js"></script>
    <script src="./app/js/streamdata-service.js"></script>
    <script src="https://cdnjs.cloudflare.com/ajax/libs/fast-json-patch/0.5.4/json-patch-duplex.min.js"></script>

    <!-- include riot.js and the compiler -->
    <script src="https://cdn.jsdelivr.net/g/riot@2.0.14(riot.min.js+compiler.min.js)"></script>

    <script>
      var streamdataAppToken = « [YOUR_STREAMDATAIO_TOKEN]";
      var xigniteToken = « [YOUR_XIGNITE_TOKEN]";

      var bus = riot.observable();
      var streamdataService = new StreamdataService(streamdataAppToken, xigniteToken, bus);

      window.onload = function() {
        streamdataService.fetchJson("EURUSD");
      };

      <!-- mount normally -->
      riot.mount('*', 'xignite-card', { currency: "EURUSD", bus: bus });
    </script>
  </body>
</html>
Riot.js is based on a compiler that transforms a Riot.js tag file into a JavaScript file.
To avoid having to install a riot compiler, we use the In-Browser compilation option.
Everything is well explained in Riot.js’ documentation.
You basically have to include following tags in your index.html to let the magic happens:
<!-- <inner-tag/> is specified on external file -->
<script src="path/to/javascript/with-tags.js" type="riot/tag"></script>

<!-- include riot.js and the compiler -->
<script src="//cdn.jsdelivr.net/g/riot@2.2(riot.min.js+compiler.min.js)"></script>
Beside this compiler configuration, the index.html content is pretty simple:
- Declare our web component with <xignite-card/> tag
- Create our event bus as explained in step#2, instantiate a StreamdataService.
- Start listening to our Xignite API by calling its fetchJson(.) method on page loading.
- Finally, mount our custom tag using riot.mount() method.
Note that while mounting our custom tag, we passed both the currency and the bus as parameters in order to specify on which bus and what type of event the tag must listen to. Both params will be accessible via the Riot.js opts object within the tag.
You can now test your basic app by launching the index.html with your favorite HTTP server.
The simplest way, if Python is installed on your machine, is executing the command:
python -m SimpleHTTPServer 8080If you are an npm afficionados, you can use http-server:
npm install http-server
node_modules/http-server/bin/http-server
You should now see in your browser a very basic / ugly page displaying:
Symbol: EURUSD Bid: 1.15818 Mid: 1.15824 Ask: 1.1583 Date: 08/24/2015 3:07:59 PM
Now that the body of our app is in shape, boosted with a real-time event-driven architecture. Let’s do some painting.
Step#6 Body painting with Material Design
We see a large adoption of Google’s Materiel Design or at least some of its core principles. So let’s be fashionable.
A friend of mine introduced me to this nice website where you can find ready to use material components. So, I picked up the card component and applied its css to the riot custom tag with only minor changes.
You can follow the getting started, but you basically have to add the following <link> and <script> in your index.html:
Add those two style sheet links in the HEAD section your index.html:
<link rel="stylesheet" href="https://storage.googleapis.com/code.getmdl.io/1.0.4/material.indigo-pink.min.css">
<link rel="stylesheet" href="https://fonts.googleapis.com/icon?family=Material+Icons">
And this <script> tag in your index.html:
<script src="https://storage.googleapis.com/code.getmdl.io/1.0.4/material.min.js"></script>Once done, modify the xignite-card.tag. Nothing really complicated here, just apply a correct class to your HTML elements. The result should look like this:
<xignite-card>
  <div class="demo-card-square mdl-card mdl-shadow--2dp">
    <div class="mdl-card__title mdl-card--expand">
      <h1>{rate.Mid}</h1>
    </div>
    <div class="mdl-card__title">
        <h4 class="mdl-card__title-text">{rate.BaseCurrency} / {rate.QuoteCurrency}</h4>
    </div>
    <div class="mdl-card__supporting-text" style="text-align: right; color: rgb(3, 169, 244);">
      {rate.Date} {rate.Time}
    </div>
    <div class="mdl-card__supporting-text">
      {rate.Text}
    </div>
  </div>

  <script>
    var self = this;

    opts.bus.on(opts.currency, function(rate) {
      self.rate = rate;
      self.update();
    });
  </script>

  <style>
    .demo-card-square {
      margin: 10px;
    }
    .demo-card-square.mdl-card {
      width: 300px;
      height: 270px;
    }
    .demo-card-square > .mdl-card__title {
      max-height: 100px;
      color: #fff;
      background: rgb(33,150,243);
    }
    .mdl-card__supporting-text {
      width: 95%;
      padding: 5px;
      font-size: 14px;
    }
    .mdl-card__supporting-text-back {
      text-align: center;
      padding:10px;
      line-height:150%;
    }
    .mdl-card__title > h1 {
      margin: 10px 0px 10px 0px;
    }
  </style>
</xignite-card>
You should now see something with a much better look: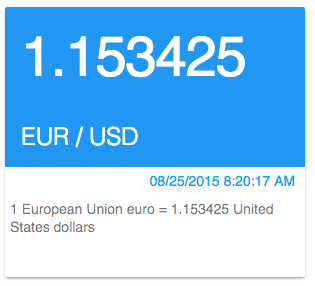
Step#7 Flip Effect
Now, I would like to apply an effect to display more detailed information at the back of the card. After a quick search, I have found this well explained blog post: that provides all the css tip & tricks to do so.
Define a flip-container and two different content panes: one for the front and the other for the back of the card:
<div class="flip-container" ontouchstart="this.classList.toggle('hover');">
  <div class="flipper">
    <div class="front">
            <!-- front content -->
    </div>
    <div class="back">
            <!-- back content -->
    </div>
  </div>
</div>
As our css is starting to grow and because we want to keep a decoupled architecture, it is time to create a dedicated css file for my custom tag. I will name it css/xignite.card.css. All you have to do is to:
- Cut-paste the content of <style> tag from your xignite-card.tag to the new css file.
- Add all css classes needed for the flip animation.
- Finally, don’t forget to add a <link> tag to pointing tocss/xignite.card.css it in your index.html:
I feel that you are getting lazy so here the command:
<link rel="stylesheet" href="./app/css/xignite-card.css" type="text/css">You can now try it out! Passing the mouse over the card flips it, nice 🙂
Step#8 CSS Animations
To enrich user experience, I would like to notify a user when a new exchange rate is available by flashing its label with a green or red color depending on the difference with its previous value. There are many ways to do it for sure, but I wanted to play with something that I had never tried: the CSS key frames.
The idea is to declare a css class with animation for each color (green and red), and applied one of the class temporary when a new update (event) is coming.
First, declare the css classes and set the animation with a duration of 1.5s that will repeat only once. Note also that we have to use -webkit-animation directives to comply with webkit based browsers).
.redflash{
  -webkit-animation: redflash linear 1.5s 1;
  animation: redflash linear 1.5s 1;
}
.greenflash{
  -webkit-animation: greenflash linear 1.5s 1;
  animation: greenflash linear 1.5s 1;
}
Then, create keyframes to specify the animation effects. As the animation is quite simple and consists in changing the color attribute of the element, I am using only 3 keyframes-selectors (0%, 50% and 100%). But you can declare as many keyframes-selectors you want:
@-webkit-keyframes redflash {
  0% { color: #FFFFFF; }
  50% { color: #FF0000; }
  100% {color: #FFFFFF; }
}
@keyframes redflash {
  0% { color: #FFFFFF; }
  50% { color: #FF0000; }
  100% {color: #FFFFFF; }
}
@-webkit-keyframes greenflash {
  0% { color: #FFFFFF; }
  50% { color: #00CC00; }
  100% {color: #FFFFFF; }
}
@keyframes greenflash {
  0% { color: #FFFFFF; }
  50% { color: #00CC00; }
  100% {color: #FFFFFF; }
}
Here comes the tricky part. In order for the animation to occur each time a new exchange rate is published through the bus, we need to add the animation class to the element temporary to be able to re-apply it on the next update. We have reached the point where JQuery can help us!
I have found this nice helper method that does the job by extending JQuery API:
$.fn.addTempClass = function(tempClass, duration){
  if( !tempClass )
    return this;

  return this.each(function(){
    var $elm = $(this);

    $elm.addClass(tempClass);
    setTimeout(function(){
      $elm.removeClass(tempClass);
    }, duration || 100);
  });
}
Now that we have everything we need, let’s modify the content of the <script> tag in xignite-card.tag file:
<script>
  var self = this;

  opts.bus.on(opts.currency, function(rate) {
    self.rate = rate;

    var oldMid = $("#mid-"+rate.Symbol).html();
    self.midClassName = (oldMid < rate.Mid)?"greenflash":"redflash";
    $("#mid-"+rate.Symbol).addTempClass(self.midClassName, 2000);

    self.update();
  });
<script>
When a new update is available:
- We get the current value of the HTML element thanks to JQuery.
- We compare the old value with the new one to apply the correct css class.
- Then we, temporarily apply the css class thanks to our JQuery addTempClass(.) extension.
- Finally, we ask the component to update itself by calling self.update().
Make sure you have properly parametrized the class and id of the HTML element you want to animate. We use Riot.js expressions to do so:
<h1 class={midClassName} id="mid-{rate.Symbol}">{rate.Mid}</h1>Step#9 You said reusable?
Now that everything is, let’s experience the power of reusability.
In your index.html, instead of declaring a single custom tag <xignite-card/> declare several <div> tags with a different id. We identify our div with an id representing the currency rate:
<div id="EURUSD"></div>
<div id="USDGBP"></div>
<div id="EURJPY"></div>
<div id="CHFDKK"></div>
Use the StreamdataService to fetch different exchange rates:
window.onload = function() {
  streamdataService.fetchJson("EURUSD");
  streamdataService.fetchJson("USDGBP");
  streamdataService.fetchJson("EURJPY");
  streamdataService.fetchJson("CHFDKK");
};
Finally, mount several custom tags on each of previously created <div> tags:
riot.mount('div#EURUSD', 'xignite-card', { currency: "EURUSD", bus: bus });
riot.mount('div#USDGBP', 'xignite-card', { currency: "USDGBP", bus: bus });
riot.mount('div#EURJPY', 'xignite-card', { currency: "EURJPY", bus: bus });
riot.mount('div#CHFDKK', 'xignite-card', { currency: "CHFDKK", bus: bus });
You should now see something like this:
Conclusion
Hope you had fun building a real-time event-driven app in few steps thanks to powerful tools such as Riot.js and Streamdata.io!
If you want to take a deeper look, you can find the complete source code on our Github.