

In this blog post, we’ll demonstrate the openness and extensibility of the Amplify Platform by leveraging Integration Webhooks and Platform APIs. We’ll show how to add API traffic badges, or shields, to your API Service description. This example customizes the platform UI to the needs of your API Governance team.
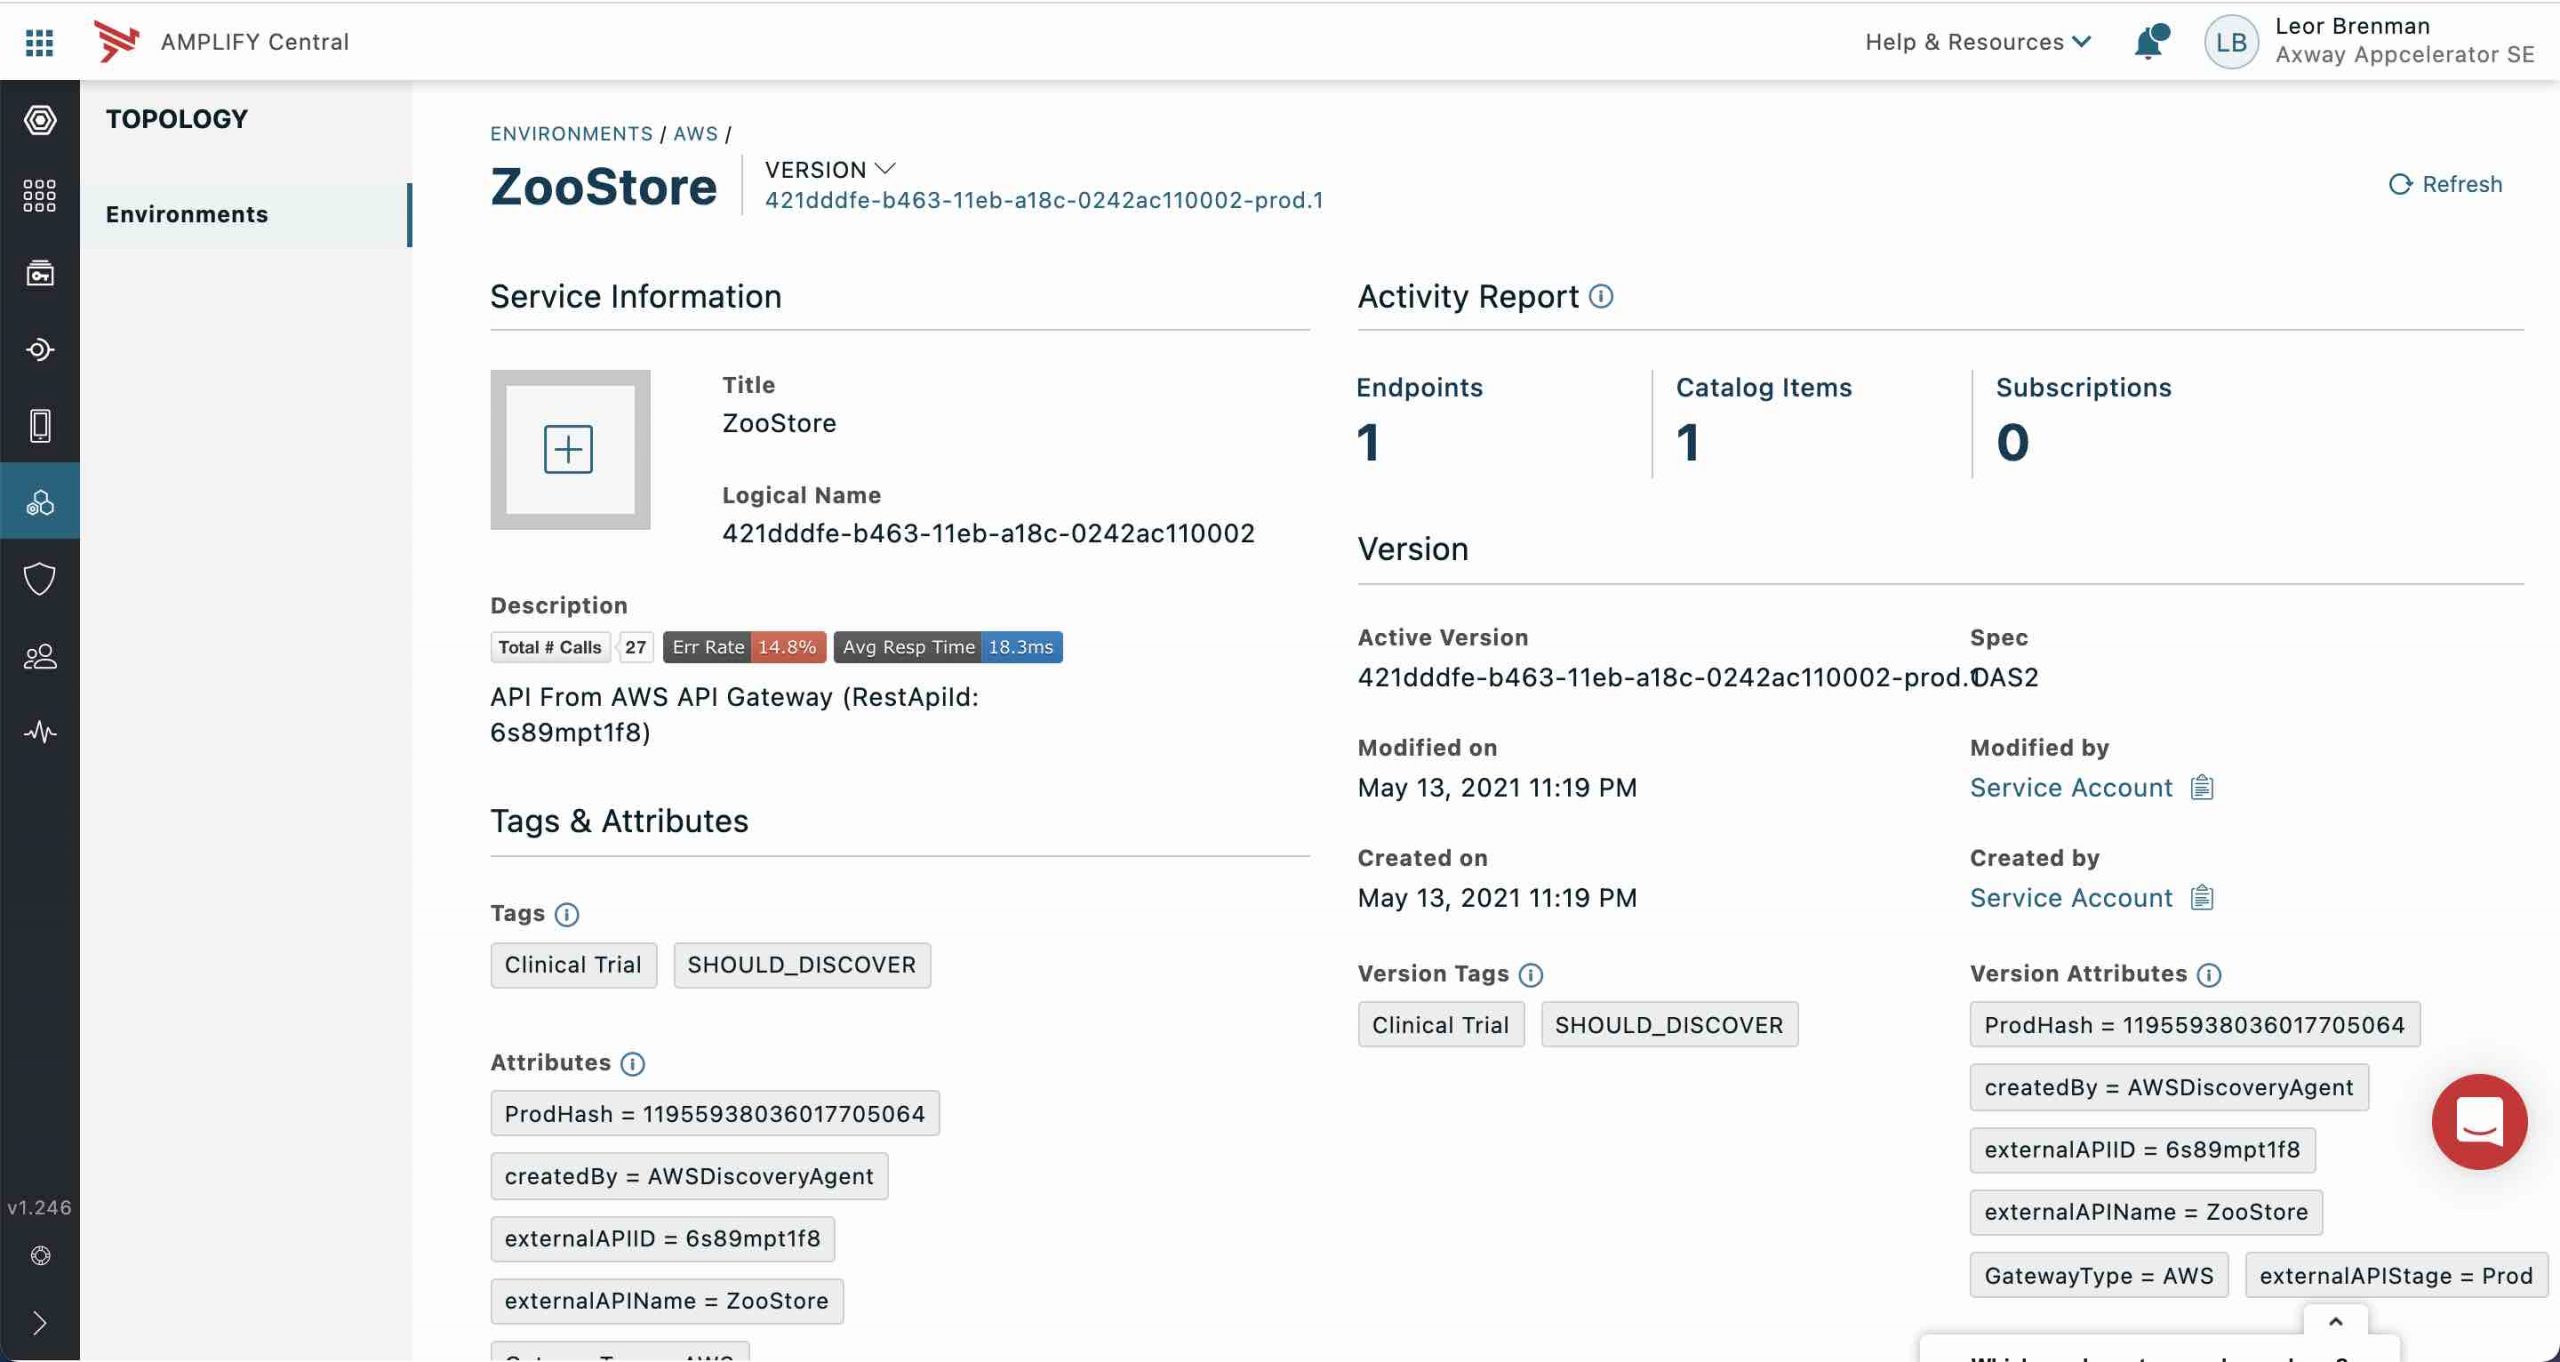
The API Service discovered by the discovery agent looks similar to this:
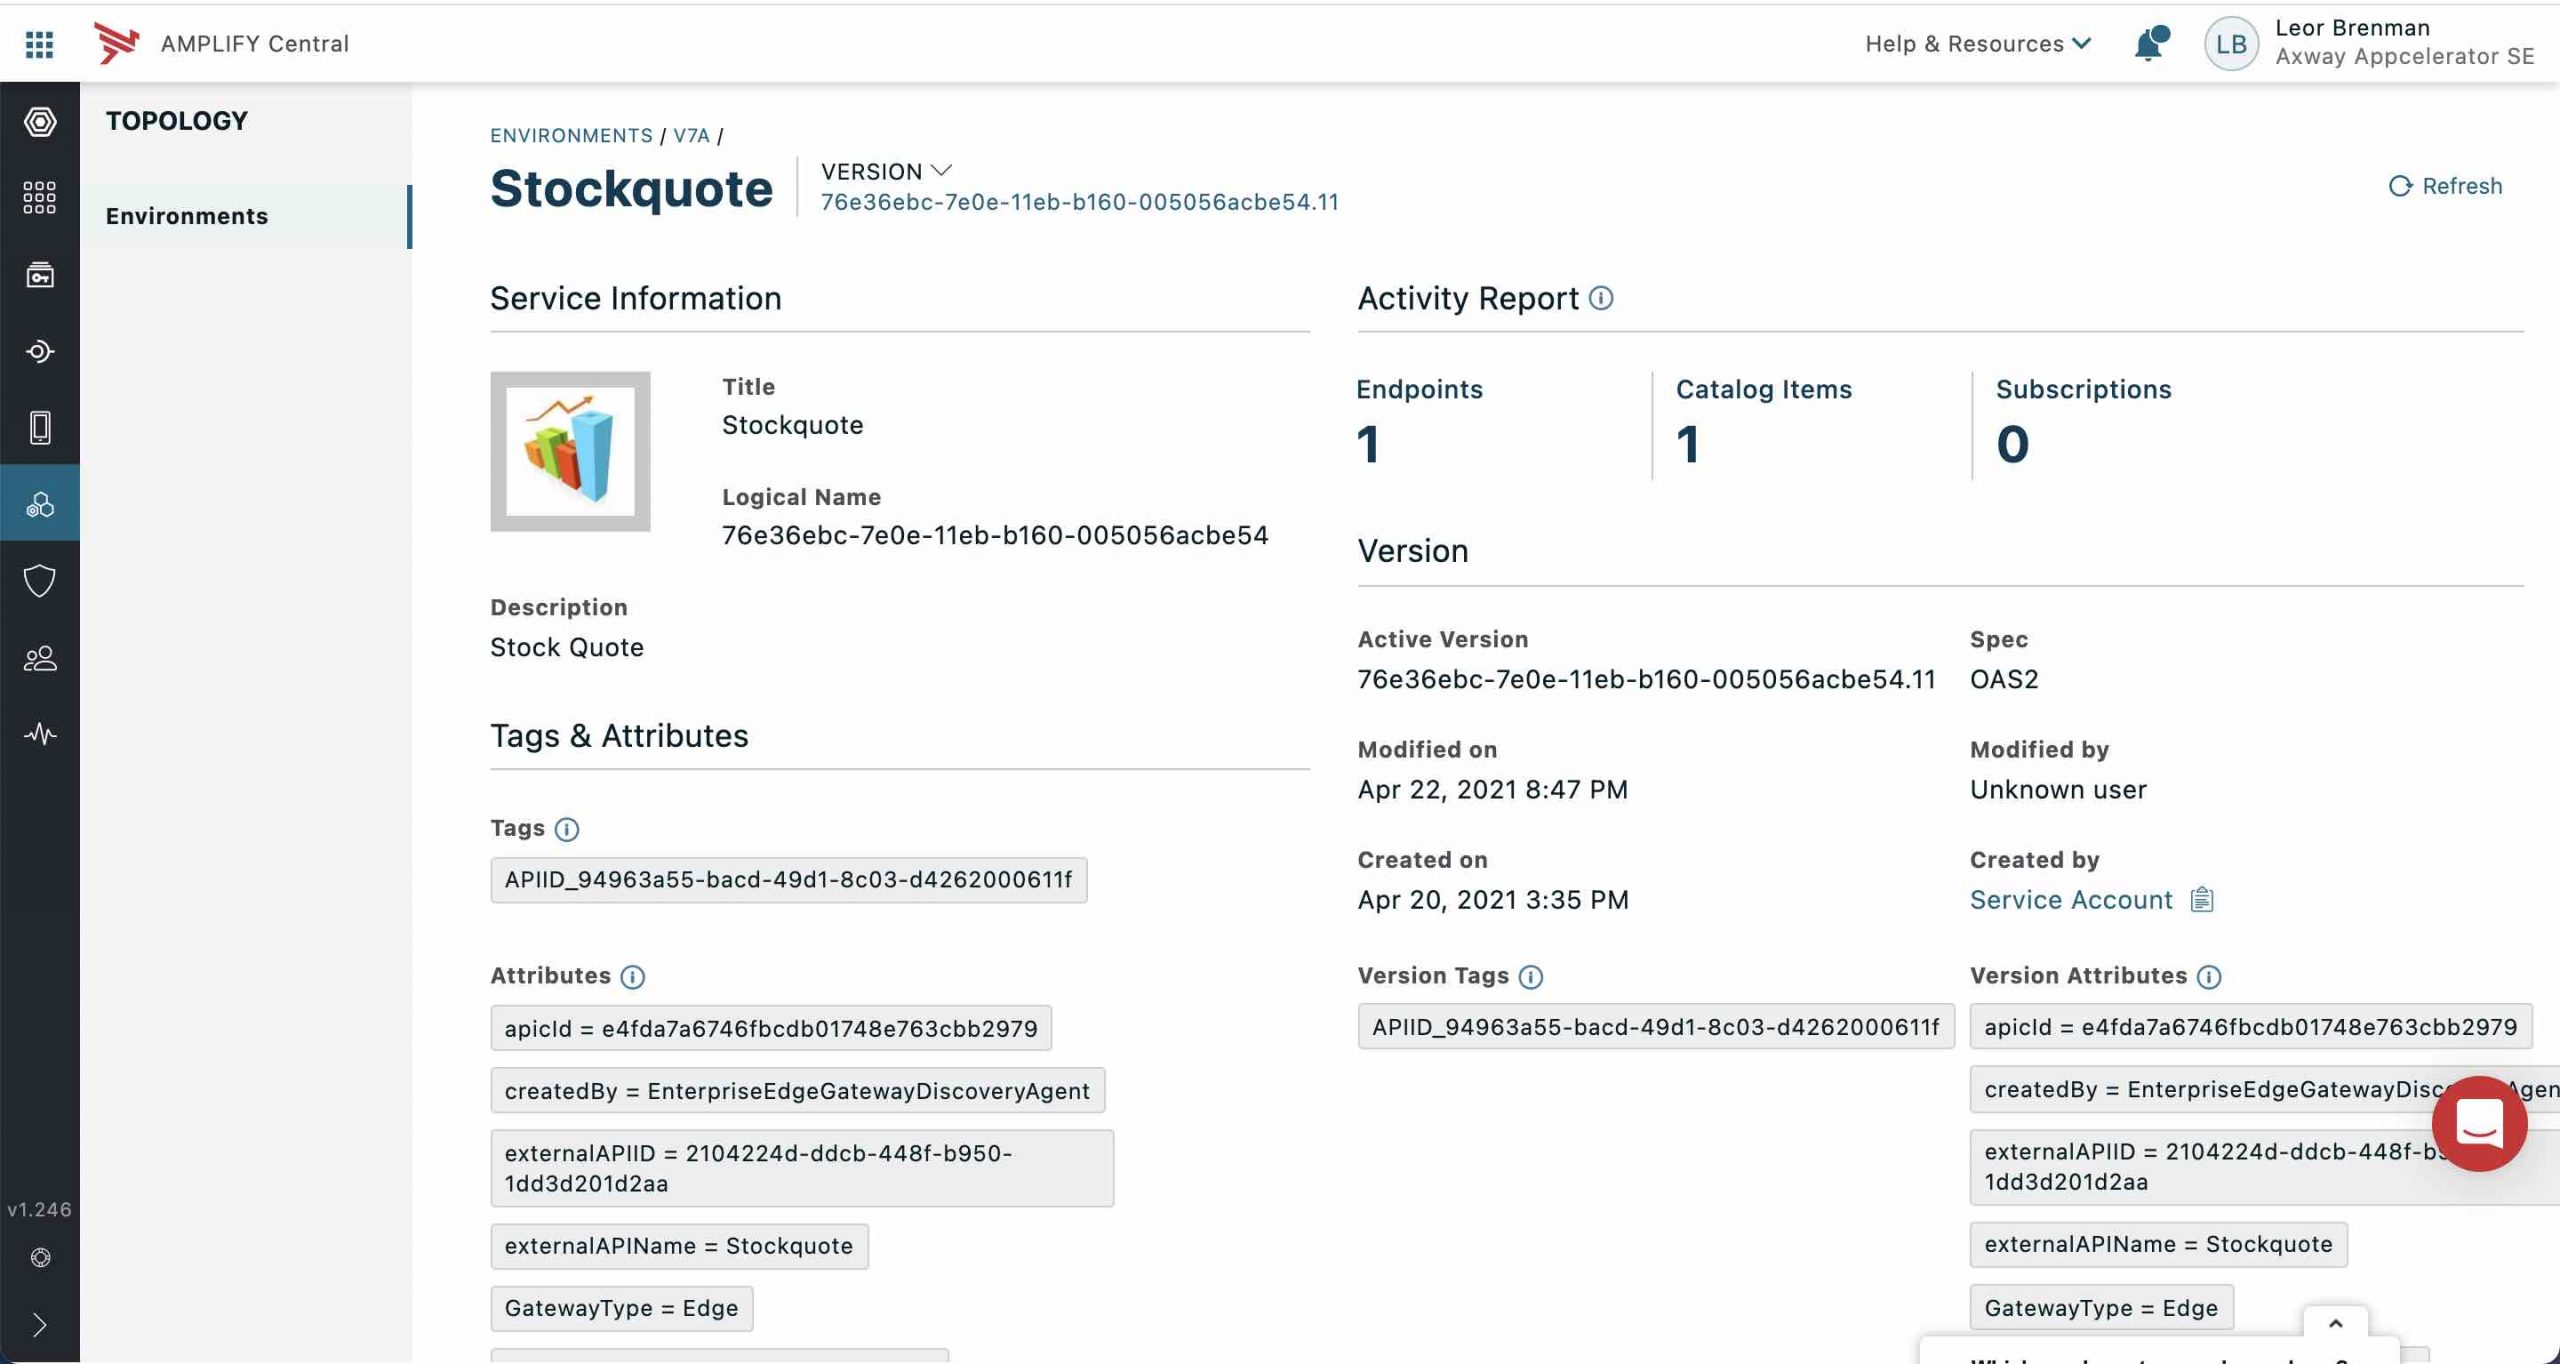
The description is inherited from the underlying Gateway where the API was discovered from.
In this blog post, we will automatically modify the Description field upon discovery and add API traffic badges so the description will look like this:
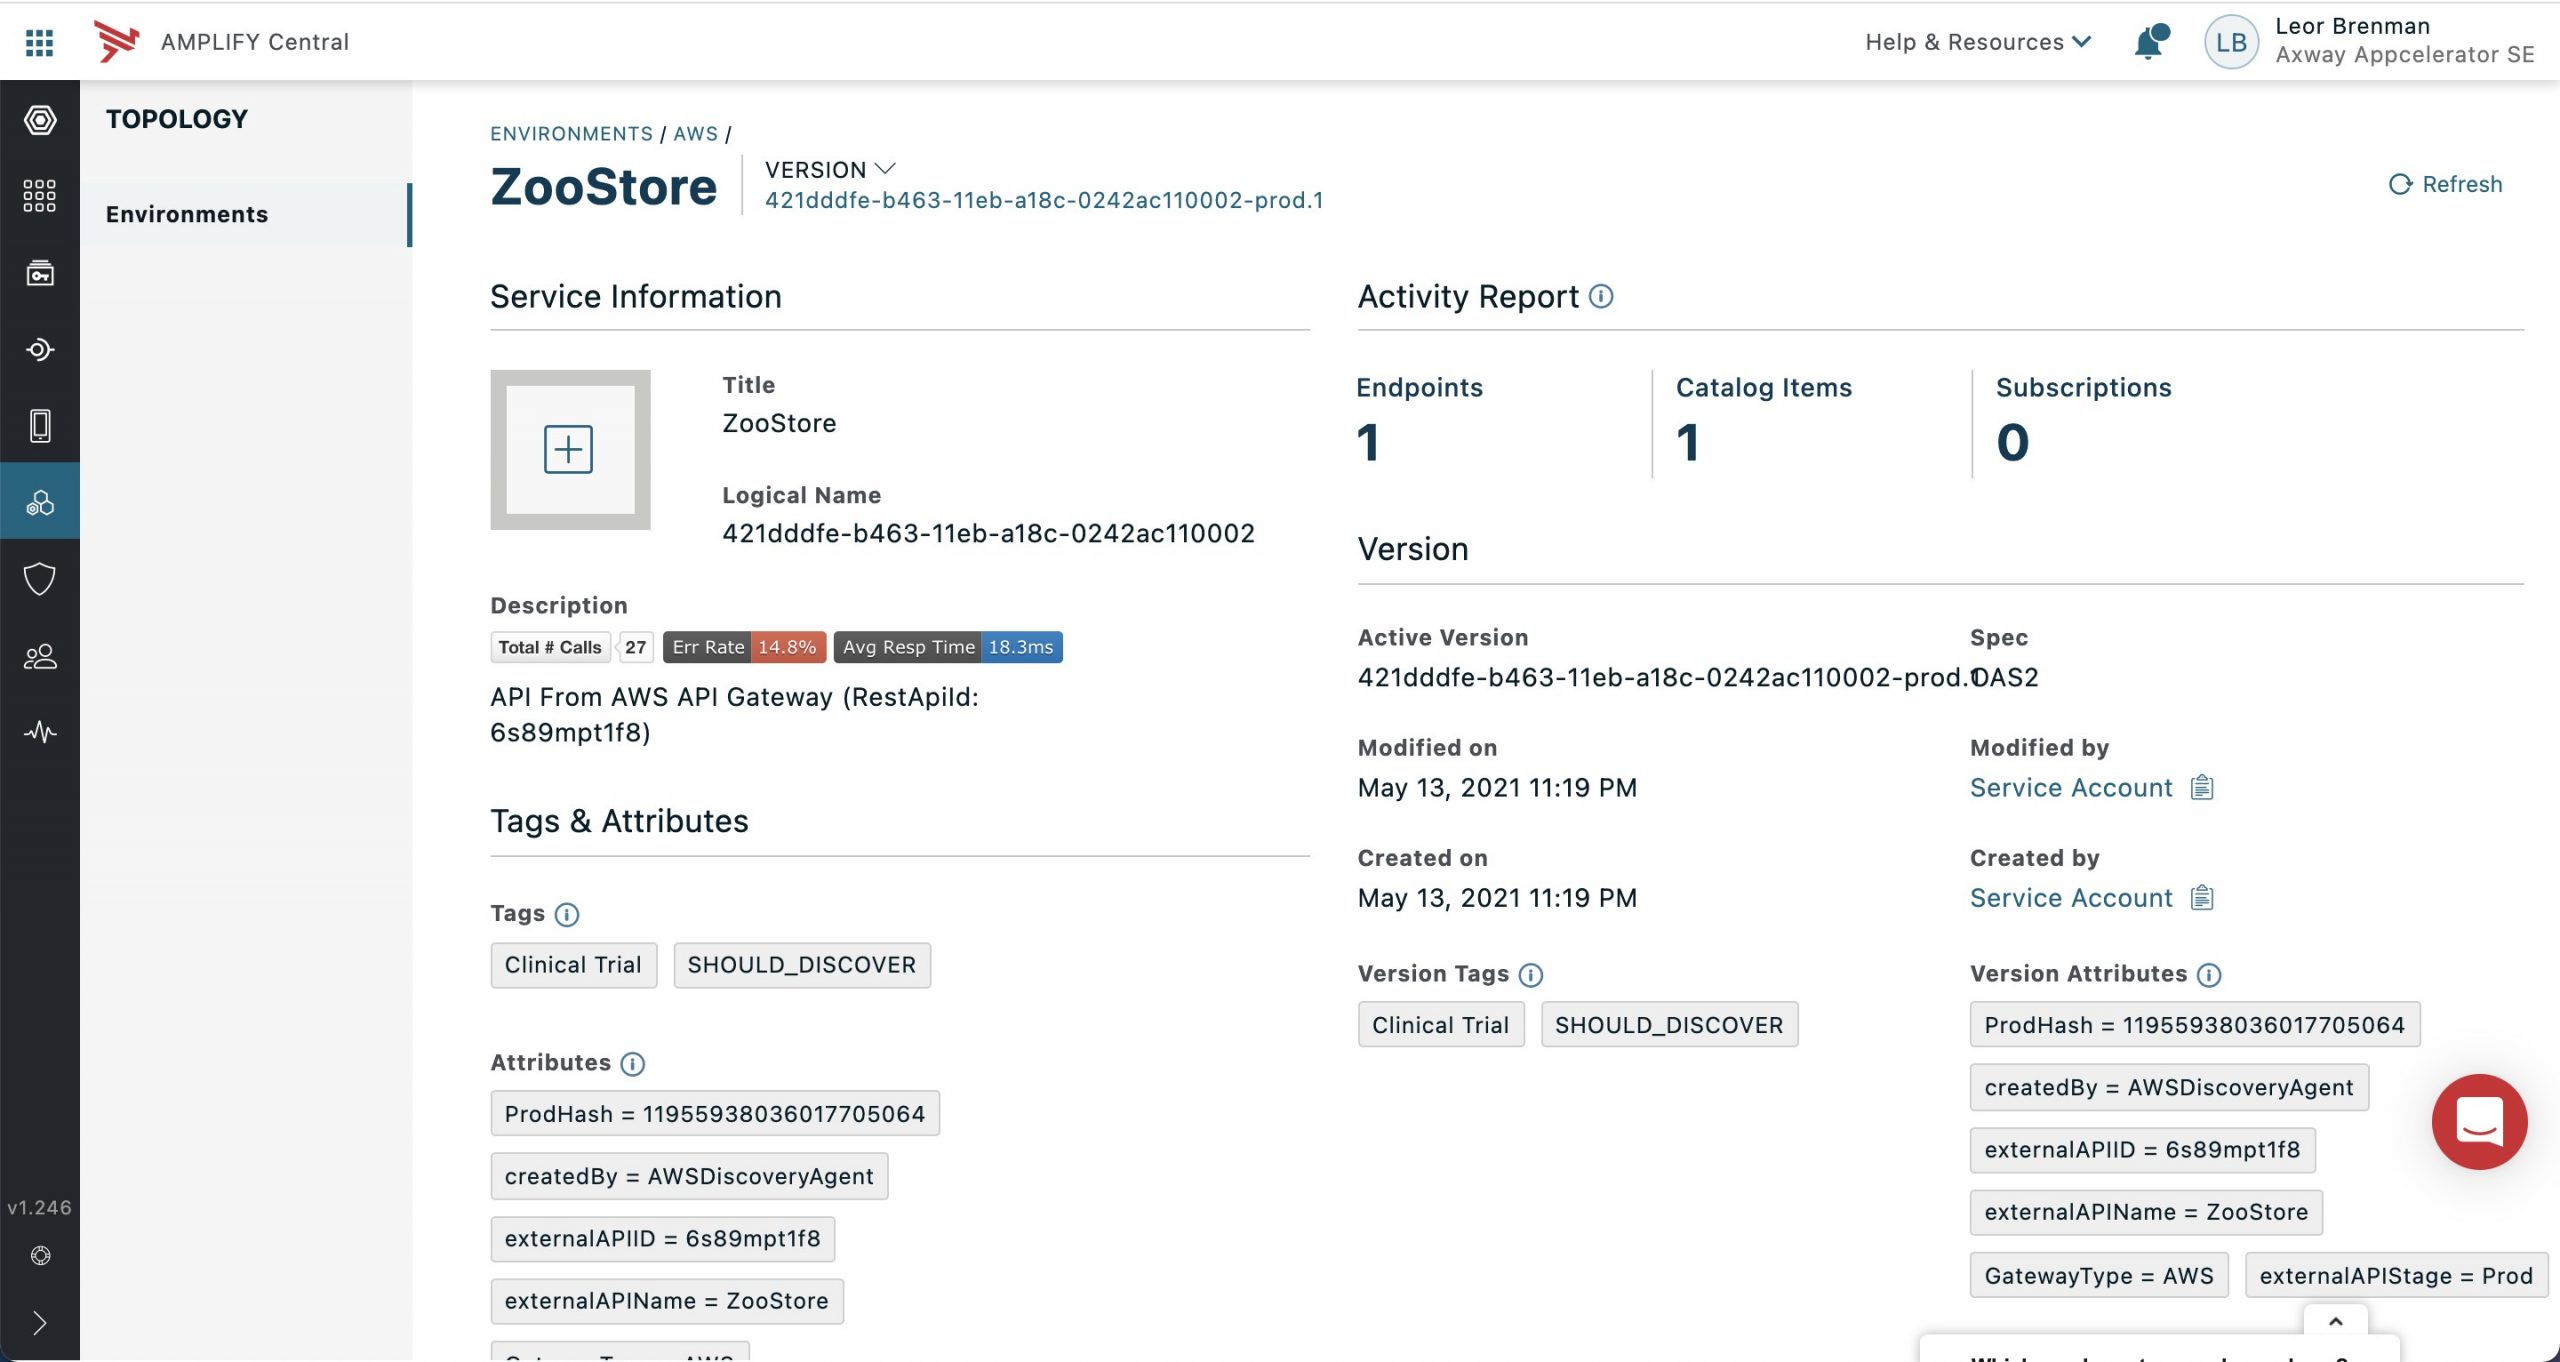
The badges display the total number of API calls, the error rate, and the average response time.
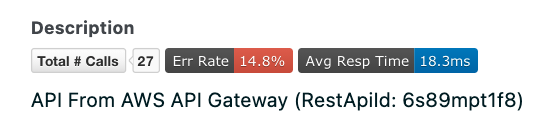
This provides more useful information for the API Governance team and alleviates the need to navigate to the API Observer to get this information, saving them valuable time.
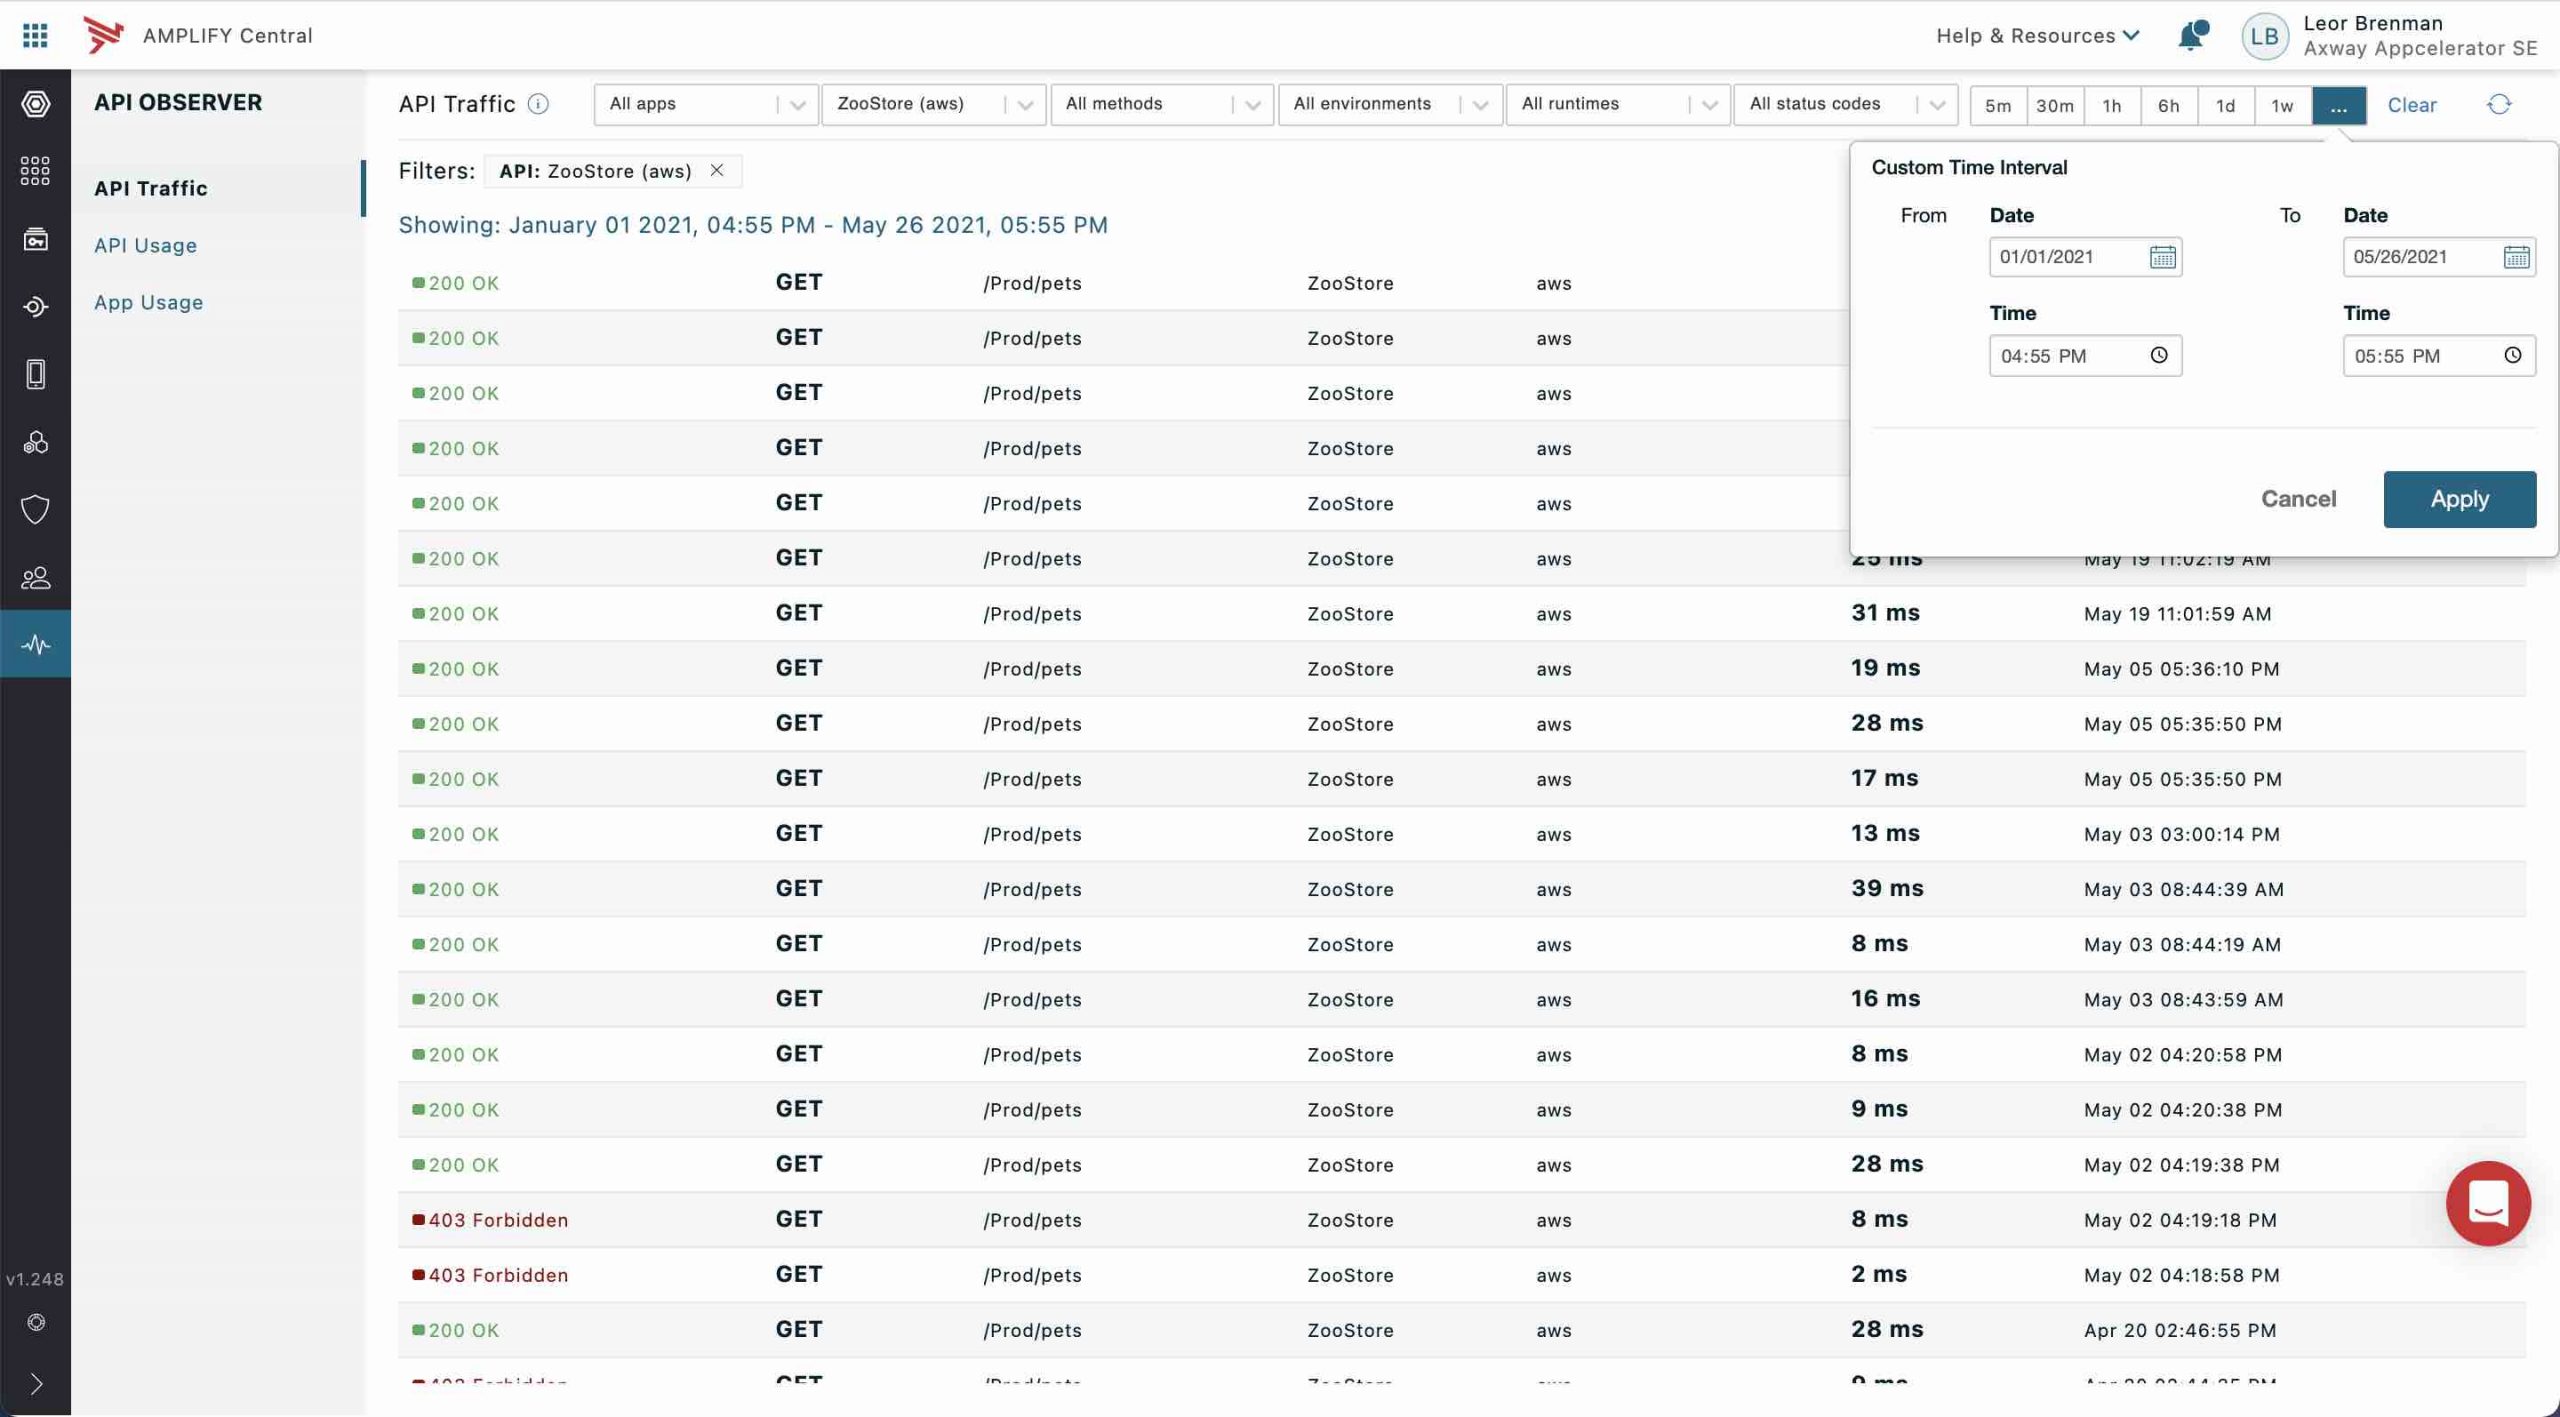
Note that in the API Observer, one would need to select the API from the API picklist and then set the date range. Furthermore, one would need to calculate the error rate and average response time. The badges provide all this info in the API Service description.
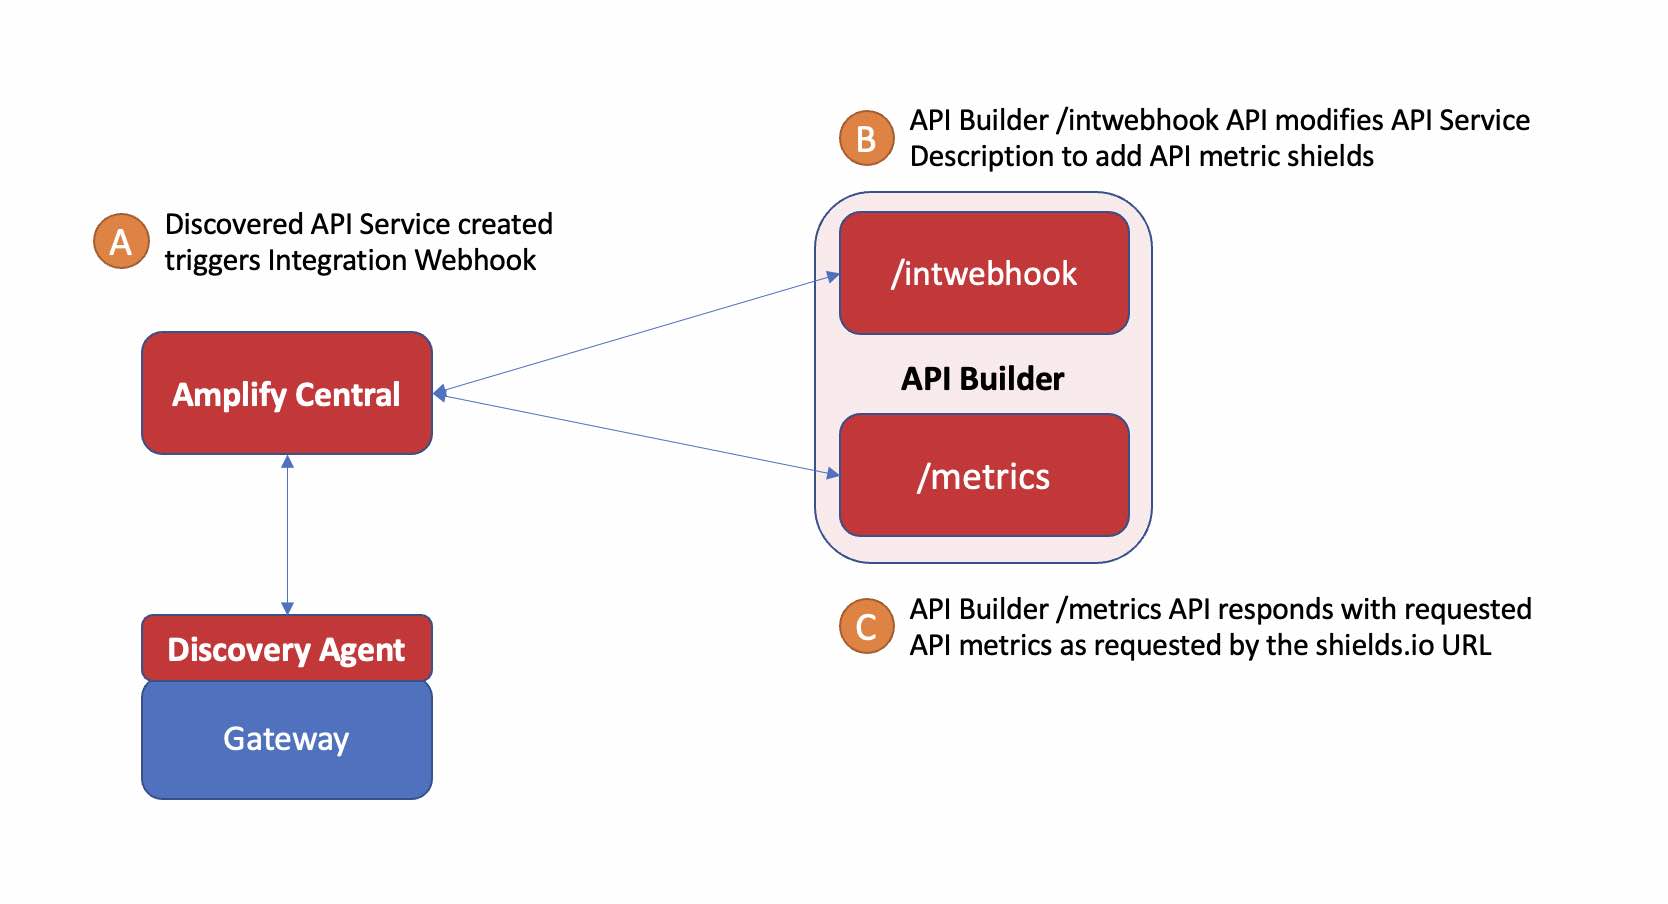
In this example, I’m using Axway’s API Builder to expose two APIs:
/api/intwebhook– triggered by Amplify Central Integration Webhook for when a new API Service is discovered by a discovery agent. This webhook adds three shields to the description. Each shield points to the metrics webhook/api/metrics– called by the shields to retrieve total number of api calls, error rate and average response time
Note that if you have previously discovered API Services, you can manually add the shields URLs to your API Service description using the Axway CLI or Axway Central API’s. More on this later.
A data flow diagram is shown below:
There are several topics we’ll need to cover in this post:
- Sheilds.io – configurable, dynamic badges that will be added to the API Service description
- Traceability APIs – specific Amplify Central APIs to determine API Traffic
- Integration Webhooks – to trigger an application that a new API Service was discovered by the discovery agent
- Amplify Central APIs – to modify the API Service description
TL;DR – If you just want to try this out yourself without reading further, you can find a Docker container that implements this here. The underlying API Builder project can be found here.
Shields.io Intro
Shields.io is a service that serves fast and scalable informational images as badges for GitHub, Travis CI, Jenkins, WordPress, and many more services.
Shields URLs are typically added to a markdown or web page. For example, in a markdown document:  generates the following static badge:
There are dynamic badges for many services, such as GitHub. For example, to add a total downloads badge for your GitHub repo, you can use the following shields URL format:
/github/downloads/:user/:repo/total
For example:
https://img.shields.io/github/downloads/lbrenman/shieldstest/total?logo=github

For services where a shields.io integration does not currently exist yet, such as Axway Amplify, there is an Endpoint service that enables you to use it with your own data by providing a webhook URL to your own service that will return a JSON payload to define the badge properties.
The shields endpoint URL is shown below:
https://img.shields.io/endpoint?url=...&style=...
A sample valid JSON payload to describe a shield is shown below:
{
  "schemaVersion": 1,
  "label": "Err Rate",
  "message": "50.8%",
  "color": "orange"
}
resulting in the following shield:
We will use this Endpoint service and point to an API Builder API that will, in turn, make Amplify Central API calls to get API traffic information for our API Service. More on this later.
Traceability APIs
The Amplify Central Traceability API swagger docs can found here.
The APIs retrieve analytics and traffic data from API activity. In this application, I am using the search API to retrieve Total API Calls, Error Rate, and Average Response Time. The API is called as follows:
HTTP request
POST /traceability/search
body:
{
  "version": "0.2",
  "invoke": {
    "field": "string",
    "method": "find",
    "params": {
      "limit": 0,
      "offset": 0,
      "sort": {
        "additionalProp1": -1,
        "additionalProp2": -1,
        "additionalProp3": -1
      },
      "include": [
        "string"
      ],
      "exclude": [
        "string"
      ],
      "count": true
    }
  },
  "filters": {
    "$and": [
      null
    ],
    "$or": [
      null
    ],
    "$not": [
      null
    ],
    "$exists": {
      "additionalProp1": true,
      "additionalProp2": true,
      "additionalProp3": true
    },
    "$geo": {
      "additionalProp1": [
        {
          "lat": 0,
          "lon": 0
        }
      ],
      "additionalProp2": [
        {
          "lat": 0,
          "lon": 0
        }
      ],
      "additionalProp3": [
        {
          "lat": 0,
          "lon": 0
        }
      ]
    },
    "$match": {
      "additionalProp1": 0,
      "additionalProp2": 0,
      "additionalProp3": 0
    },
    "$prefix": {
      "additionalProp1": "string",
      "additionalProp2": "string",
      "additionalProp3": "string"
    },
    "$range": {
      "additionalProp1": {
        "additionalProp1": {
          "lt": 0,
          "lte": 0,
          "gt": 0,
          "gte": 0
        },
        "additionalProp2": {
          "lt": 0,
          "lte": 0,
          "gt": 0,
          "gte": 0
        },
        "additionalProp3": {
          "lt": 0,
          "lte": 0,
          "gt": 0,
          "gte": 0
        }
      },
      "additionalProp2": {
        "additionalProp1": {
          "lt": 0,
          "lte": 0,
          "gt": 0,
          "gte": 0
        },
        "additionalProp2": {
          "lt": 0,
          "lte": 0,
          "gt": 0,
          "gte": 0
        },
        "additionalProp3": {
          "lt": 0,
          "lte": 0,
          "gt": 0,
          "gte": 0
        }
      },
      "additionalProp3": {
        "additionalProp1": {
          "lt": 0,
          "lte": 0,
          "gt": 0,
          "gte": 0
        },
        "additionalProp2": {
          "lt": 0,
          "lte": 0,
          "gt": 0,
          "gte": 0
        },
        "additionalProp3": {
          "lt": 0,
          "lte": 0,
          "gt": 0,
          "gte": 0
        }
      }
    },
    "$suffix": {
      "additionalProp1": "string",
      "additionalProp2": "string",
      "additionalProp3": "string"
    }
  },
  "group_by": {}
}
Note that these Amplify Central APIs require an access_token as described here.
Total API Calls
The specific body I used to get the total number of API calls for an API Service is shown below:
{
  "filters": {
    "$and": [
      {
        "$match": {
          "type": [
            "transactionSummary"
          ]
        }
      },
      {
        "$match": {
          "transactionSummary.proxy.id": [
            'remoteApiId_o18il3ymuh'
          ]
        }
      },
      {
        "$match": {
          "environmentId": [
            '8a2e862d779860e20177a6888d450233'
          ]
        }
      }
    ],
    "$range": {
      "@event_time": {
        "gt": 0,
        "lt": now.getTime()
      }
    }
  },
  "invoke": {
    "field": "@event_time",
    "method": "count"
  },
  "version": "0.2"
}
Note that the proxyId (remoteApiId_o18il3ymuh) is the externalAPIID of the API Service with the prefix “remoteApiId_” and the environmentId (8a2e862d779860e20177a6888d450233) is the id of the environment that the API Service is published into by the discovery agent
A sample curl command is shown below:
curl --location --request POST 'https://apicentral.axway.com/api/traceability/v1/traceability/search' \
--header 'Content-Type: application/json' \
--header 'Authorization: Bearer eyJ.....ONg_w' \
--data-raw '{
  "filters": {
    "$and": [
      {
        "$match": {
          "type": [
            "transactionSummary"
          ]
        }
      },
      {
        "$match": {
          "transactionSummary.proxy.id": [
            "remoteApiId_o18il3ymuh"
          ]
        }
      },
      {
        "$match": {
          "environmentId": [
            "8a2e862d779860e20177a6888d450233"
          ]
        }
      }
    ],
    "$range": {
      "@event_time": {
        "gt": 0,
        "lt": 1819649355045
      }
    }
  },
  "invoke": {
    "field": "@event_time",
    "method": "count"
  },
  "version": "0.2"
}'
Note the authorization header with the Bearer access_token
The response is just a number, representing the total number of API calls, e.g. 27.
Average Response Time
The specific body I used to get the average response time of API calls for an API Service is shown below:
{
  "filters": {
    "$and": [
      {
        "$match": {
          "type": [
            "transactionSummary"
          ]
        }
      },
      {
        "$match": {
          "transactionSummary.proxy.id": [
            'remoteApiId_o18il3ymuh'
          ]
        }
      },
      {
        "$match": {
          "environmentId": [
            '8a2e862d779860e20177a6888d450233'
          ]
        }
      }
    ],
    "$range": {
      "@event_time": {
        "gt": 0,
        "lt": now.getTime()
      }
    }
  },
  "invoke": {
    "field": "transactionSummary.duration",
    "method": "avg"
  },
  "version": "0.2"
}
The response is just a number, representing the average response time in milliseconds, e.g. 10.372781065088757
Error Rate
In order to determine the error rate, I use the number of failed calls (e.g. status code 4xx) and exception calls (e.g. 5xx) divided by the total number of API calls.
The specific body I used to get the number of API calls by status for an API Service is shown below:
{
  "filters": {
    "$and": [
      {
        "$match": {
          "type": [
            "transactionSummary"
          ]
        }
      },
      {
        "$match": {
          "transactionSummary.proxy.id": [
            "remoteApiId_o18il3ymuh"
          ]
        }
      },
      {
        "$match": {
          "environmentId": [
            "8a2e862d779860e20177a6888d450233"
          ]
        }
      }
    ],
    "$range": {
      "@event_time": {
        "gt": 0,
        "lt": now.getTime()
      }
    }
  },
  "invoke": {
    "field": "@event_time",
    "method": "count"
  },
  "group_by":[
      {
          "field":"transactionSummary.status",
          "type":"string"
      }
  ],
  "version": "0.2"
}
The response is just a JSON object, representing the calls by status, e.g.:
{
    "Failure": 94,
    "Success": 91,
    "Exception": 3
}
The error rate is 100*(Failure+Exception)/(Failure+Exception+Success).
API Builder Metrics API
As mentioned above, there are two API Builder APIs. For now, let’s look at the metrics API that services the traffic shields. Later we’ll look at the other API Builder API.
In order to support shields for multiple metrics (total num API calls, average response time, and error rate), I created a metrics API that has three required query parameters as follows:
HTTP request
GET /api/metrics
Query parameters
- metrictype – totalnumcalls, avgresptime, errorrate
- eid – Environment ID of the API
- pid – Proxy ID of the API
A sample curl command for average response time is shown below:
curl --location --request GET 'https://c94....45eb0.cloudapp-enterprise.appcelerator.com/api/metrics?metrictype=avgresptime&eid=8a2e862d779860e20177a6888d450233&pid=remoteApiId_rrsprqdux3'Sample response:
{
    "schemaVersion": 1,
    "label": "Avg Resp Time",
    "message": "10.8ms",
    "color": "blue"
}
Note that the environment id and proxy id (externalAPIID) can be retrieved several ways: Axway CLI, Axway Central API and via the Integration Webhook that we’ll look at later.
For reference, the API Builder project can be found here.
Sheilds.io API Traffic Shields
Now that we know the API Builder API call the shield must make to display API metrics and now that we have a basic understanding of how shields work, let’s look at how we’ll construct the shield URLs to the API Builder API.
Let’s take the API Builder API:
https://c94....45eb0.cloudapp-enterprise.appcelerator.com/api/metrics?metrictype=errorrate&eid=8a2e862d779860e20177a6888d450233&pid=remoteApiId_o18il3ymuh
and paste it into the shields.io endpoint as follows:
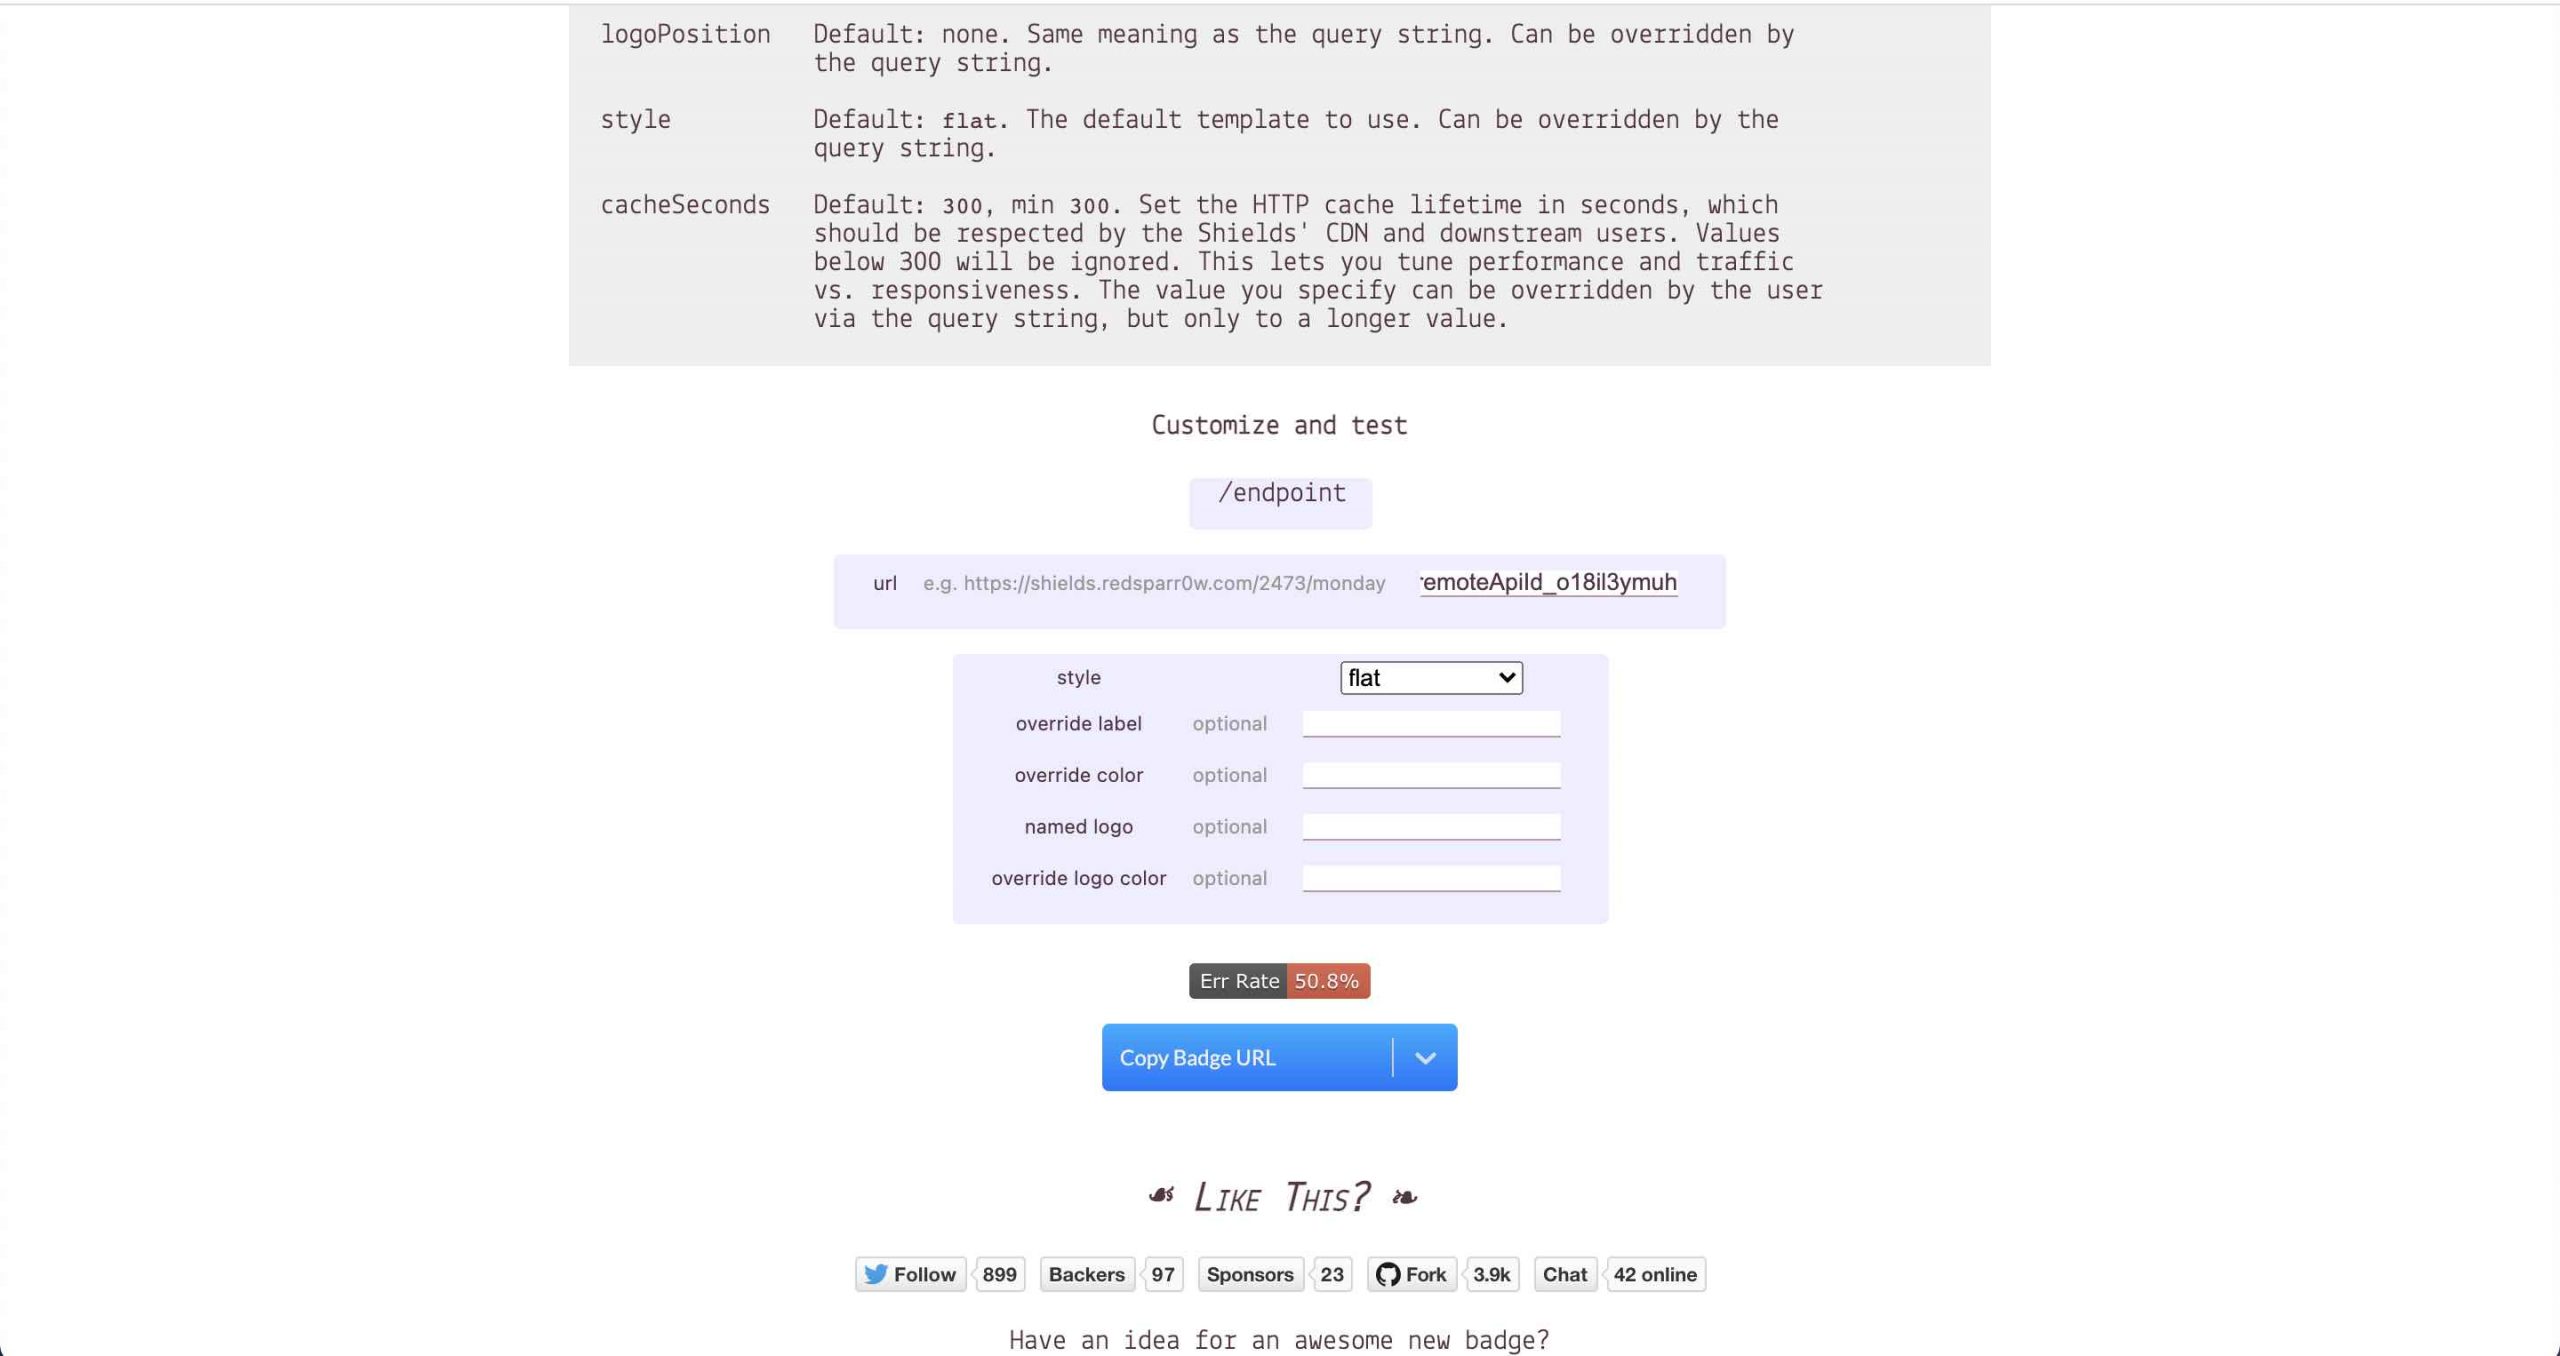
You then click the Copy Badge URL button to get the shields URL:
https://img.shields.io/endpoint?url=https%3A%2F%2Fc94....45eb0.cloudapp-enterprise.appcelerator.com%2Fapi%2Fmetrics%3Fmetrictype%3Derrorrate%26eid%3D8a2e862d779860e20177a6888d450233%26pid%3DremoteApiId_o18il3ymuh
Of course, programmatically, we’ll need to construct this URL in our code and will not be able to leverage the shields form to construct the shields URL but you can see that it’s simply a URI encoded string (the API Builder API) assigned to the shields url query parameter.
Let’s rewrite the shield URL as follows:
https://img.shields.io/endpoint?url=https%3A%2F%2Fc94....45eb0.cloudapp-enterprise.appcelerator.com%2Fapi%2Fmetrics%3Fmetrictype%3D+{{metric type}}+%26eid%3D+{{environment Id}}+%26pid%3D+{{proxy id}}You can replace {{metric type}}, {{environment Id}} and {{proxy id}} for the API Service and metric of interest. Recall that the proxy id is the externalAPIID with a prefix of ‘remoteApiId_’.
For this service, we include three badges for each API Service as shown below:
We’ll look at how we can automatically add these for newly discovered APIs as well as manually add them for previously discovered APIs.
Modify The API Service Description Automatically
Now that we have a good understanding of how to create a shields URL that will retrieve API metrics data from our API Builder API, let’s look at how we can automatically add the shields to a newly discovered API Service description.
We will do this as follows:
- Set up an Amplify Central Integration Webhook when a NEW API Service is created (e.g. discovered by the discovery agent)
- The Webhook will be set to the API Builder API
/api/intwebhook - Note that the Webhook payload for an API Service event contains the full API Service as part of the payload
- The API Builder API will extract the proxy id and environment id from the Webhook payload in order to construct the 3 API Traffic metric shields: total number of api calls, error rate and average response time
- The API Builder API will create a new API Service description by prefixing the 3 shield URLs as markdown image tags (e.g.
) to the description - The API Builder API will then make a PUT API call to the API Service API in order to update the API Service Description
Setup Amplify Central Integration Webhooks
You can do this using the Axway CLI as follows:
- Create a YAML file, resources.yaml, as follows:
name: apiscintegration
kind: Integration
apiVersion: v1alpha1
title: API Service Created Integration
tags:
- cloud
spec:
    description: This is an Integration for when an API Service is created.
---
name: apiscwebhook
kind: Webhook
apiVersion: v1alpha1
title: API Service Created Webhook to invoke an API Builder API
metadata:
  scope:
    kind: Integration
    name: apiscintegration
spec:
    enabled: true
    url: https://c94....45eb0.cloudapp-enterprise.appcelerator.com/api/intwebhook
---
group: management
apiVersion: v1alpha1
kind: ResourceHook
name: apisc-hook
title: Resource Hook to monitor environment aws and new API Service created
metadata:
  scope:
    kind: Integration
    name: apiscintegration
spec:
  triggers:
    - group: management
      kind: APIService
      name: '*'
      type:
        - created
      scope:
        kind: Environment
        name: aws
  webhooks:
    - apiscwebhook
Note that the URL above is the URL of the API Builder API so the API Builder project must be deployed/running before setting up the Integration. Replace with the URL of your container.
Note that the scope for the resource hook is my aws environment. You can replace it with your environment name or use an asterisk ‘*’ for all environments.
- Run the following Axway CLI commands to authenticate using your platform credentials and to create the Integration Webhook resources:
axway auth login
axway central create -f resources.yaml
The response will be something like this:
⠋ Creating resource(s)(node:96292) ExperimentalWarning: The fs.promises API is experimental
✔ "integration/apiscintegration" has successfully been created.
✔ "webhook/apiscwebhook" has successfully been created.
✔ "resourcehook/apisc-hook" has successfully been created.
If you need to make a change to your YAML file, say to update the URL of the Webhook, for example, you can use the following command to update the resources:
axway central apply -f resources.yaml
Create Updated API Service Description
A sample payload of the Integration Webhook is shown below:
{
  "id": "59962c01-0a4a-4df7-852a-a2d26fdba0ba",
  "time": "2021-04-29T19:10:11.169+0000",
  "version": "v1",
  "product": "AmplifyCentral",
  "correlationId": "f168edbc-e3e9-4aaf-b72f-6ff7e1cb5104",
  "organization": {
    "id": "100000142"
  },
  "type": "ResourceCreated",
  "payload": {
    "finalizers": [],
    "metadata": {
      "id": "8a2e8394791ac9cf01791f09dcf40a24",
      "audit": {
        "createTimestamp": "2021-04-29T19:10:10.676+0000",
        "createUserId": "DOSA_50e7481fc643403cbc031315cfa013ab",
        "modifyTimestamp": "2021-04-29T19:10:10.676+0000",
        "modifyUserId": "DOSA_50e7481fc643403cbc031315cfa013ab"
      },
      "scope": {
        "id": "8a2e862d779860e20177a6888d450233",
        "kind": "Environment",
        "name": "aws",
        "selfLink": "/management/v1alpha1/environments/aws"
      },
      "resourceVersion": "0",
      "references": [],
      "selfLink": "/management/v1alpha1/environments/aws/apiservices/84912656-a91e-11eb-a3be-0242ac110002"
    },
    "apiVersion": "v1alpha1",
    "kind": "APIService",
    "name": "84912656-a91e-11eb-a3be-0242ac110002",
    "attributes": {
      "ProdHash": "11955938036017705064",
      "createdBy": "AWSDiscoveryAgent",
      "externalAPIID": "6s89mpt1f8",
      "externalAPIName": "ZooStore",
      "GatewayType": "AWS"
    },
    "title": "ZooStore",
    "spec": {
      "icon": {},
      "description": "API From AWS API Gateway (RestApiId: 6s89mpt1f8)"
    },
    "group": "management",
    "tags": [
      "Clinical Trial",
      "SHOULD_DISCOVER"
    ]
  }
}
Note that the webhook payload has a payload property. This is the same payload/response that you would get if you made a GET API call to the API Service directly. This means that it contains all the info we need for:
* Constructing the shields URLs (environment id and proxy id)
* Modifying the description
* Making a PUT API call to update the API Service with the modified description. We will use the selfLink property for the URL of our PUT API call
Here are the properties that we need:
* enviroment id is {{webhook payload}}.payload.scope.id
* proxy id is {{webhook payload}}.payload.attributes.externalAPIID with a prefix of ‘remoteApiId_‘
* description is {{webhook payload}}.payload.spec.description
The following Javascript code fragment from the API Builder API illustrates how the new API Service description is constructed using the shields URL and the existing description:
let payload = req.body.payload;
let url = '/apis'+payload.metadata.selfLink;
let data = payload;
let totalCallsShieldsURL = 'https://img.shields.io/endpoint?style=social&url=https%3A%2F%2F'+baseAddress+'%2Fapi%2Fmetrics%3Fmetrictype%3Dtotalnumcalls%26eid%3D'+data.metadata.scope.id+'%26pid%3DremoteApiId_'+data.attributes.externalAPIID
let avgResponseTimeShieldsURL = 'https://img.shields.io/endpoint?url=https%3A%2F%2F'+baseAddress+'%2Fapi%2Fmetrics%3Fmetrictype%3Davgresptime%26eid%3D'+data.metadata.scope.id+'%26pid%3DremoteApiId_'+data.attributes.externalAPIID
let errorRateShieldsURL = 'https://img.shields.io/endpoint?url=https%3A%2F%2F'+baseAddress+'%2Fapi%2Fmetrics%3Fmetrictype%3Derrorrate%26eid%3D'+data.metadata.scope.id+'%26pid%3DremoteApiId_'+data.attributes.externalAPIID
data.spec.description = ' ' + ' ' + '\n\n' + data.spec.description;
Note that the API Builder base address as referenced in the shields URL is a variable (actually an environment variable). This provides the necessary flexibility for development and production deployments.
Then the API Builder API simply makes the PUT API call to the selfLink with the modified API Service payload.
Modify The API Service Description Manually
Now that we see how the shields can be automatically added to a newly discovered API Service, we still need to handle the case of previously discovered APIs. If we want to add shields to previously discovered APIs, then we will need to do that manually.
Thankfully, the Axway CLI makes that pretty straightforward.
Here is what we need to do:
- Use the CLI to retrieve the API Service definition as a YAML file
- Construct the API Builder metrics API URL for the 3 shields we want to add based on the environment and proxy id in the API Service
- Use the Shields Endpoint form to create shields URLs
- Add the shields URLs as markdown images and modify the API Service YAML we downloaded
- Use the CLI to apply the modified API Service YAML in order to modify the API Service description
Retrieve API Service
Use the Axway CLI to log in to the platform using:
axway auth login
Your default browser will launch and you will be prompted to log in to the platform. Use your platform login credentials and log in.
Use the Axway CLI to get the list of existing API Services:
axway central get apiservices
The response for my environment is:
NAME AGE TITLE RESOURCE KIND SCOPE KIND SCOPE NAME
76e36ebc-7e0e-11eb-b160-005056acbe54 3 months ago Stockquote APIService Environment v7a
42e7ba2e-b463-11eb-a18c-0242ac110002 12 days ago PetStore APIService Environment aws
d47c1a63-8d7d-11eb-99ea-0242ac110003 2 months ago weather APIService Environment v7b
421dddfe-b463-11eb-a18c-0242ac110002 12 days ago ZooStore APIService Environment aws
2503419d-8cea-11eb-9e62-0242ac110003 2 months ago translate APIService Environment v7b
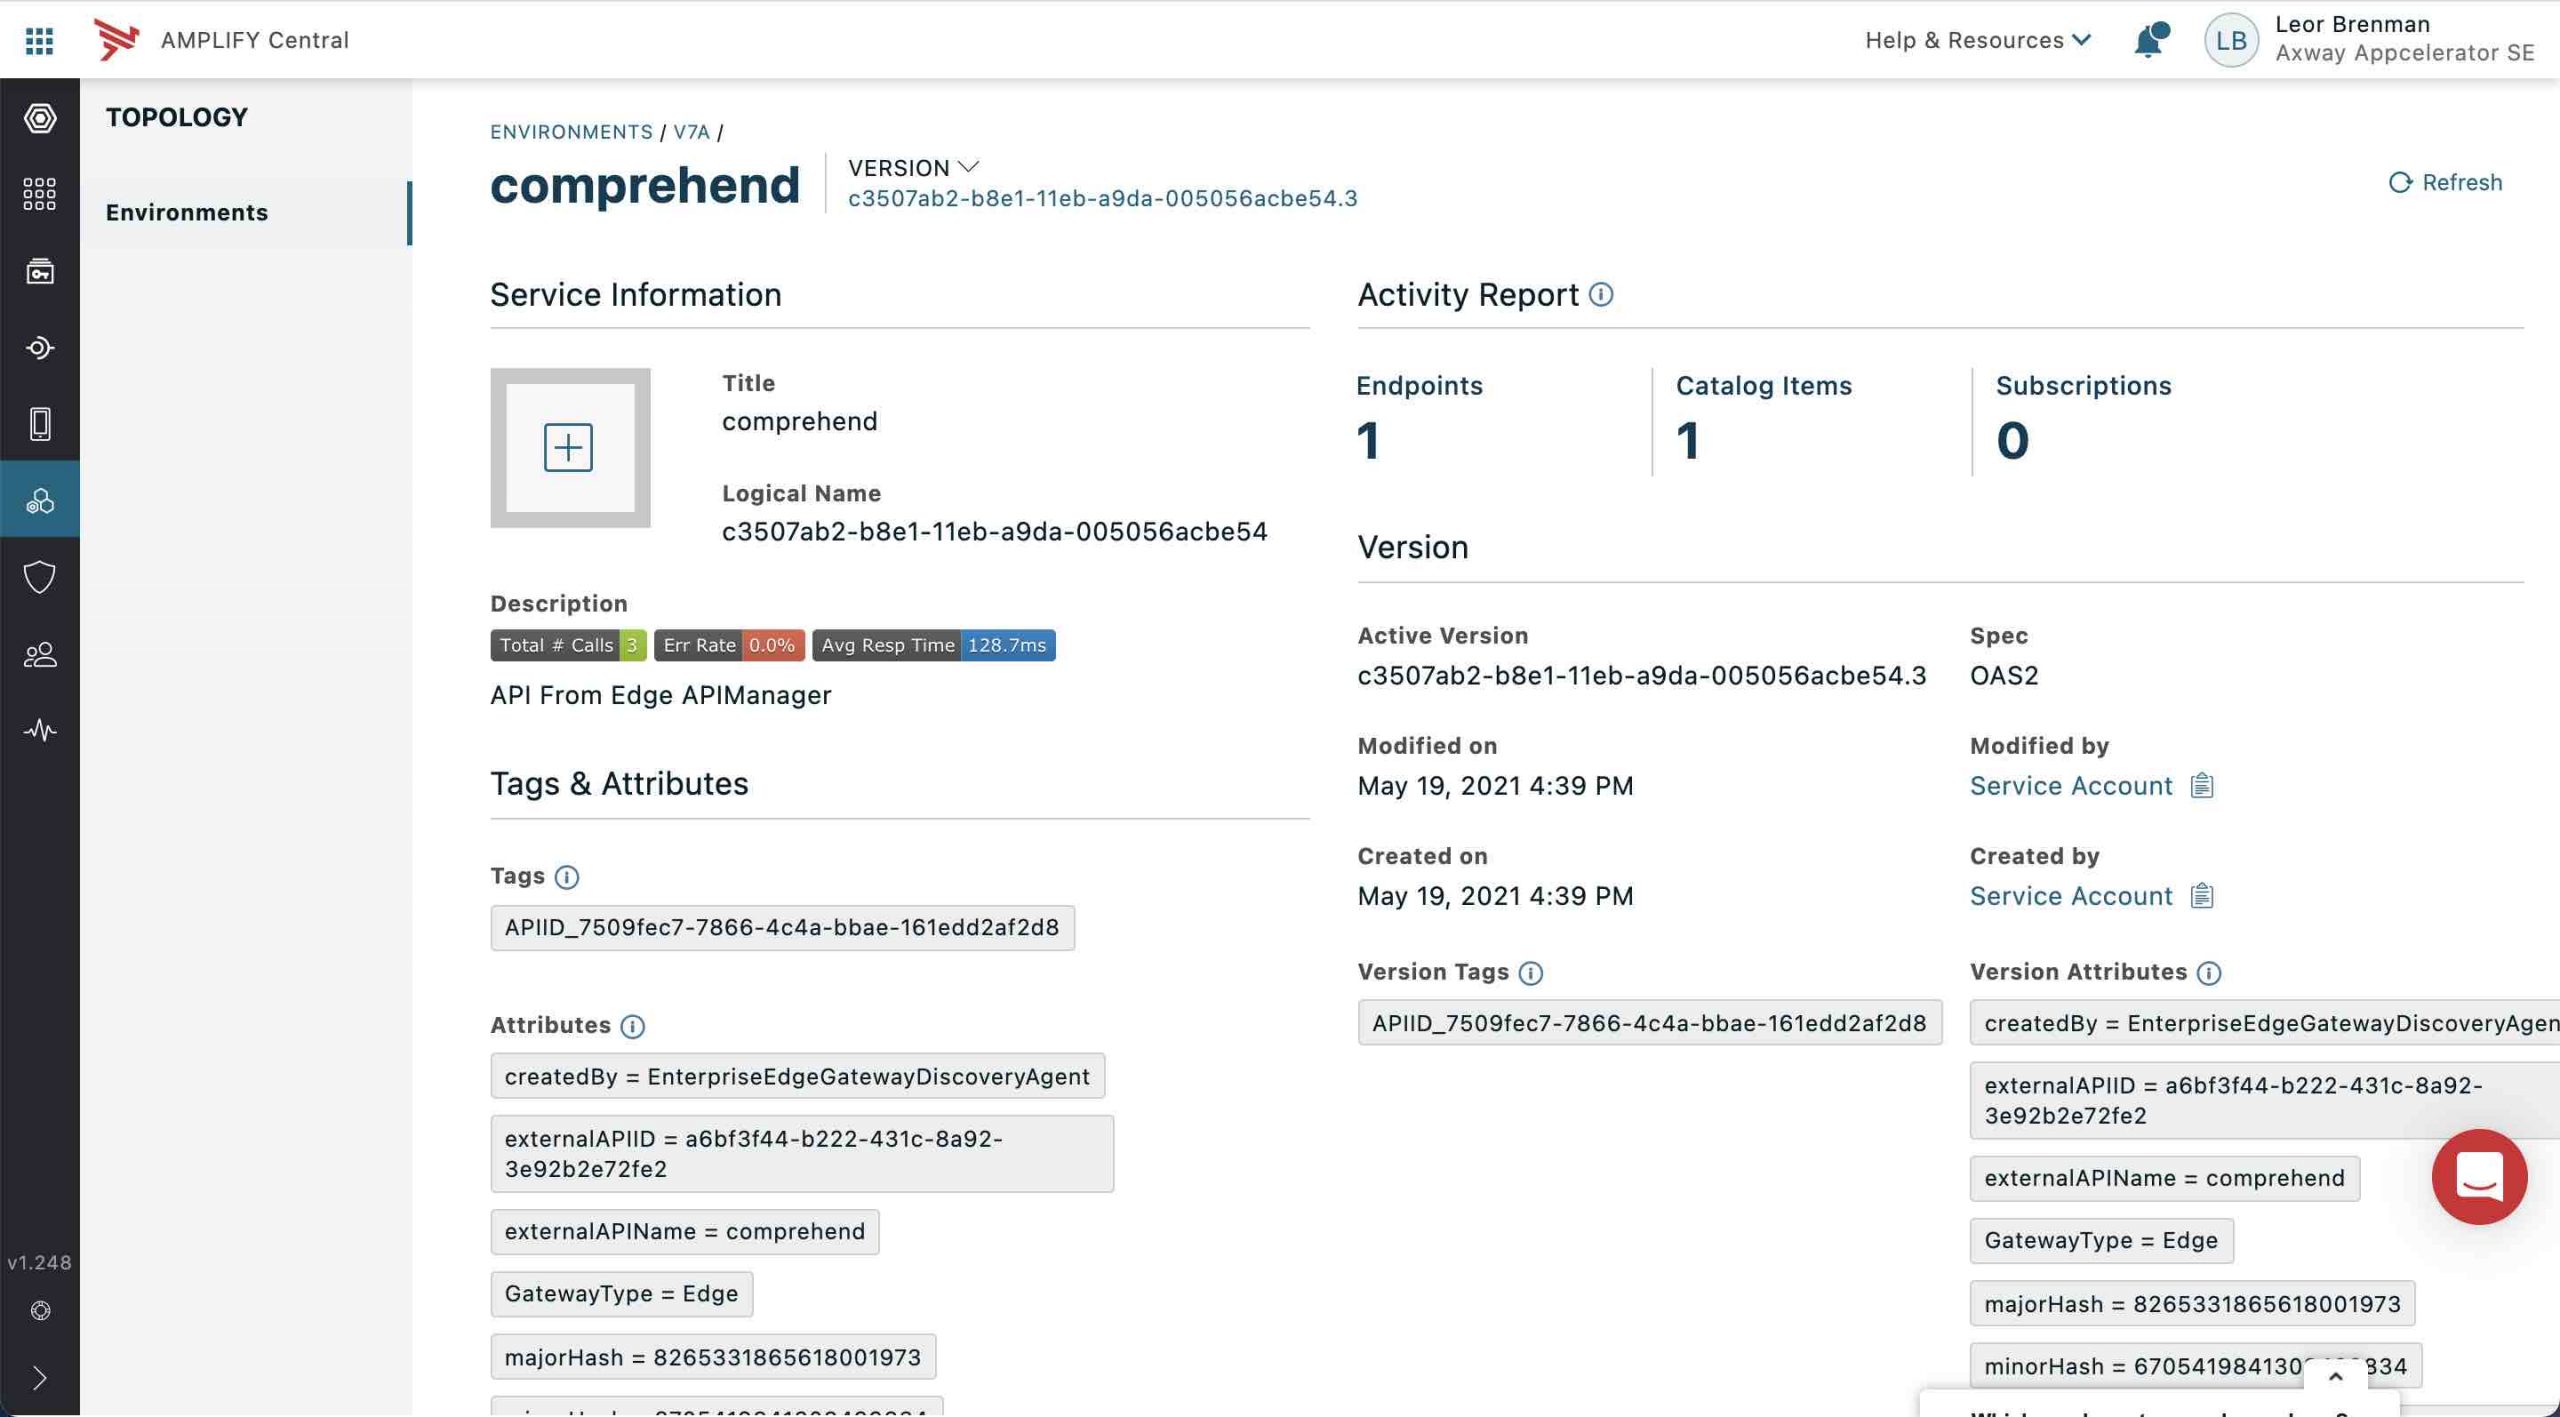
c3507ab2-b8e1-11eb-a9da-005056acbe54 6 days ago comprehend APIService Environment v7a
petstore a year ago Petstore APIService Environment mulesoftI’ll modify my comprehend API Service below as an example:
Get the desired API Service (e.g. comprehend) as YAML:
axway central get apiservices c3507ab2-b8e1-11eb-a9da-005056acbe54 -s v7a -o yaml
The response is:
group: management
apiVersion: v1alpha1
kind: APIService
name: c3507ab2-b8e1-11eb-a9da-005056acbe54
title: comprehend
metadata:
  id: 8a2e97f7798226dd017986573ebf1cfd
  audit:
    createTimestamp: '2021-05-19T20:35:35.231+0000'
    createUserId: DOSA_ced1f1cf6c8048e89eb591065a6c7813
    modifyTimestamp: '2021-05-19T20:39:37.114+0000'
    modifyUserId: DOSA_ced1f1cf6c8048e89eb591065a6c7813
  scope:
    id: 8a2e92f577a98b2b0177b6a2603b0aa2
    kind: Environment
    name: v7a
    selfLink: /management/v1alpha1/environments/v7a
  resourceVersion: '2'
  references: []
  selfLink: >-
    /management/v1alpha1/environments/v7a/apiservices/c3507ab2-b8e1-11eb-a9da-005056acbe54
attributes:
  createdBy: EnterpriseEdgeGatewayDiscoveryAgent
  externalAPIID: a6bf3f44-b222-431c-8a92-3e92b2e72fe2
  externalAPIName: comprehend
  GatewayType: Edge
  majorHash: '8265331865618001973'
  minorHash: '6705419841308499834'
finalizers: []
tags:
  - APIID_7509fec7-7866-4c4a-bbae-161edd2af2d8
spec:
  icon: {}
  description: API From Edge APIManager
Save the returned YAML in a file called resource.yaml.
Construct the API Builder Metric API URLs
Look at the YAML and find the environment id (metadata.scope.id). Mine is 8a2e92f577a98b2b0177b6a2603b0aa2.
Find the externalAPIID (attributes.externalAPIID) and prefix with ‘remoteApiId_’. This will be the proxy id. Mine is remoteApiId_a6bf3f44-b222-431c-8a92-3e92b2e72fe2.
Now let’s construct our API Builder API URLs using the environment id, proxy id, and metric type as follows:
* {{API Builder Base Address}}/api/metrics?eid={{environment id}}&pid={{proxy id}}&metrictype=totalnumcalls
* {{API Builder Base Address}}/api/metrics?eid={{environment id}}&pid={{proxy id}}&metrictype=errorrate
* {{API Builder Base Address}}/api/metrics?eid={{environment id}}&pid={{proxy id}}&metrictype=avgresptimeFor my comprehend API and API Builder project hosted in ARS, the URLs are:
* https://c940....45eb0.cloudapp-enterprise.appcelerator.com/api/metrics?eid=8a2e92f577a98b2b0177b6a2603b0aa2&pid=remoteApiId_a6bf3f44-b222-431c-8a92-3e92b2e72fe2&metrictype=totalnumcalls
* https://c940....45eb0.cloudapp-enterprise.appcelerator.com/api/metrics?eid=8a2e92f577a98b2b0177b6a2603b0aa2&pid=remoteApiId_a6bf3f44-b222-431c-8a92-3e92b2e72fe2&metrictype=errorrate
* https://c940....45eb0.cloudapp-enterprise.appcelerator.com/api/metrics?eid=8a2e92f577a98b2b0177b6a2603b0aa2&pid=remoteApiId_a6bf3f44-b222-431c-8a92-3e92b2e72fe2&metrictype=avgresptime
Create Shields URLs
For each of the API Builder URLs, we’ll need to construct a shields URL using the Shields Endpoint form.
Copy and paste each API Builder URL into the form and click the Copy Badge URL button as shown below:
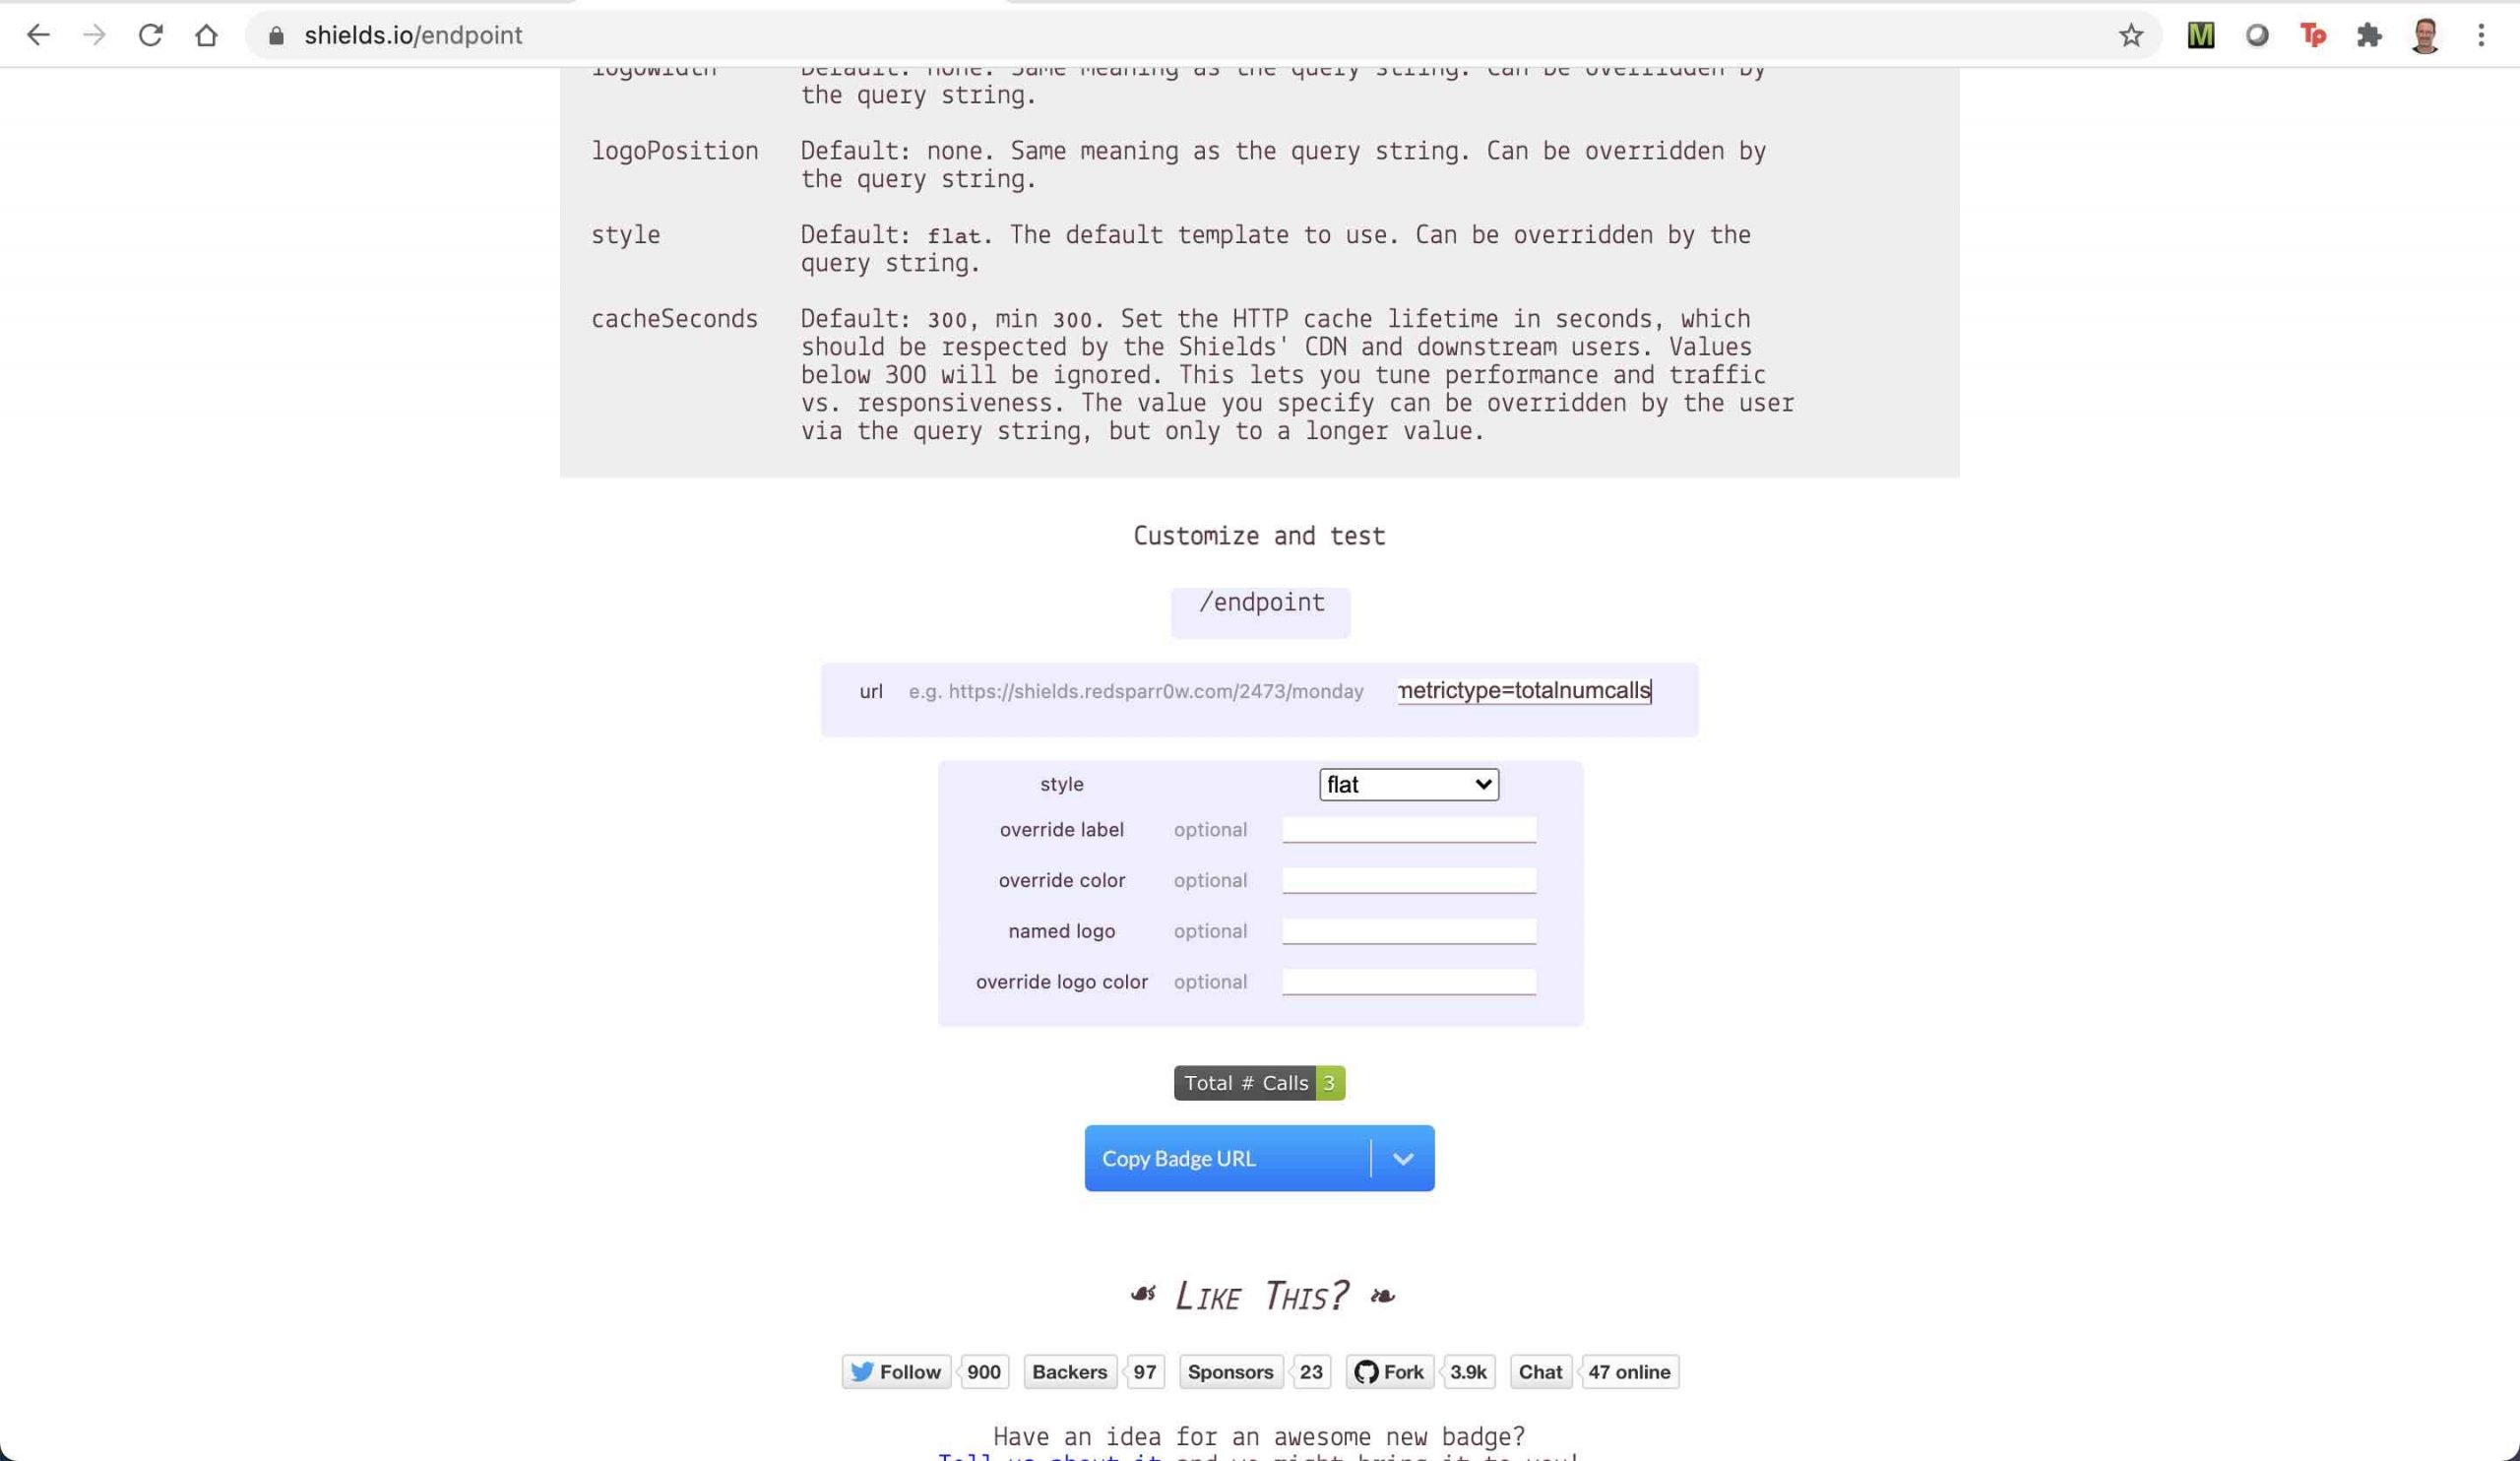
Note the displayed shield above the Copy Badge URL button. This is based on the response from the API Builder service and is what the resulting shield will look like in the API Service once we are done.
My 3 shields URLs are:
* https://img.shields.io/endpoint?url=https%3A%2F%2Fc940....45eb0.cloudapp-enterprise.appcelerator.com%2Fapi%2Fmetrics%3Feid%3D8a2e92f577a98b2b0177b6a2603b0aa2%26pid%3DremoteApiId_a6bf3f44-b222-431c-8a92-3e92b2e72fe2%26metrictype%3Dtotalnumcalls
* https://img.shields.io/endpoint?url=https%3A%2F%2Fc940....45eb0.cloudapp-enterprise.appcelerator.com%2Fapi%2Fmetrics%3Feid%3D8a2e92f577a98b2b0177b6a2603b0aa2%26pid%3DremoteApiId_a6bf3f44-b222-431c-8a92-3e92b2e72fe2%26metrictype%3Derrorrate
* https://img.shields.io/endpoint?url=https%3A%2F%2Fc940....45eb0.cloudapp-enterprise.appcelerator.com%2Fapi%2Fmetrics%3Feid%3D8a2e92f577a98b2b0177b6a2603b0aa2%26pid%3DremoteApiId_a6bf3f44-b222-431c-8a92-3e92b2e72fe2%26metrictype%3Davgresptime
Add Shields URLs to the YAML
Modify the resource.yaml file you created earlier and modify the description as follows:
group: management
apiVersion: v1alpha1
kind: APIService
name: c3507ab2-b8e1-11eb-a9da-005056acbe54
title: comprehend
metadata:
id: 8a2e97f7798226dd017986573ebf1cfd
audit:
createTimestamp: '2021-05-19T20:35:35.231+0000'
createUserId: DOSA_ced1f1cf6c8048e89eb591065a6c7813
modifyTimestamp: '2021-05-19T20:39:37.114+0000'
modifyUserId: DOSA_ced1f1cf6c8048e89eb591065a6c7813
scope:
id: 8a2e92f577a98b2b0177b6a2603b0aa2
kind: Environment
name: v7a
selfLink: /management/v1alpha1/environments/v7a
resourceVersion: '2'
references: []
selfLink: >-
/management/v1alpha1/environments/v7a/apiservices/c3507ab2-b8e1-11eb-a9da-005056acbe54
attributes:
createdBy: EnterpriseEdgeGatewayDiscoveryAgent
externalAPIID: a6bf3f44-b222-431c-8a92-3e92b2e72fe2
externalAPIName: comprehend
GatewayType: Edge
majorHash: '8265331865618001973'
minorHash: '6705419841308499834'
finalizers: []
tags:
- APIID_7509fec7-7866-4c4a-bbae-161edd2af2d8
spec:
icon: {}
description: |+
  
API From Edge APIManagerUpdate API Service
Apply updated YAML:
axway central apply -f resources.yaml
A successful response is shown below:
✔ "apiservice/c3507ab2-b8e1-11eb-a9da-005056acbe54" has successfully been updated.
The API Service should now contain your API traffic badges:
Summary
In this blog post, we saw how the openness and extensibility of the Amplify Platform enable us to customize the platform to our API Governance needs. We leveraged several aspects of the platform such as the Axway Central CLI, Amplify Central APIs, including Traceability Search APIs and Integration Webhooks to automatically add API Traffic shields to an API Service. We also used the Axway CLI to add the traffic shields manually so that we could update previously discovered APIs. This will give API Governance team a greater user experience in the platform UI and save time and effort.
A Docker container that implements this service can be found here. The underlying API Builder project can be found here.
Learn more about Amplify Central Integration Webhooks – API Publish Approval.