If you joined us for the Virtual Axway IMAGINE SUMMIT 2020, watched the recording, or checked out the demo VOD (video on demand) after, you have likely seen the platform demo we put together for the CTO’s Open Everything portion of the event.
We have a simulated deep-dive virtual event coming in September where we go deeper, but having received several requests for more information on the setup now, I have decided to put together a Devblog series to cover the configuration.
Introduction
In our IMAGINE SUMMIT Demo, a company called ACME needed to enable more partners to use their service. A key piece of this is customer onboarding. This process is often overlooked as it is one-and-done – once completed, it generally does not need to be revisited. With that said, it is very important for several reasons.
- This is your partner’s first experience with your offering. A frictionless first experience sets the stage for ongoing exemplary CX.
- Frictionless onboarding gets partners using the system faster; they are more likely to continue use.
- Faster onboarding also means more rapid revenue realization.
In our demo, we handle the automated onboarding into our Syncplicity service, which we will cover in another post. But we wanted to take it a step further. I know I for one rarely work with paper or pen anymore. As a result, my printer is in the basement. To physically sign and return a document is a couple of trips up and down to print, sign, scan, and shred (assuming it is not a mail-in – digital initiatives forbid), which can lead to procrastination on my part. What if I could receive a digital document and electronically sign it all from the comfort of my computer desk in a matter of seconds with a few clicks? Some may call that attitude lazy, but I tend to embrace “work smart, not hard” or “utilize force multipliers” wherever possible, and the experience for me is far superior.
This blog post shows how to work with Adobe Sign in, Axway’s Application Integration portion of the AMPLIFY Platform, as well as being to enable Event-Driven Architecture (EDA) in an organization. The configuration will mirror the setup we used for the Axway virtual IMAGINE SUMMIT 2020 to support the CTO Open Everything demo. You can learn more about this in the CTO’s follow up blog article.
This will be the first blog in a series that shows how we “Open Everything” using Axway technology in the Axway 2020 Imagine Tech Demo. The blog series will consist of these parts:
- Application Integration and Adobe Sign
- Application Integration and Syncplicity Onboarding
- TBD
Prerequisites
This blog assumes you have a working Adobe Sign instance. The focus is on creating the application and integrating it into Axway Integration Builder.
This post assumes a working knowledge of Axway Integration Builder.
Configure Adobe Sign Application
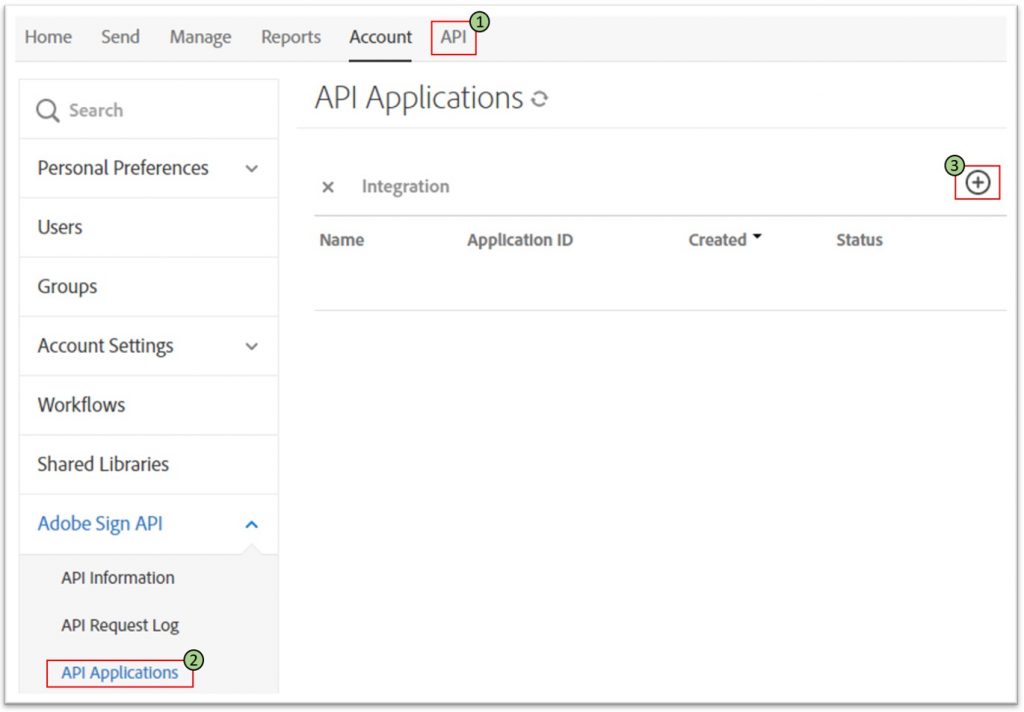
- Login to the Adobe Sign web portal. Your URL will vary depending on which region slice your account is set up in. Example: https://secure.eu1.echosign.com/public/login. Navigate to the API page by clicking the link on the horizontal bar at the top of the page.
- Click on “API Applications”.
- Click the “+” (plus) button in the top right-hand corner to create a new API Application.
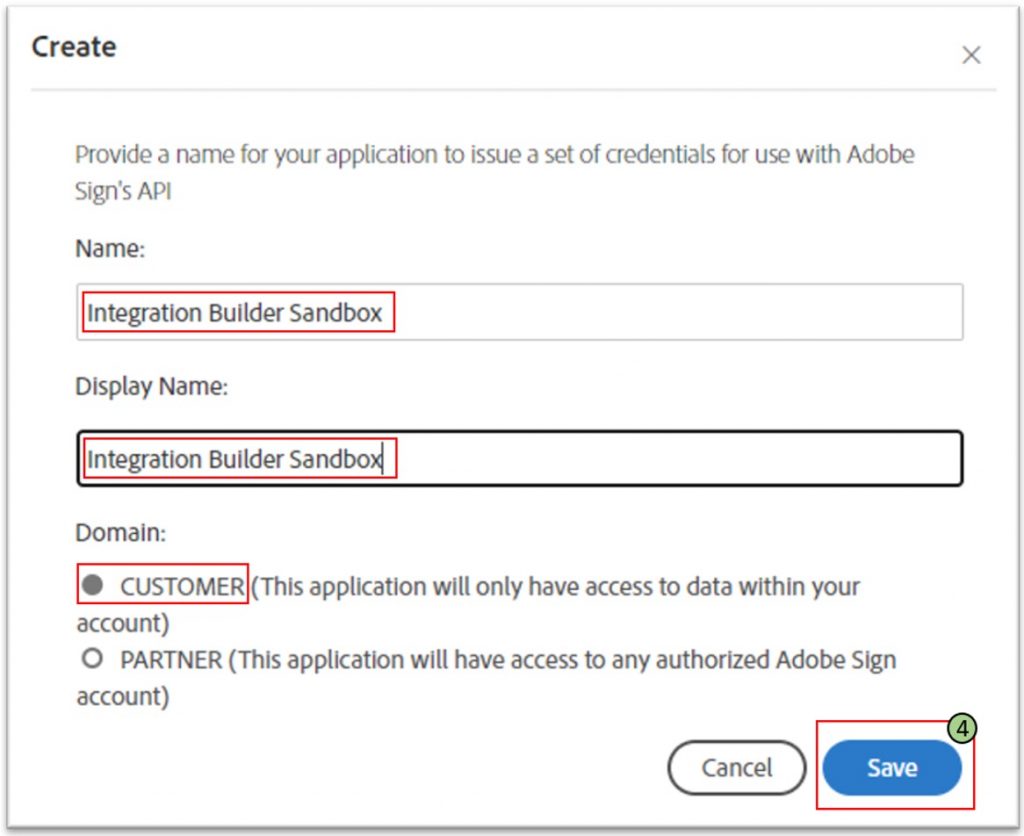
- Fill in the dialog box as shown below and click “Save”.
- Name: Your Choice (eg Integration Builder Sandbox)
- Display Name: Your Choice (eg Integration Builder Sandbox)
- Domain: Customer
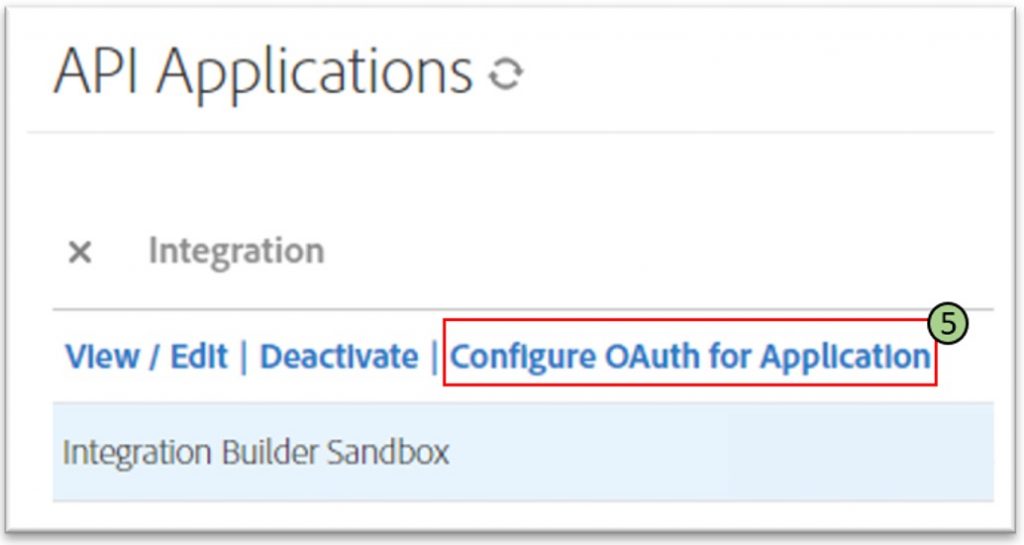
- Once the API Application has been created, click on it and choose “Configure OAuth for Application” on the task bar above it.
- Configure this setup as follows:
- Redirect URL: https://auth.cloudelements.io/oauth
- Scopes: For my testing, I enabled all scopes at the “account” level, but the webhook scopes should not be required.
- Capture your Client ID and Client Secret for authentication in Integration Builder.
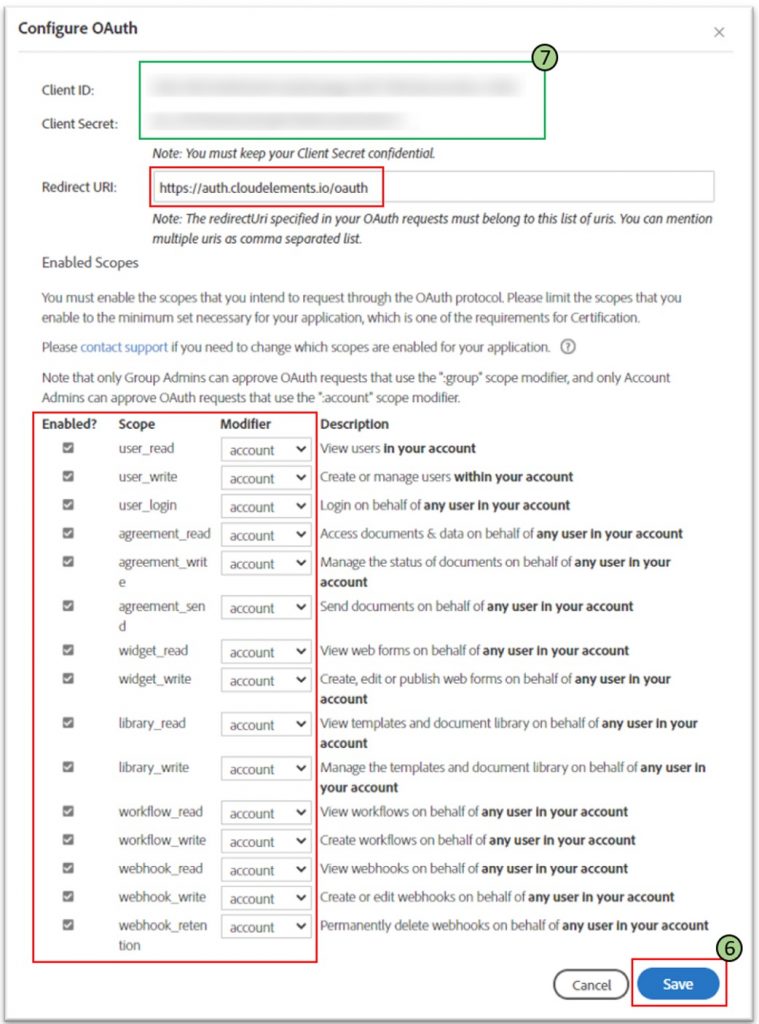
At this point, you should have an API application built in Adobe Sign with credentials that can be used to generate an OAuth connection from Axway Integration Builder.
Setup Abobe Sign Connector Instance
- Log into the Axway Platform and select your Integration Builder environment. Click on “Connectors” and navigate to the Adobe Sign Connector.
- Hover over the Adobe Sign Connector box and choose “Authenticate” to configure your Instance.
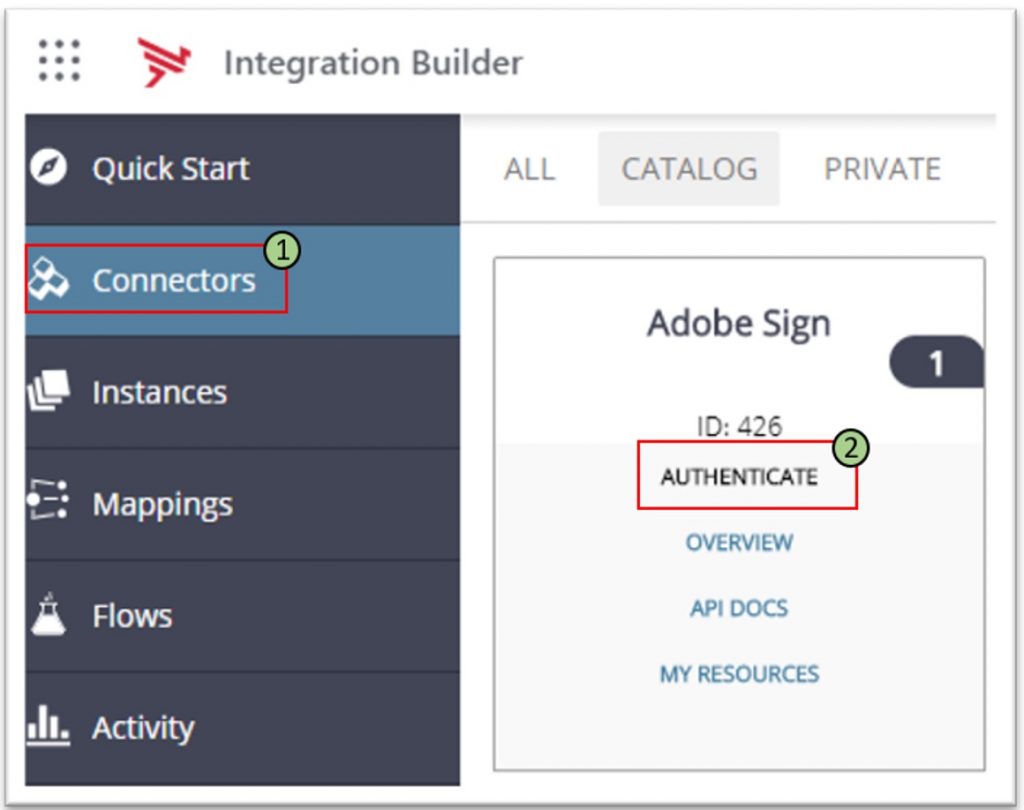
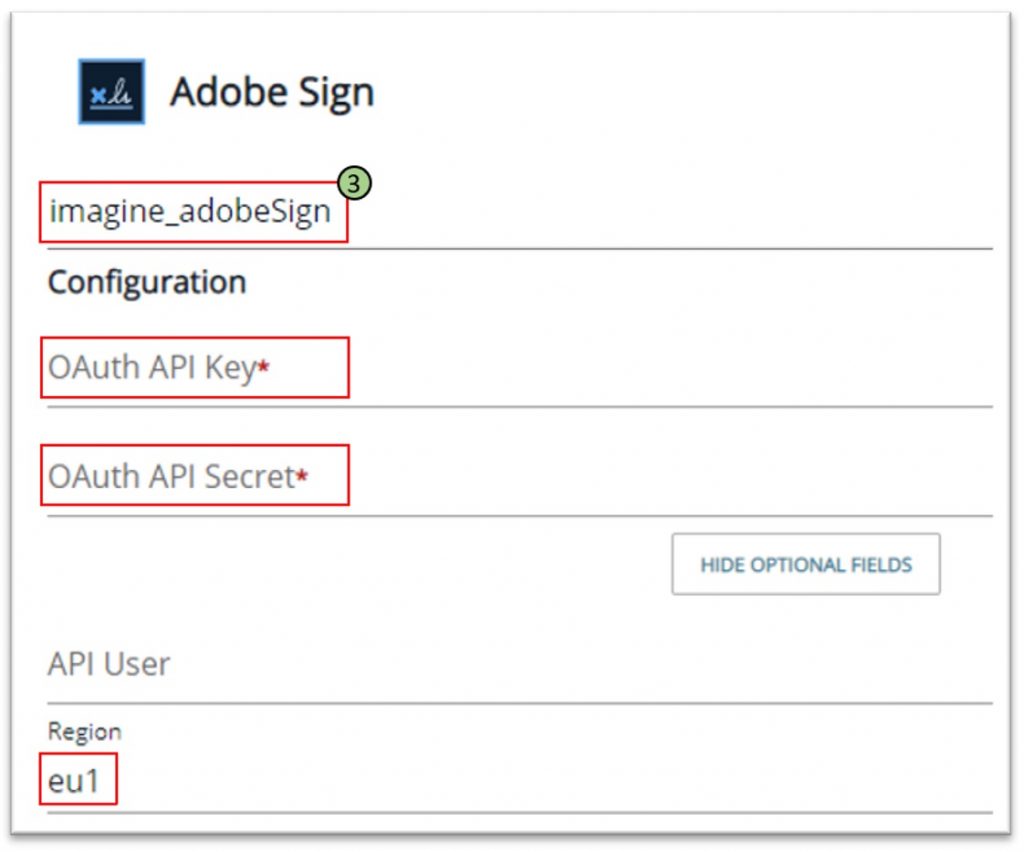
- Expand the drop-down to “Show Additional Fields”. Configure the Connector Instance as shown below.
- Name: Your Choice (eg imagine_adobeSign)
- OAuth API Key and Secret: Enter the values from step 7 in the previous section.
- Region: Change this to match the region slice you used from step 1 in the previous section (eg eu1).
- Toggle the “Events Enabled” box in the Event Configuration section. Change the “Refresh Interval” to one minute. This will enable us to poll the Adobe REST API to see new Events that occur in the ESign process and use them in an Event Trigger later.
- Ensure you are logged into your Adobe Sign account in a separate tab. Click “Create Instance” and follow the authentication dialogs that follow.
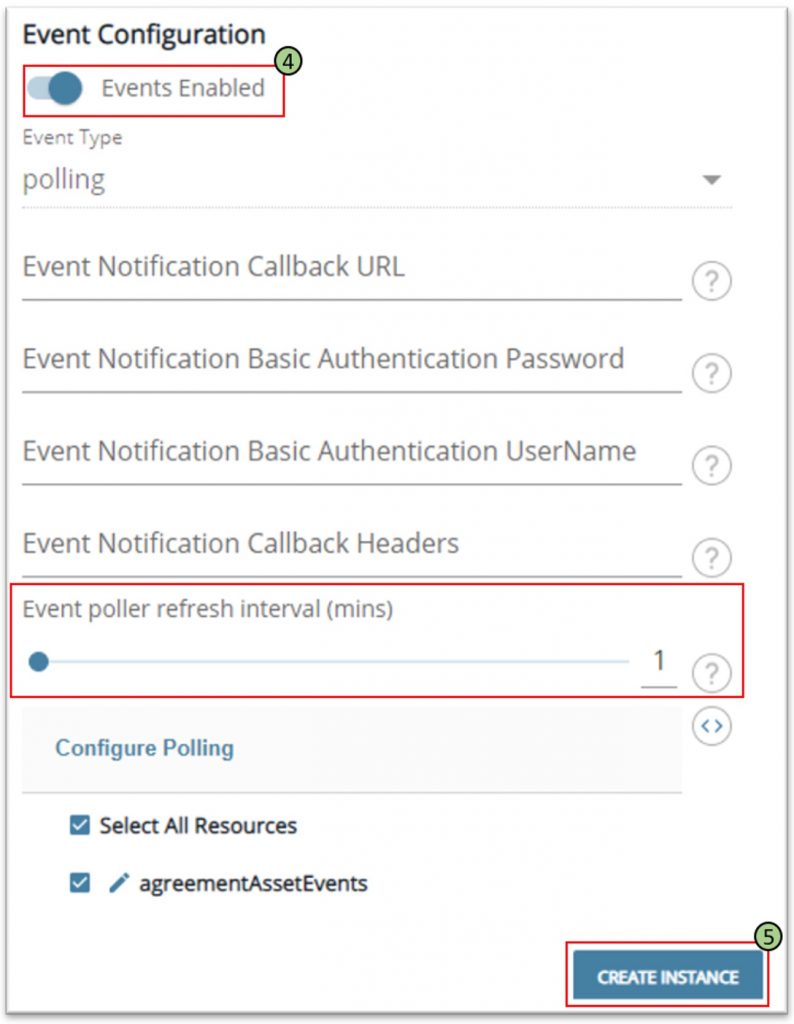
At this point, you should have a working Adobe Sign Connector Instance in Axway Integration Builder. The Instance is also set up to poll Adobe Sign for new signing events once a minute, which can be used to execute additional logic in an Event Trigger, as shown below.
Setup Adobe Sign Agreement Event Flow Template
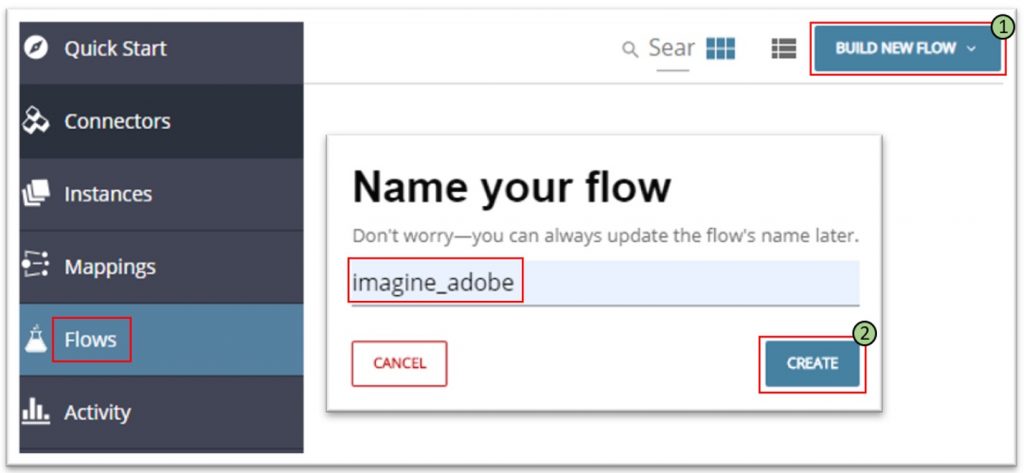
- Navigate to Flows and select “Build New Flow” from the top right corner.
- Give your Flow a name (eg imagine_adobe) and click “Create”.
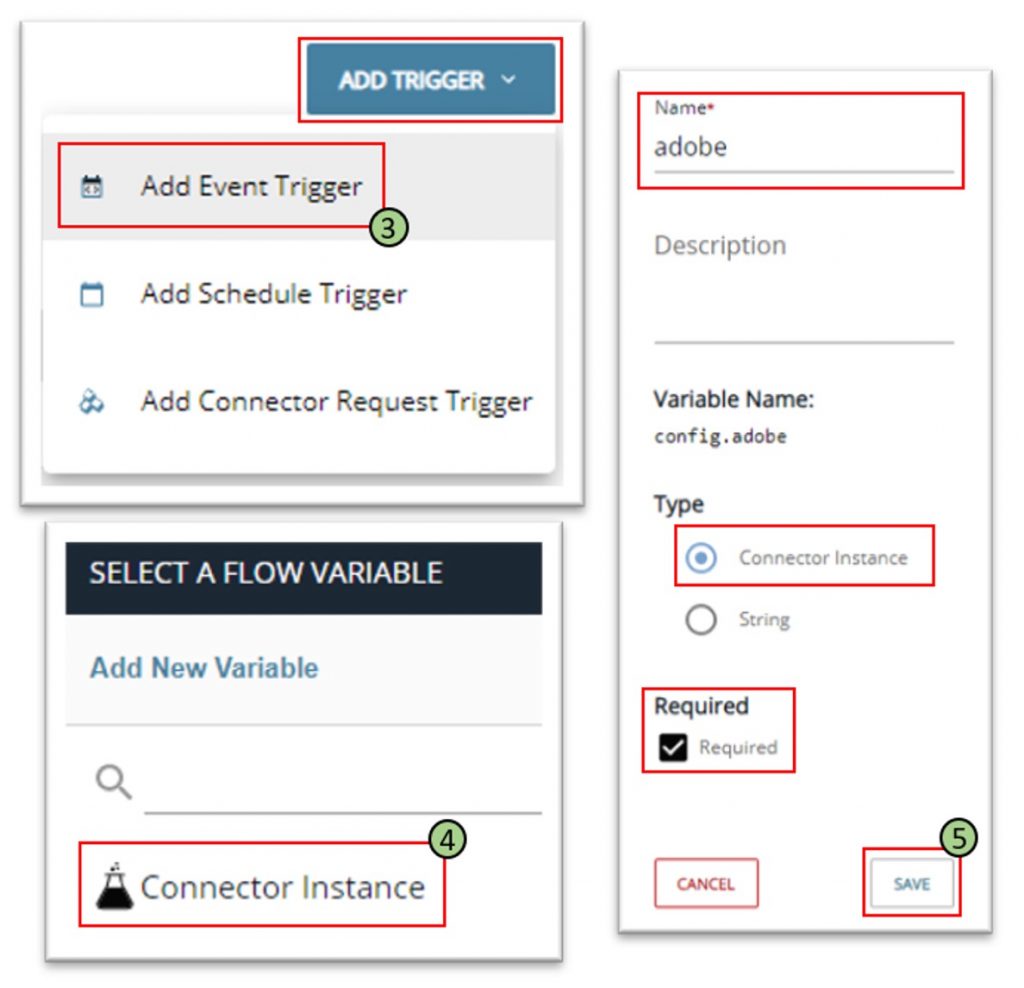
- In your new Flow, select the Trigger and select Edit. Click “Add Trigger” and add an Event Trigger.
- Press the “+” Plus button in the top right, then press the “+” Plus button in the top right of the popup. Select “Connector Instance”.
- Fill out the popup dialog box with a variable we will use to point to our Adobe Sign Connector Instance to track Events as they occur when we poll. Configure it as described here and click Save:
- Name: Your Choice (eg Adobe)
- Description: Optional (eg Adobe Sign Connector Instance)
- Type: Connector Instance
- Required: Check this box.
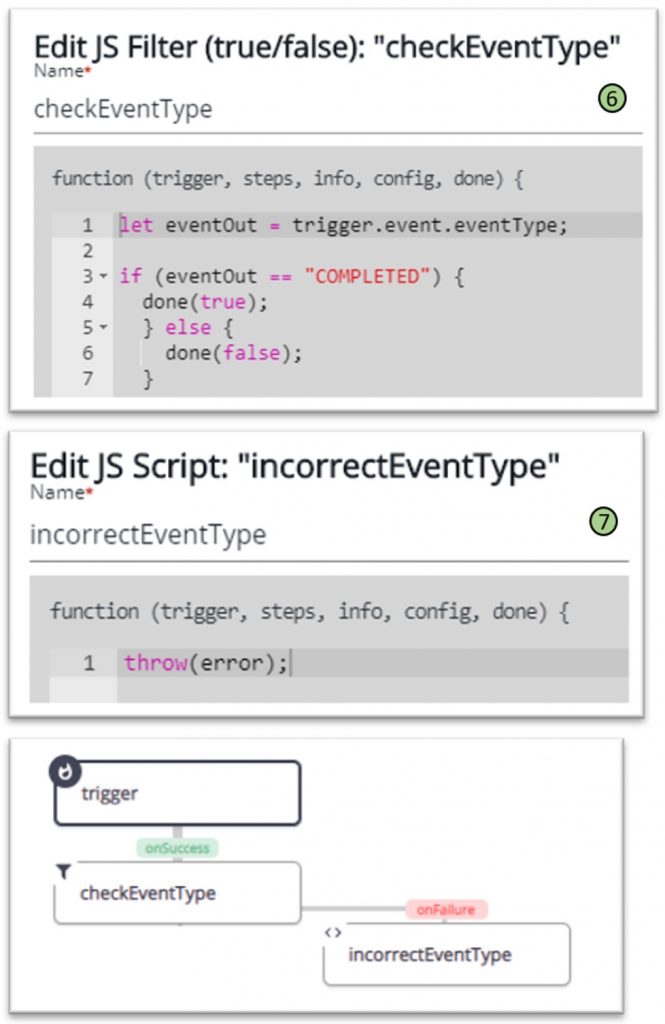
- The Adobe Event Poller will create Events for each step in the ESign process. These include creating the doc on the Adobe server, sending the email for signing, etc. For the Imagine demo, we only wanted to act on the completion of the e-sign process. To do this, we created a Javascript True/False step. If the eventType is “COMPLETED”, we progress with the orchestration logic. If not, we will use a JS Script step to throw an error. First, create your true false step immediately after your Trigger Event.
- Once created, click on the Event Type check and choose “onFailure”. Create your JS Script step here to throw the error.
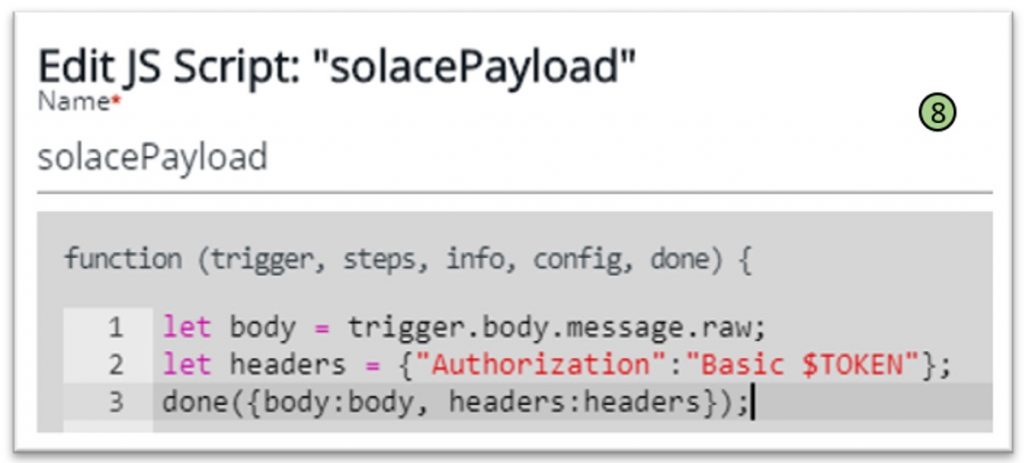
- For our Imagine demo, we posted the COMPLETED payloads to an Event Broker to decouple Integration Builder for directly interfacing with one or more consuming applications, in line with an Event-Driven Architecture (EDA) strategy. To do this, we set the headers and payload to variables, then POSTed them to the REST interface of our Event Broker, in this case, Solace PubSub+. Create a Javascript “onSuccess” step after your checkEventType step and populate it as shown below. Be sure to replace the “$TOKEN” placeholder with your actual Base64 encoded HTTP Basic token.
- Click on Manage in the top right-hand corner and select “Manage Variables”. Select “Add Variable” from the top right.
- Create the new variable as follows to serve as a placeholder for your Event Broker Topic.
- Name: Your Choice (eg SolaceTopic)
- Description: Optional (eg Event Broker Topic)
- Type: String
- Required: Check

- Add an “onSuccess” to this step and do an HTTP Request step to POST the message to your Event Broker. Configure the URL using the Event Broker Topic variable we setup so it can be populated dynamically per Flow Instance (note you could also do this with the host). Be sure to show Advanced Options to add the variables set in the previous step.

You should now have a working Flow Template we can use to create Flow Instances. Both the Adobe Connector Instance and Event Broker Topic can be set dynamically to support multiple lines of business or subscription flows. For this demo, we simply set the Event Broker connection up in the Flow Template. In a Production scenario, we would instead build a new Connector for the Event Broker to ensure we do not hard code security tokens in the Flow.
Create Adobe Flow Instance
- Navigate back to the Flows menu. Hover over your new Flow and choose “Create Instance”.
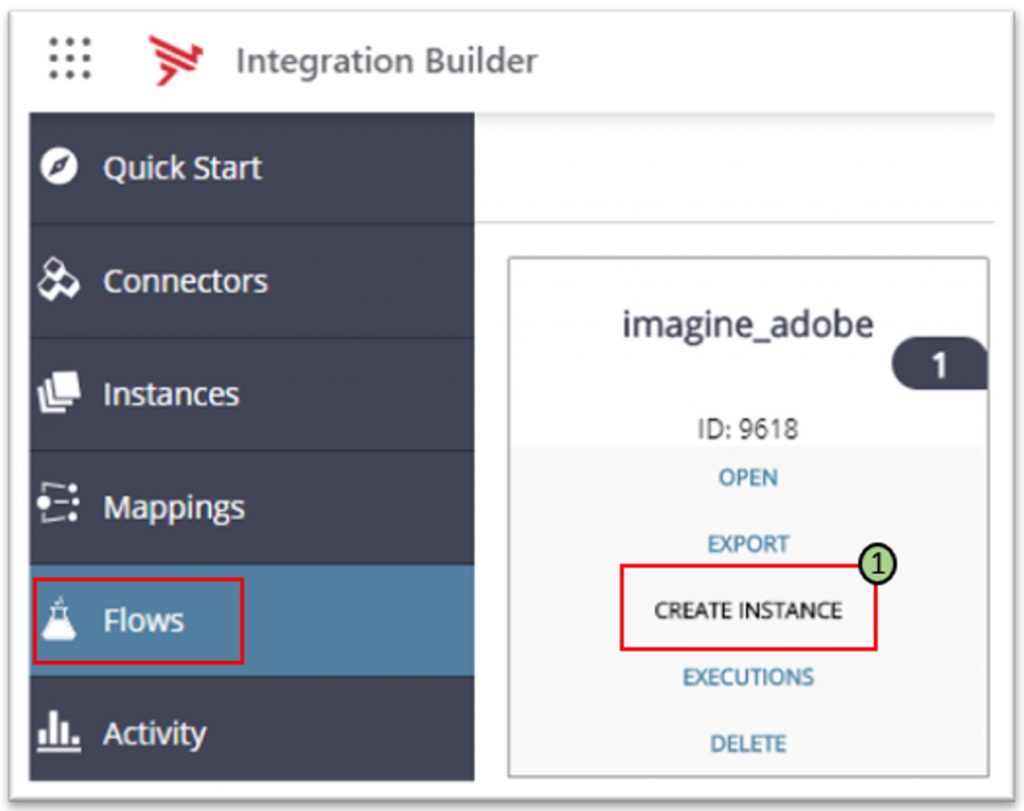
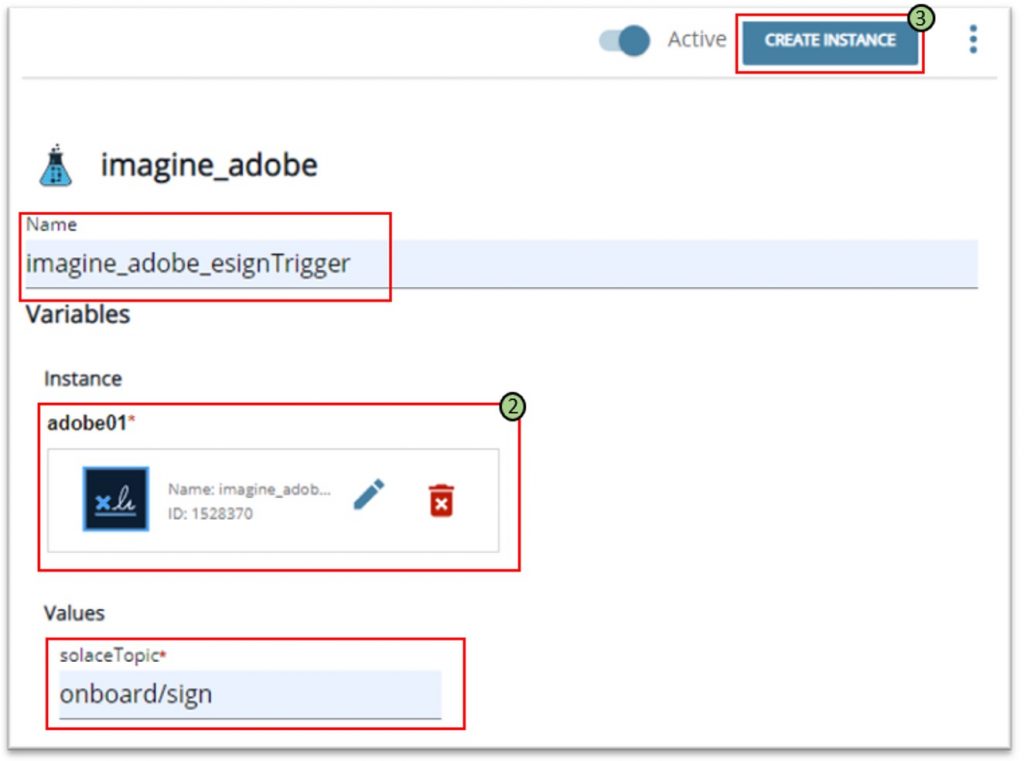
- Configure the Flow Instance: Give your Flow Instance a Name. Click the “+” Plus button next to your adobe variable and select the Connector Instance you created earlier. Populate the eventBrokerTopic field with your Topic path.
- Ensure the Active toggle is enabled, then click the Create Instance button on the top right.
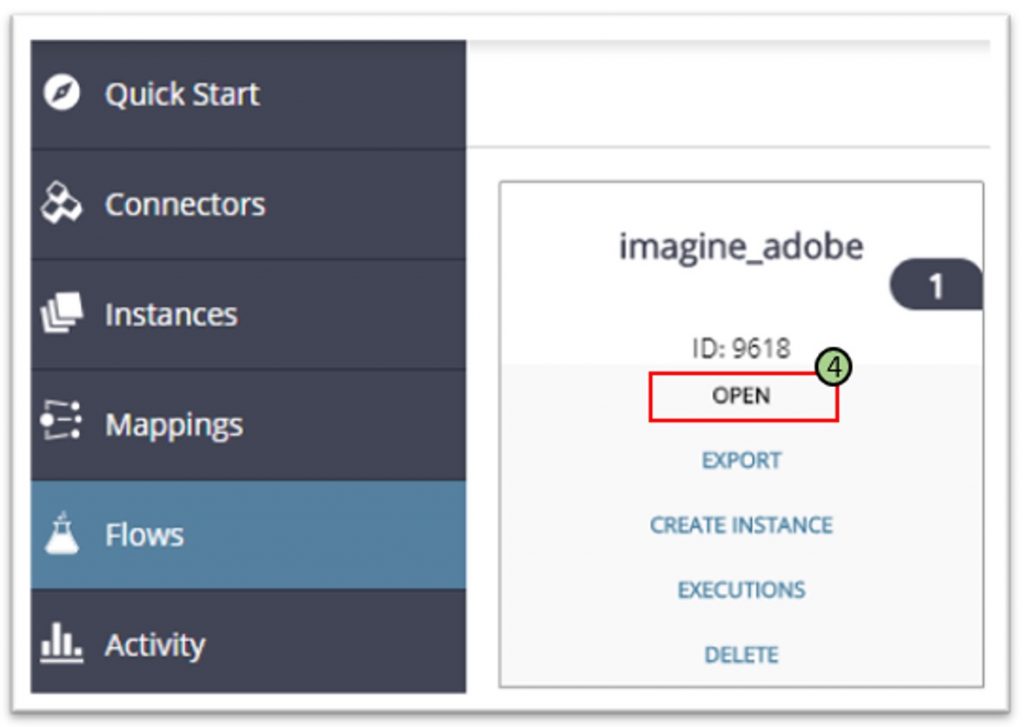
- Go back to the Flow tab. Hover over your Flow Template and select “Open”.
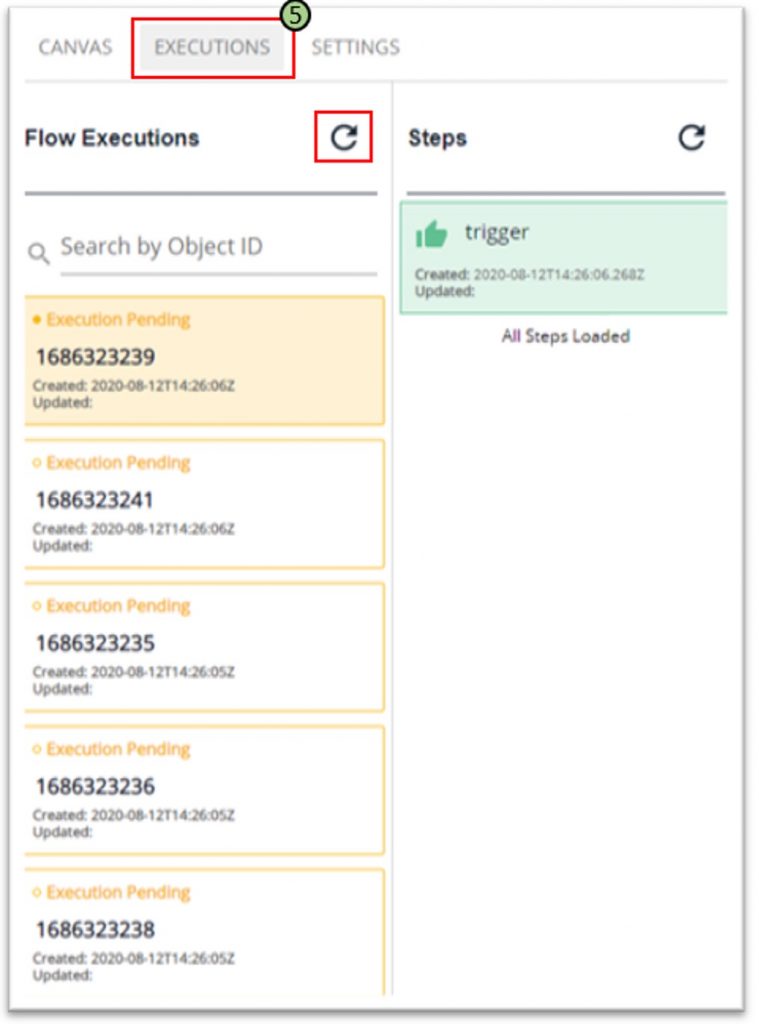
- Select the Executions tab on the top bar. Send a document for ESigning and complete the process. Upon refreshing, you should see your Events start to appear.
- Confirm all Events that were not “COMPLETED” have failed due to the True/False logic we implemented in the flow, but the eventType “COMPLETED” message was Published to your Event Broker, as shown below.
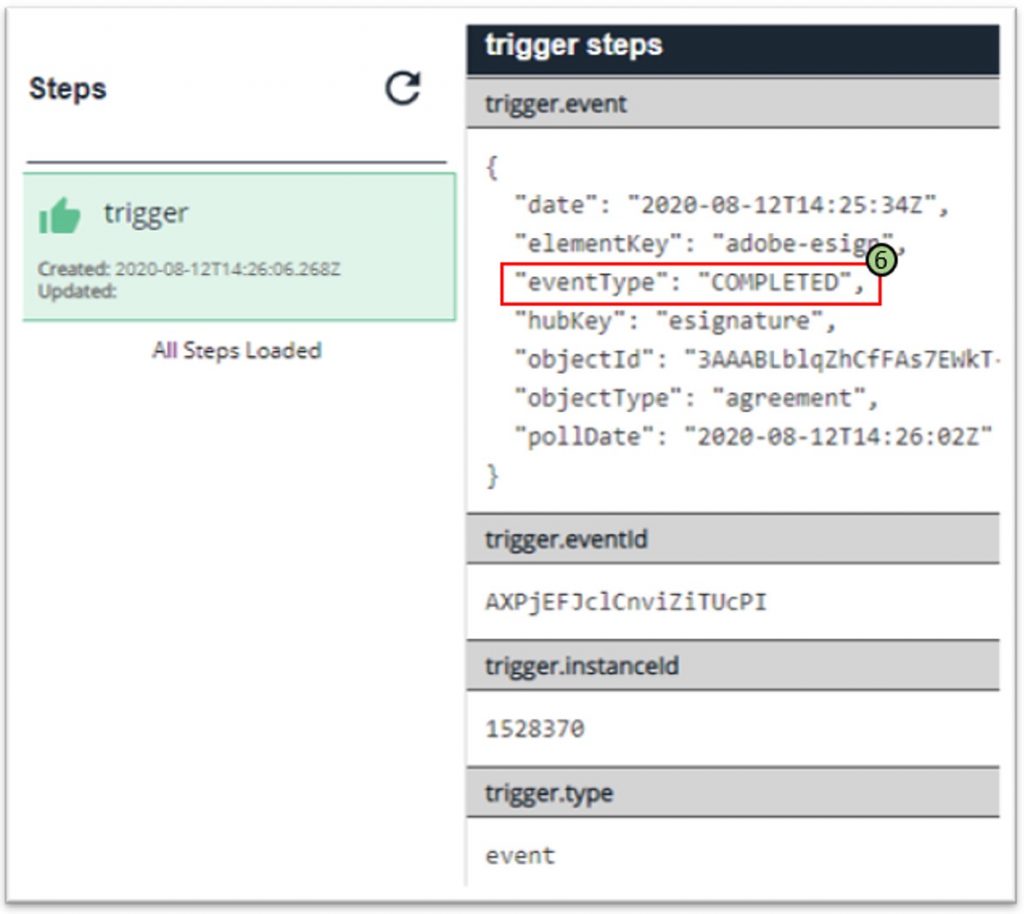
At this point, you should have a working Adobe Sign Connector Instance with Event Polling to enable updates to the Request/Response Agreements API turned into Streaming Events that initiate orchestrated logic in your Flow Instance. This logic checks for the final COMPLETED Event and Publishes the payload of this Event onto and Event Broker Topic.
Conclusion
In this post we covered several topics:
- Setting up Adobe Sign for Application Integration
- Integrating Adobe Sign into Axway’s Integration Builder (IB) using a prebuilt Connector
- Setting up an Event Poller to turn a Connector Instance’s REST API into streaming data to power other processing and Event-Driven Architecture (EDA) requirements.
- Implementing context-based decision logic in an IB Flow.
- Integrating an IB Flow with an Event Broker Topic.
In our IMAGINE SUMMIT Demo, this Adobe Sign Event kicks off our automated onboarding process in Axway Syncplicity to allow partners to start trading files immediately with our ACME company. Stay tuned for more posts that cover the rest of our Open Everything demo and show Axway in Action.
Here is the schedule of our “Demo Deep Dive” demos:
- September 8 – EMEA 11am CEST
- September 9 – Americas 2pm ET
- September 10 – APAC 11am SGT
Register for these demo webinars. Join Axway’s top chefs as they cook up an experience with 9 different products in 2 days.

