A key piece of successful API monetization is making the process more self-service. It’s why we’ve added billing integration to Amplify Enterprise Marketplace, making it easier for providers to collect payments for product usage by consumers, enhancing user convenience and streamlining revenue collection.
In this article, we will explore how to configure a billing platform, integrate it with your API marketplace, build an API Product with a paid plan which leverages the integration, and finally walk through the consumer experience for getting access to an API with the paid plan.
We will be using Stripe as the billing platform in this example.
Stripe account configuration
Navigate to Stripe at https://stripe.com and log into your account.
A developer account can be used to test your Marketplace integration. You can register for a developer account at https://dashboard.stripe.com.
The Marketplace uses a webhook with a Stripe Restricted API Key to communicate between the platforms. At the time of this writing, the Marketplace only supports the Stripe 2022-11-15 API version. The Stripe UI does not provide the ability to generate a webhook using this version, so we will need to use the Stripe platform API to generate the webhook.
Create a Restricted Key for API calls from Marketplace
- Navigate to https://dashboard.stripe.com and log into your stripe account.
- Navigate to Developer -> API Keys.
- Click Create restricted key.
- Use the following values:Name: Amplify Marketplace Integration
Permissions:
Core resource : Customers -Write-
All billing resources : Invoices -Write- - Click create key.
- Click Reveal test key and note the value of the key. It will be required later in when configuring billing in the Marketplace.
Locate the Secret Key for calling Stripe APIs.
- Navigate to Developer -> API Keys.
- In the Standard keys section, click the Reveal test key button.
- Copy the value of the Secret key. This will be used when calling the Stripe Platform APIs.

Use the Stripe Platform API to create the Webhook
Access and Configure Stripe Postman Collection
- Navigate to the Postman Stripe API Collection. You will need to log on to your Postman account or create one.
- Either fork the project (for use online) or export the Collection and Environment (for use locally). In this example we will export and run the collection locally in Postman.
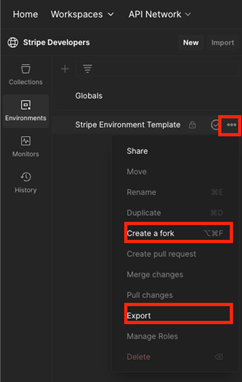
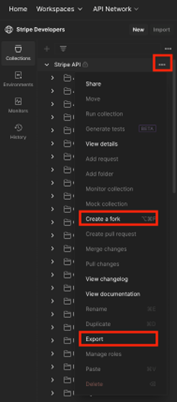
- (Optional) Import the collection into Postman if running locally.
- Make sure the Stripe Environment Template environment is selected.
- Open the Stripe Environment Template.
- Paste the value of the Stripe Secret Key obtained above into the secret_key value in the Stripe Environment Template.
- Save your changes.
Create the Webhook Endpoint
- Locate the Webhook Endpoints folder in the Postman Collection.
- Select the POST Create a webhook endpoint operation.
- Use the following values:Note: Keys for enabled_events[2]&[3] must be added to what is provided in the template.enabled_events[0]: invoice.finalized
enabled_events[1]: invoicemarked_uncollectable
enabled_events[2]: invoice.paid
enabled_events[3]: invoice.voided
url: https://apicentral.axway.com/integrations/stripe
api_version: 2022-11-15
description: [Optional description. Helpful in the Stripe UI to identify the webhook] - Send the POST request. Stripe will return a 200 response containing details about the newly created webhook. It is not necessary to note anything in the response.
- In the Stripe UI, navigate to Developers -> Webhooks. A Hosted endpoint should be present, representing the newly created webhook.
Locate the Webhook signing secret
- Click on the newly created webhook.
- Click the reveal link in the Signing secret column.
- Note the value of the signing secret. It will be used later when configuring Billing in the Marketplace.
Enable Stripe Billing Customer portal
- In the Stripe UI, navigate to Settings -> Billing -> Customer portal
- Enable to Customer portal link.
- Copy the link URL. This will be used when configuring billing in the Enterprise Marketplace.
Enable Stripe Integration in Marketplace
- Navigate to https://platform.axway.com and log in.
- Navigate to Organization -> Marketplace. The Organization link can be found under the Organization name located in the top right corner of the UI.
- Select the Marketplace where billing will be enabled.
- Select the Billing tab.
- Enable the billing integration.
- Select Stripe form the billing Vendor list.
- Restricted key: Enter the restricted key obtained earlier when configuring Stripe.
- Webhook signature: Enter the value of the Webhook signing secret obtained after creating the webhook in Stripe.
- Customer portal: Enter the URL of the Stripe Billing customer portal obtained when enabling the customer portal in Stripe.
- Click Save.
This completes the configuration of both Stripe and Amplify Marketplace, enabling the Marketplace to use Stripe as a billing platform.
Enable Consumer Organizations in the Marketplace
Marketplace Consumers must be members of a Consumer Organization. If self-signup is enabled for a Marketplace, a new user has the option to create a new Consumer Organization and they will become the administrator of that Organization. If self-signup is not enabled then a Marketplace administrator must create a Consumer Organization and invite the initial member, who will become the administrator.
Creating and managing Consumer Organizations is outside the scope of this example. Complete details and instructions can be found in the Consumer organization management section of the Marketplace documentation.
- Navigate to https://platform.axway.com and log in.
- Navigate to Marketplaces.
- Locate the tile representing the Marketplace you want to configure.
- Click on the name of the Marketplace.
- Under settings, check the following.
Note the Marketplace URL
Consumer Organizations: Allow
Self Signup: Disallow/Allow (optional)
If self-signup is disallowed, navigate to Consumer orgs then create a new org and invite a user per the instructions in the documentation linked above.
If self-signup is allowed, then navigate to the Marketplace URL and register as a consumer.
Note: Before registering as a consumer, you will need to either log out of the Marketplace administrative view or use a browser’s anonymous capabilities. Otherwise you will connect to the consumer Marketplace as your admin account.
Create a Product with a Pricing Plan
In the previous section, a Marketplace was configured to integrate billing with the Stripe platform. Any product containing a paid Plan which is published to the integrated Marketplace will use Stripe for billing.
Multiple Marketplaces can be configured to use the same Stripe integration. The steps from the previous section simply need to be followed for each subsequent Marketplace.
Note: These steps assume you are familiar with creating an API Product in the Marketplace and have existing Assets to place into a Product. If not, please refer to the Marketplace Documentation sections for Manage your Service Registry and Manage your Asset Catalog. Once you have Assets, return to these instructions.
See also: How to curate API assets with Amplify Enterprise Marketplace
In this section we will complete the minimal steps to create a Product with a Paid pricing plan.
For complete details on all options available when creating a Procut, refer to the Marketplace Documentation section on Manage your Product Foundry. For a complete description of all Pricing Plan options, refer to the Marketplace Documentation section on Manage Product Plans.
- Navigate to https://platform.axway.com and log in.
- Navigate to Catalog -> Product Foundry -> Add New.
- Provide a Name for the Product. Logical Name, Description and Image/Icon are optional.
Name: Monetized Product
- Click Next.
- Leave all defaults on the Release Management page and click Next.
- Select an Asset from the list of Available Assets to add to the Product by clicking the link icon to the left of the Asset name.
- In the Versions to include dialog, accept the defaults and click Link Asset.
- Click Next.
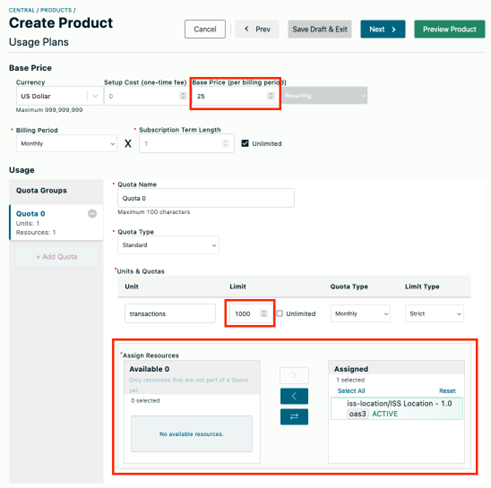
- In the Usage plan dialog, create a new Paid plan.
Name: Enterprise Plan
Plan Cost: Paid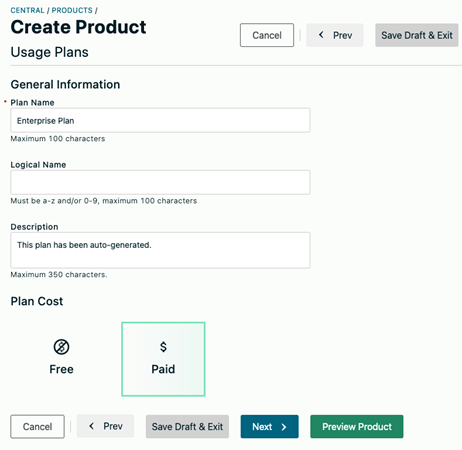
- Click Next.
- Enter a Base Price of 25.
- Change the Limit under Units & Quotas to 1000.
- Under Assign Resources, click Select All and then the right arrow to assign the selected Resources.
- This is a very basic plan and should look similar to the image below when complete. There are many other options available when building pricing plans, this is the minimum required for this example.
- Click Next.
- Leave the defaults on all subsequent panels by clicking Next until the Save & Activate button turns green.

- Click Save & Activate.
- Select Major Release Type, click Save & Activate.
The product is now activated but has not yet been published to a Marketplace.
Publish API Product to a Marketplace
- In the Product Foundry, locate the Product which was created in the previous step.
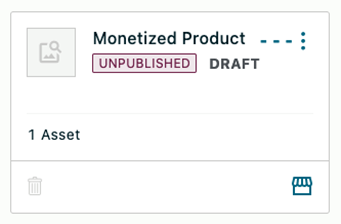
- Click the Marketplace icon to publish the Product.
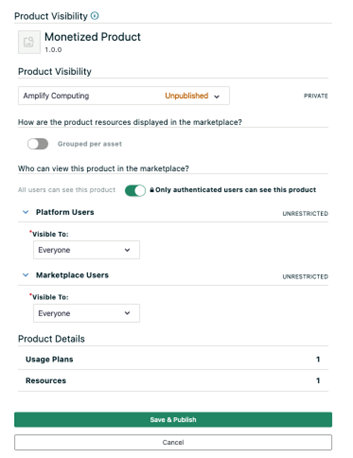
- Under Product Visibility, select the Marketplace where Stripe Billing was enabled in a previous step.
- Leave all other options as default.
- Click Save & Publish.
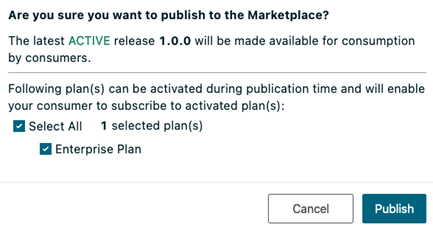
- In the subsequent dialog, click the Select All checkbox.
- Click Publish.
- Click Return to product.
The product has now been published to a Marketplace which has Stripe Billing enabled. The next step is to connect to the Marketplace as a Consumer and get access to the API Product.
Gain access to a Monetized API
In this section, we will navigate to the Marketplace where Stripe billing has been configured. As an API Consumer we will select a pricing plan and navigate through the steps to complete payment and gain access to the API.
- Navigate to the Marketplace URL noted in a previous section of this document.
- Log on to the Marketplace as a member of a Consumer Organization which was created in the same previous section.
- Locate the API Product you want to gain access to and click on its tile. If following the steps in this example it will be the “Monetized Product”.
- Select Plans and click Subscribe.

- In the Subscription Request panel, accept all defaults and click the Terms of Use checkbox.
- Click Continue.
- In the Subscription Summary panel, click Checkout.

- Since the Subscription approval process for this Product is set to Automatic, the subscription is approved.
- Click View Subscription.
- Expand the Invoices section.
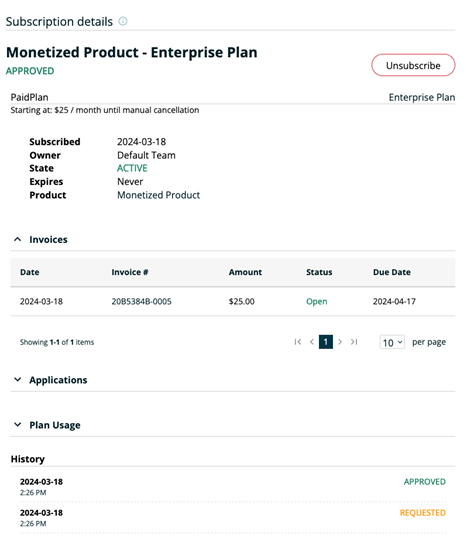
- Click on the Invoice #.
- You will be redirected to the Stripe payment portal. If using a Stripe Developer account, select the US Bank Account option and Test Institution.
- If prompted, grant access to the Test Institution, select the High Balance account and click Connect Account.
- Click Pay.
- Once payment has been processed you may close the Stripe Invoice tab.
- Close the Subscription Details panel in the Marketplace.
- Click on the Subscription name in the Product Subscriptions panel.

- Expand the Invoices section. The invoice should now show as paid.

Now that the invoice has been paid you can navigate to the Resources tab for the API Product and click the Request Access (key icon) link next to the APIs you have subscribed to.
Note: It is possible to have APIs in a single product covered by different plans. If this is the case, then only APIs to which you have a valid (and paid if required) will be accessible.

If the plan has a recurring billing cycle, the invoice must be paid (either manually or automatically) for each new cycle, or access will be denied to the API(s) in the plan.
Discover 9 steps to implementing the API marketplace of the future
Follow us on social