

Axway’s AMPLIFY Integration Builder is a robust catalog of 150+ pre-built cloud connectors across 17 different categories of service, accelerating integration projects by easily authenticating and orchestrating the most popular SaaS applications on the market.
Salesforce accounts don’t have geolocation (GPS) coordinates by default. In this blog post, we’ll use Integration Builder to detect newly created Salesforce accounts and add the GPS coordinates to the account. This will make it easier for applications to display the accounts on a map for prospecting and routing purposes.
Prerequisites
- Axway AMPLIFY account – register for free
- Salesforce Sales Cloud account – get a free developer account
- OpenCage Geocode API Key – get a free one
While it’s not a requirement for this blog, it’s a good idea to familiarize yourself with Integration Builder concepts by reviewing the following online docs and videos:
- About Application Integration
- Creating a Connector Template in Integration Builder
- Instantiating a Connector in Integration Builder
- Creating a flow Template and instantiating a Flow in Integration Builder
- Salesforce to Slack integration example
Outline
Here is what we’ll do:
- Modify the Salesforce Account structure and add a custom Geocode field to hold the GPS coordinates (latitude and longitude) based on the account’s shipping address
- Use Integration Builder to create a connector to Salesforce and configure the connector to detect new salesforce accounts
- Create an Integration Builder flow to run when the connector detects a new account and perform the following:
- Get the shipping address from the new account
- Make an API call to OpenCage Geocode API and retrieve the GPS coordinates of the account address
- Store the GPS coordinates back in the Salesforce account
Preparing Salesforce
By default, the Salesforce Account object does not have fields for GPS coordinates. These must be added by your Salesforce admin.
The following links will guide you on how to create the Geocode field:
* https://help.salesforce.com/articleView?id=adding_fields.htm&type=5
* https://salesforce.vidyard.com/watch/um8ZtKv_2awfCTitmz0vtA
On create New, select Geocode as shown below.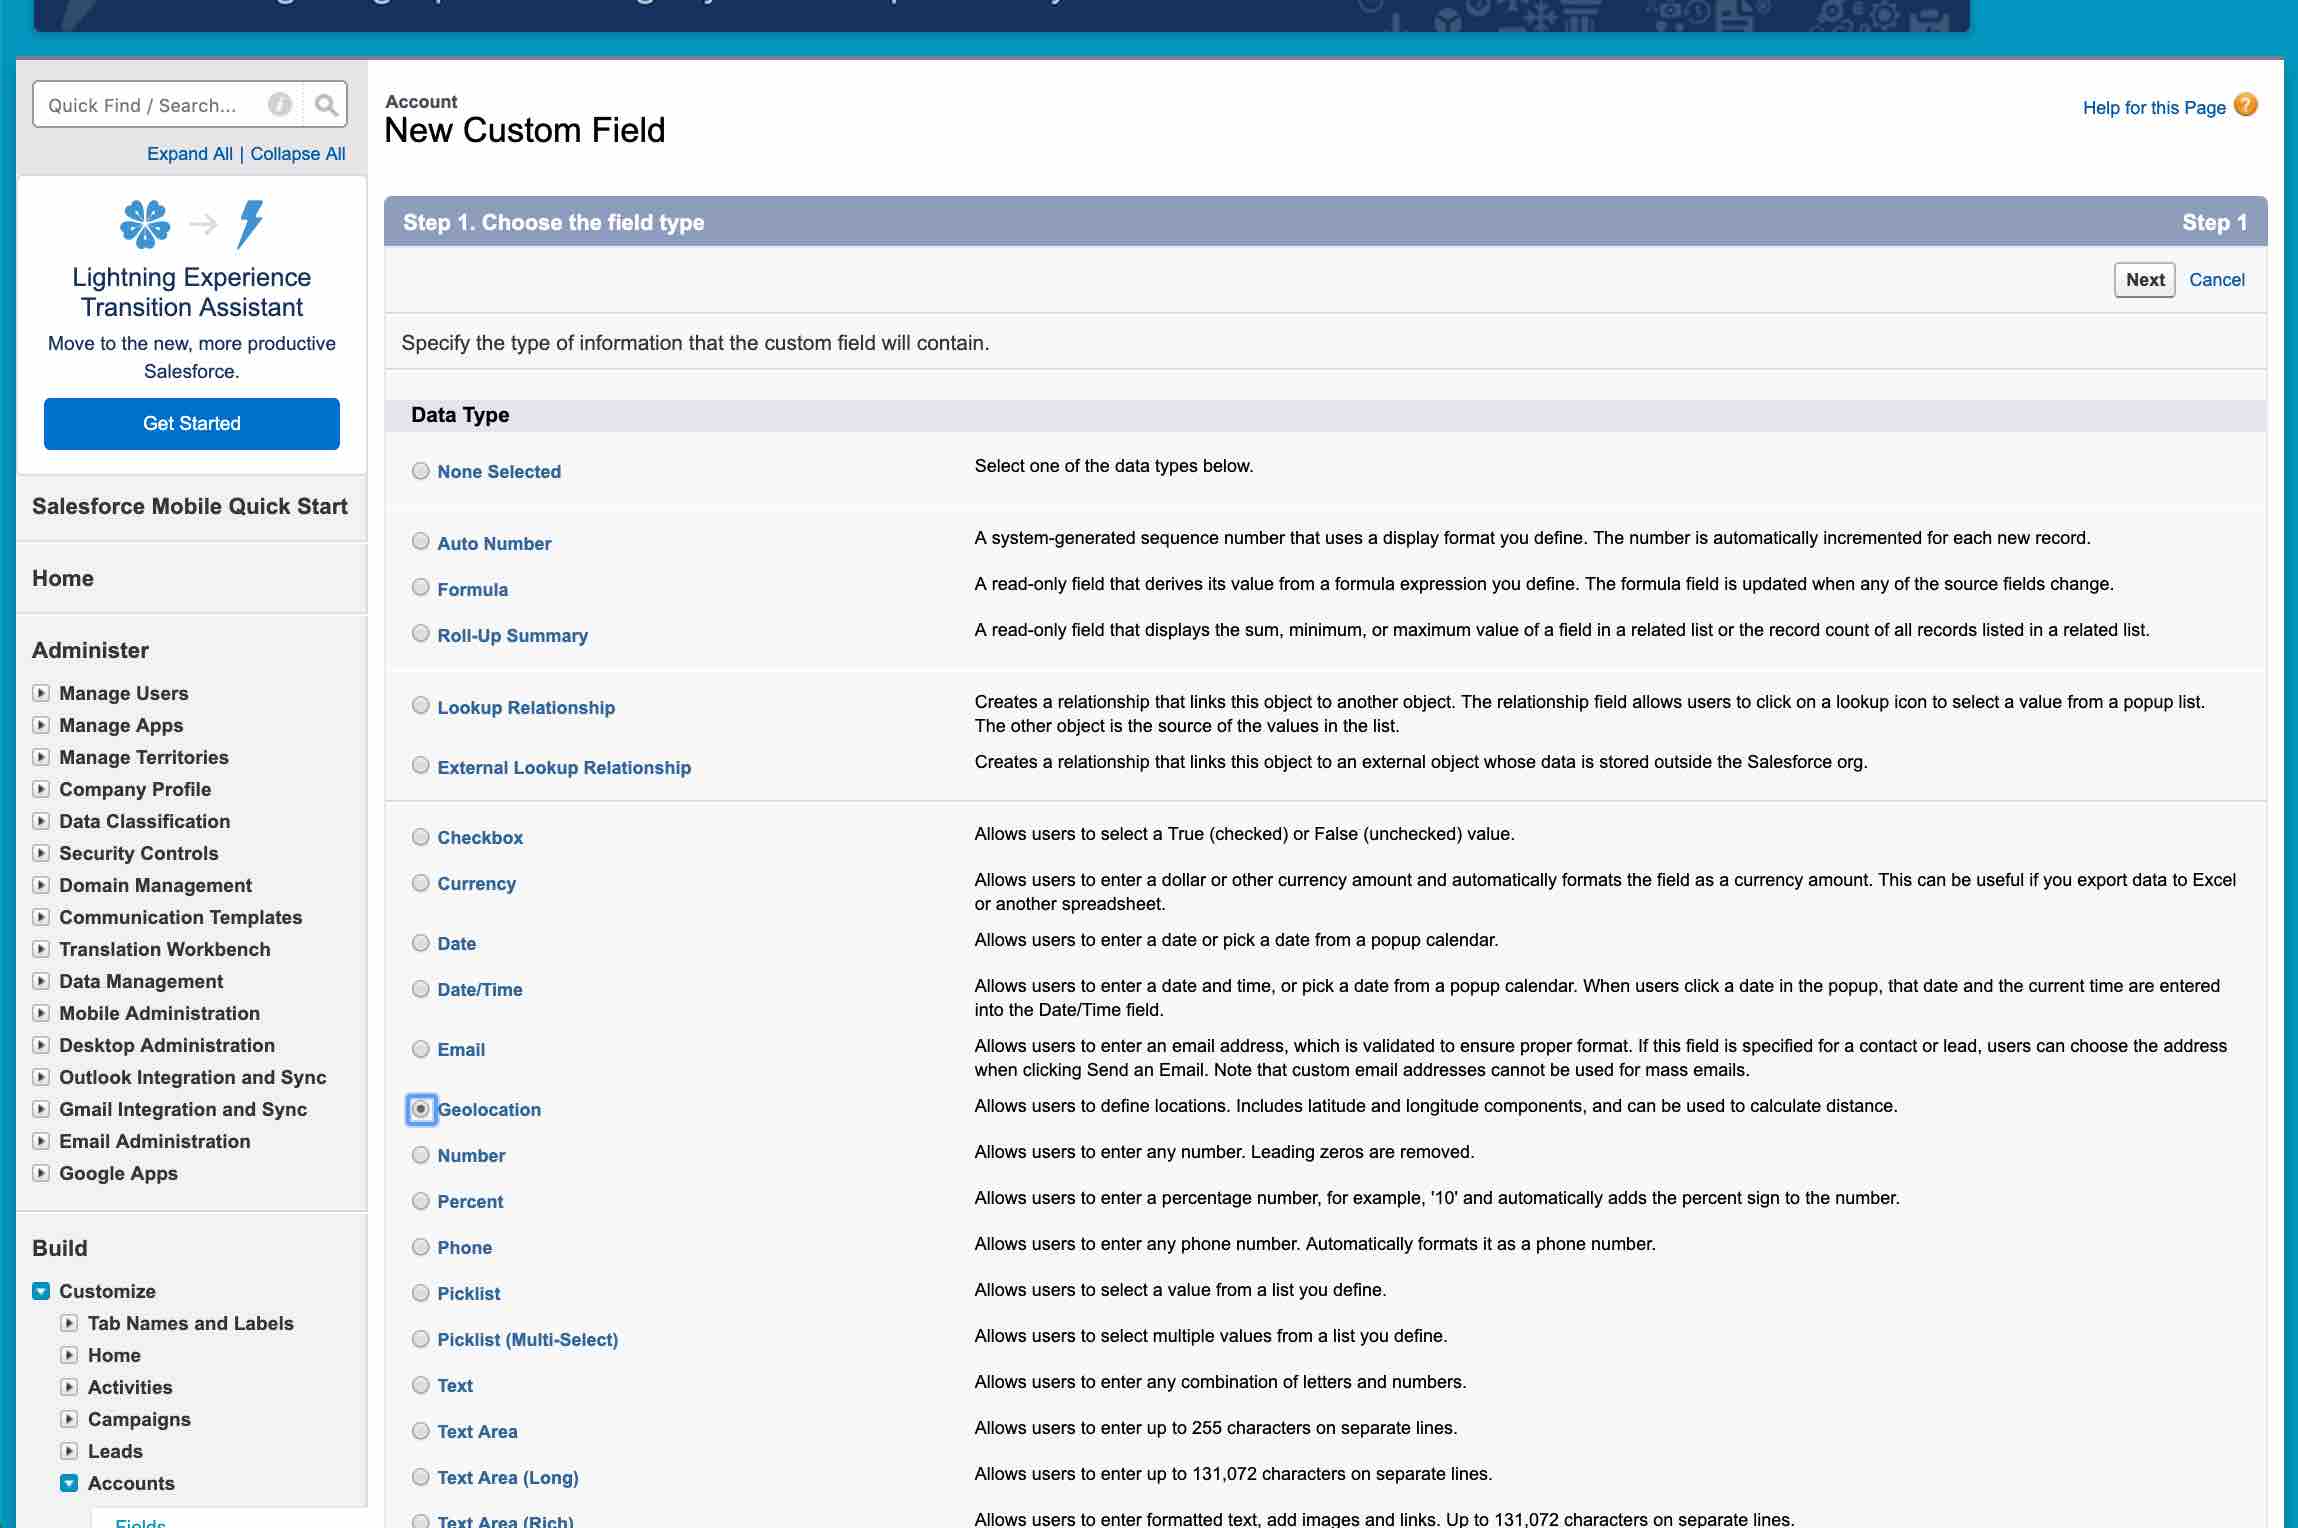
Note: I named the field Geocode as well
When prompted, choose decimal notation (instead of DMS) and 5 decimal places.
Now the trick is to determine the field names for latitude and longitude associated with our new custom field, Geocode. I’ll show you how shortly after we create our Integration Builder Salesforce connector.
Add a Salesforce connector in Integration Builder
Perform the following steps in Integration Builder.
On the AMPLIFY Platform, find the Application Integration tile on the home page and open Integration Builder
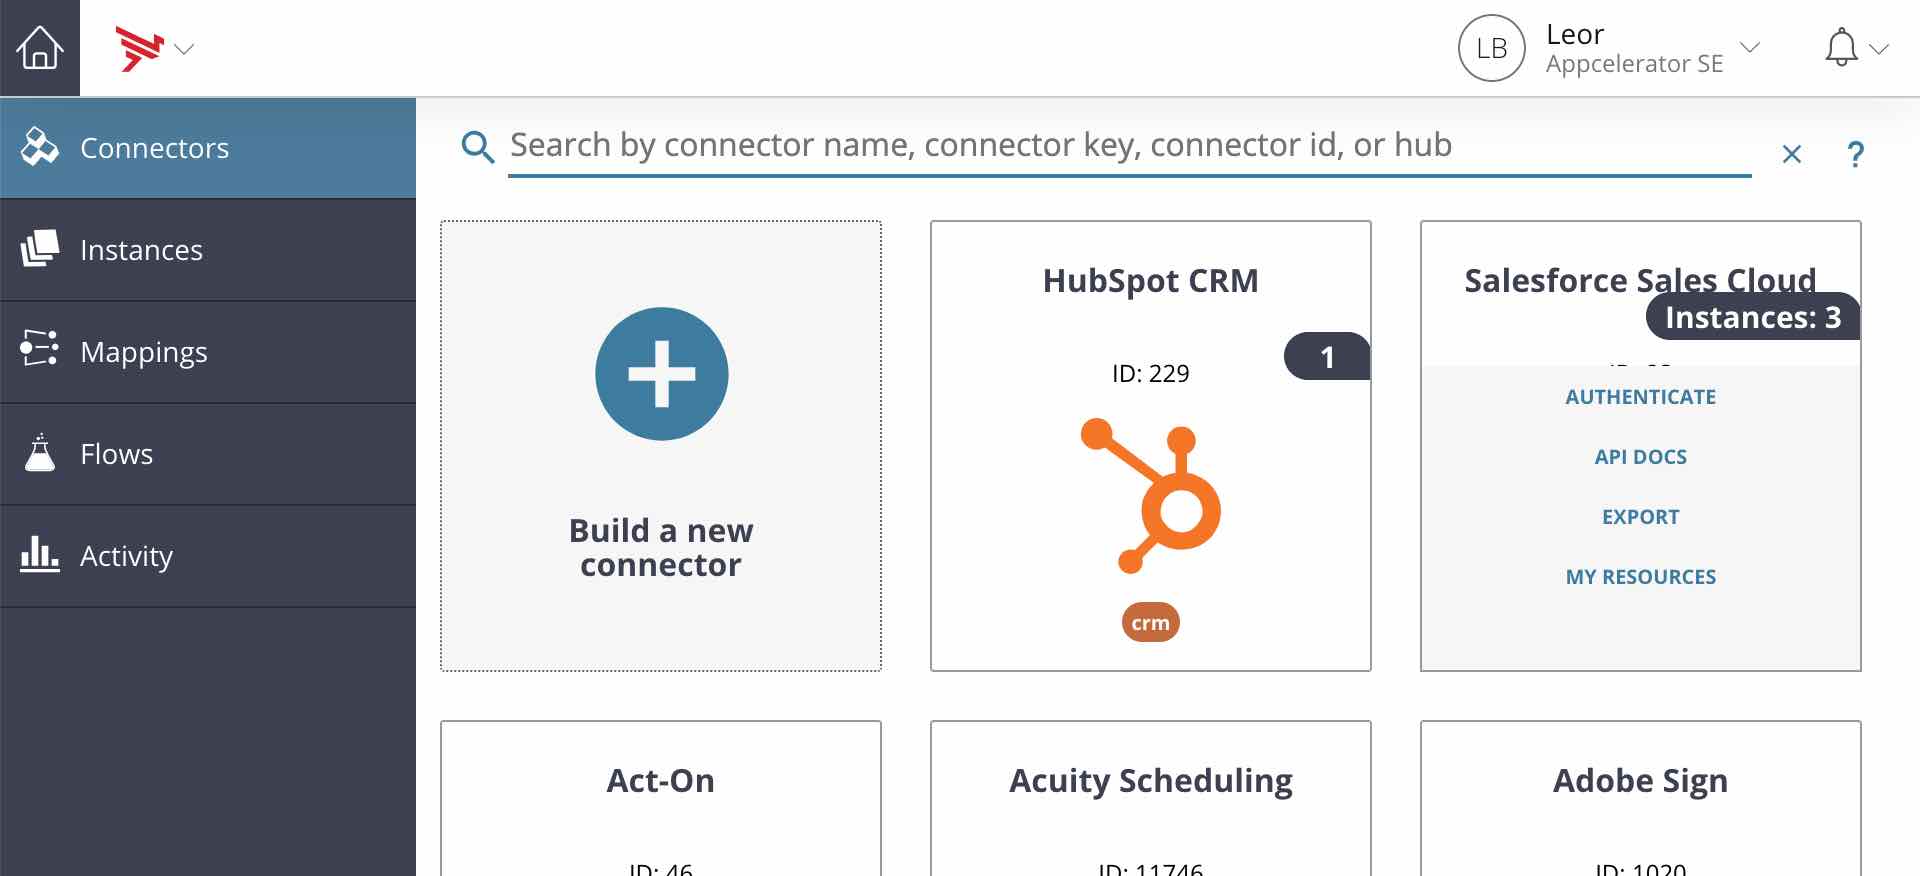
- Select Connectors in the left pane
- Find the Salesforce Sales Cloud connector. You can search for it by typing all or part of the connector name in the search field
- Place the cursor over the Salesforce Sales Cloud tile and click Authenticate
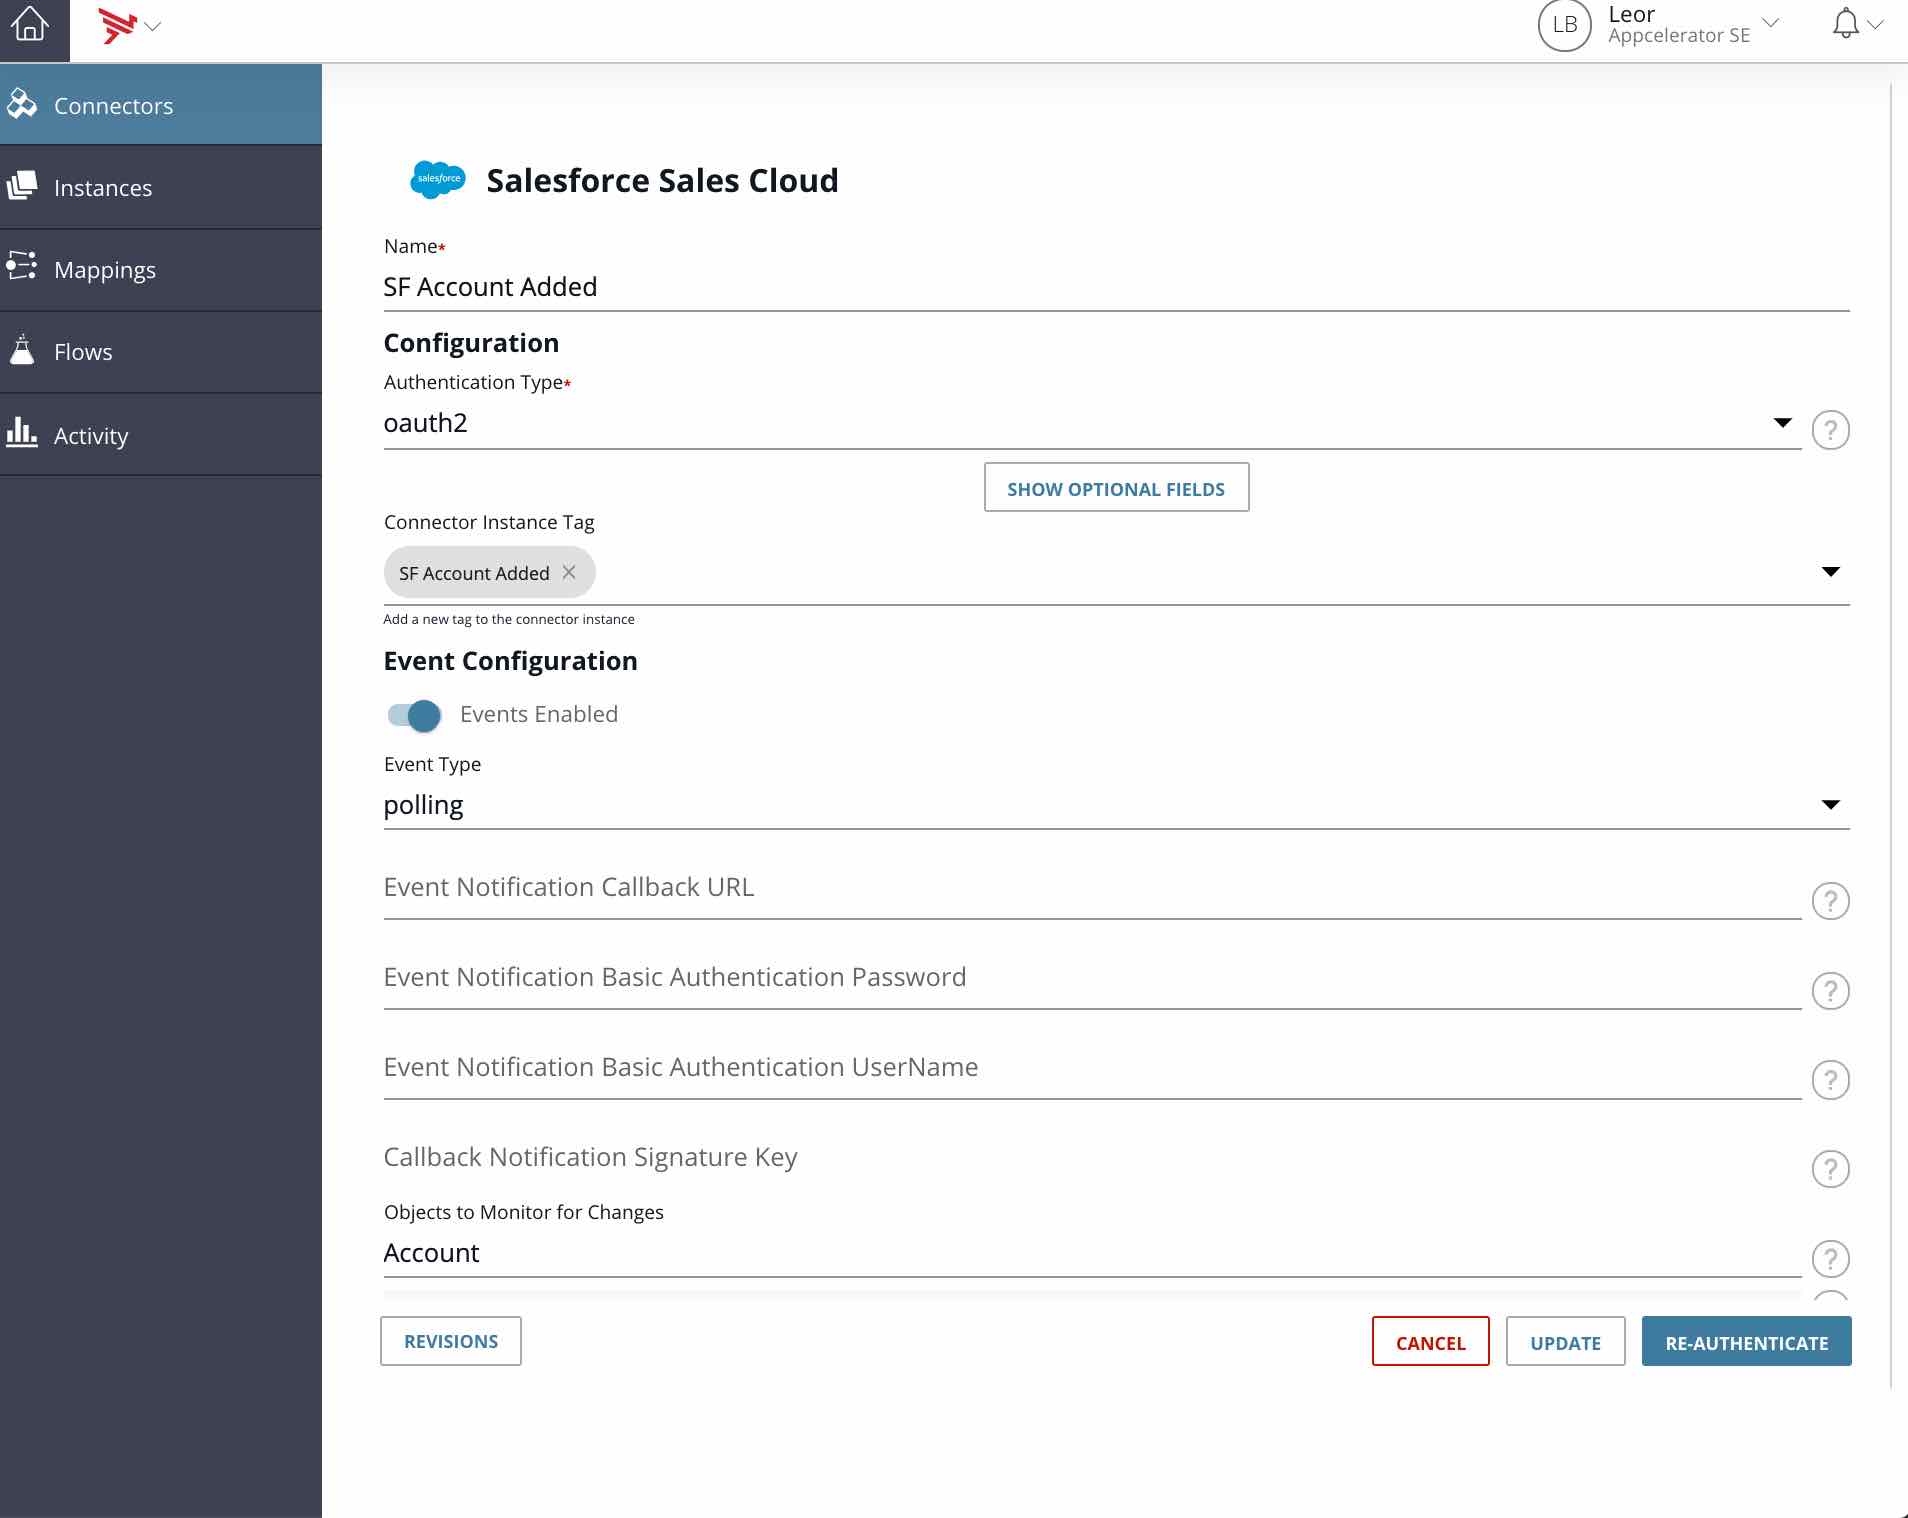
- Type a name for the connector instance. I named mine SF Account Added
- Skip the Authentication Type and Connector Instance Tag fields
- Under Event Configuration:
- Click the toggle to turn on Events Enabled
- Select polling in the Event Type drop-down
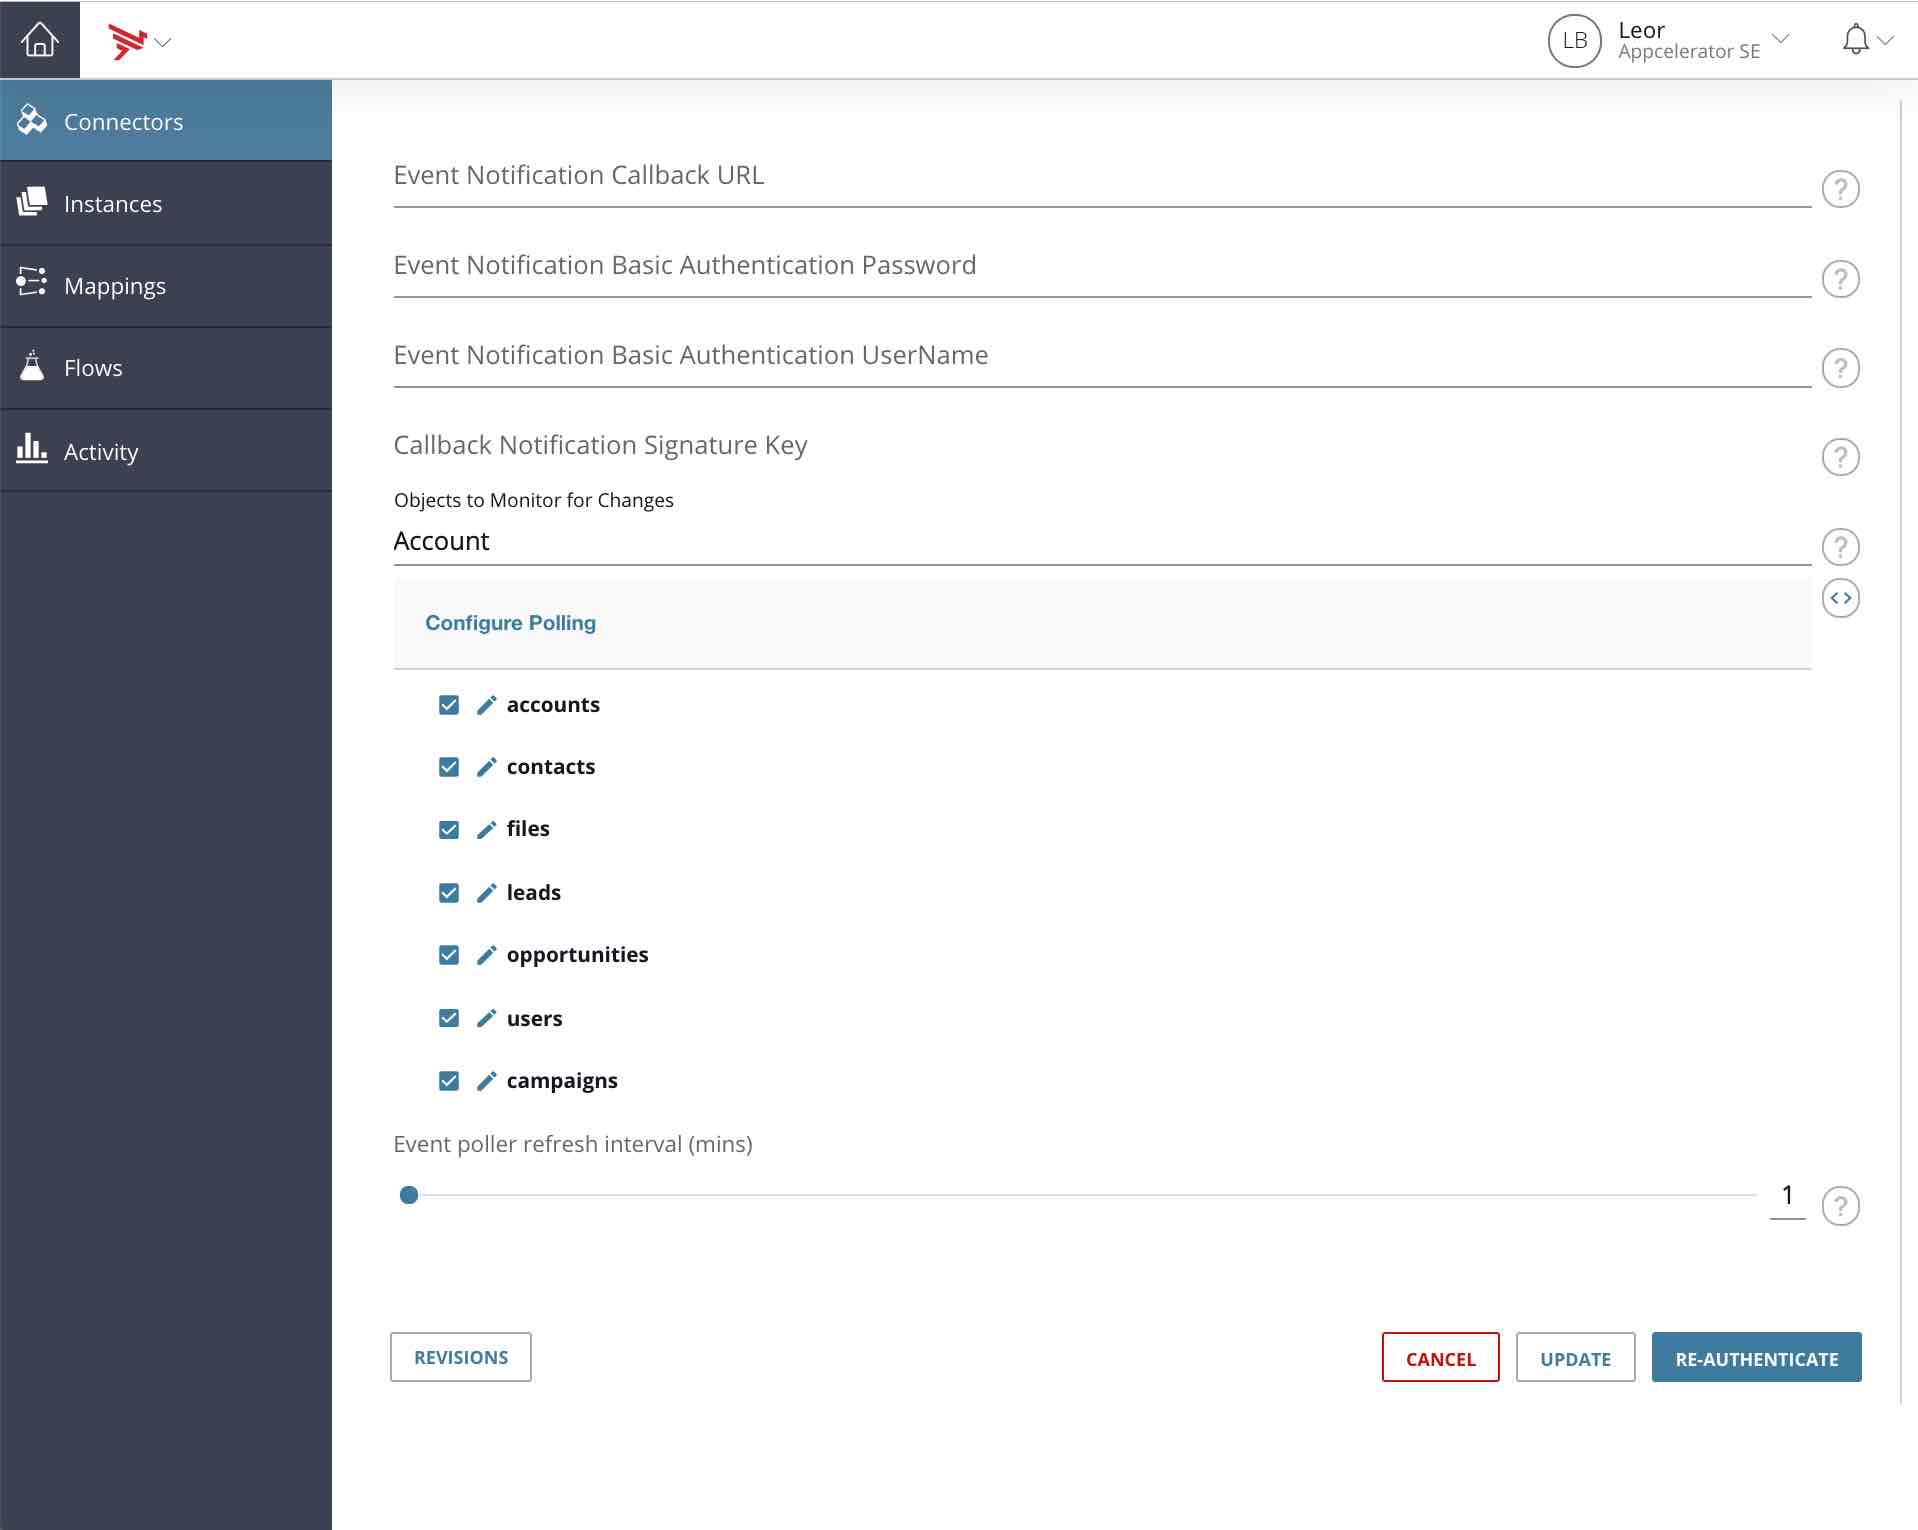
- Type Account in the Objects to Monitor for Changes field
- Scroll down to Event poller refresh interval (mins). Click and hold to slide the value to 1 minute
- Click Create Instance. You are prompted to log on to Salesforce
- Enter your Salesforce user name and password to log on
- Click Allow when prompted to allow access. You are returned to Integration Builder
Screenshots below are provided for reference:
Test Your Connector
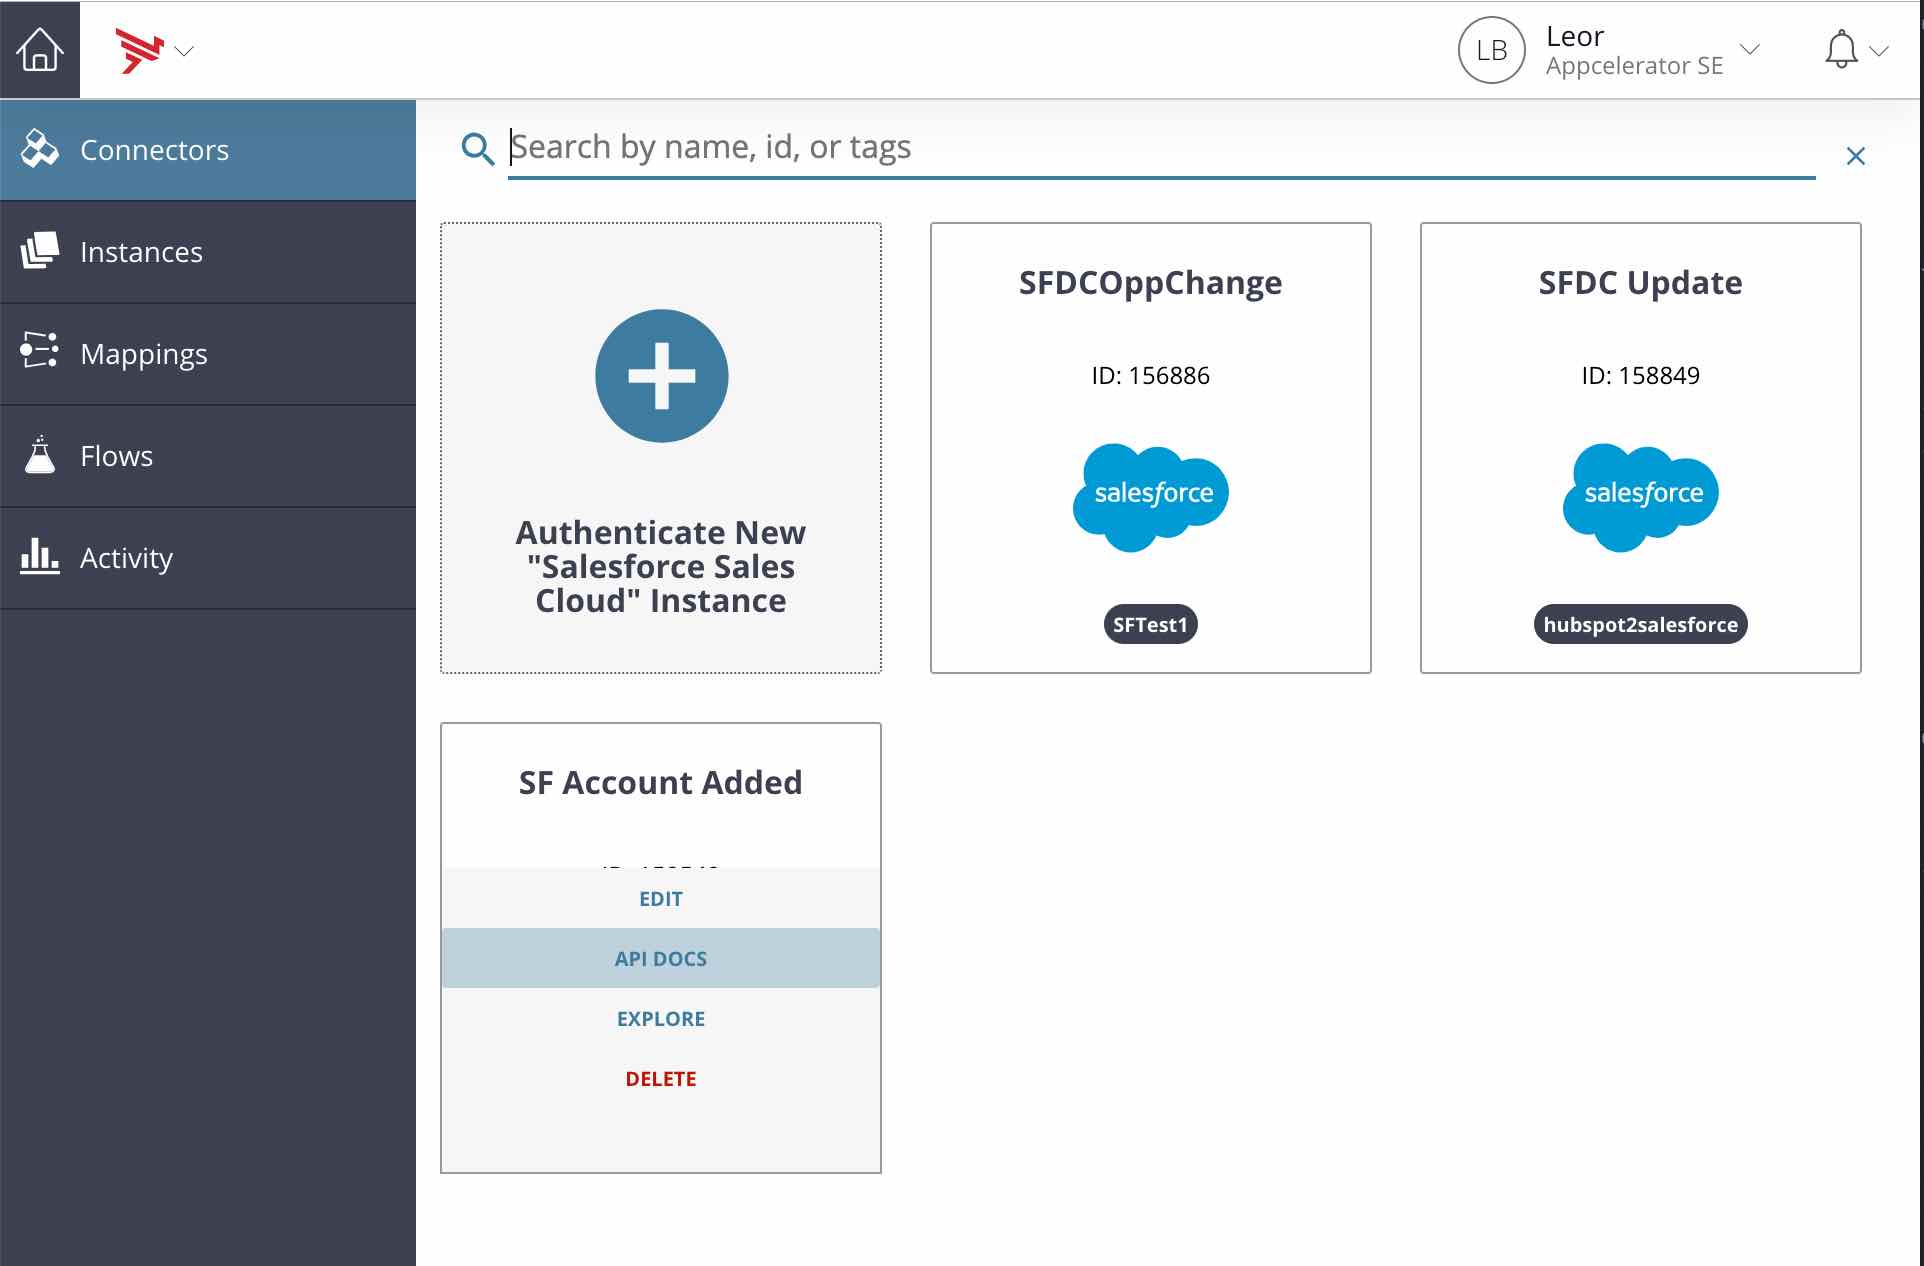
- Select Connectors in the left pane
- Find the Salesforce Sales Cloud connector. You can search for it by typing all or part of the connector name in the search field
- Place the cursor over the Salesforce Sales Cloud tile and click on the instances
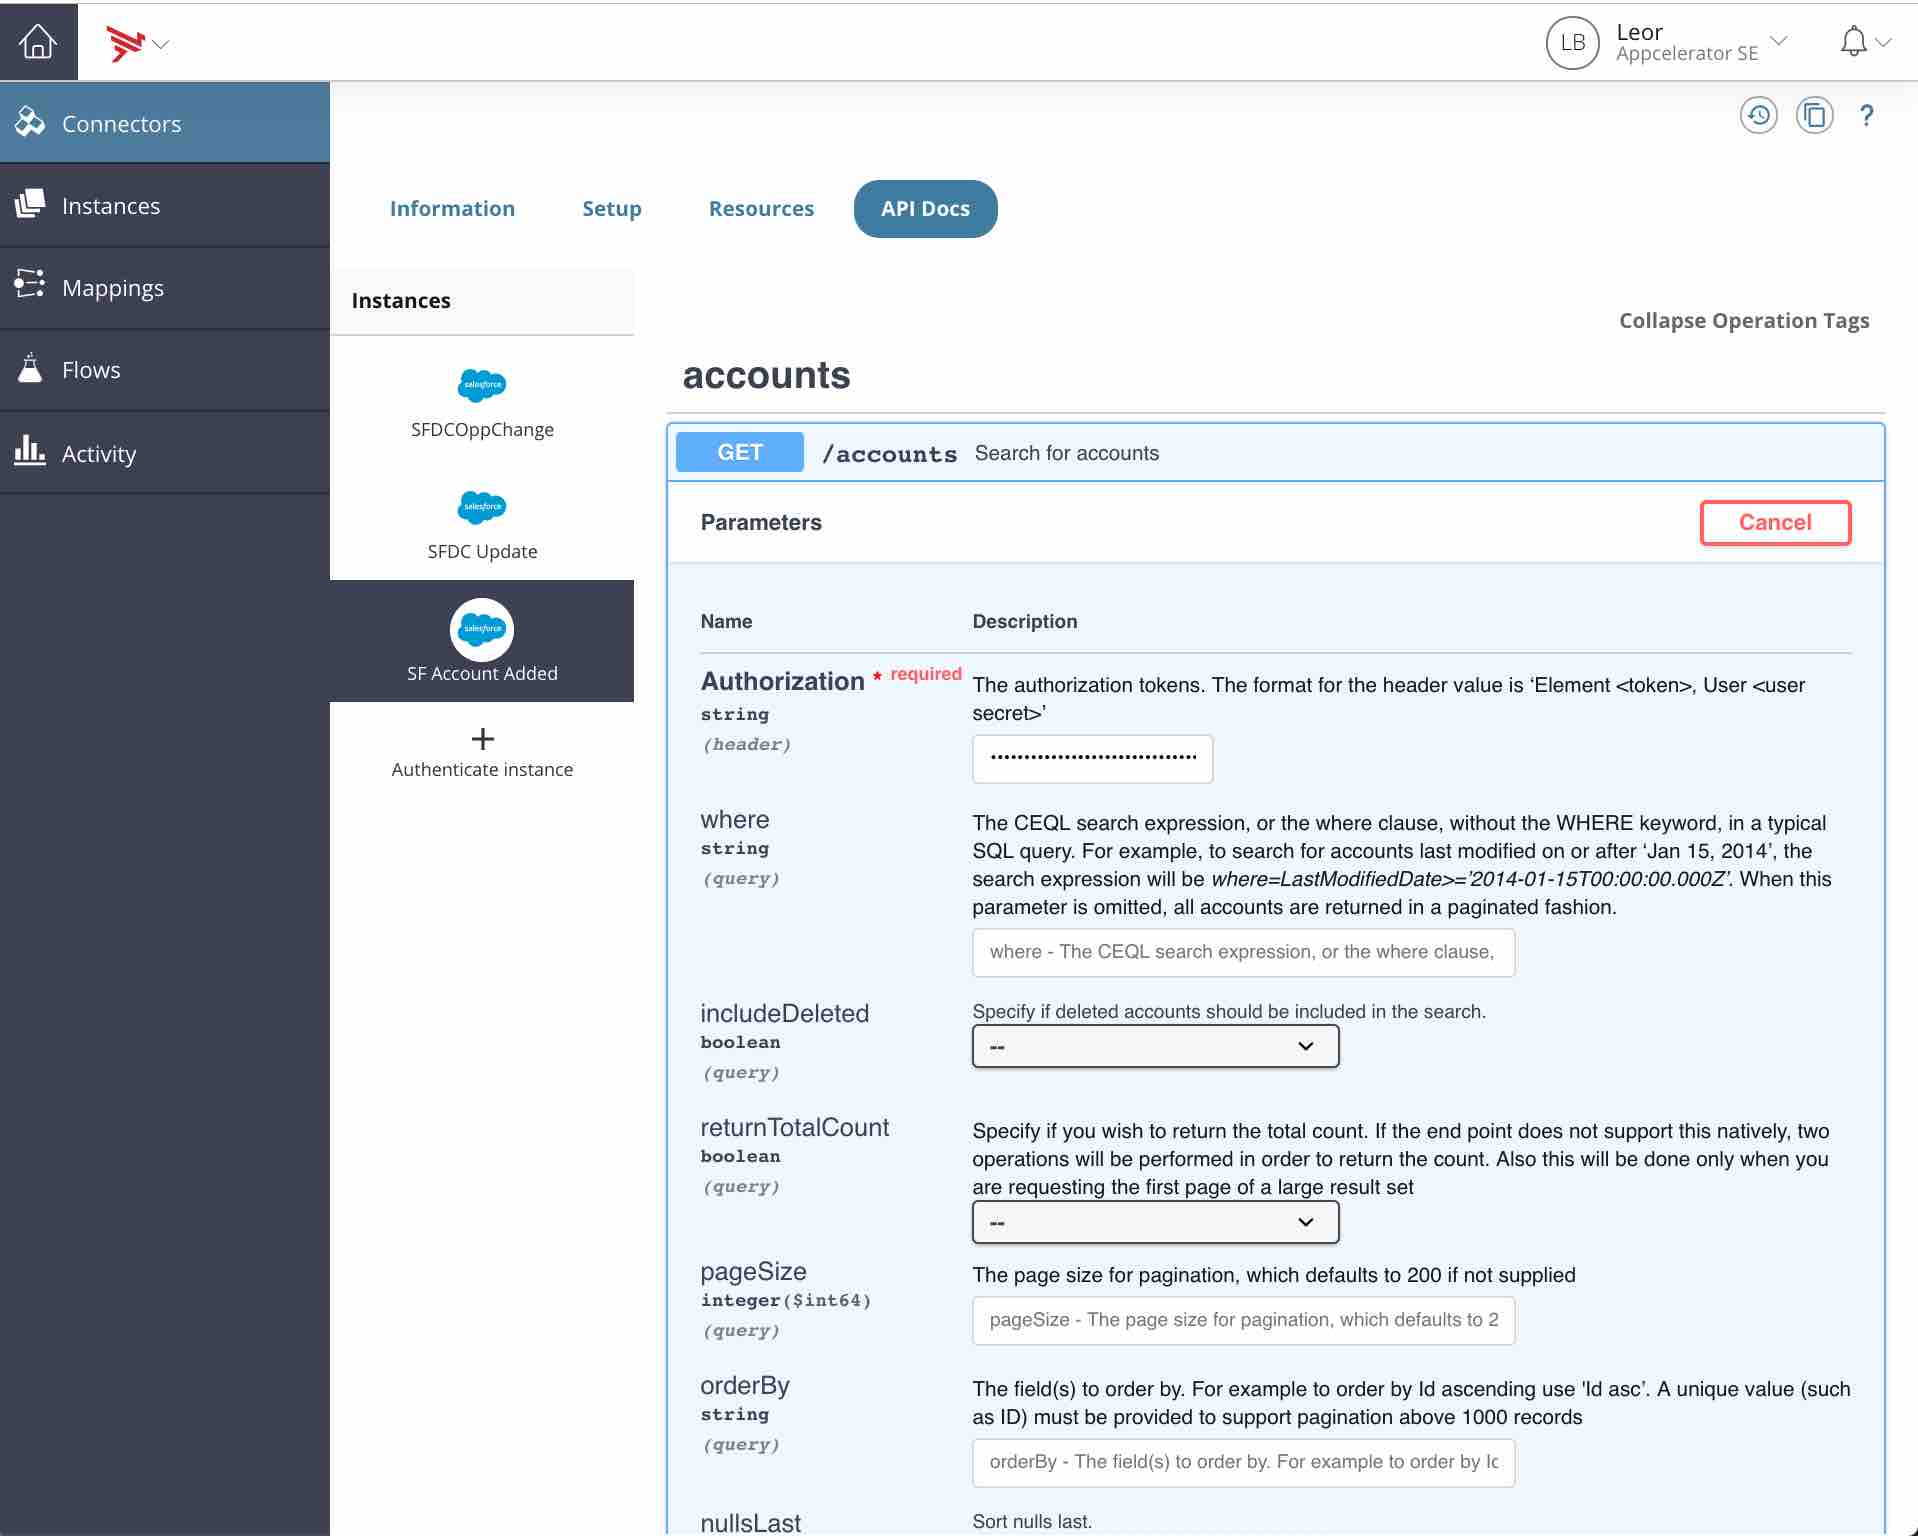
- Locate your newly created instance and place the cursor over the SF Account Added instance and click API docs
- Click on GET accounts and click Try it out and scroll down to click the Execute button
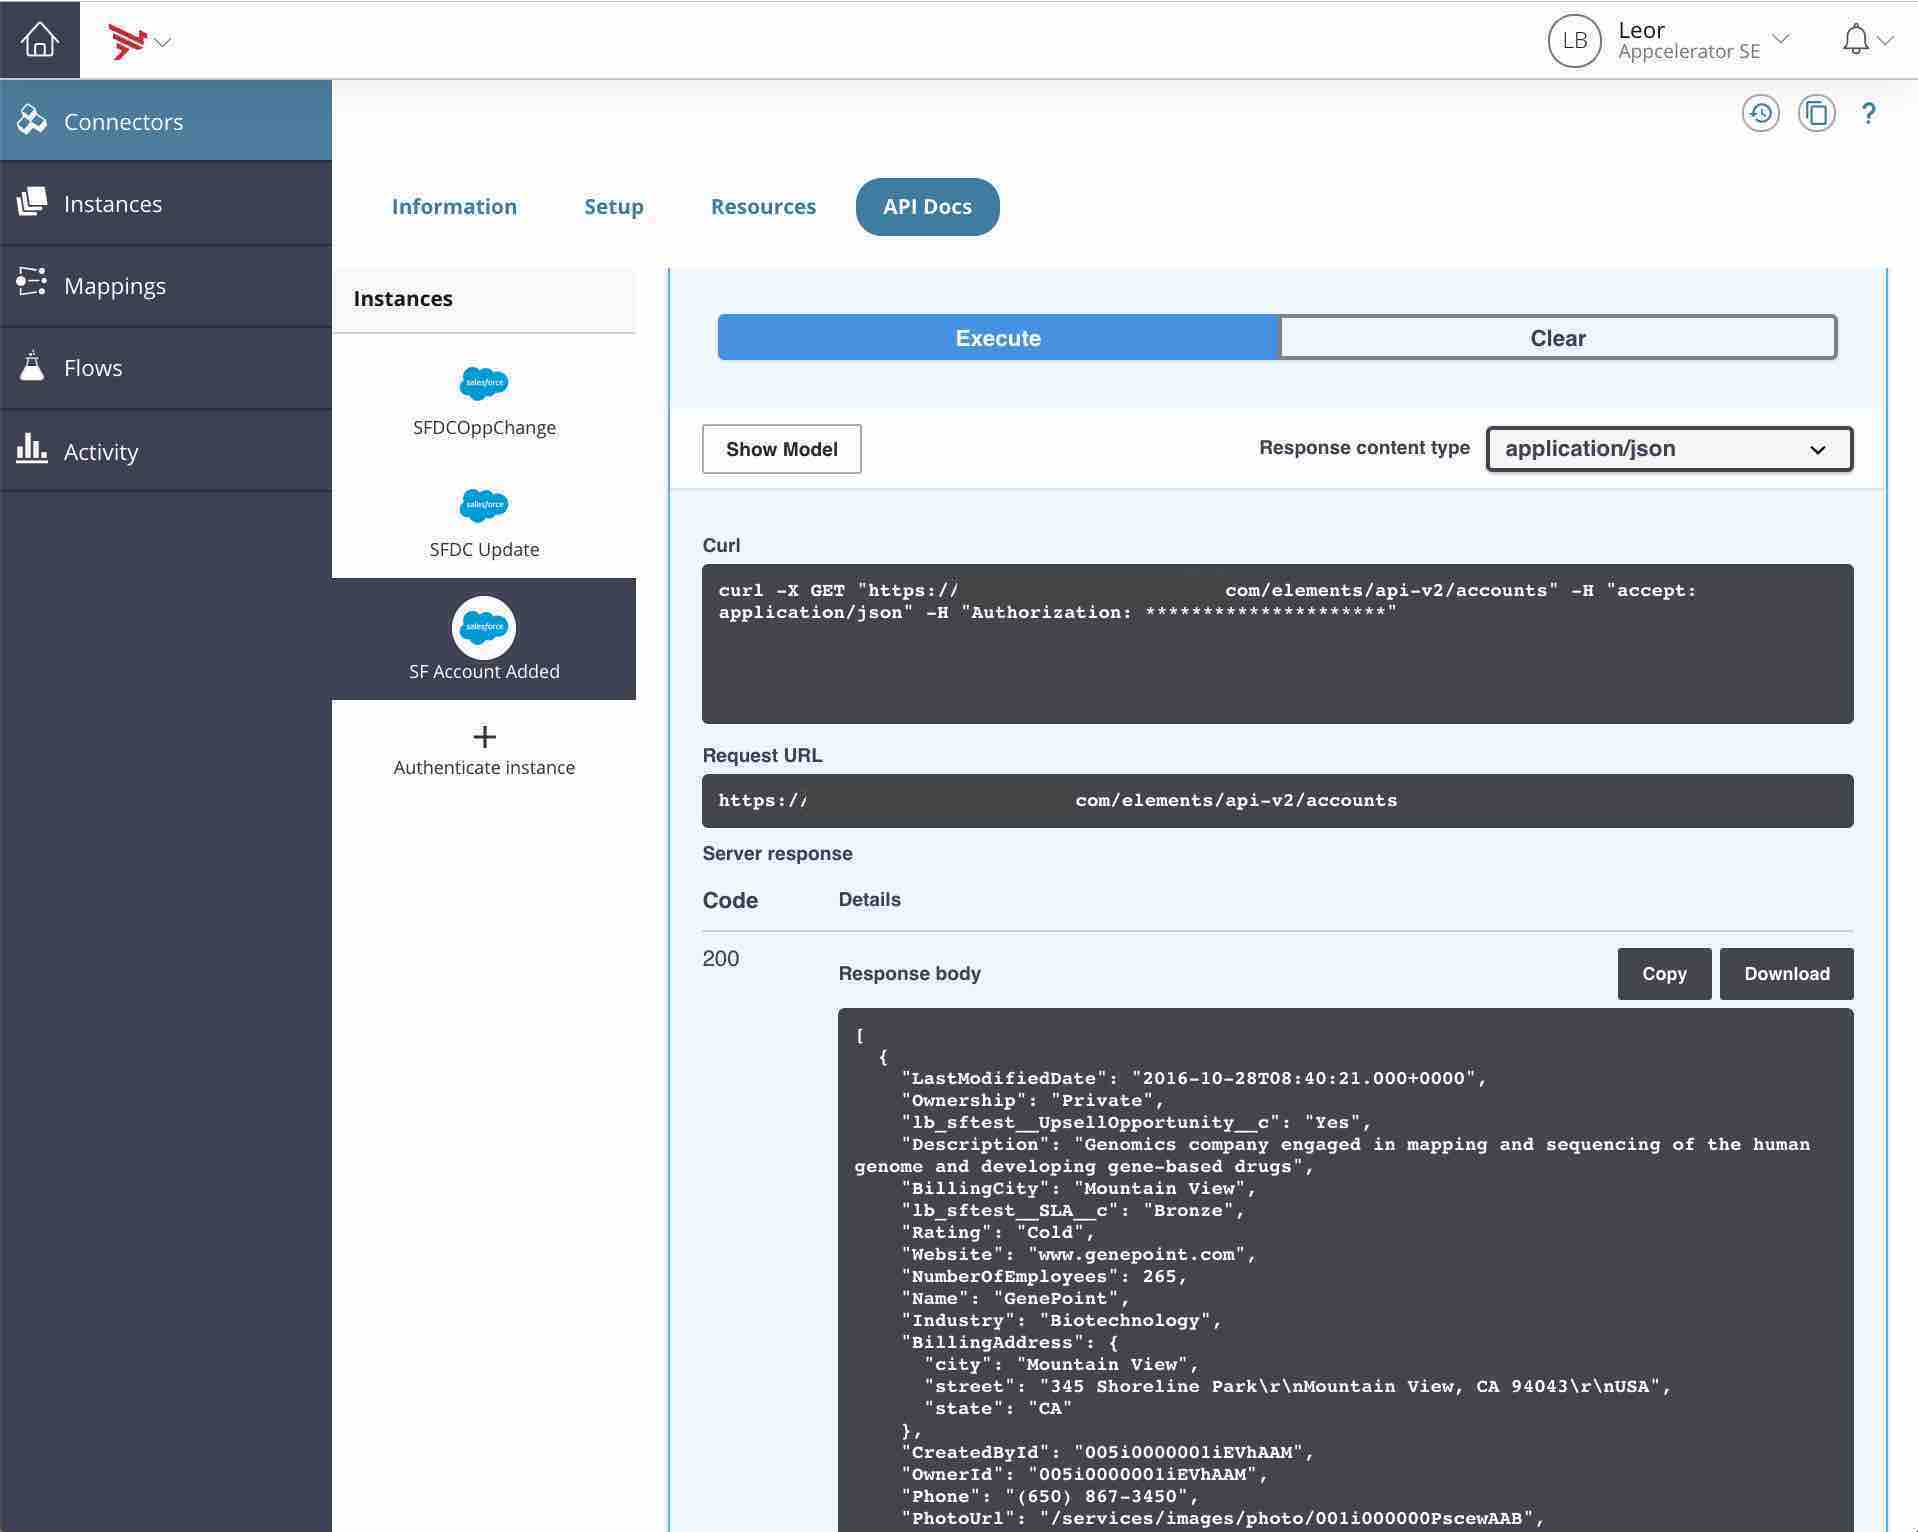
- You should see your Salesforce accounts response appear in the Response body area
Screenshots below are provided for reference:
Determine Field Names for Geocode Coordinates
- Create a new Salesforce account and populate the custom Geocode field we added with dummy data
- Call the GET accounts API in the SF Account Added connector API docs to see the response
- Find the new account you created and jot down the field names for later – we’ll need them. You can see my response below:
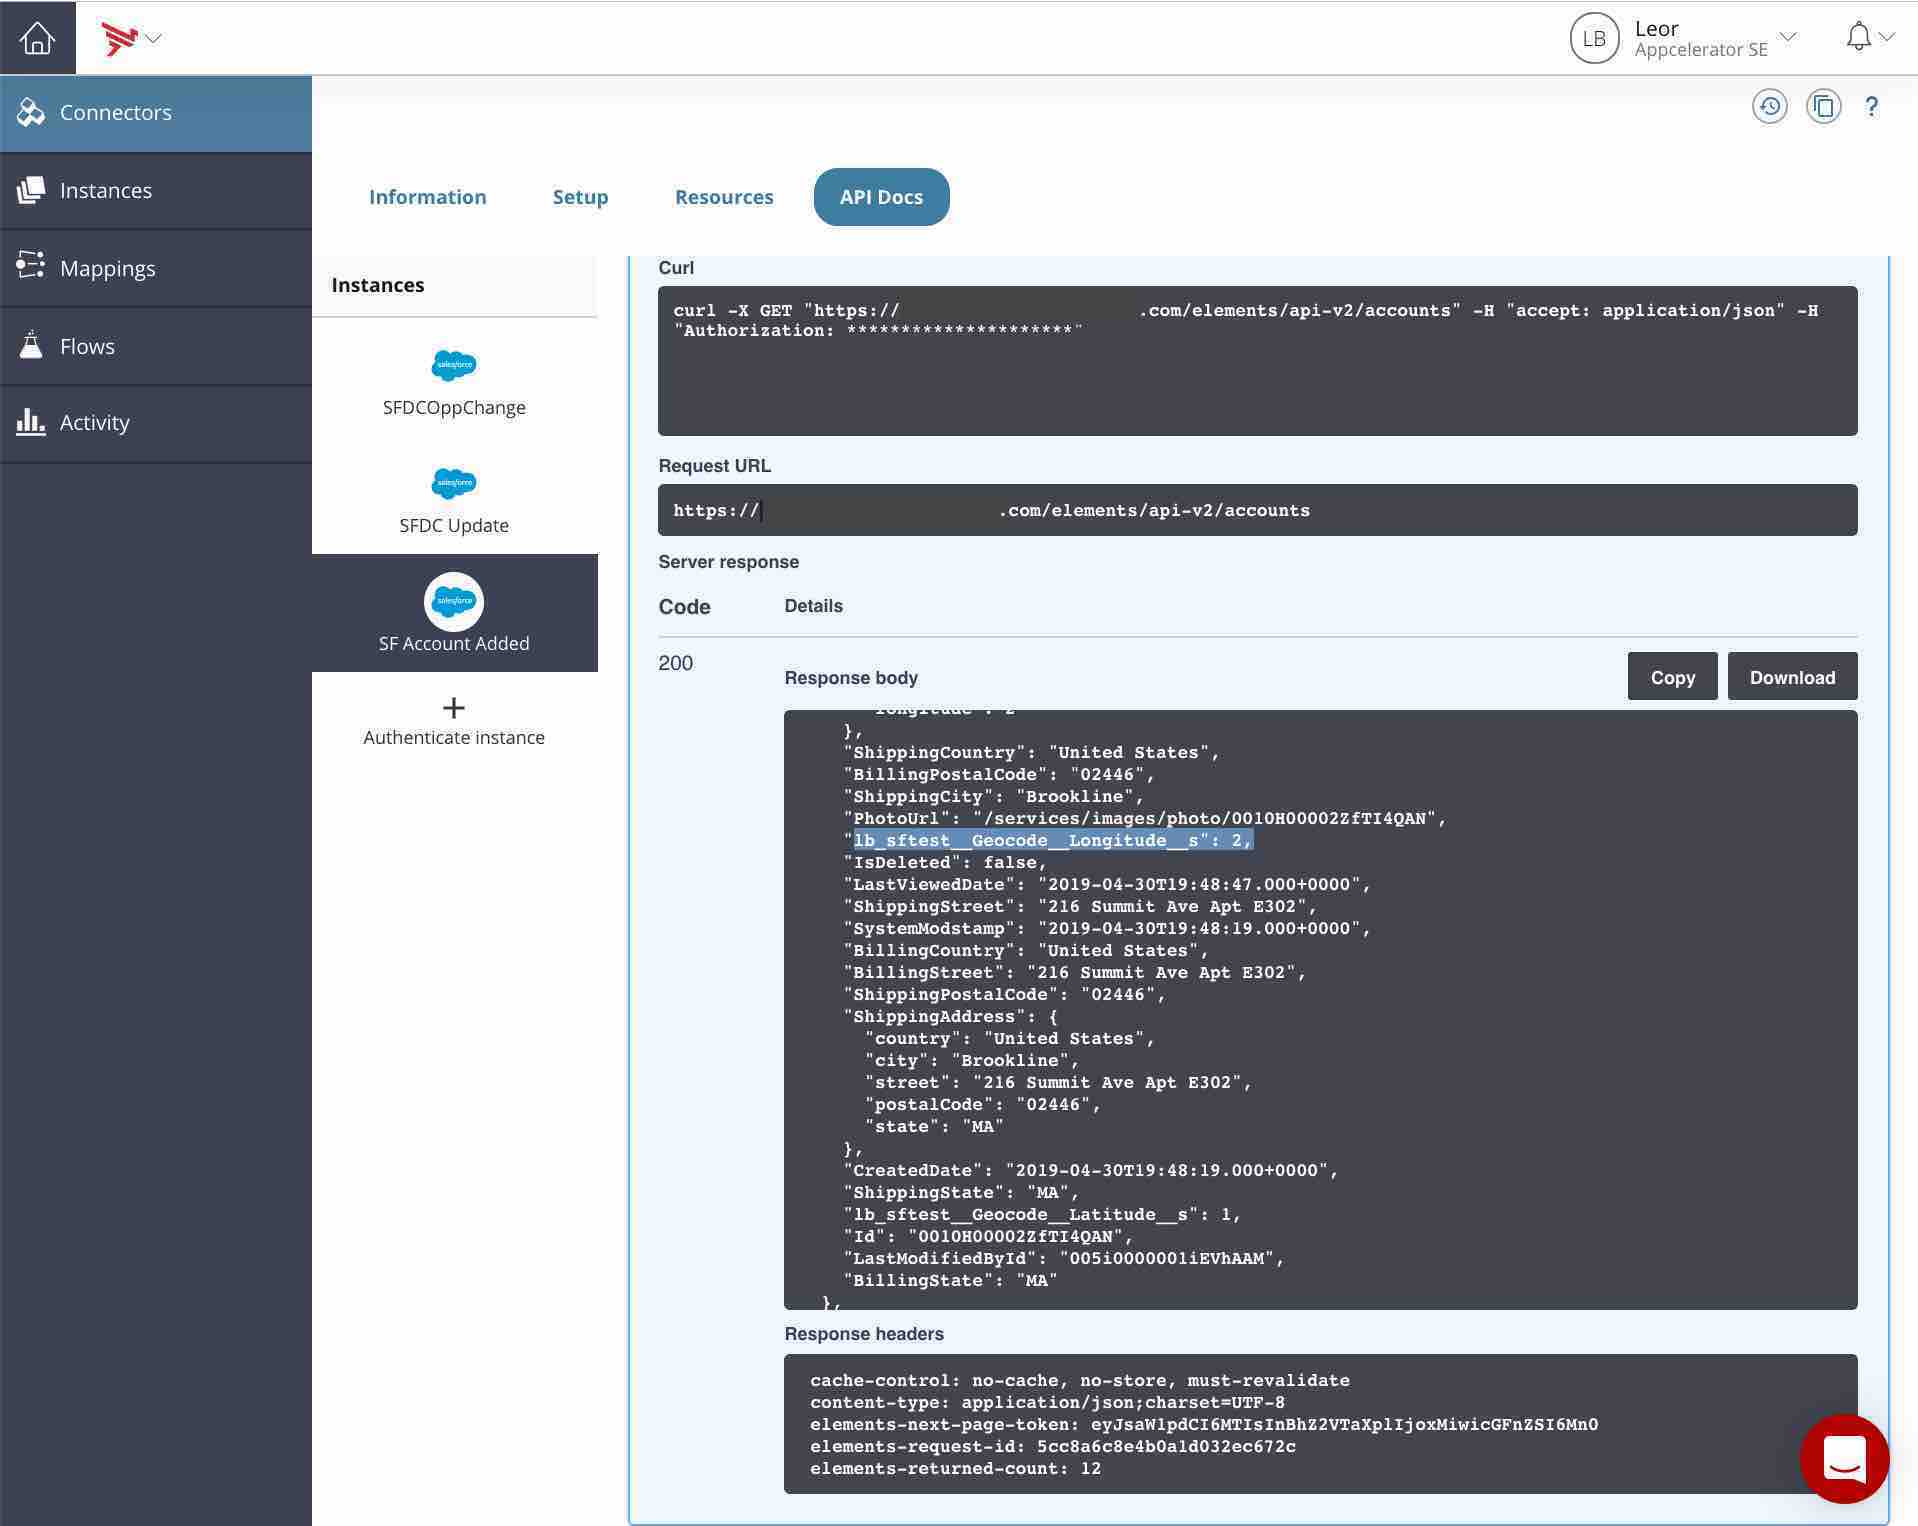
You can see that the two fields for me are:
- lb_sftest__Geocode__Latitude__s
- lb_sftest__Geocode__Longitude__s
At this point, we can now go create our flow.
Add a flow in Integration Builder
- Select Flows in the left pane in Integration Builder
- Click Build New Flow Template. Options for adding flows are displayed
- Click Build New Flow
- Type a name for the flow when prompted. I named mine SF New Account Geocode
- Click Create. You are prompted to select the type of trigger that will start the flow
- Select Event as the trigger type by clicking the ADD EVENT button
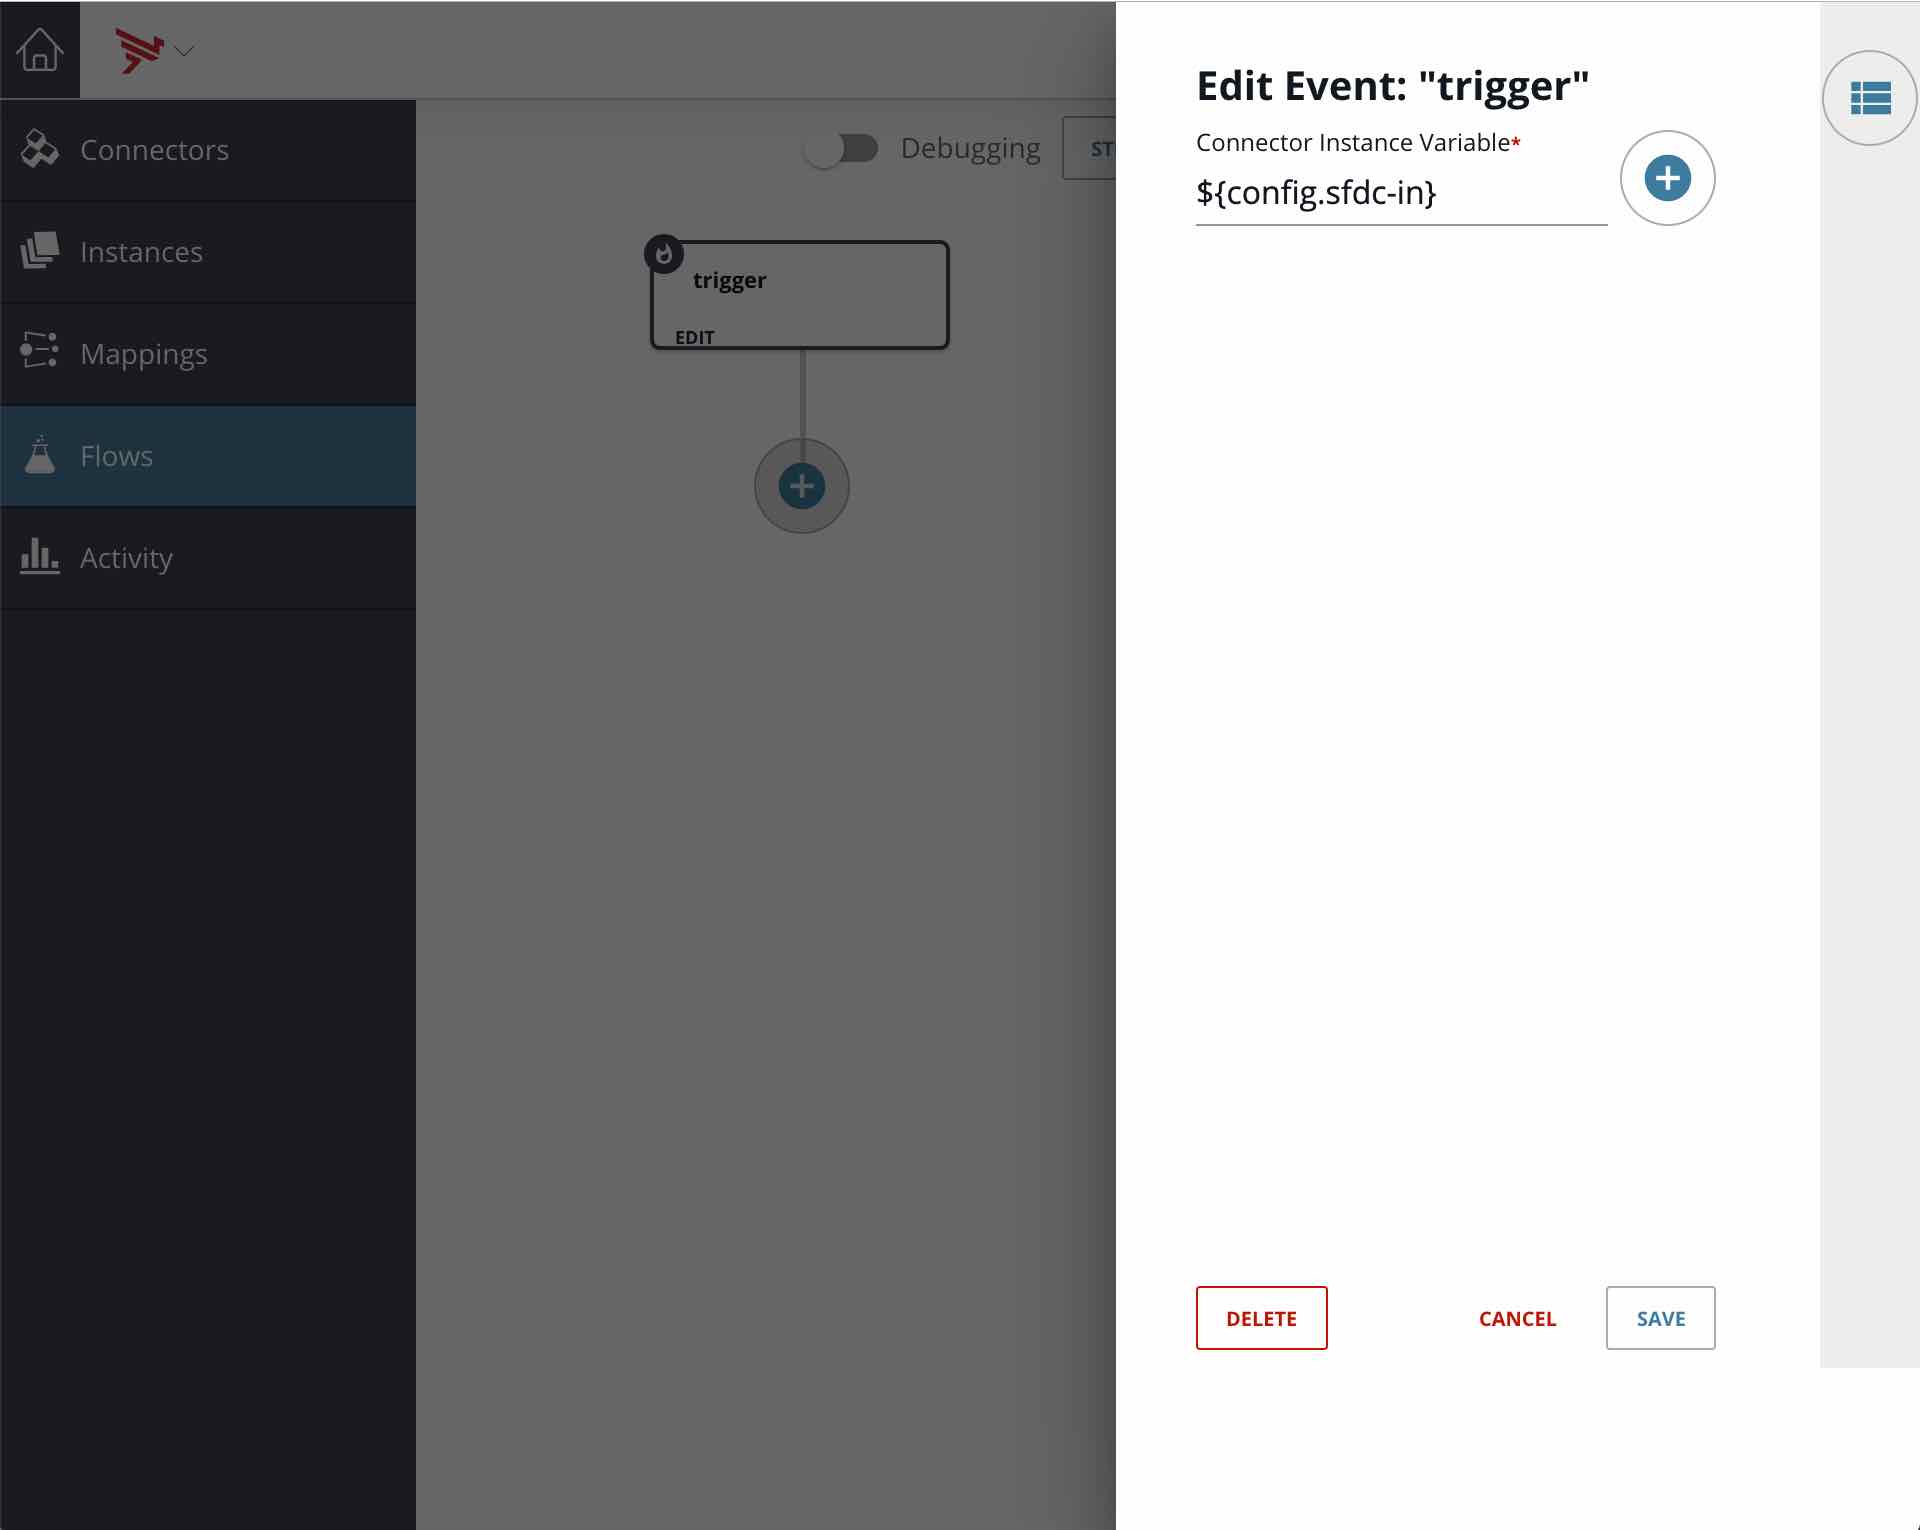
- Under Connector Instance Variable click the + button
- In the Select a flow Variable dialog, click the + button
- Click the Connector Instance icon
- Name the variable sfdc-in
- Click Save
- Click Cancel
- Select sfdc-in
- See that ${config.sfdc-in} is populated in the Connector Instance Variable field (as shown below) and press Save
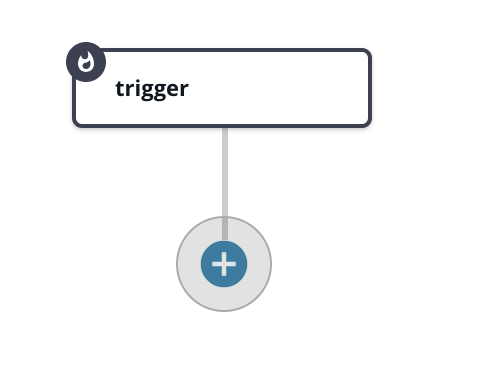
A flow diagram like the following is displayed. You add to this flow in the next steps.
Continue to configure the flow
Our complete flow is shown below:

Instead of describing how to build this flow step-by-step, I’ll describe each step by name, screen shot and any code contents below:
isNewAccount Step
In this step, we’ll make sure the event is a new account by checking that the event type is CREATED and that the event object is Account.
You add this step by clicking on the + button below the trigger step and select JS Filter.
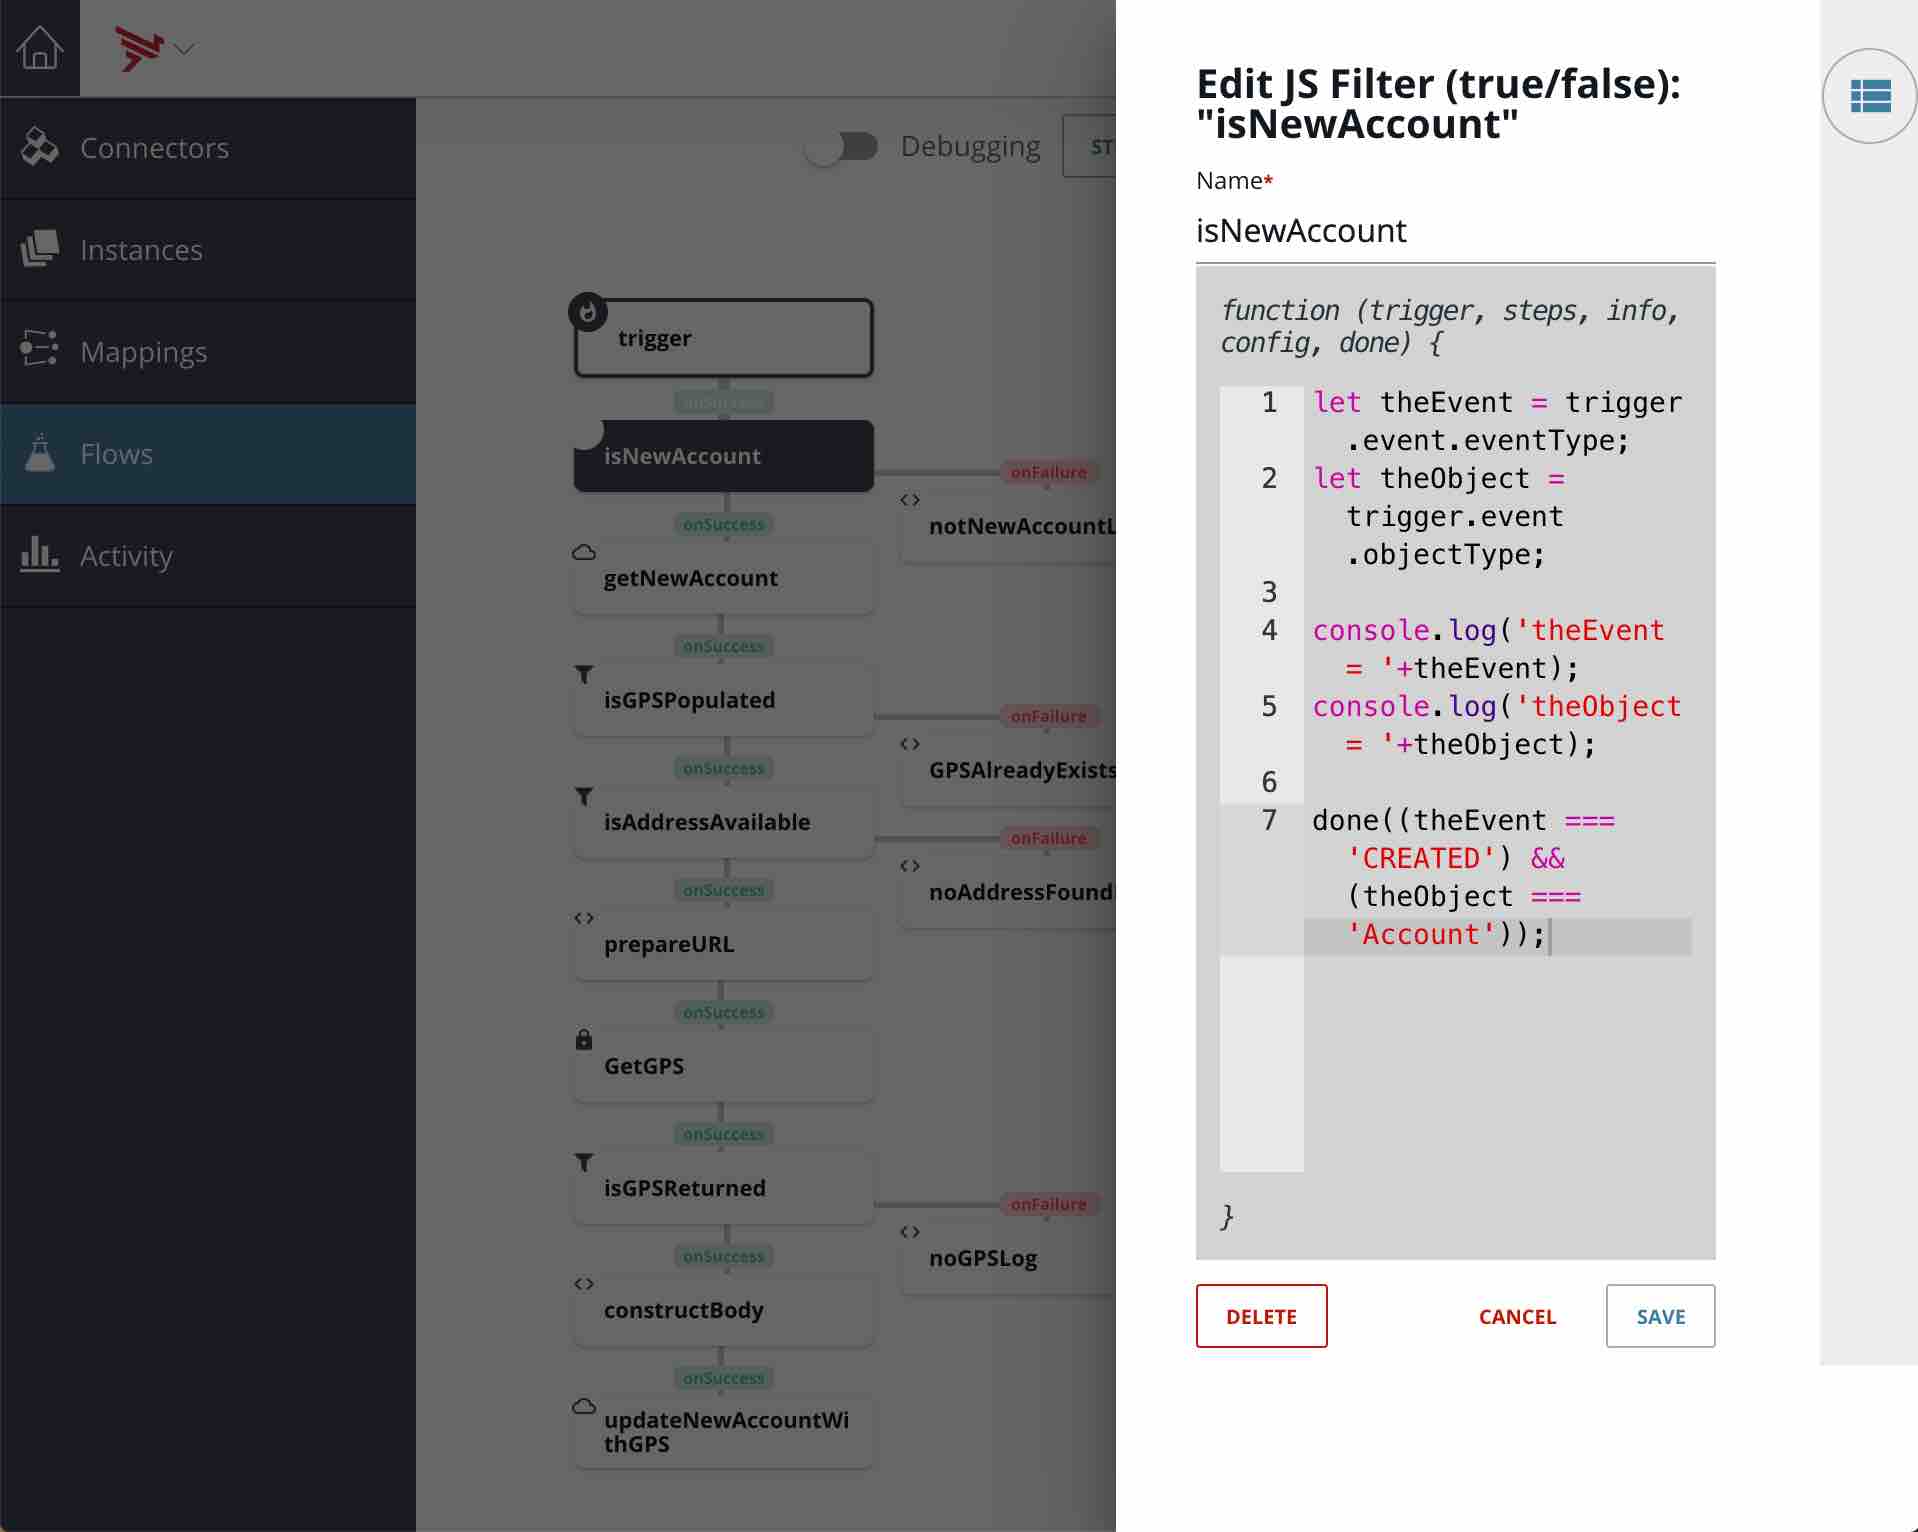
The code is shown below:
let theEvent = trigger.event.eventType;
let theObject = trigger.event.objectType;
console.log('theEvent = '+theEvent);
console.log('theObject = '+theObject);
done((theEvent === 'CREATED') && (theObject === 'Account'));
notNewAccountLog Step
In this step, we’ll just print a message to the console for debugging purposes.
You add this step by clicking on the isNewAccount step and selecting add on failure and then select JS Script.
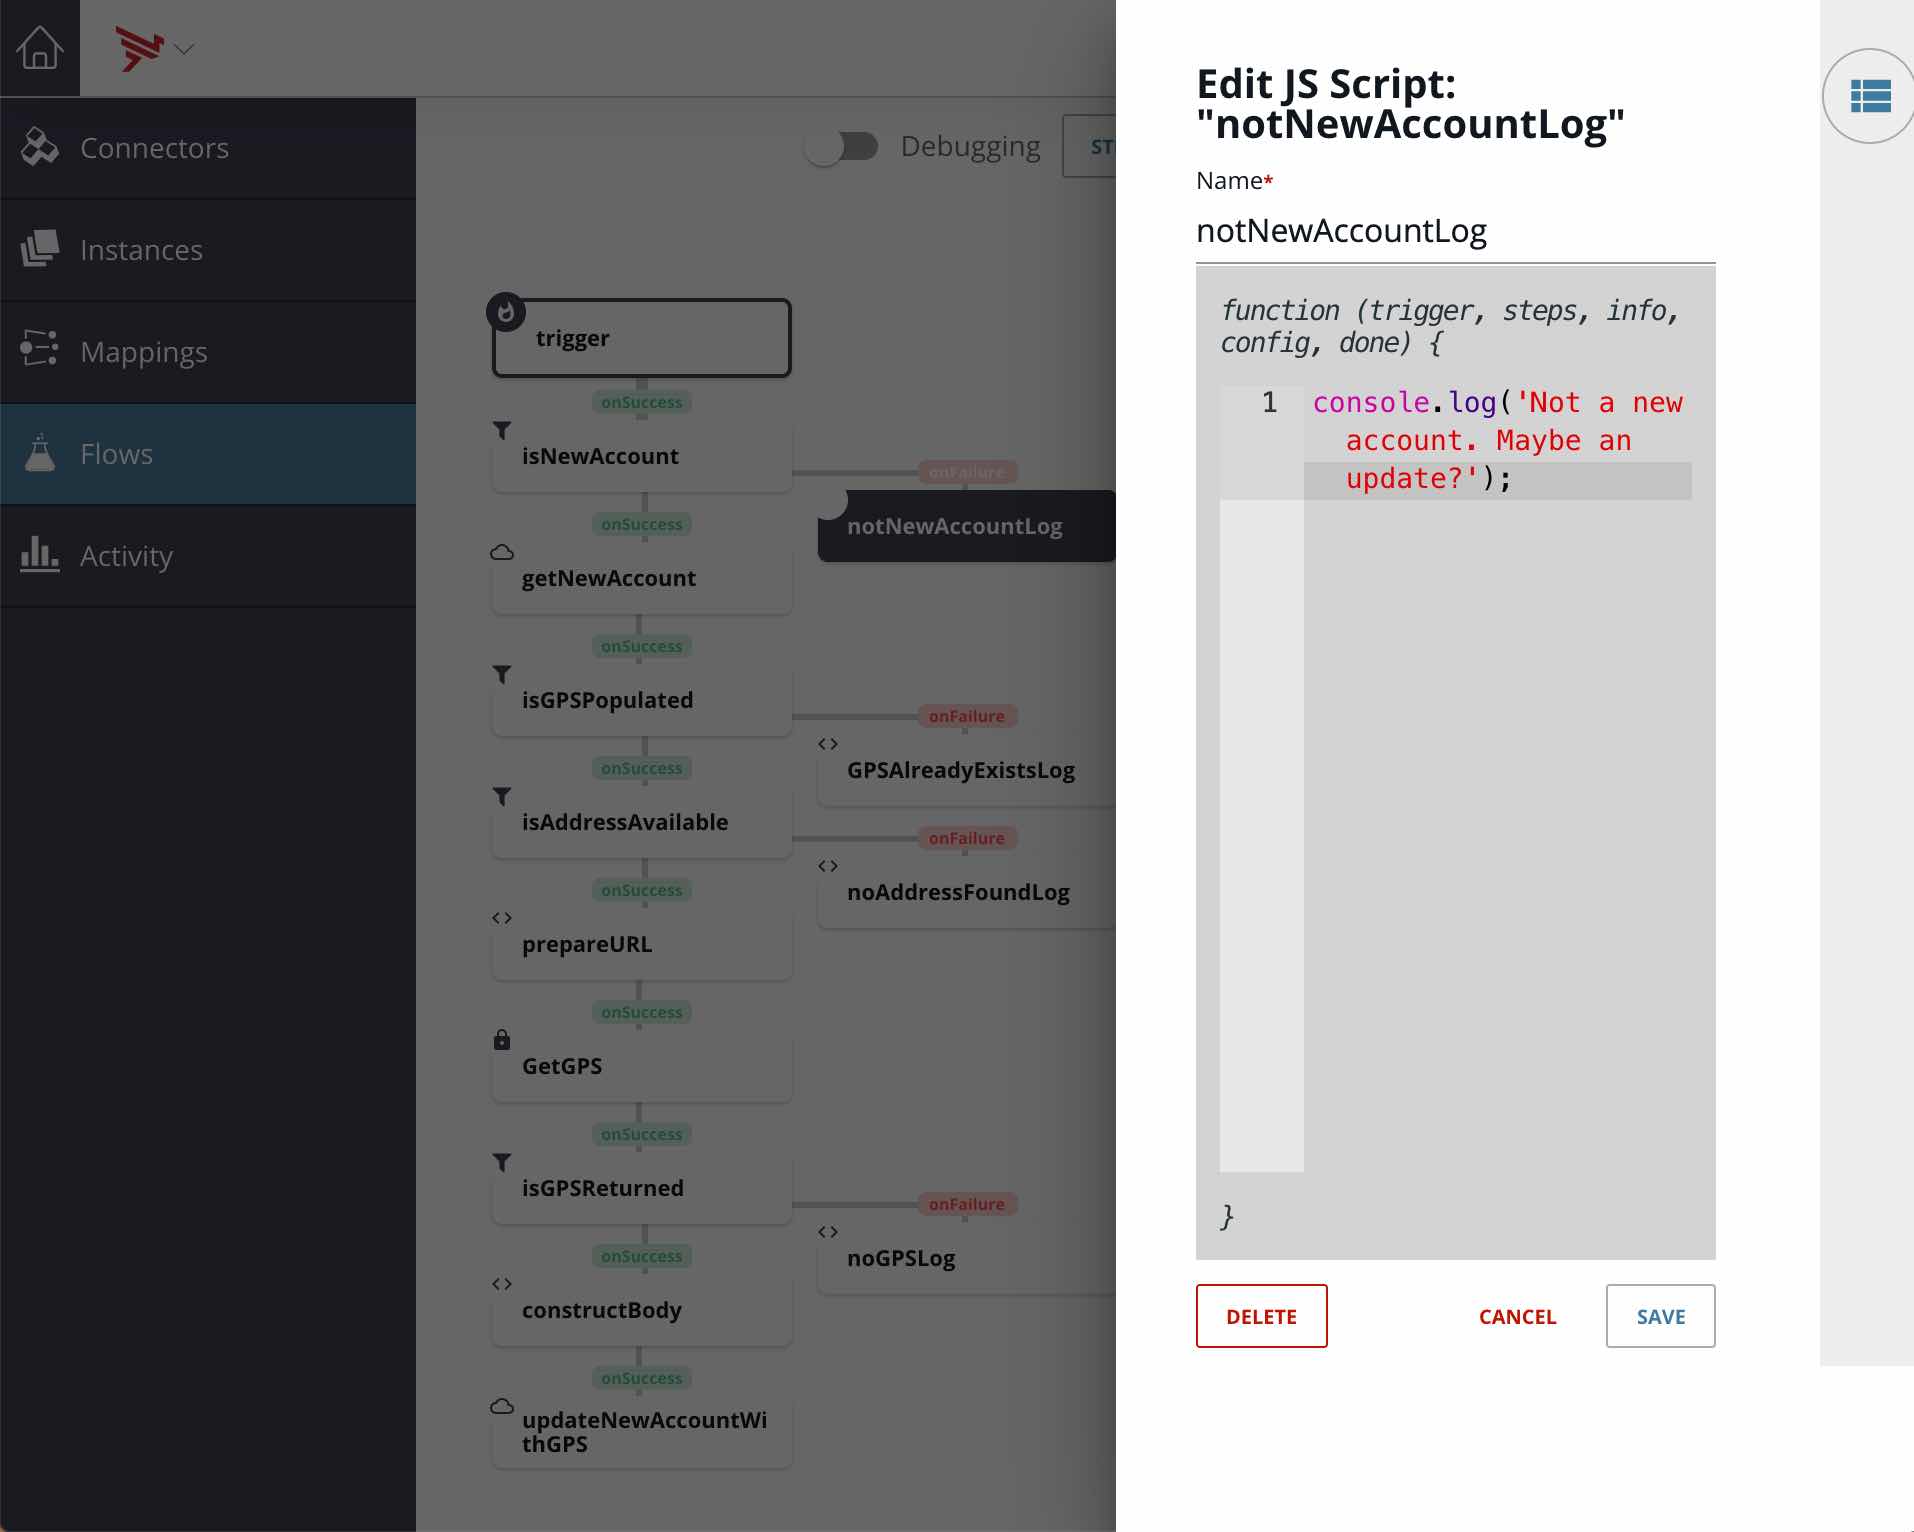
The code is shown below:
console.log('Not a new account. Maybe an update?');
getNewAccount Step
In this step, we’ll make a connector API request to Salesforce with the ID of the newly created account which we get from the trigger event.
You add this step by clicking on the isNewAccount step and selecting add on success and then select Connector API Request.
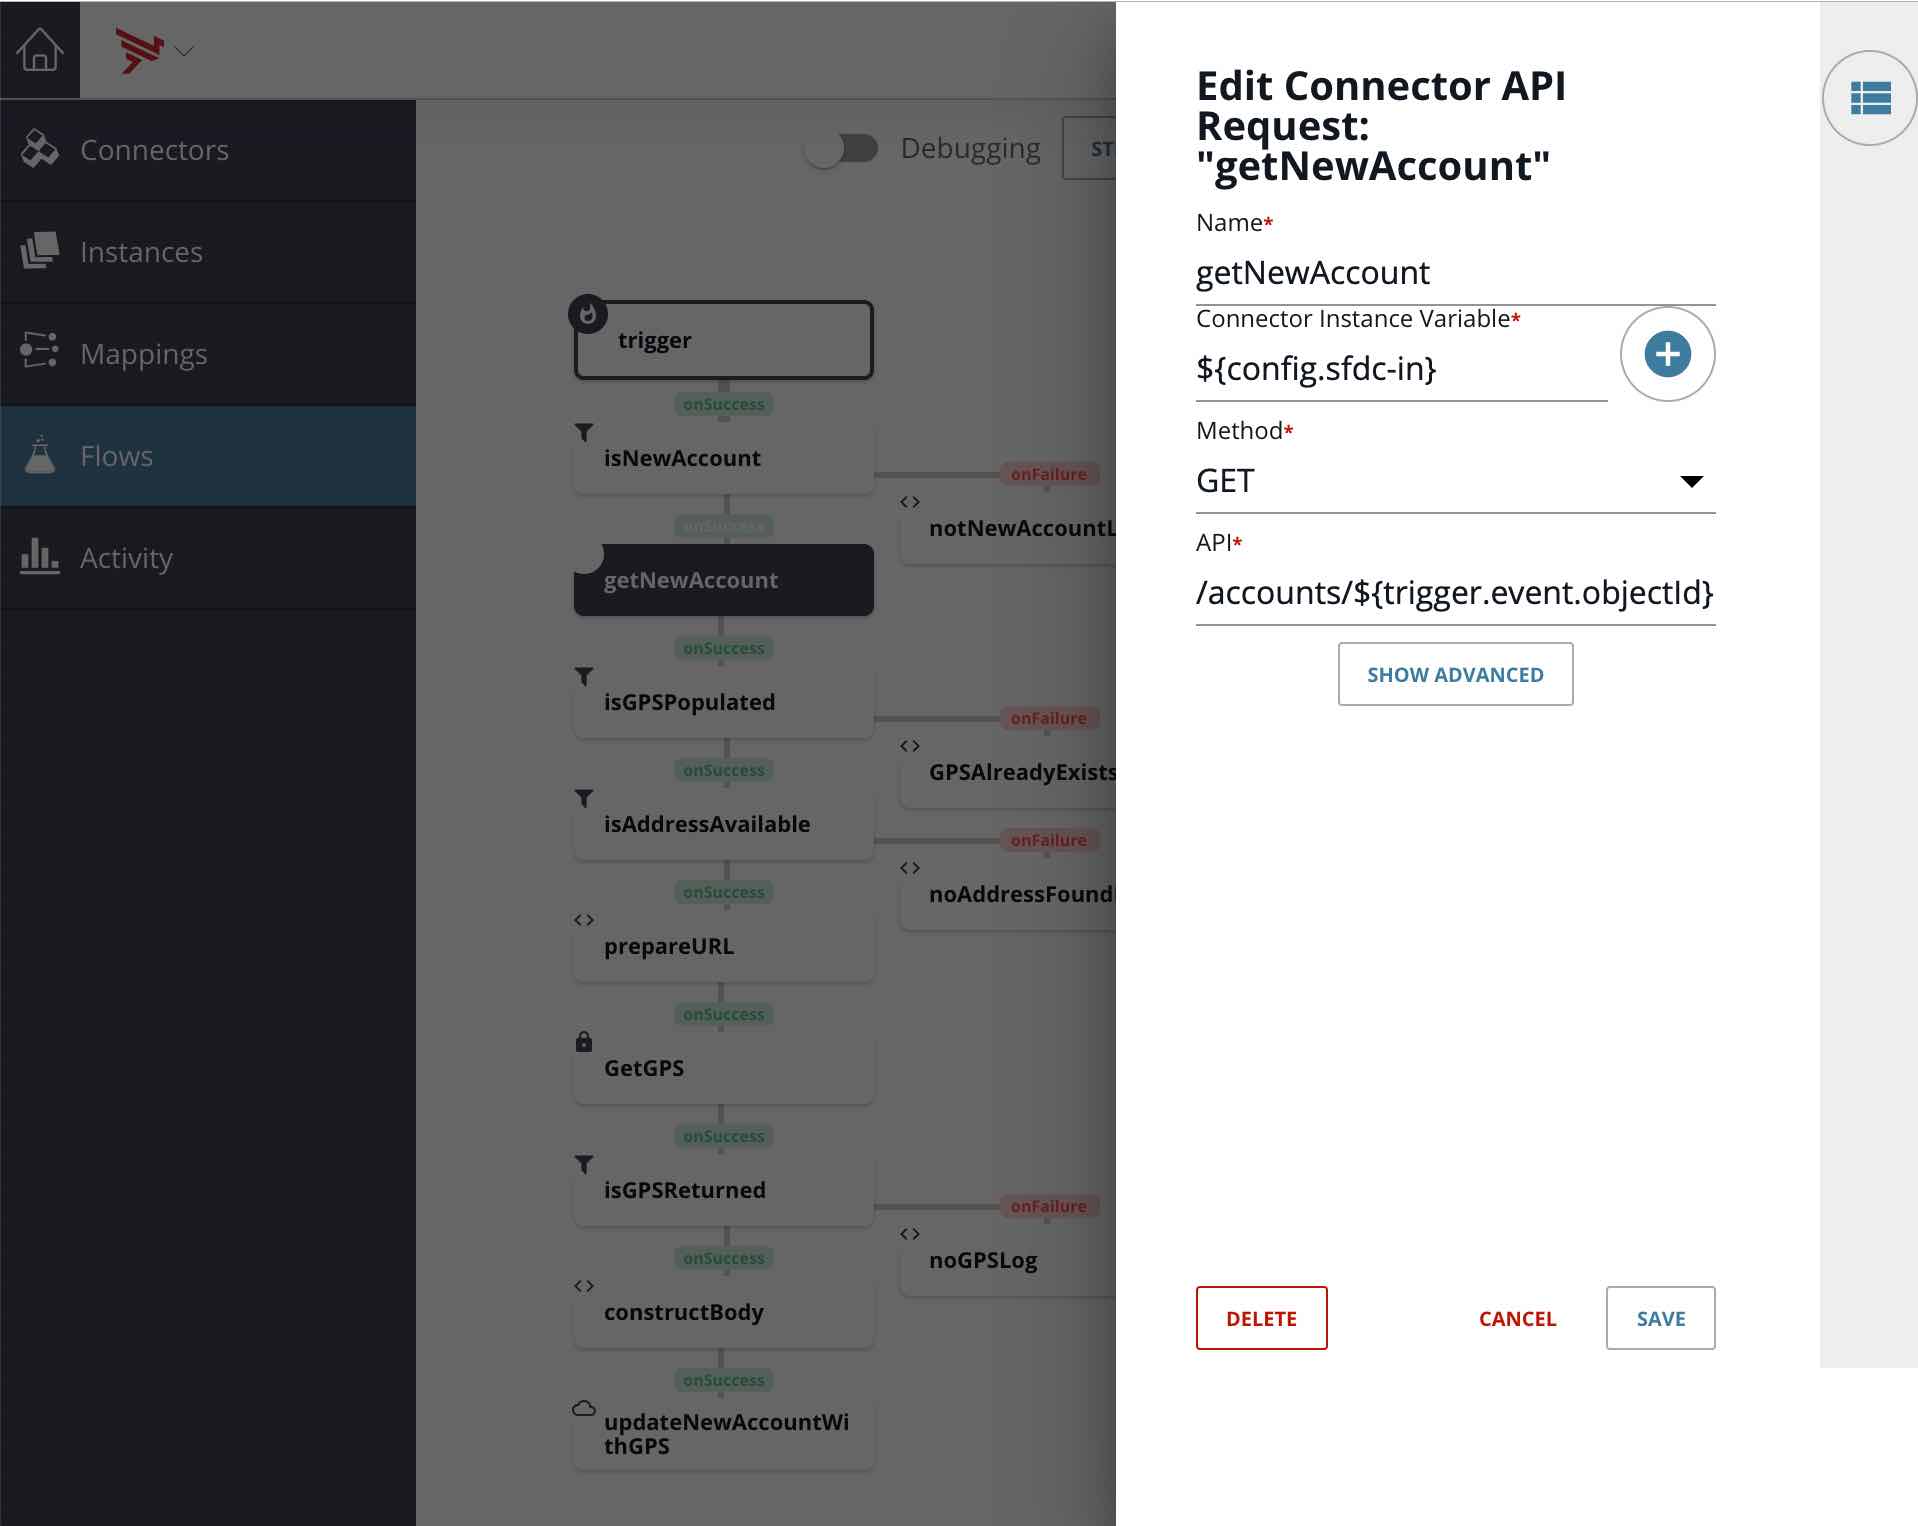
As you can see from the screen shot above, we are referencing the connector using the variable assigned to its instance, ${config.sfdc-in}. Recall that we created this variable name when we created the flow. You can also see the API path has the objectId from the trigger event, /accounts/${trigger.event.objectId}.
isGPSPopulated Step
In this step, we’ll make sure GPS is not already populated to avoid overwriting it.
You add this step by clicking on the getNewAccount step and selecting add on success and then select JS Filter.
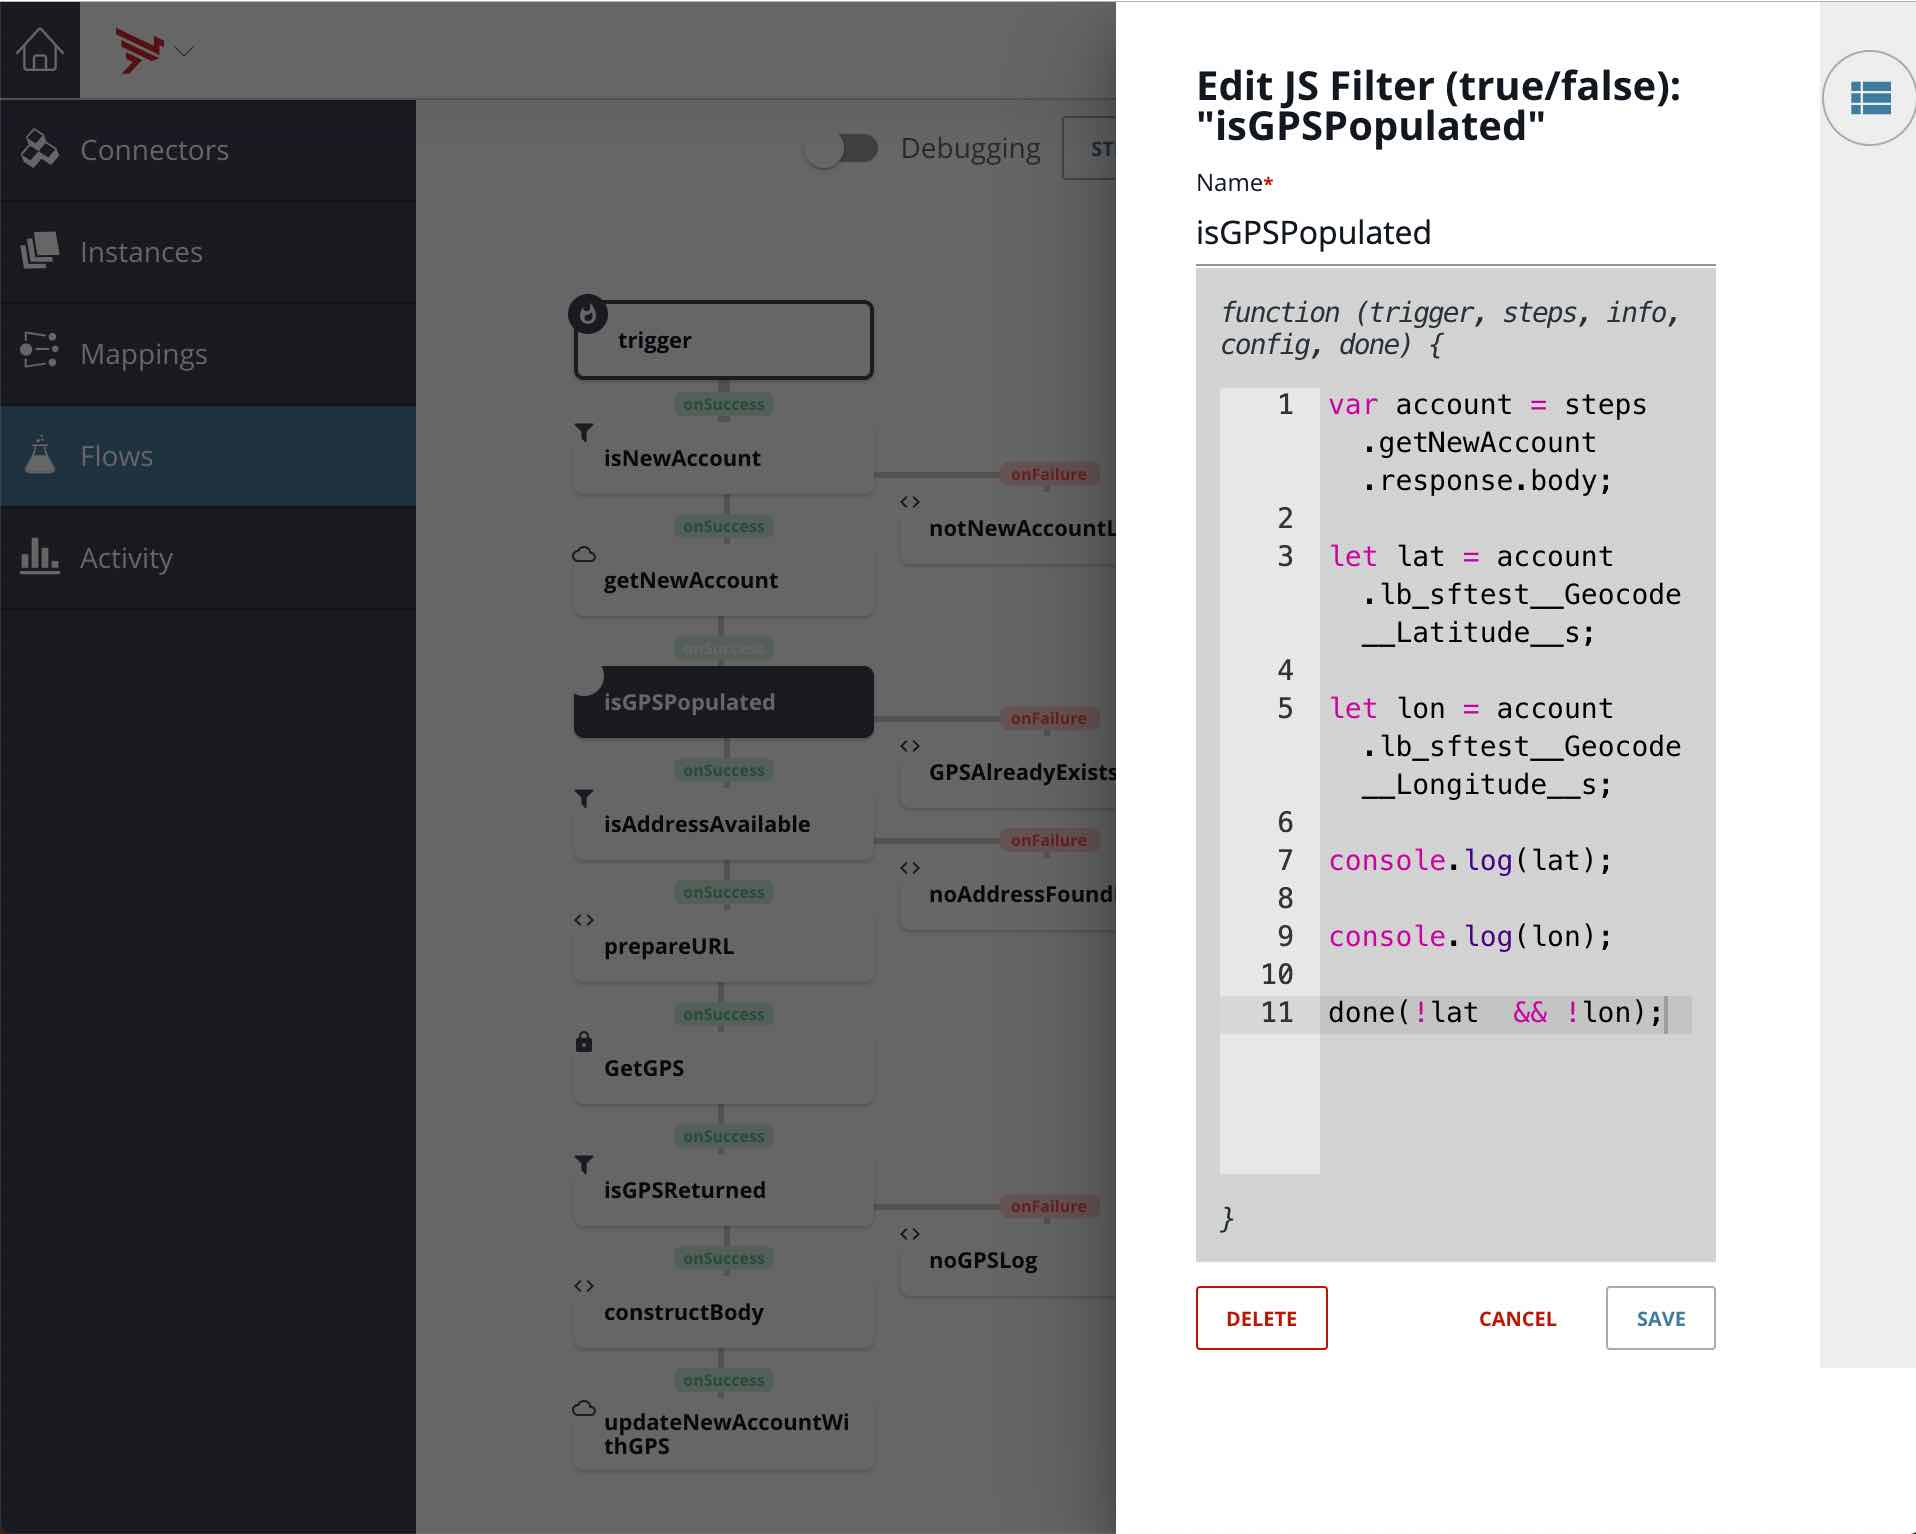
The code is shown below:
var account = steps.getNewAccount.response.body;
let lat = account.lb_sftest__Geocode__Latitude__s;
let lon = account.lb_sftest__Geocode__Longitude__s;
console.log(lat);
console.log(lon);
done(!lat  && !lon);
Note that here is where we needed to know the Geocode field names that we added to Salesforce and that we determined after creating the Salesforce Connector Instance and using the API Docs.
GPSAlreadyExistsLog Step
In this step, we’ll just print a message to the console for debugging purposes.
You add this step by clicking on the isGPSPopulated step and selecting add on failure and then select JS Script.
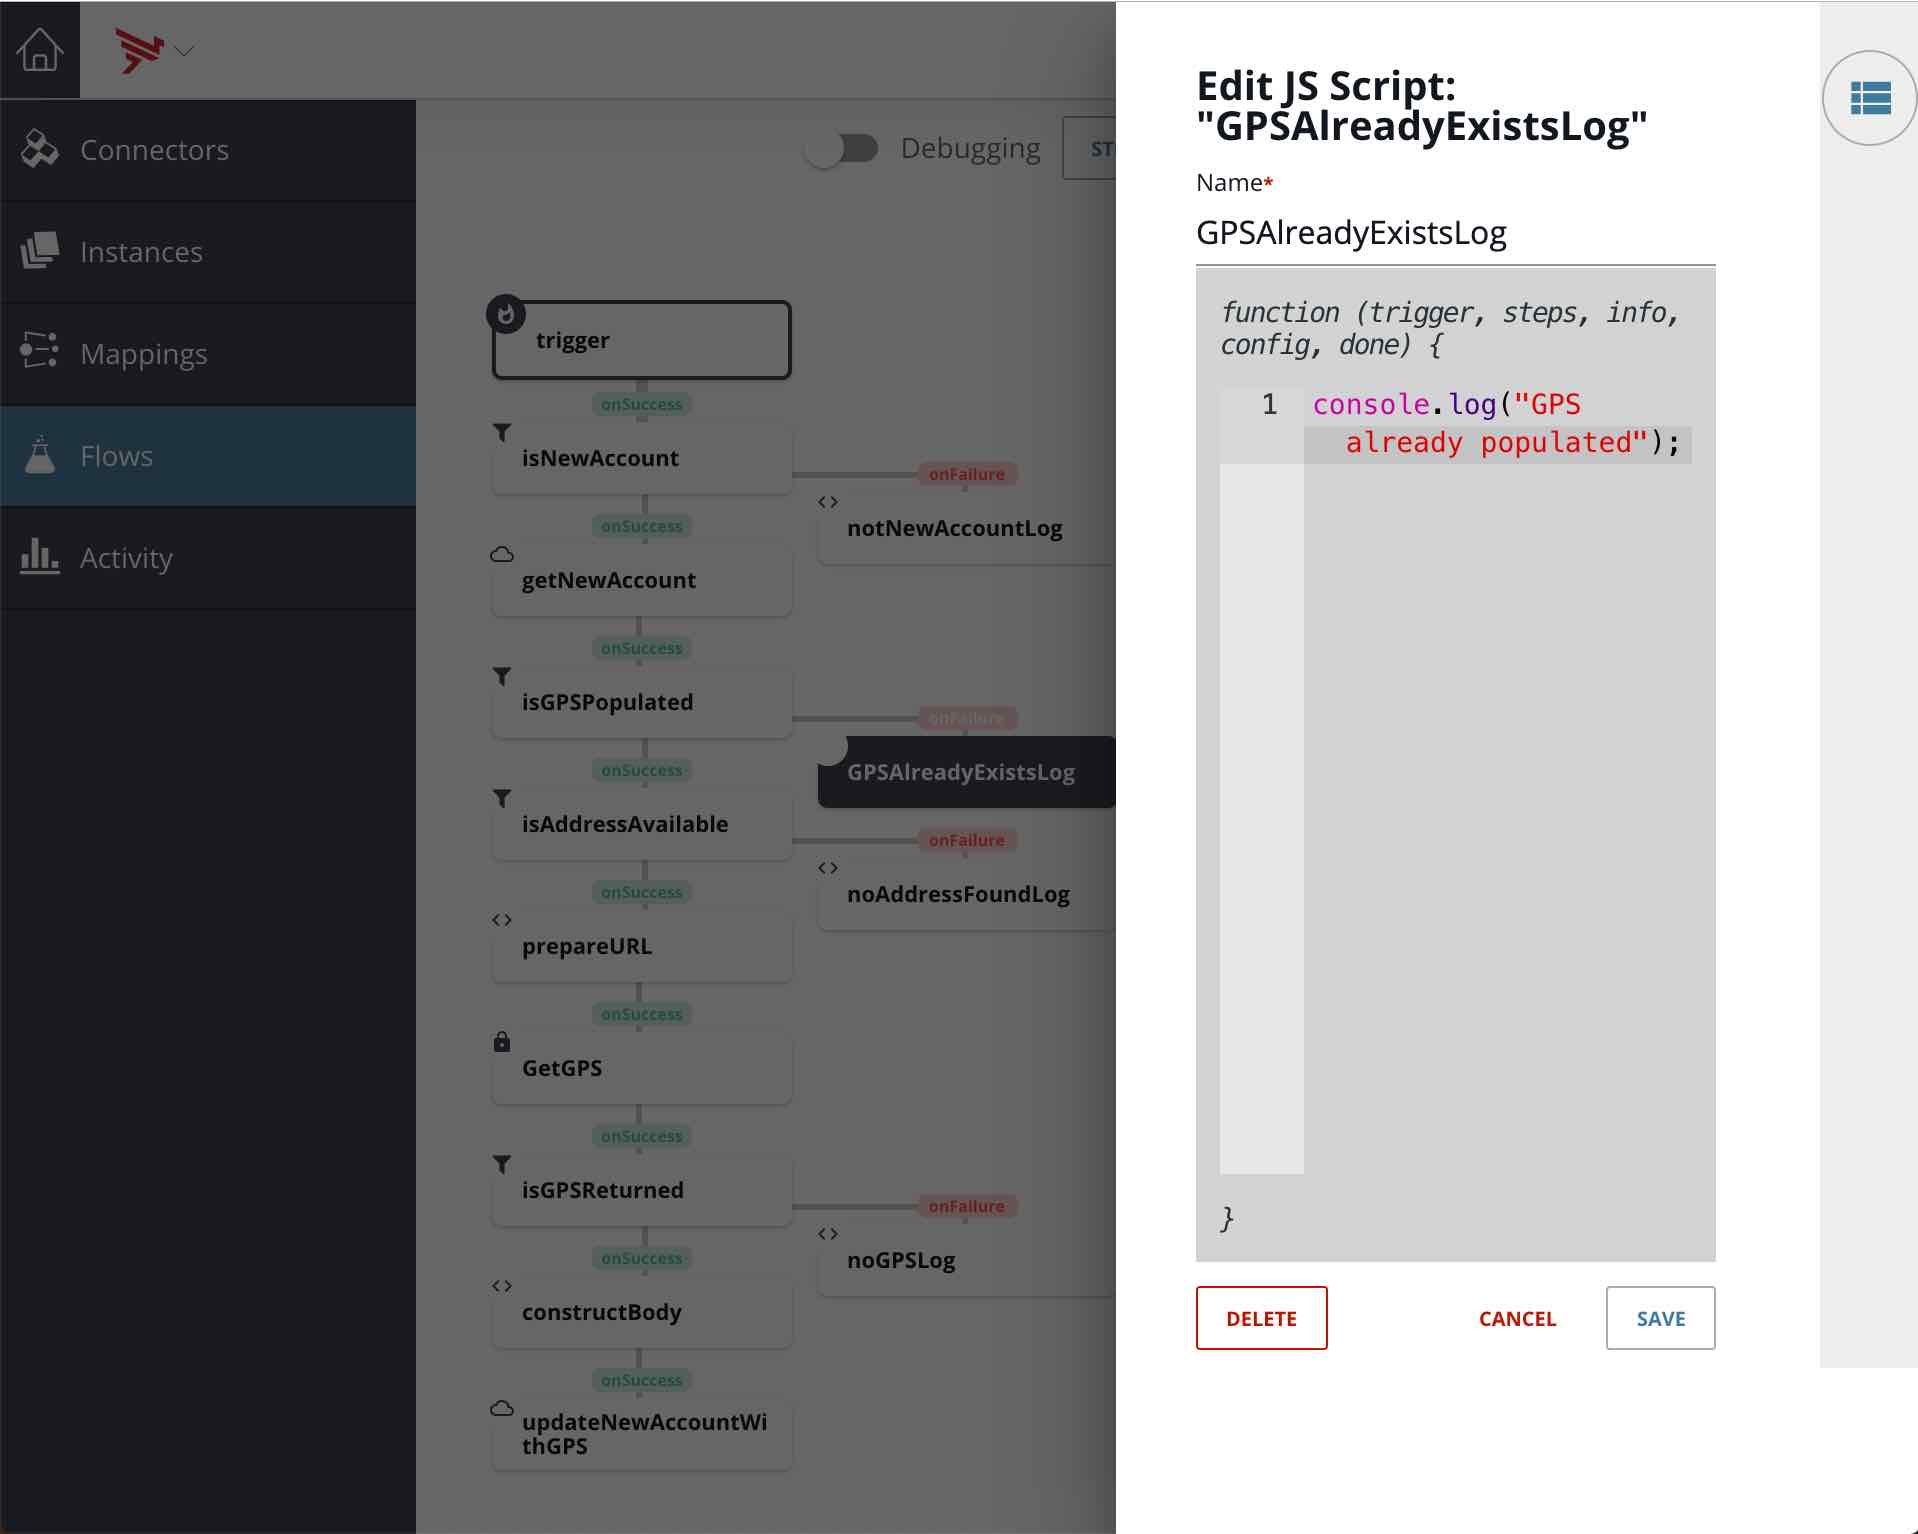
The code is shown below:
console.log("GPS already populated");
isAddressAvailable Step
In this step, we’ll make sure the (shipping) address fields are all populated.
You add this step by clicking on the isGPSPopulated step and selecting add on success and then select JS Filter.
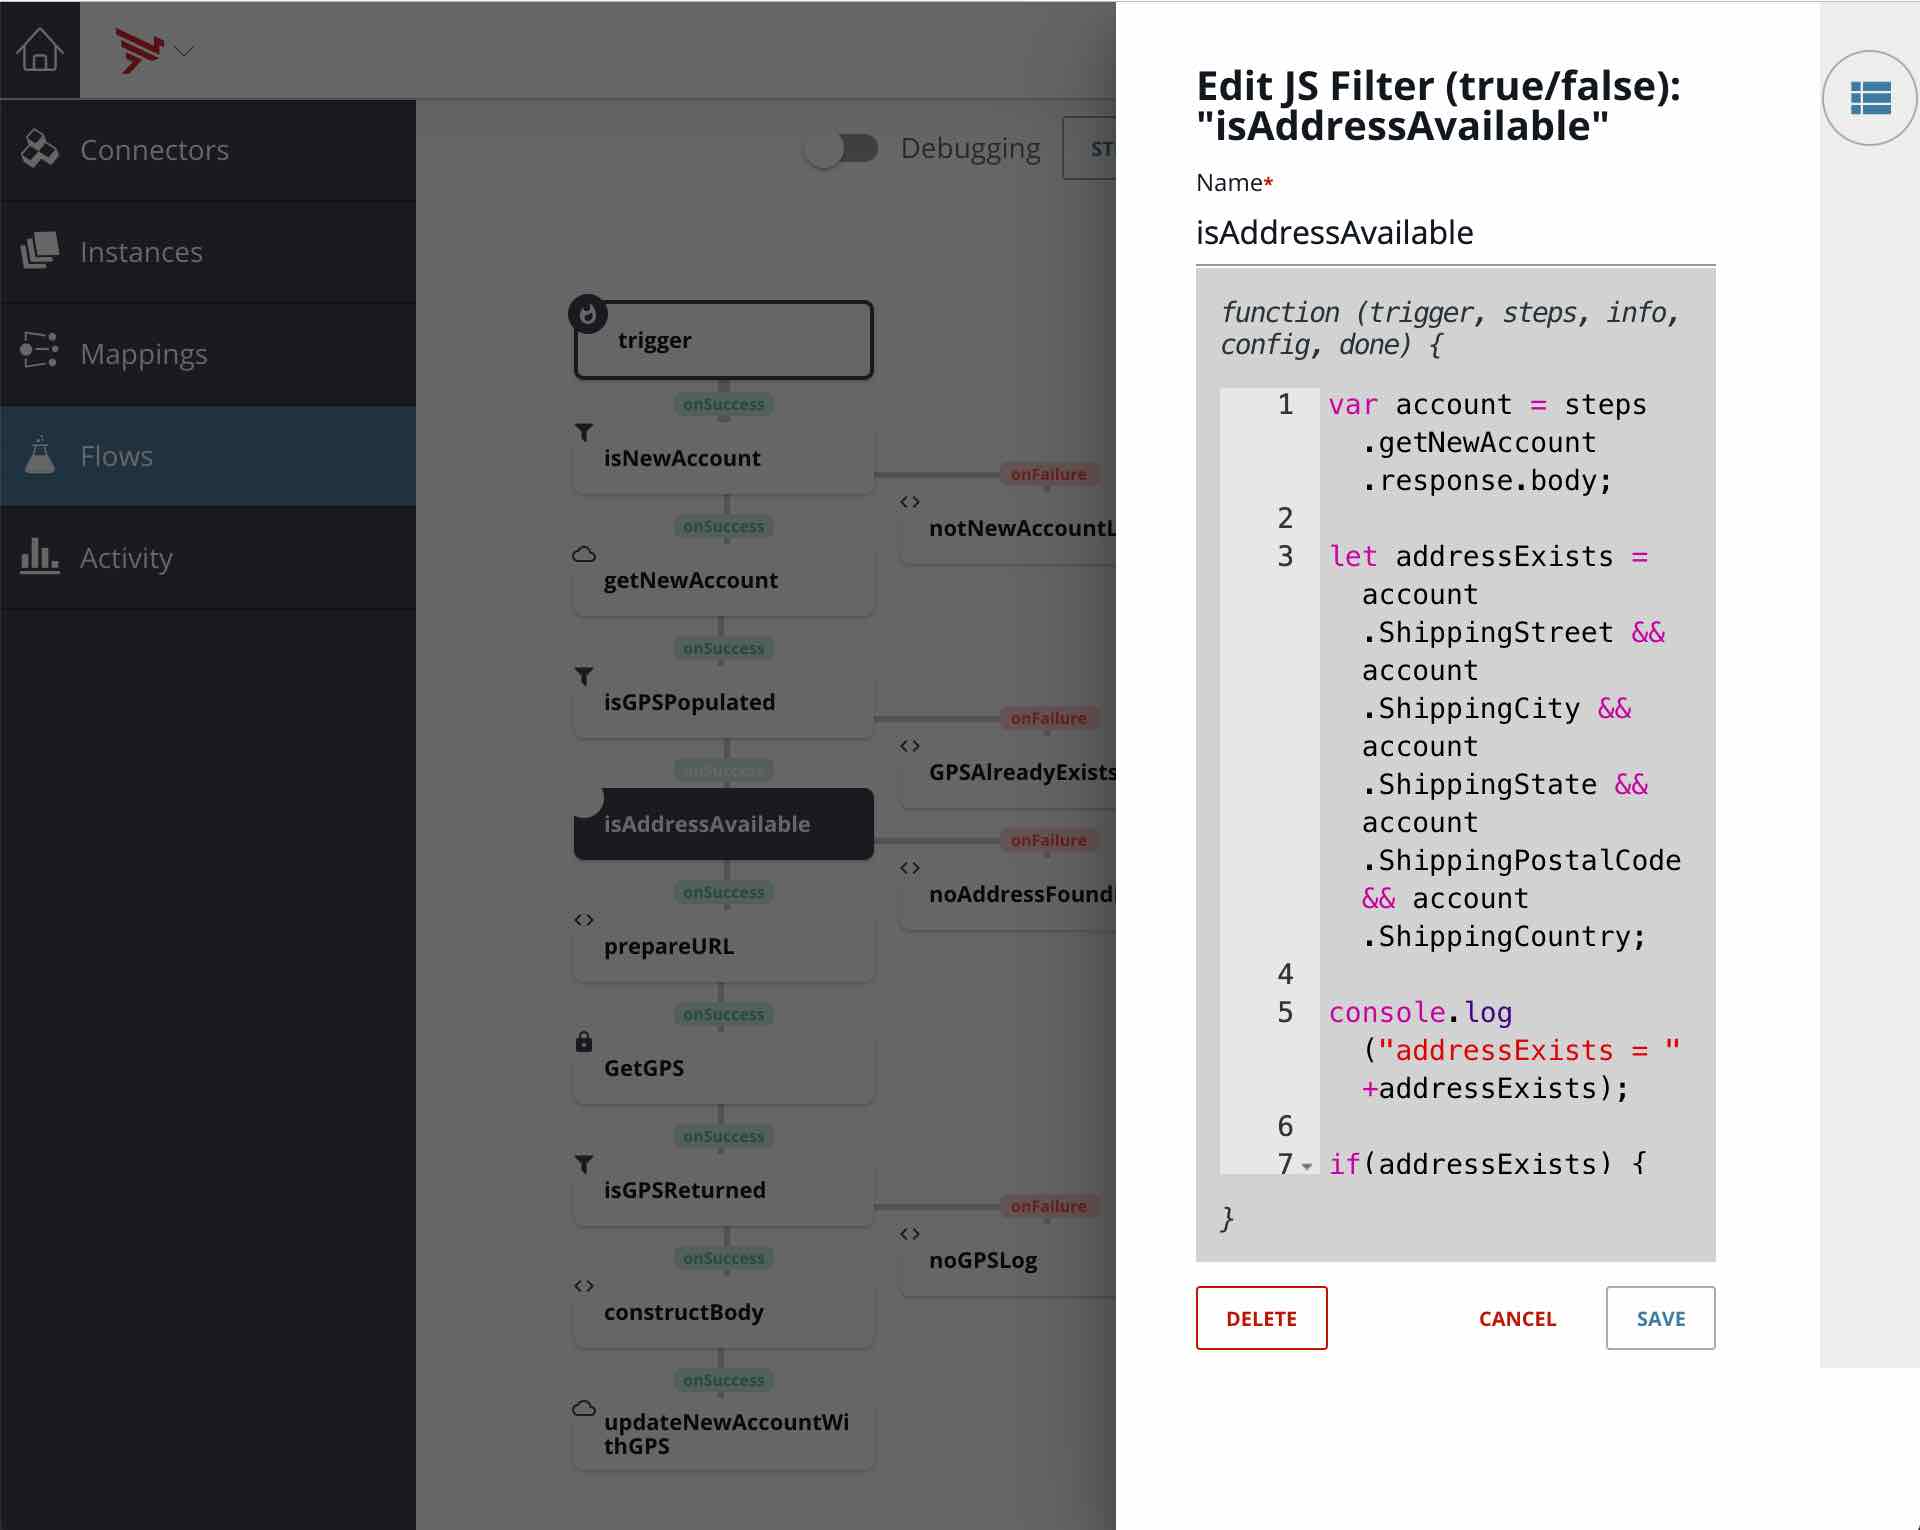
The code is shown below:
var account = steps.getNewAccount.response.body;
let addressExists = account.ShippingStreet && account.ShippingCity && account.ShippingState && account.ShippingPostalCode && account.ShippingCountry;
console.log("addressExists = "+addressExists);
if(addressExists) {
  done(true);
} else {
  done(false);
}
Note that using the shipping address versus the billing address as well as requiring street, city, zip, state and country are all arbitrary decisions made for demonstration purposes and you can implement what suits your business case best. For example, the OpenCage API is very robust and can determine GPS coordinates without a state and country or without a zip code.
noAddressFoundLog Step
In this step, we’ll just print a message to the console for debugging purposes.
You add this step by clicking on the isAddressAvailable step and selecting add on failure and then select JS Script.
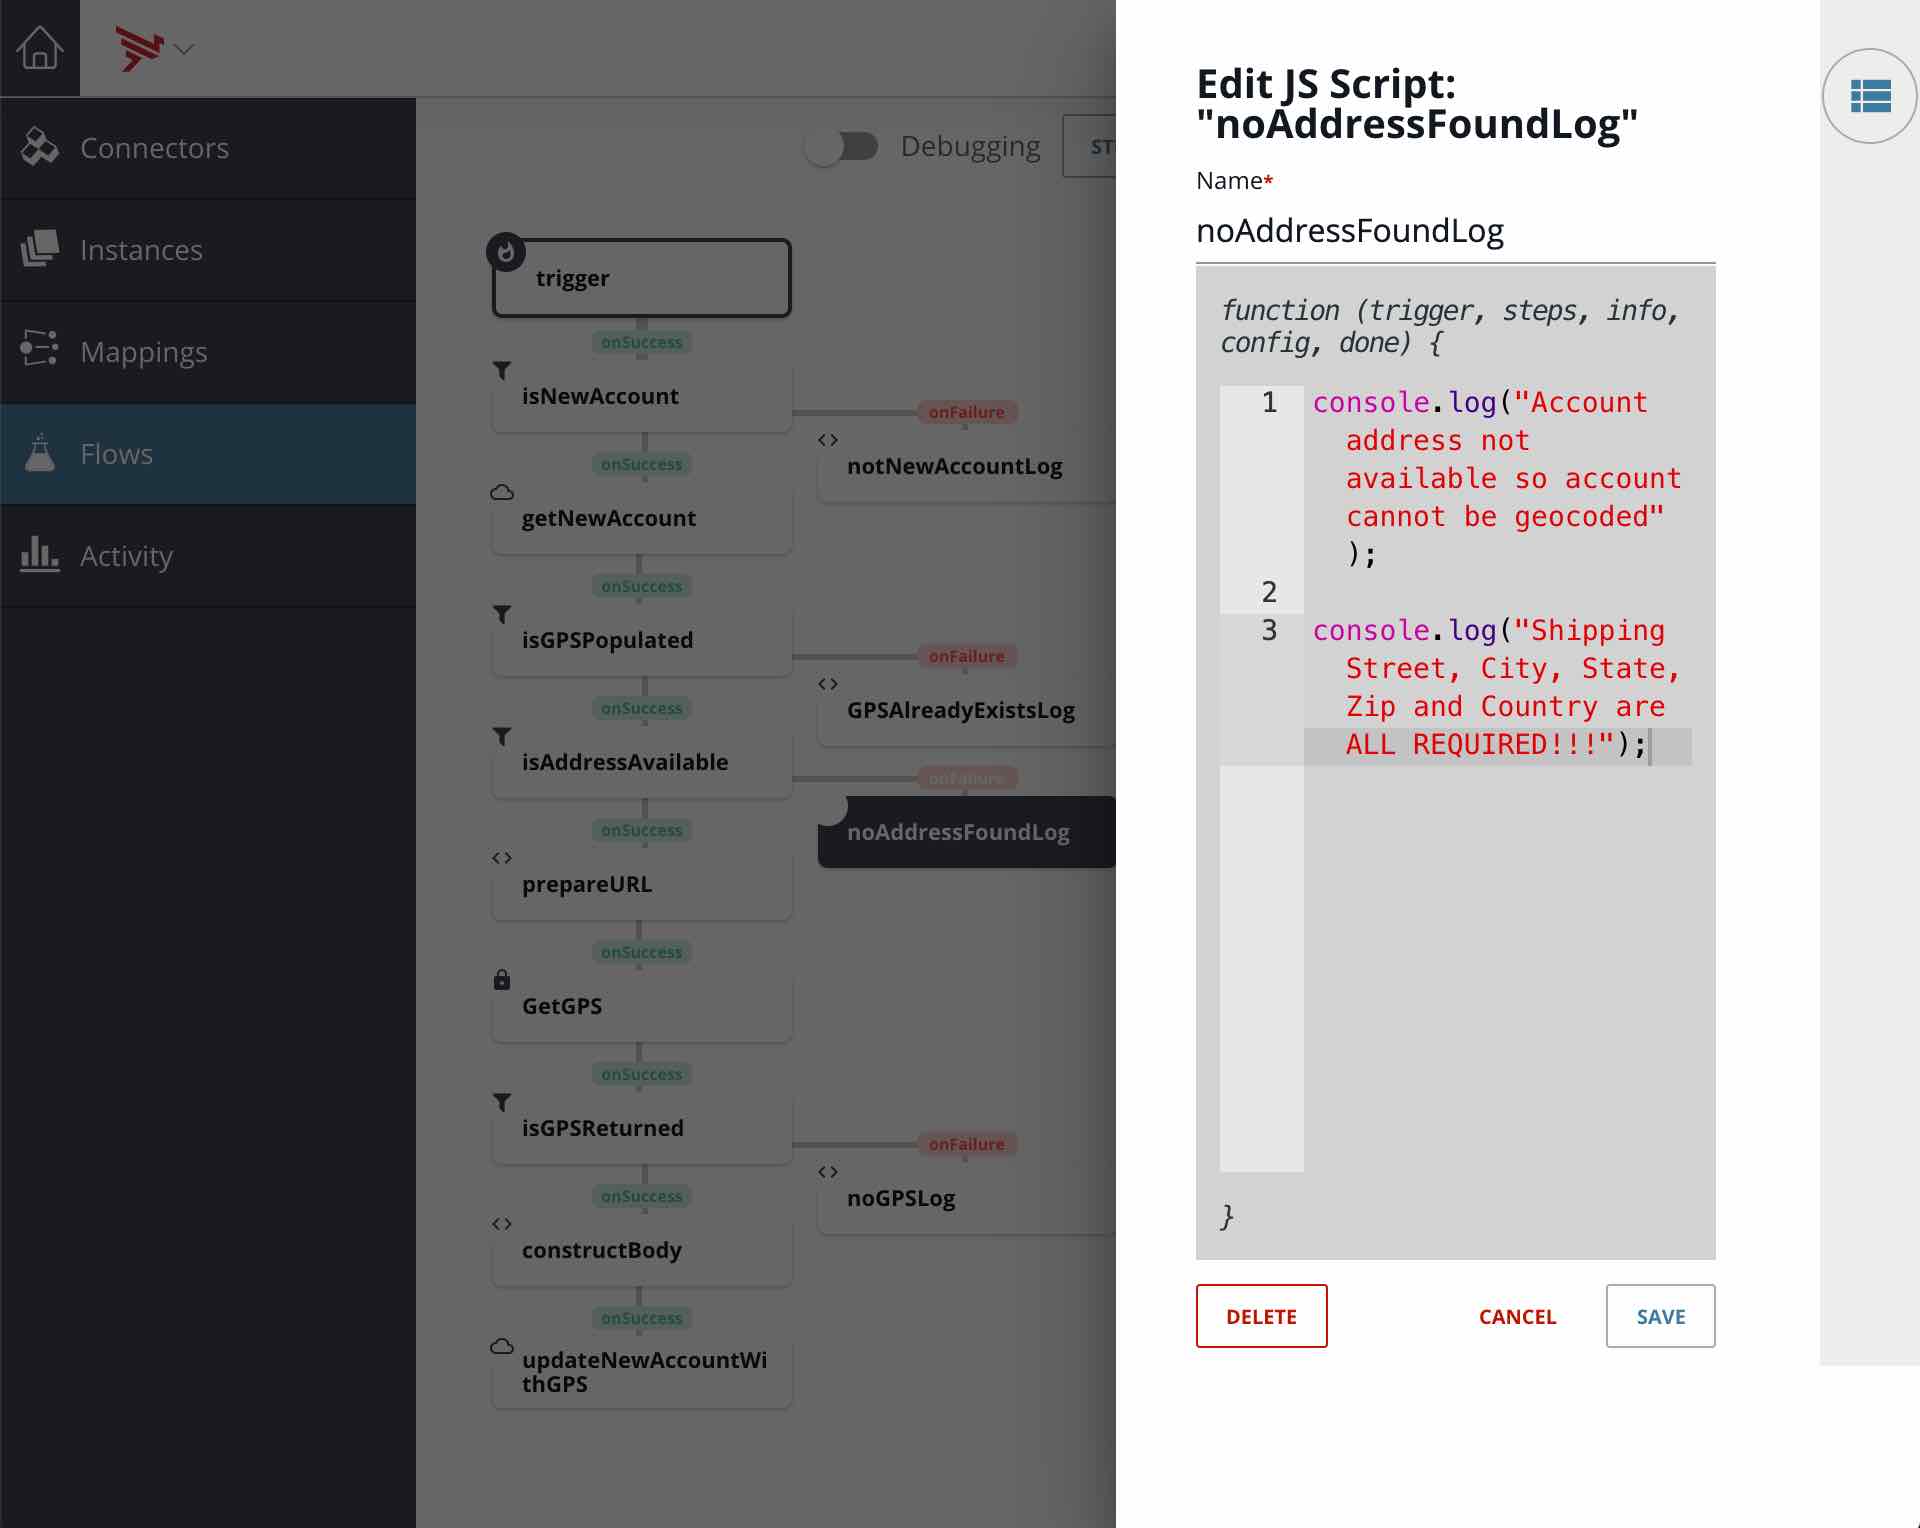
The code is shown below:
console.log("Account address not available so account cannot be geocoded");
console.log("Shipping Street, City, State, Zip and Country are ALL REQUIRED!!!");
prepareURL Step
At this point in the flow, we know we have a new Salesforce account without its Geocode field populated but with a full shipping address populated so now we can make a call to the OpenCage Geocode API to get the GPS coordinates of the account. In order to make a call to the Geocode API, you will need an API Key.
The format of the API request is:
https://api.opencagedata.com/geocode/v1/json?q=PLACENAME&key={YOURAPIKEY}
PLACENAME is the URL encoded address.
Refer to the OpenCage docs for the format of the response.
In this step, we are preparing the URL for the API request to retrieve the GPS coordinates corresponding to the account address.
You add this step by clicking on the isAddressAvailable step and selecting add on success and then select JS Script.

The code is shown below:
var account = steps.getNewAccount.response.body;
let url = 'https://api.opencagedata.com/geocode/v1/json'
    + '?'
    + 'key=' +encodeURIComponent('{YOUR OPENCAGE API KEY}')
    + '&q=' + encodeURIComponent(account.ShippingStreet) + ',' + encodeURIComponent(account.ShippingCity) + ',' +
      encodeURIComponent(account.ShippingState) + ',' +
      encodeURIComponent(account.ShippingPostalCode)
        + ',' +
      encodeURIComponent(account.ShippingCountry)
    + '&pretty=1'
    + '&no_annotations=1';
done({url:url});
Note how we pass the URL on in the done() method. We’ll reference this in the next step.
GetGPS Step
In this step, we’re making a call to the OpenCage API using the URL constructed in the prepareURL step.
You add this step by clicking on the prepareURL step and selecting add on success and then select HTTP Request.
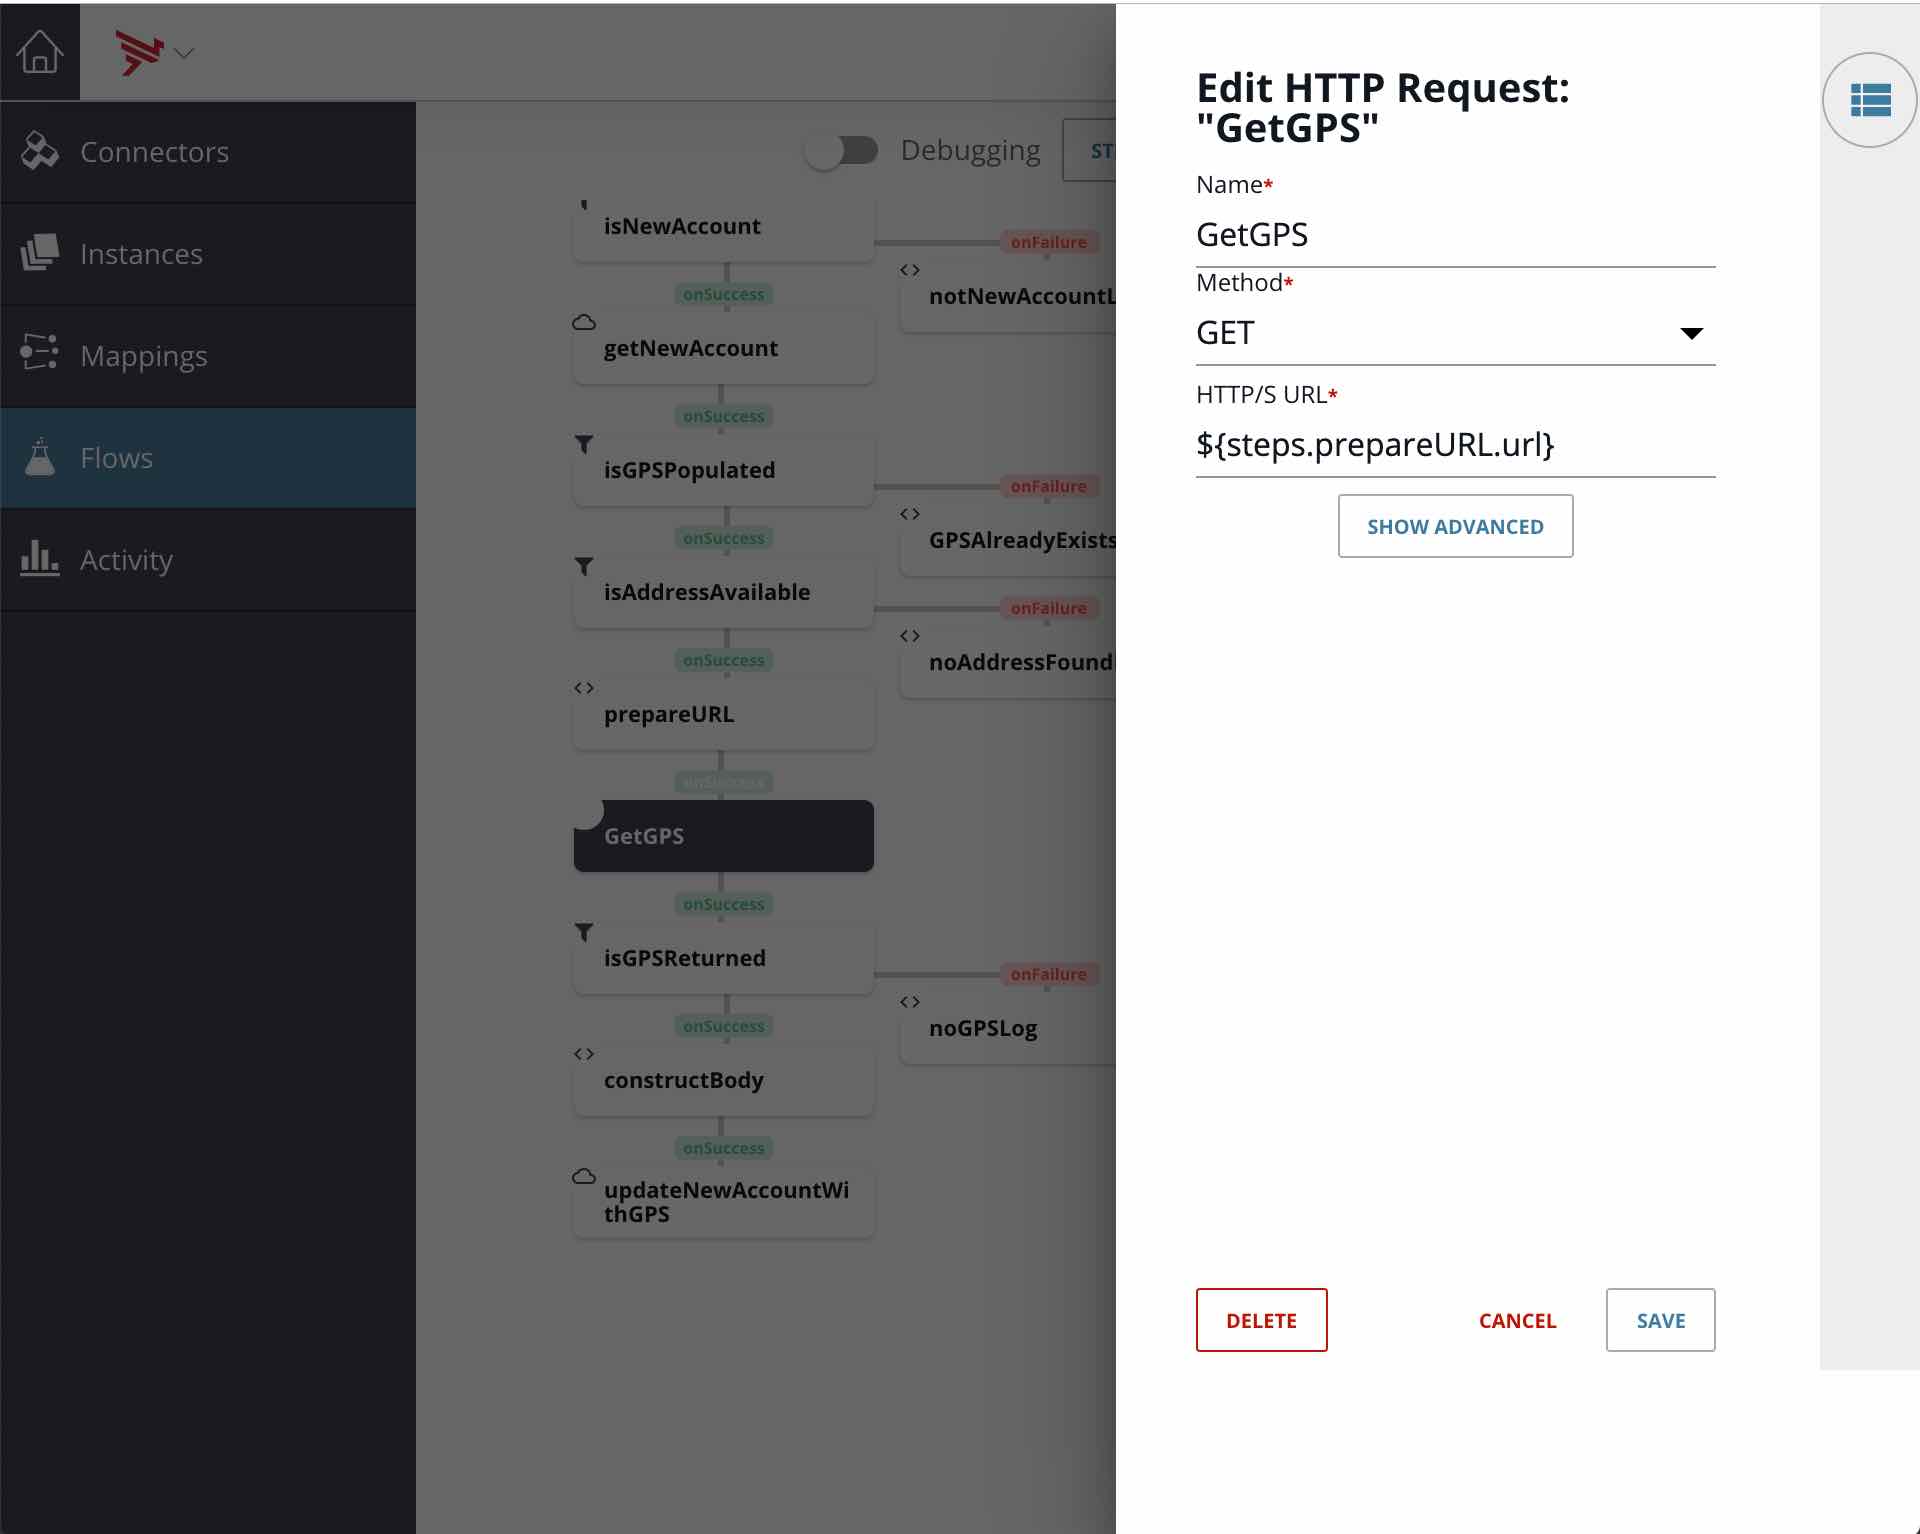
You can see from the screen shot above how we are referencing the OpenCage URL from the prepareURL step using ${steps.prepareURL.url}.
isGPSReturned Step
In this step, we’re going to make sure that the response from OpenCage contains a valid response with GPS coordinates.
You add this step by clicking on the GetGPS step and selecting add on success and then select JS Filter.

The code is shown below:
var gps = steps.GetGPS.response.body;
if(gps.hasOwnProperty('results')) {
  if(gps.results.length > 0) {
    if(gps.results[0].hasOwnProperty('geometry')) {
        console.log('lat/lon exists');
        done(true);
    } else {
      console.log('geometry does NOT exist');
      done(false);
    }
  } else {
    console.log('results has zero length');
    done(false);
  }
} else {
  console.log('results does NOT exist');
  done(false);
}
noGPSLog Step
In this step, we’ll just print a message to the console for debugging purposes.
You add this step by clicking on the isGPSReturned step and selecting add on failure and then select JS Script.
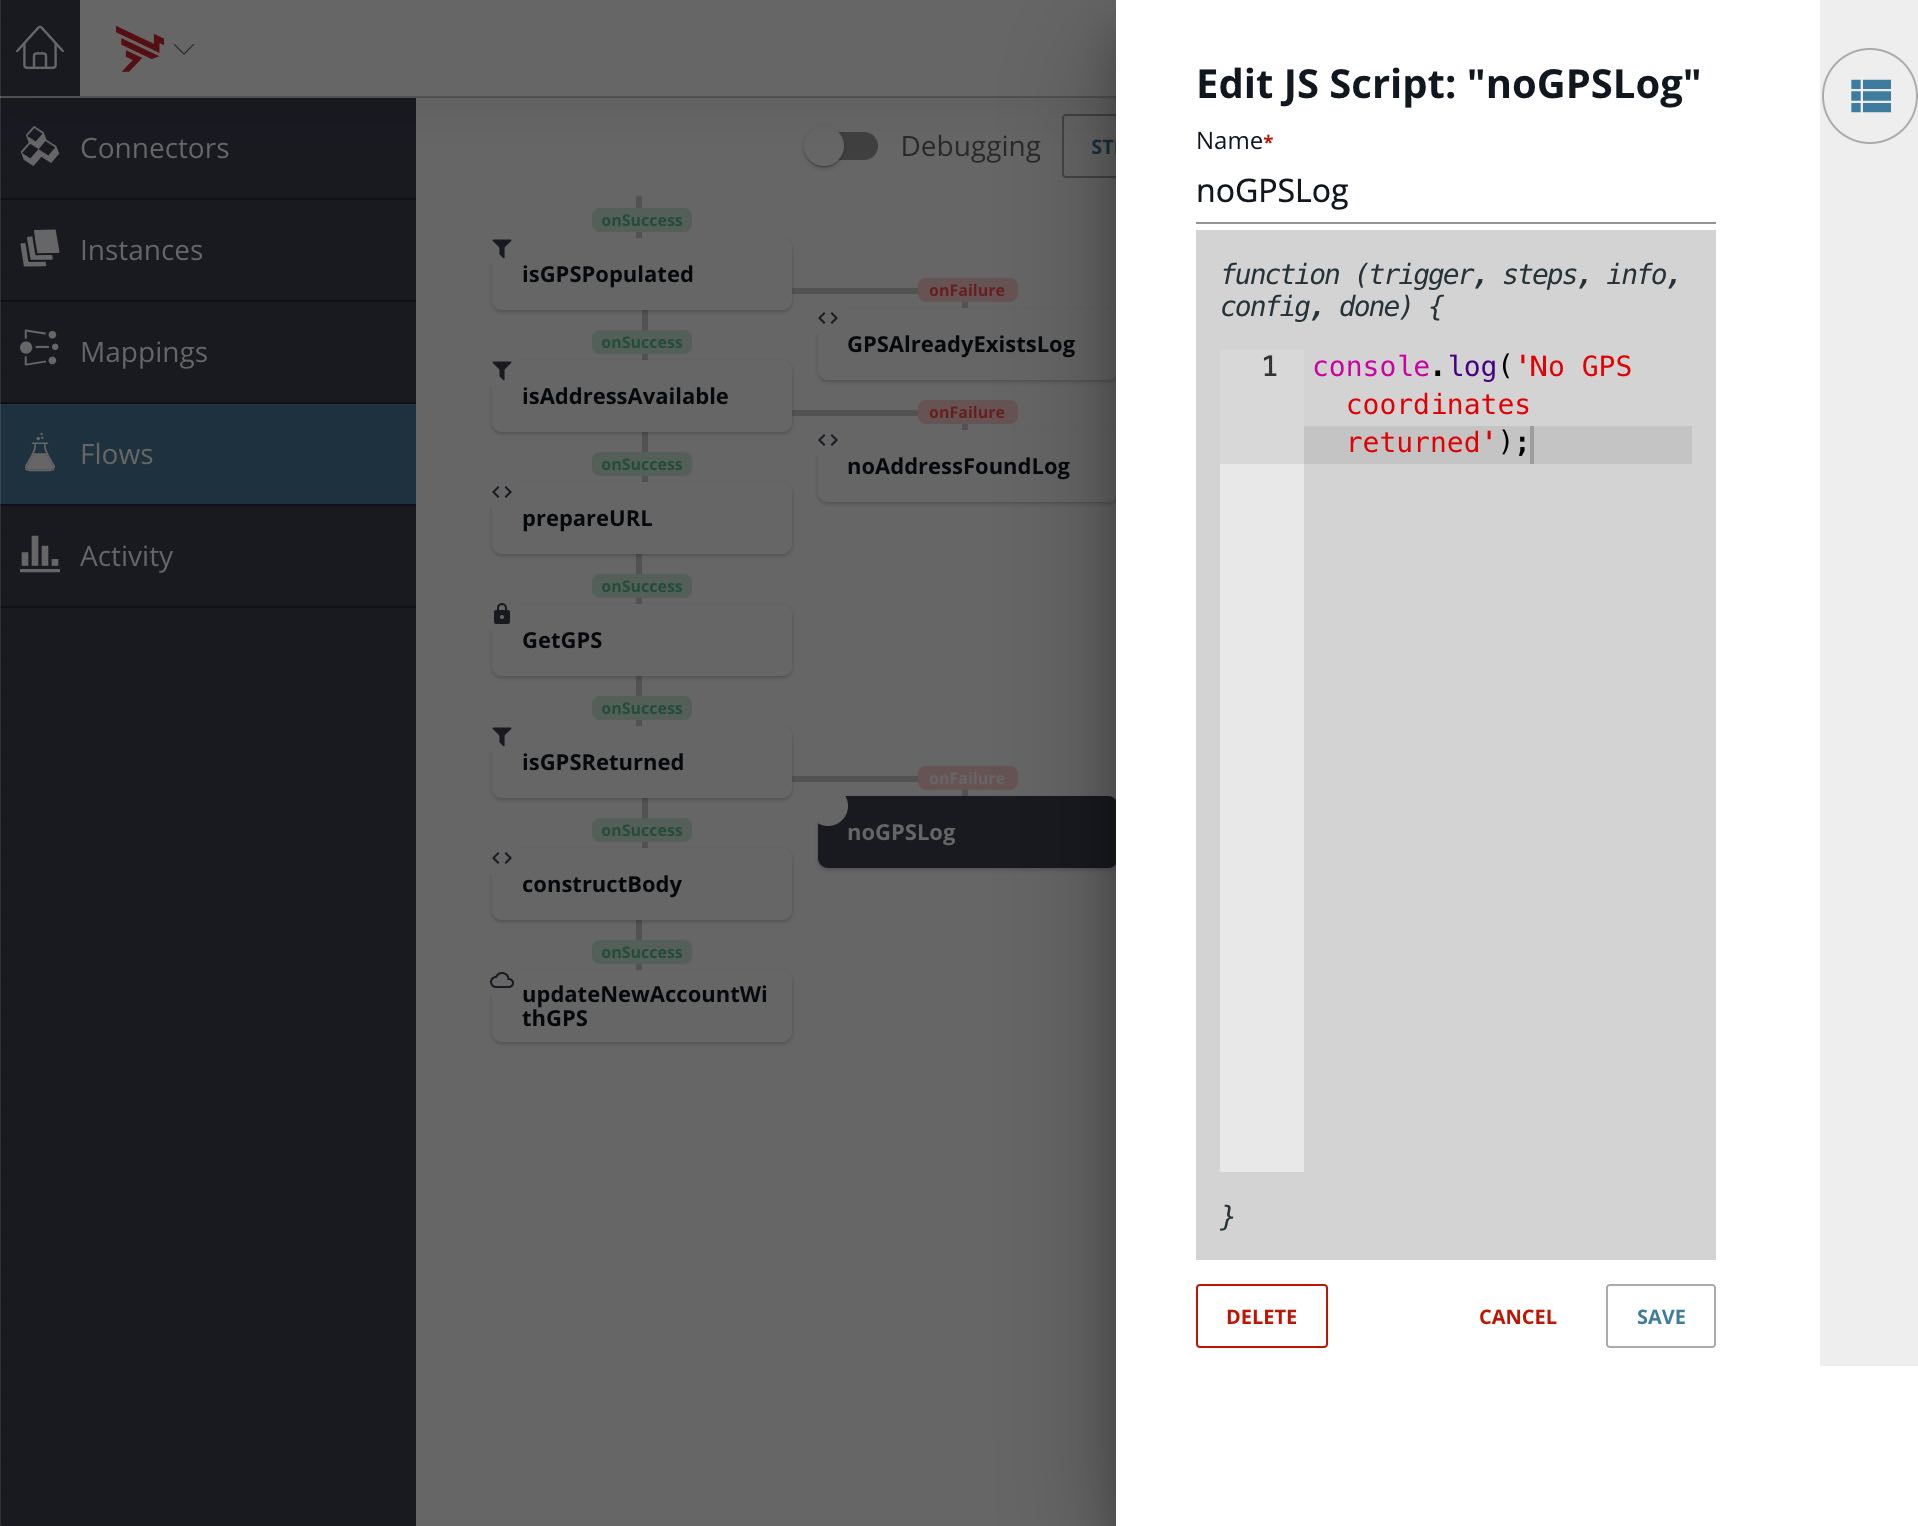
The code is shown below:
console.log('No GPS coordinates returned');
constructBody Step
In this step, we’ll create the body for our PATCH API call to Salesforce to update the new account with the GPS coordinates.
You add this step by clicking on the isGPSReturned step and selecting add on success and then select JS Script.
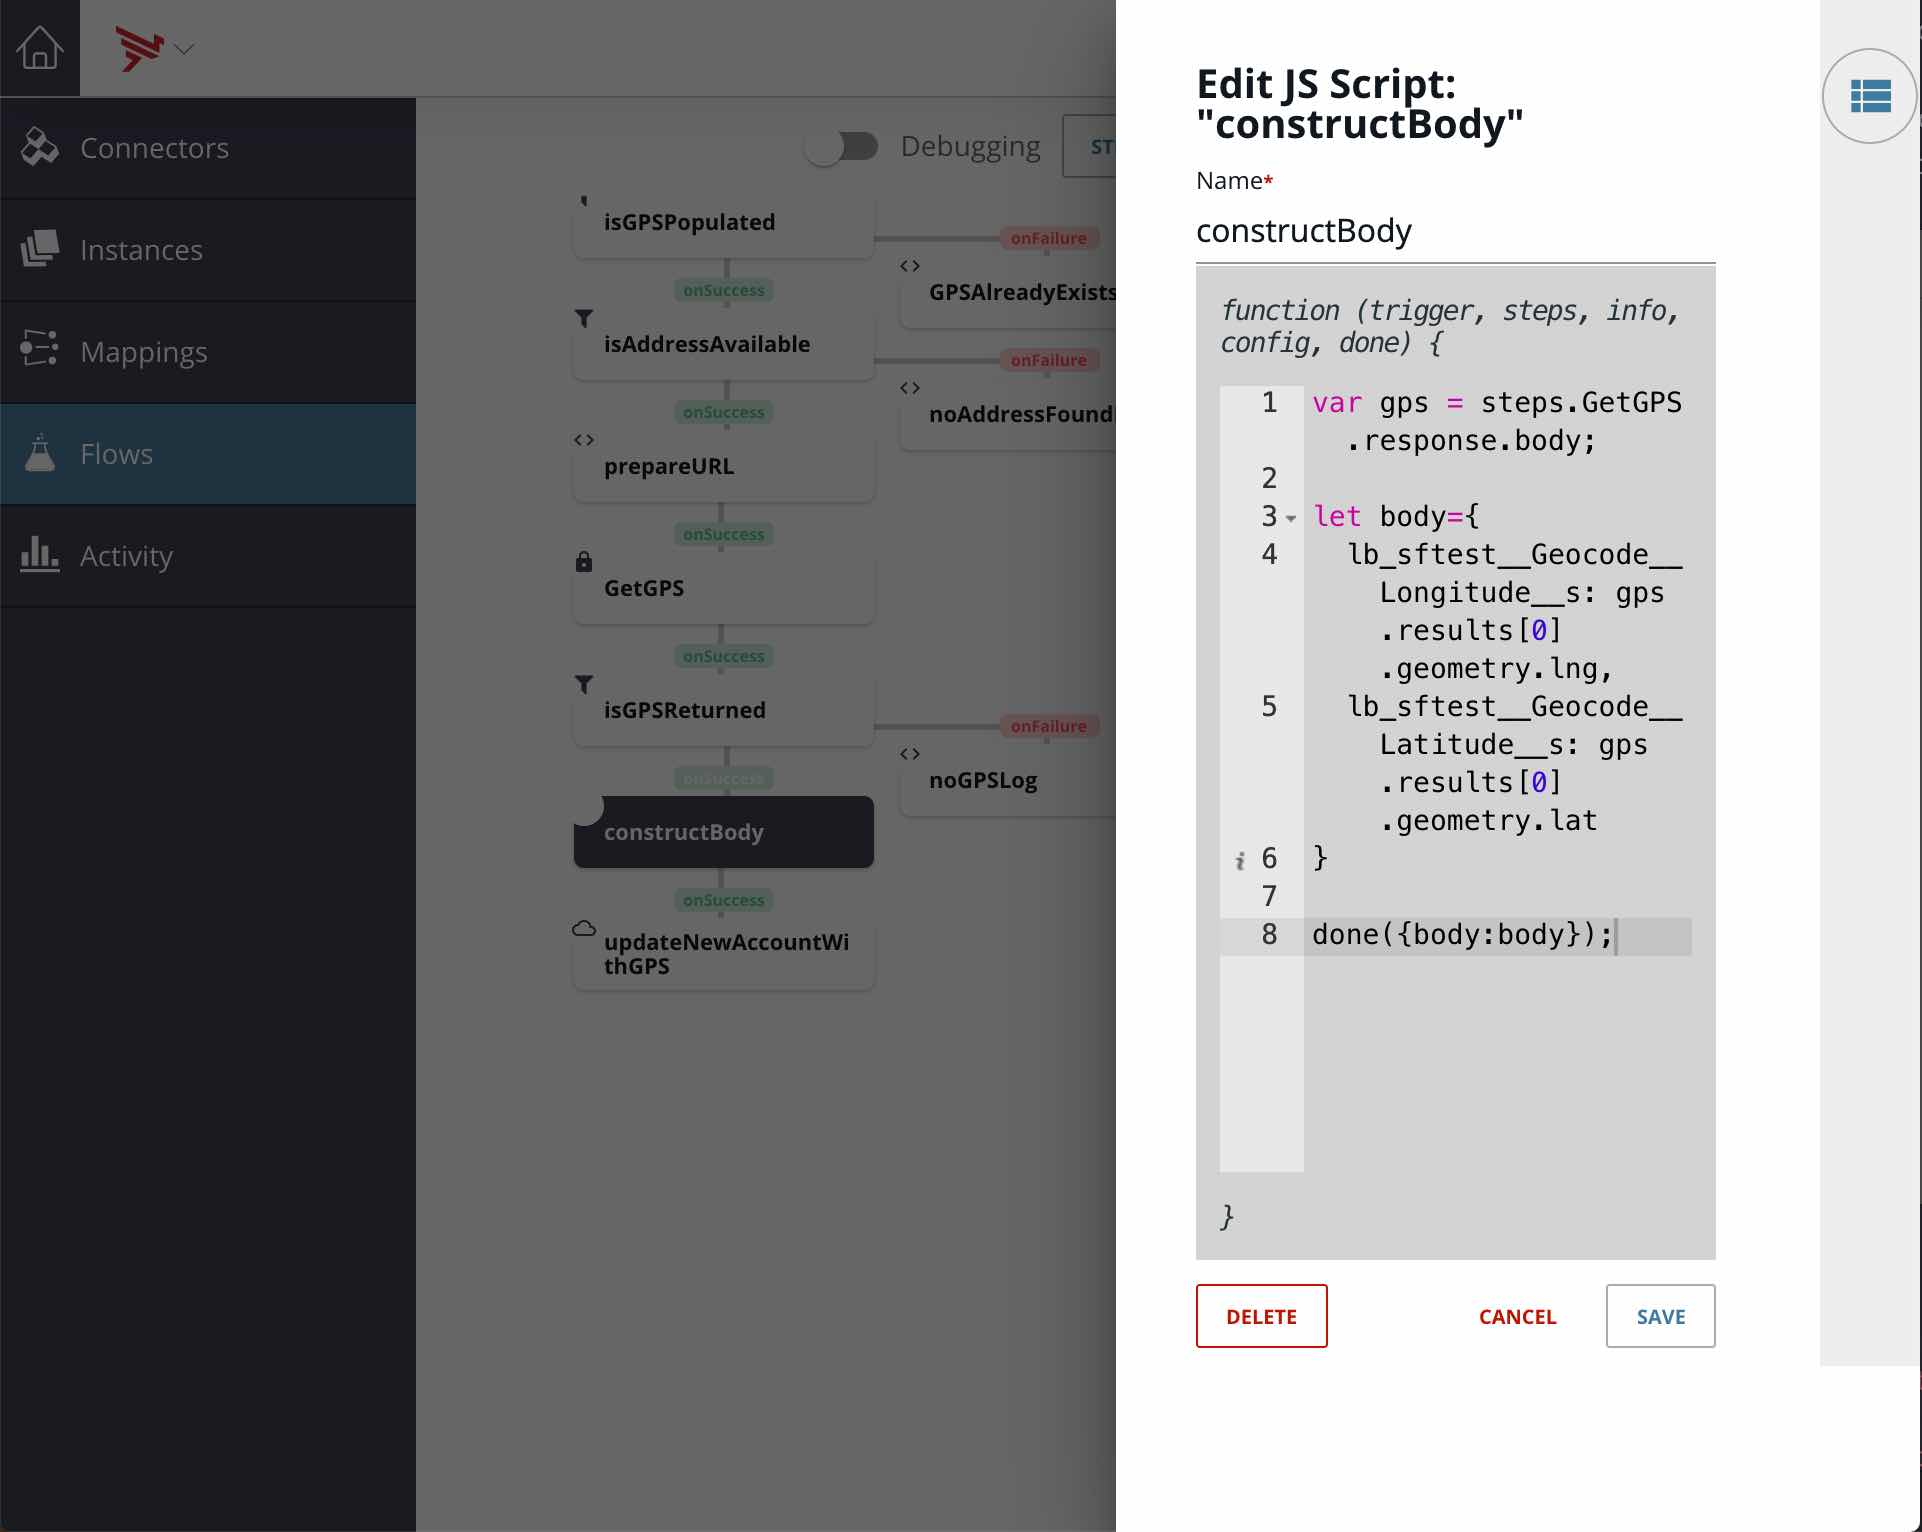
The code is shown below:
var gps = steps.GetGPS.response.body;
let body={
    lb_sftest__Geocode__Longitude__s: gps.results[0].geometry.lng,
    lb_sftest__Geocode__Latitude__s: gps.results[0].geometry.lat
}
done({body:body});
You will need to modify the field names with the proper field names for your Salesforce instance that you determined at the beginning of this blog post.
Note how we pass the body on in the done() method. We’ll reference this in the next step.
updateNewAccountWithGPS Step
In this step, we’ll make a PATCH API request to Salesforce to update the new account with the GPS coordinates.
You add this step by clicking on the constructBody step and selecting add on success and then select Connector API Request.
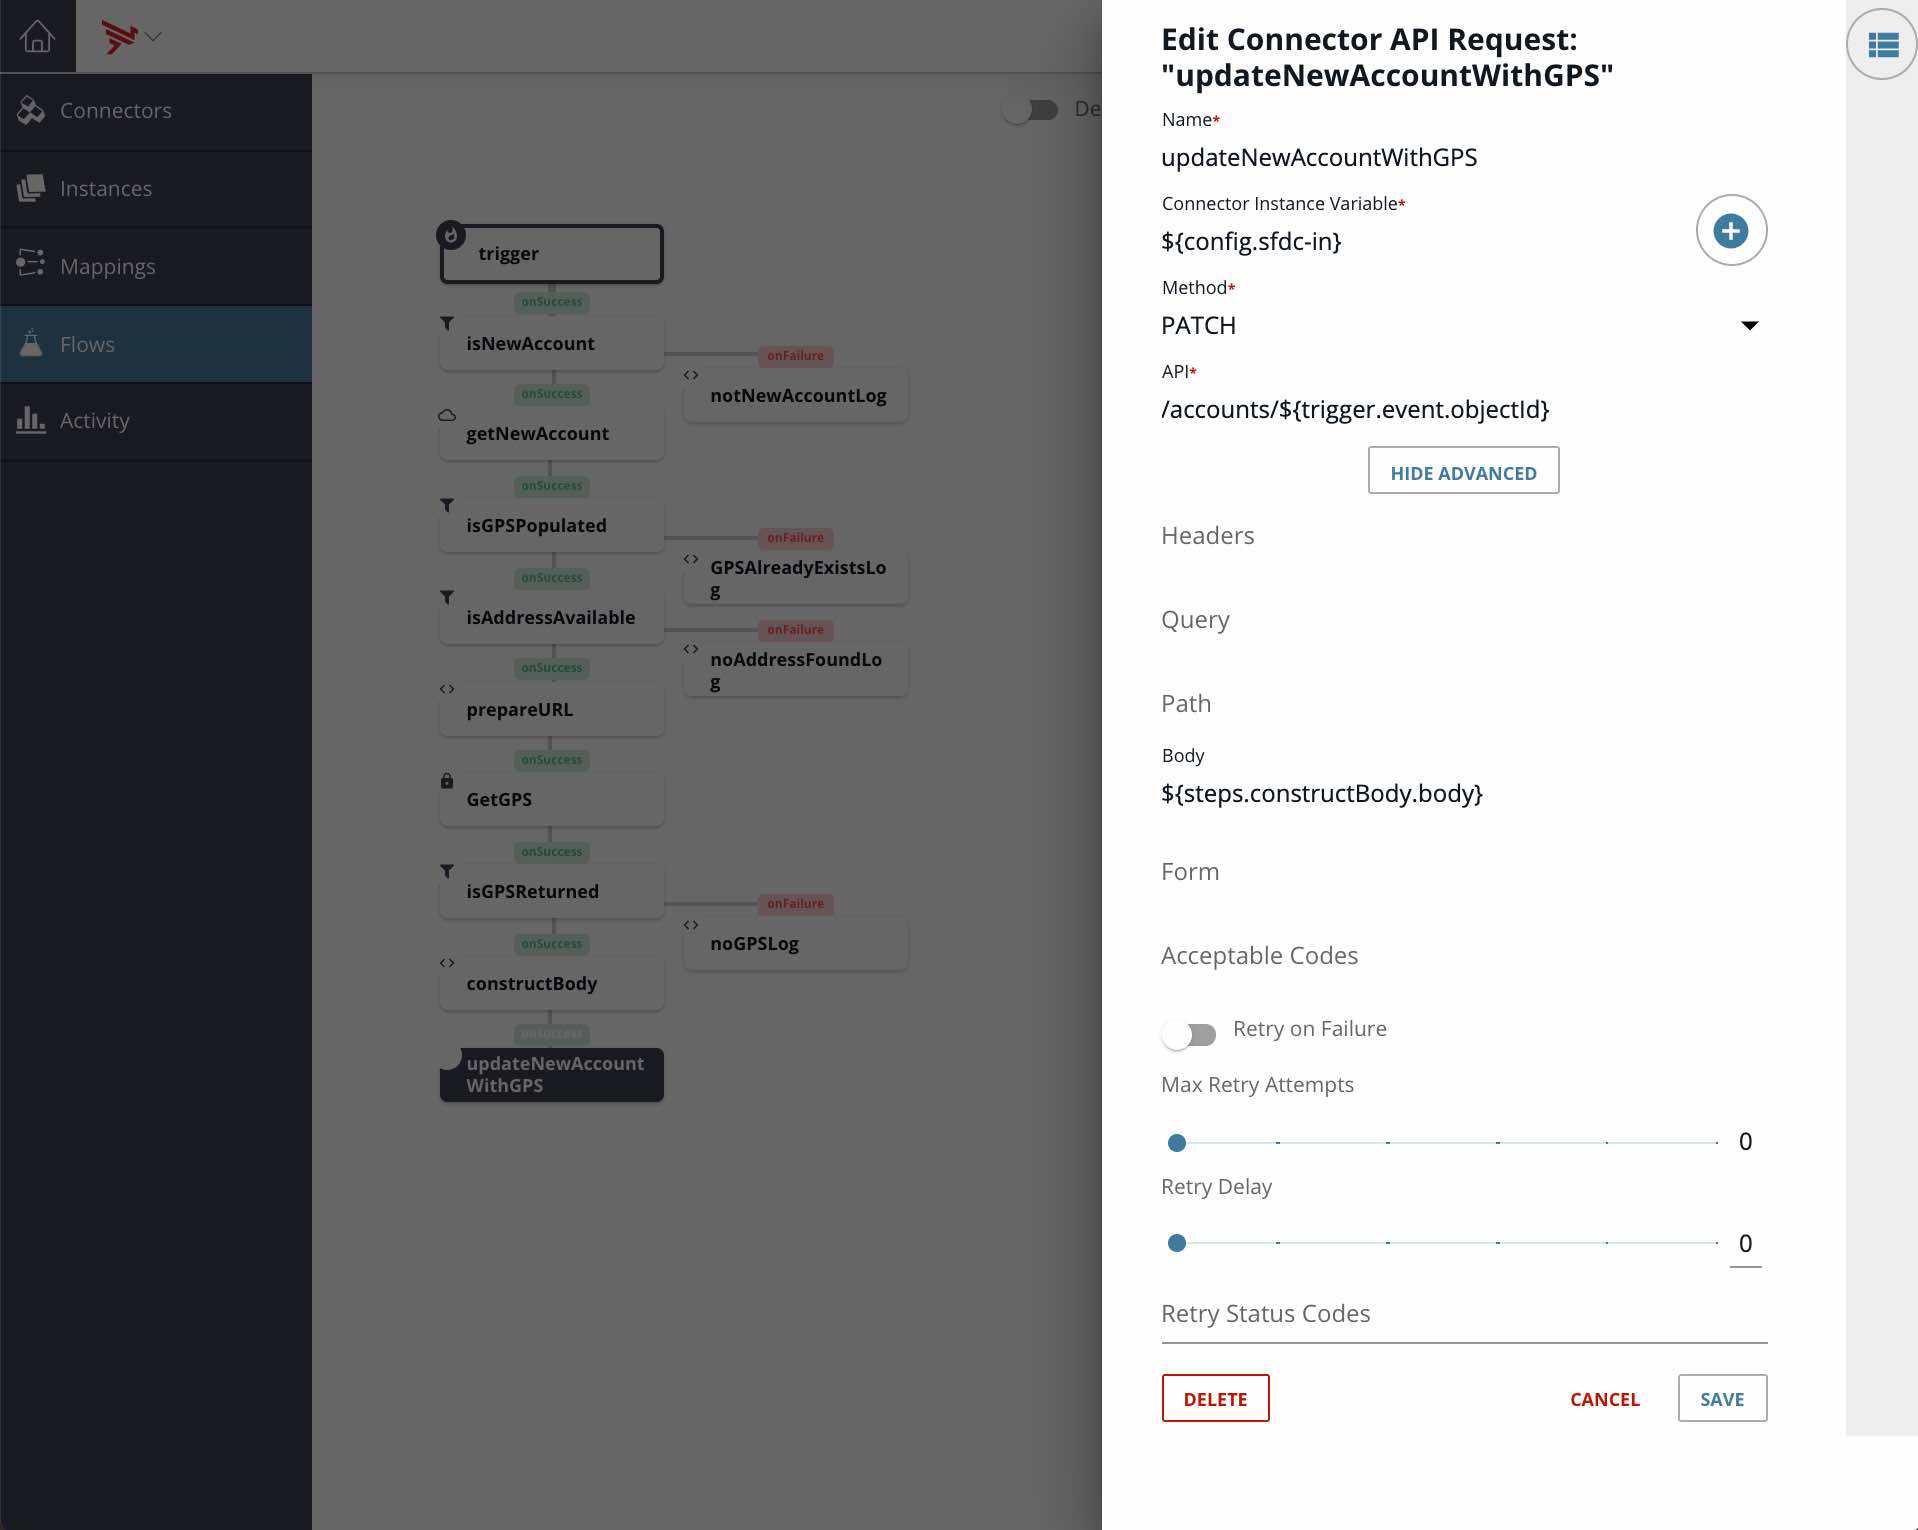
You can see how we are referencing our Salesforce connector instance using the variable ${config.sfdc-in}. The API Path references the ID of the new account retrieved from the trigger event using /accounts/${trigger.event.objectId}. Finally, the body is referenced from the prior step using ${steps.constructBody.body}.
This completes our flow. Now, we can test it out.
Create an instance of the flow
Think of the flow you created as a template. Using the flow requires creating an instance of the flow template.
- Click Flows in the left pane to open the page that shows all flows
- Find the SF New Account Geocode flow. You can search for it by typing all or part of the flow name in the search field
- Place the cursor over the SF New Account Geocode tile and click Create Instance. One variable tile is displayed for sfdc-in
- Type a name for the flow instance. For example, SFGeocodeNewAccountFlowInstance
- In the source tile click + to select a connector instance. Click SF Account Added
- Click Create Instance
Test The Flow Instance
Once the configuration has been completed, perform the following steps to test whether a new Salesforce account gets GPS coordinates automatically added to it.
- Add an account in Salesforce
- Select Accounts > New Accounts on the top menu bar
- Type the company name and enter the full shipping address. Click Save
- Click refresh after 1 minute to see the Geocode field magically populated
As you set the polling interval for 1 minute, it might take that long for the event to trigger.
Screenshots below are provided for reference:
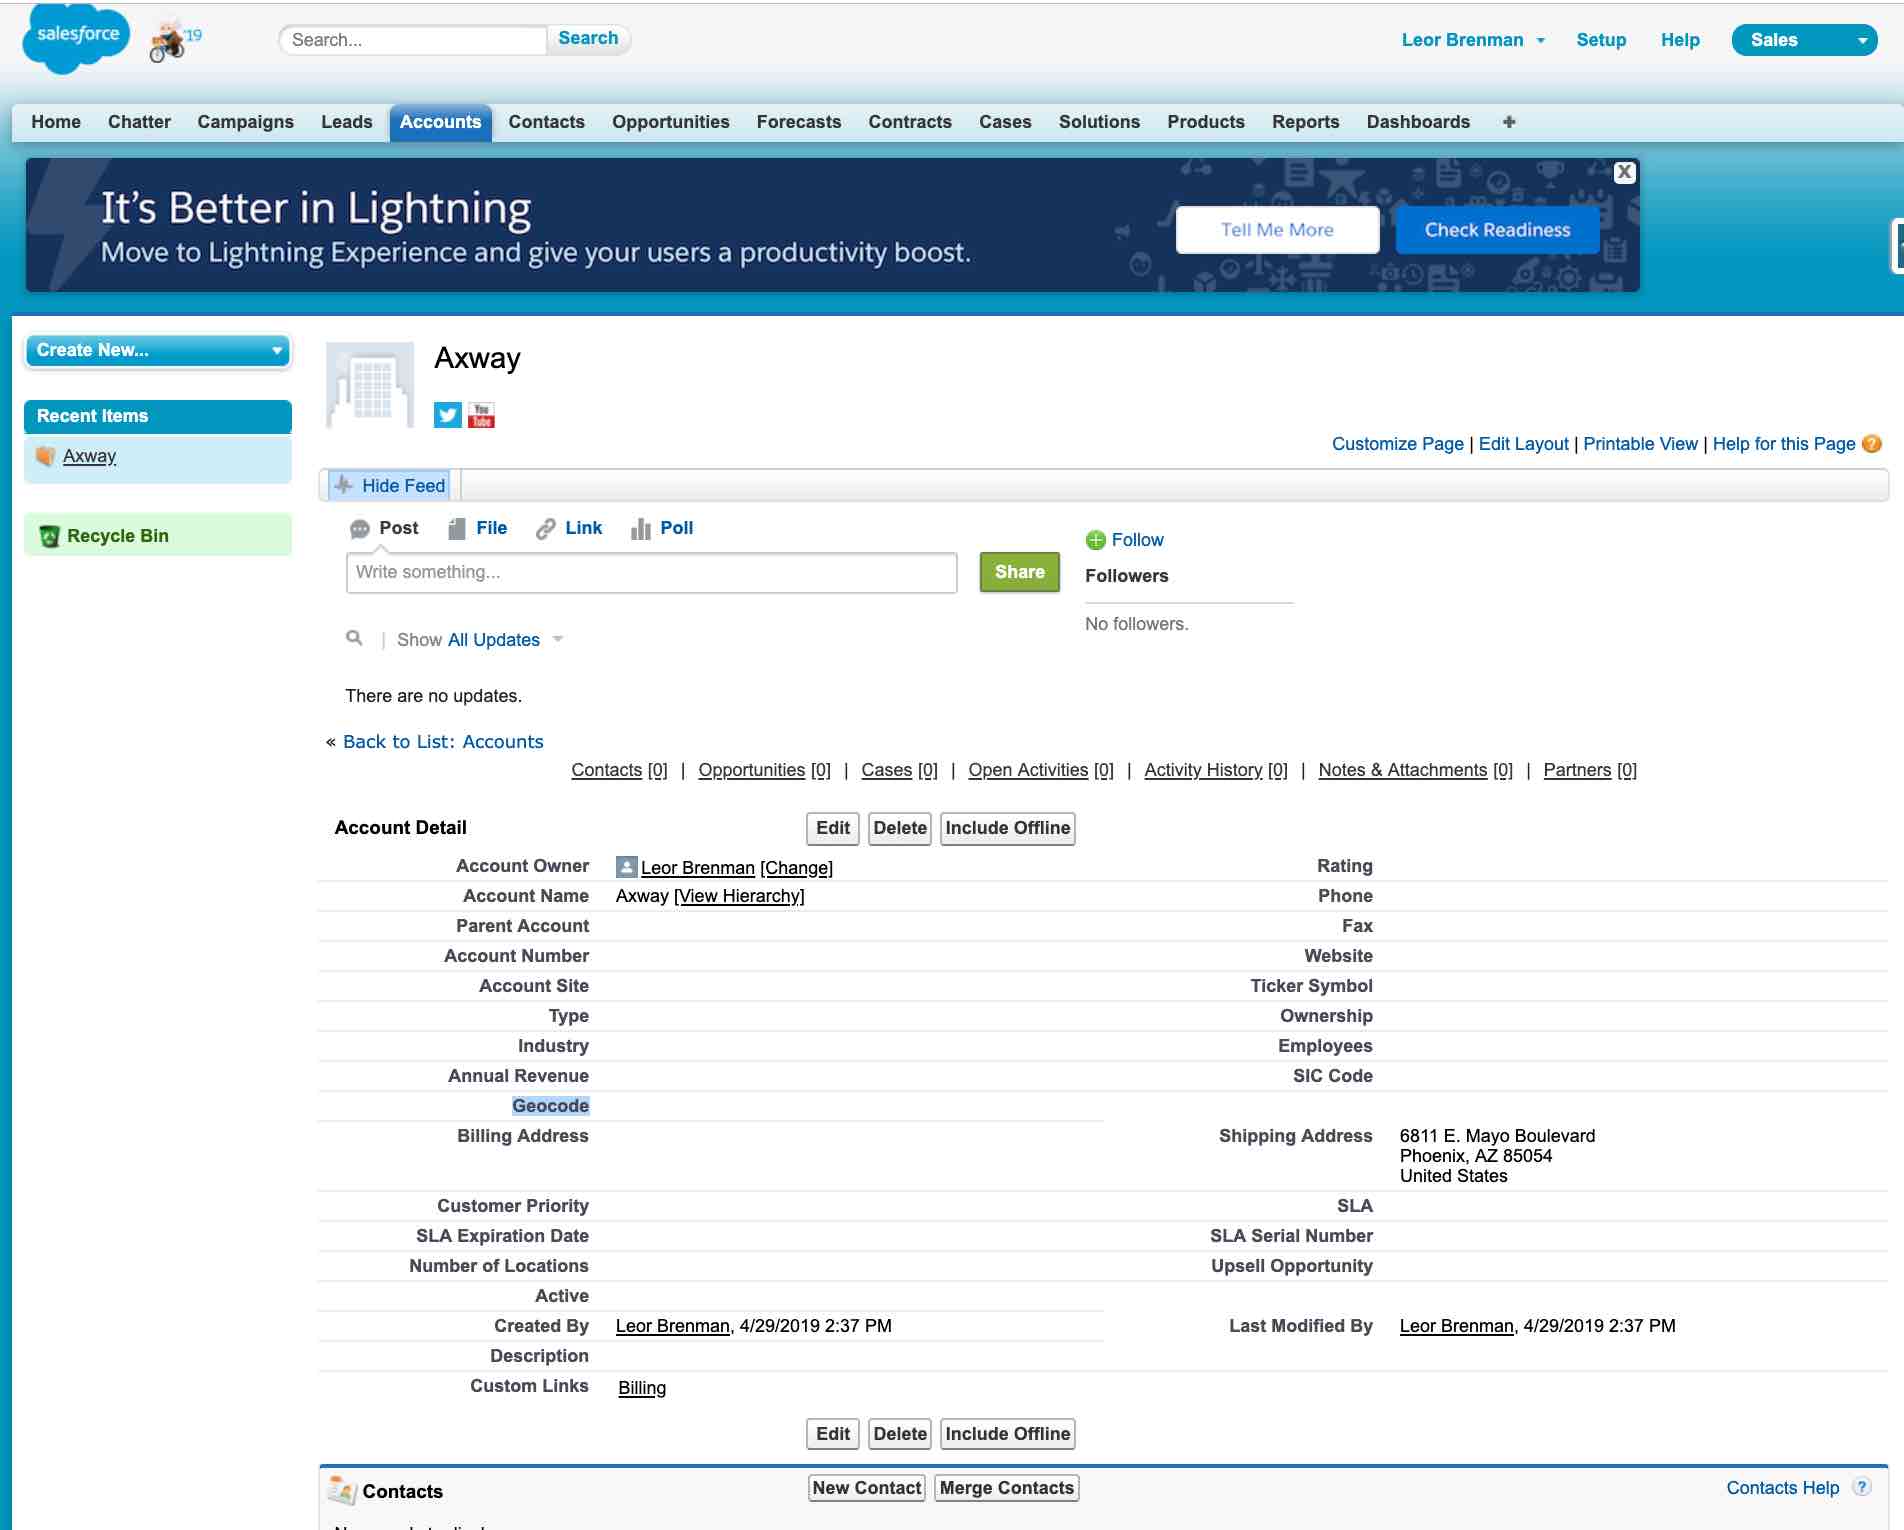
Note the lack of GPS coordinates in the screen shot above.
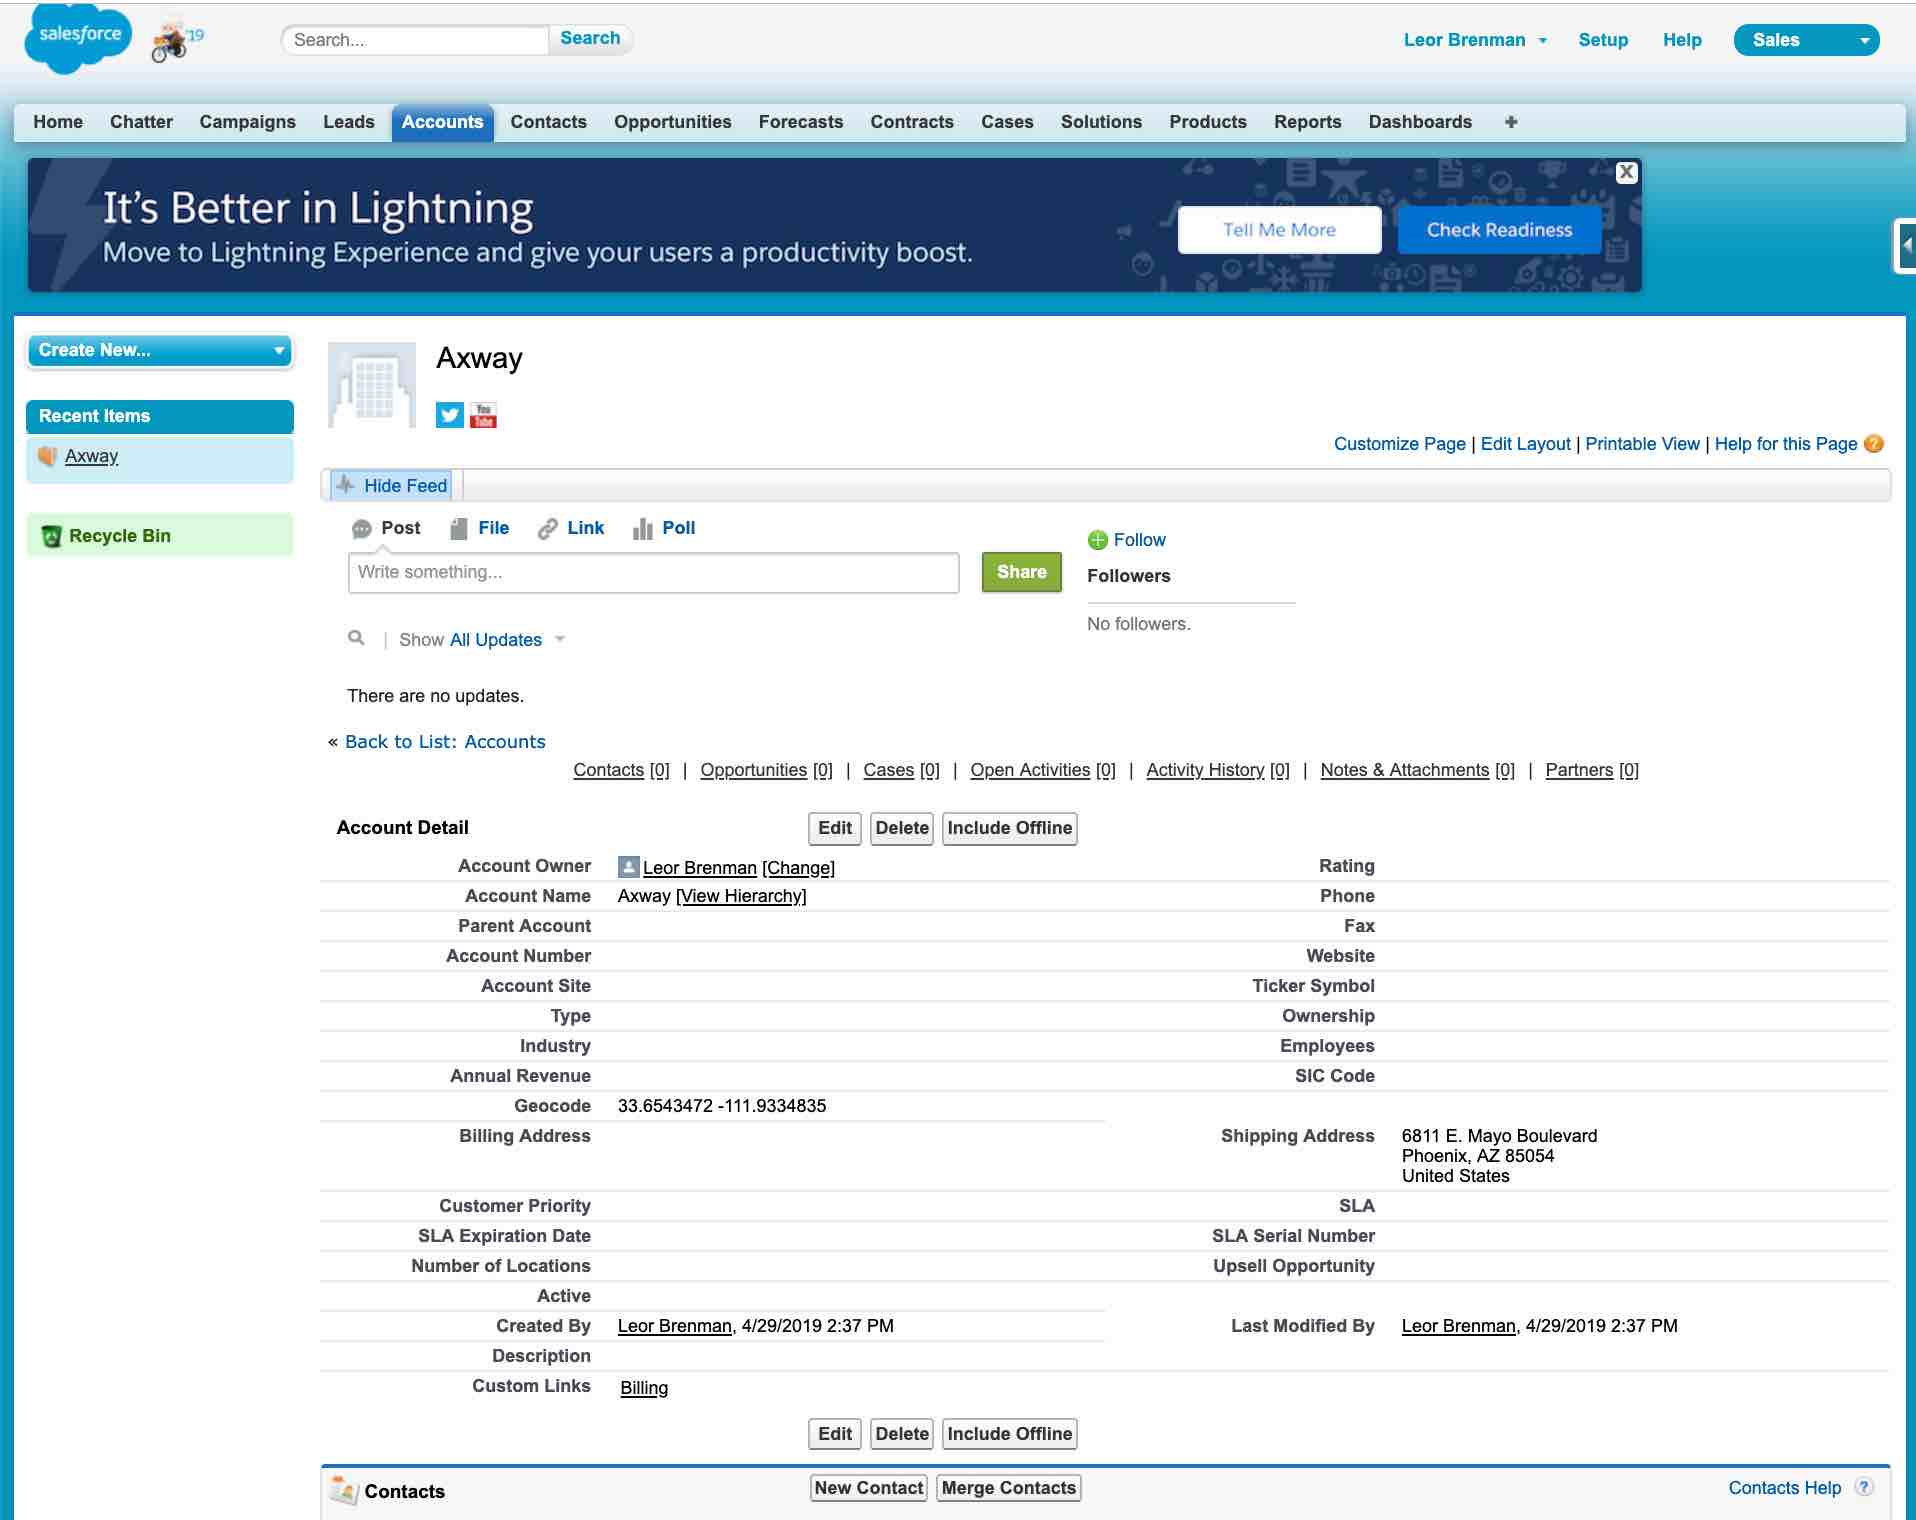
Note the presence of GPS coordinates in the screen shot above.
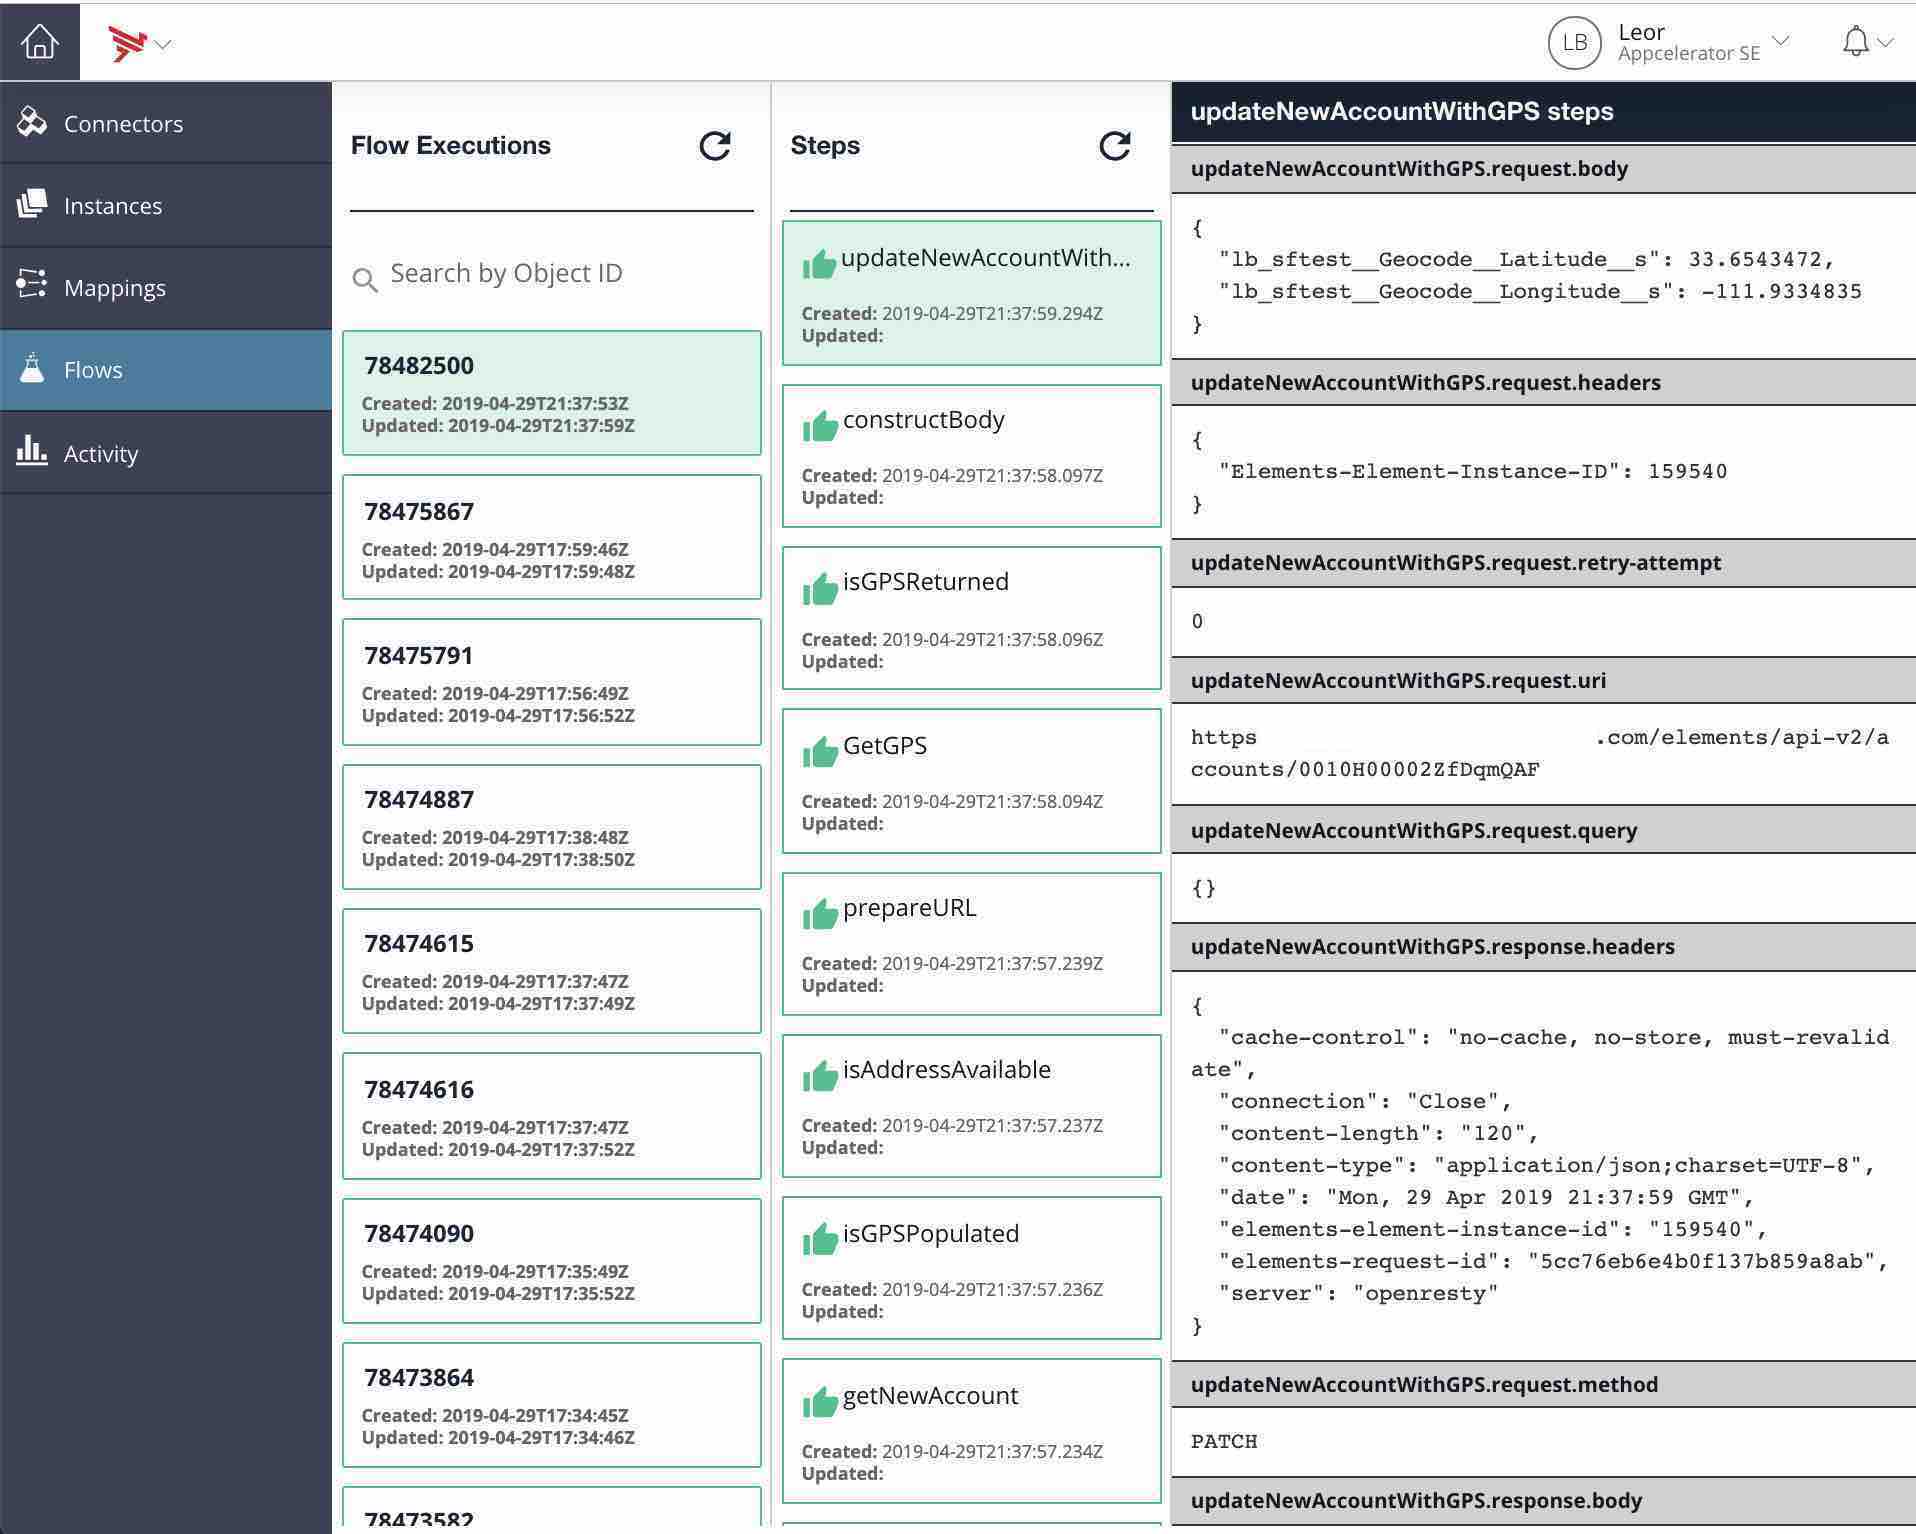
You can monitor the flow execution in Integration Builder.
- Click Instances in the left pane
- Click Flow
- Find the flow instance in the list and click Executions
- Click an object ID tile to reveal execution step tiles
- Click a step tile to show details as follows:
Summary
In this blog post, we saw how to use Axway’s AMPLIFY Integration Builder to automatically geocode new Salesforce accounts with minimal coding.
You can download an export of my flow here. Remember to edit the OpenCage API Key in the prepareURL step after import.
In future blog posts in this series, we’ll look at:
- Switching from polling to using a webhook from Salesforce to Integration Builder to trigger the flow
- Using a data model to normalize field names
- How to handle the OpenCage API Key in a variable so that it is not hard coded into the flow for better reuse
- How to export and import the flow for better reuse
In the meantime, try Integration Builder yourself!