

In the following two blog posts, we showed how to use API Builder and its flows to service Amplify webhooks and to make Amplify API calls as these are the two building blocks of integrating with Amplify:
- Make an Axway Amplify Platform Webhook Handler using an API Builder Flow
- Make Axway Amplify Platform API Calls from an API Builder Flow
In this blog post, we’ll put it all together and create a simple Amplify Central Custom API Subscription Approval workflow using an API Builder Flow. Note that we did the same thing using Amplify Integration Builder in this blog post so you can refer to that blog post for reference.
The API Builder API and associated flow that we’ll create will do the following:
- Respond to an Amplify Central webhook call
- Parse the payload
- Make an Amplify Central API call to approve the API subscription request
The steps involved in doing this are shown below:
- Create the API Builder project
- Create a webhook handler API by importing a swagger that defines an Amplify webhook call
- Use the Amplify Unified Catalog API swagger definition to expose a connector in the API Builder Flow Editor
- Use the connector to make an API call to Amplify that will approve the API subscription request
- Configure Amplify to trigger a webhook to our API Builder API when an API subscription request is made by an API Consumer in the Amplify Unified Catalog
The first three steps were covered in the two blog posts referenced above. Refer to those blog posts for links to the Amplify Unified Catalog API swagger definition and any other assets mentioned below.
API Builder Flow
- Create your API Builder Project and set your clientId and clientSecret in your
/conf/.envfile (see this post for details) - Copy the Amplify Unified Catalog API swagger definition to the API Builder Project
/swaggerfolder - Create an API by importing the integration webhook swagger. If you use the swagger definition I provided in the prior blog post, your API will be
/api/amplifycentralwebhookhandler - Create a flow on the API as shown below:
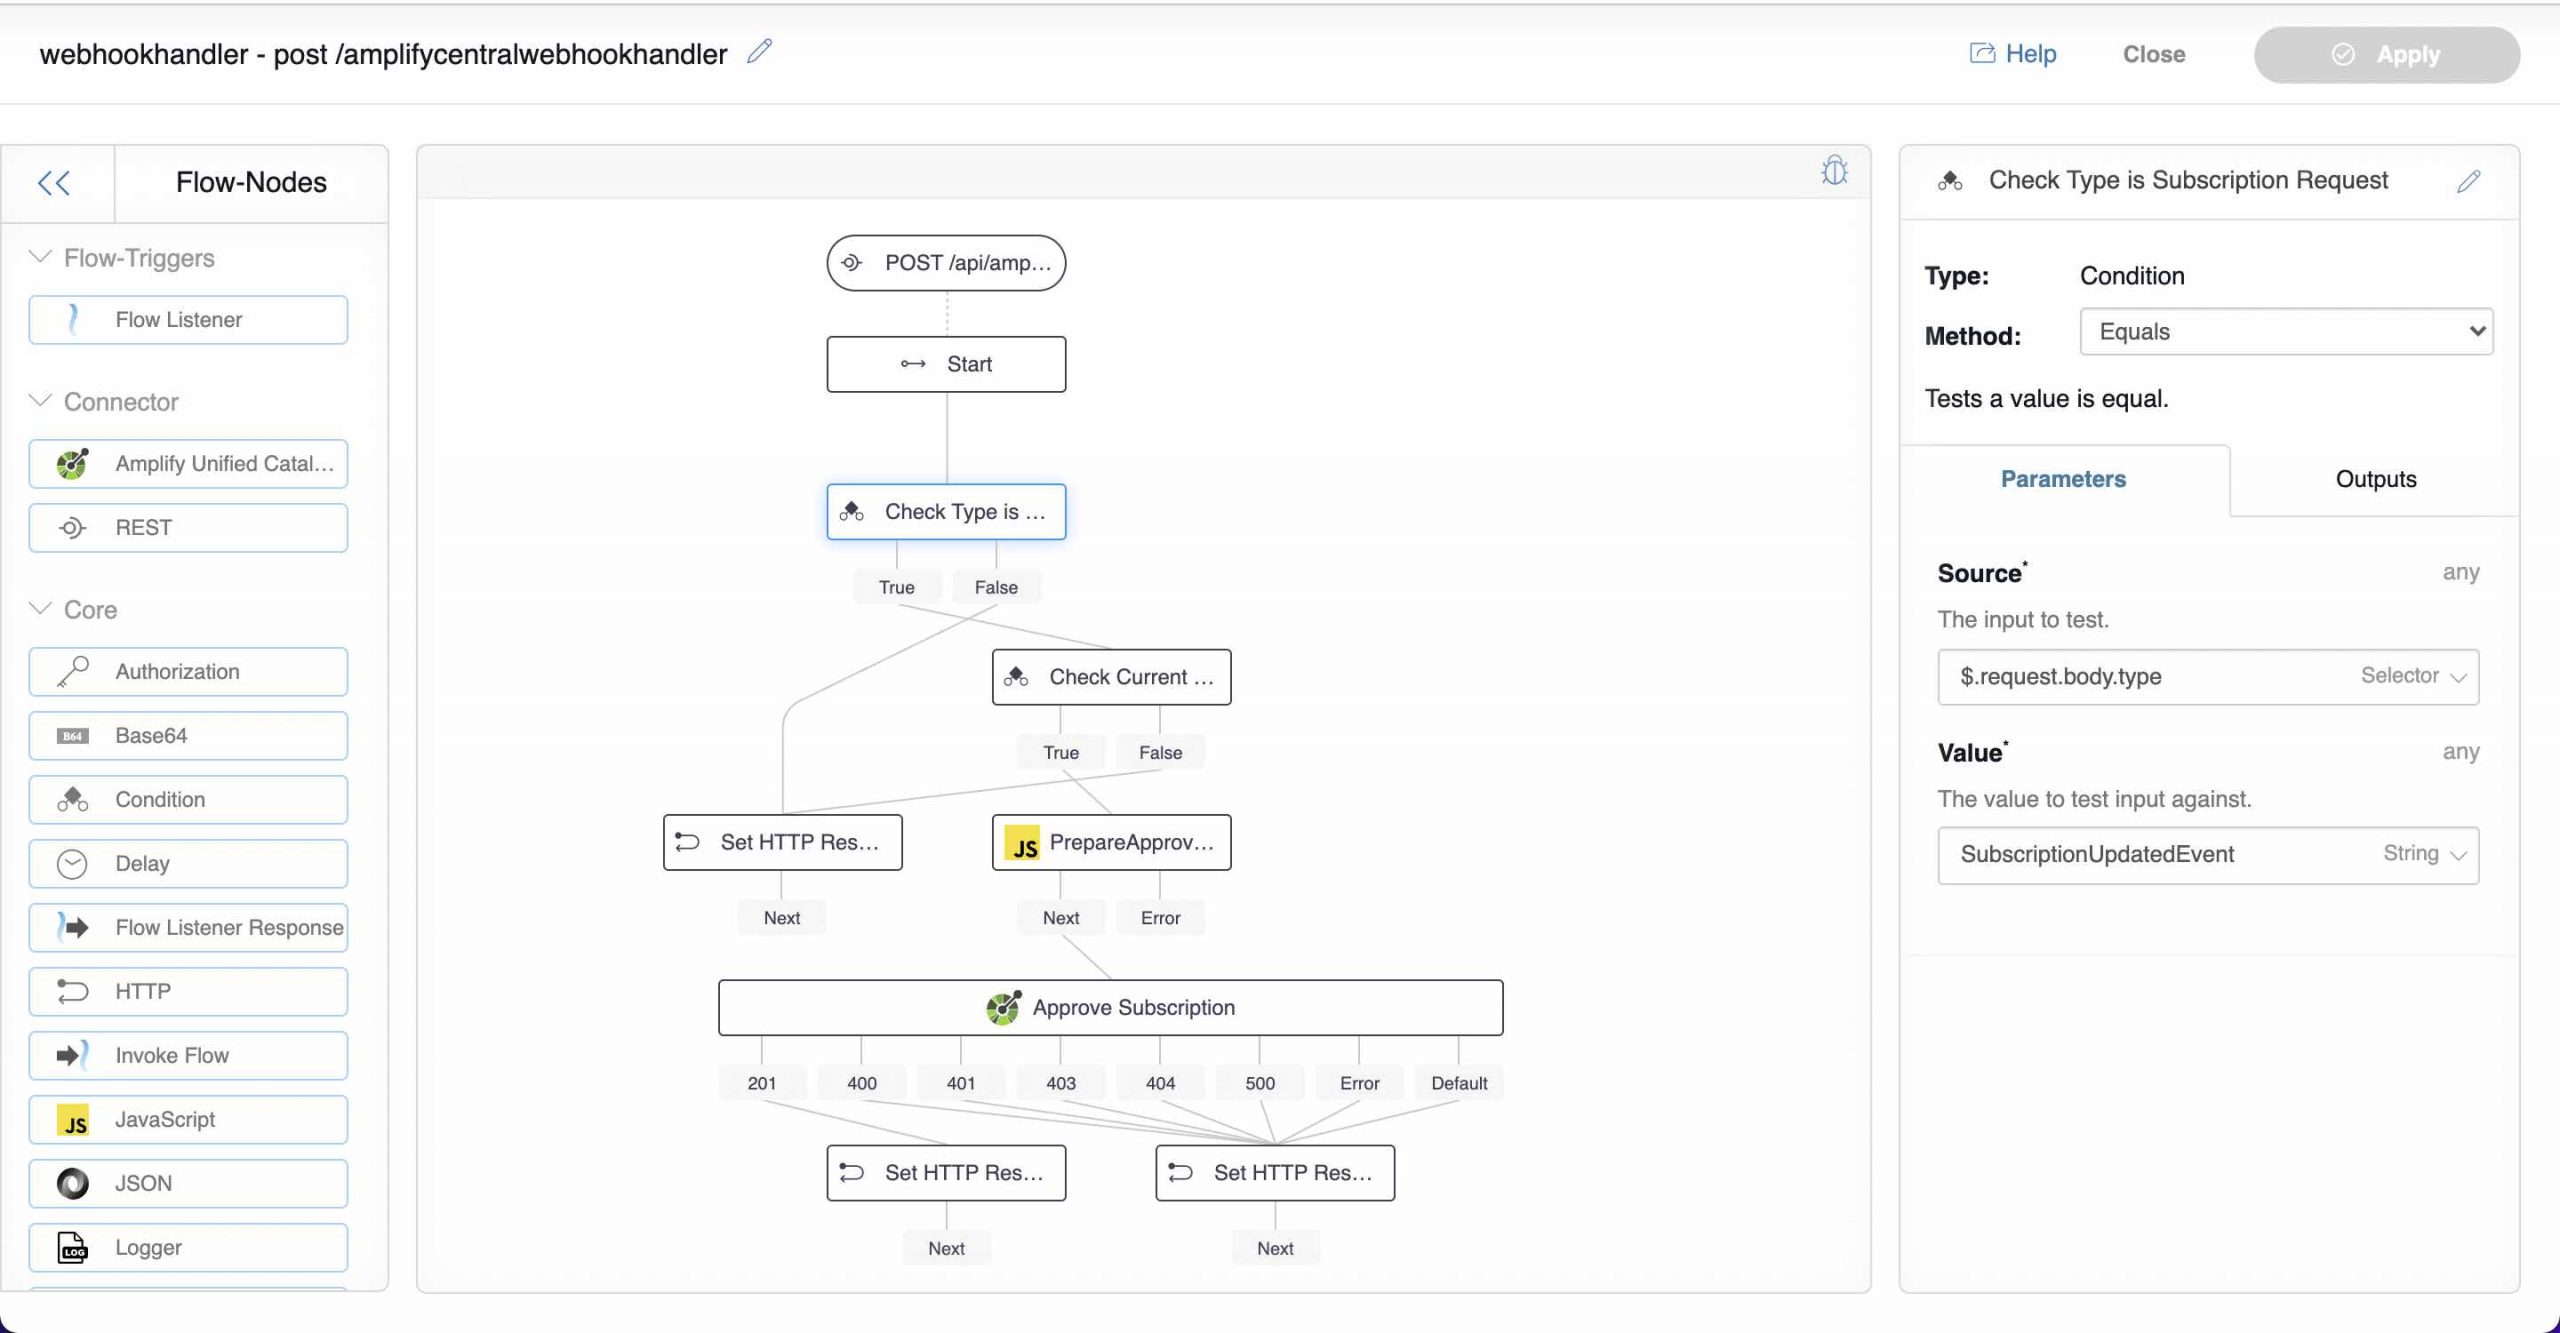
- Add a Condition flow-node to ensure that webhook type ($.request.body.type) is SubscriptionUpdatedEvent
- Add another Condition flow-node to ensure that the subscription.currentState ($.request.body.payload.subscription.currentState) is REQUESTED
- If either of those conditions is false, then set an HTTP response and end the flow
- If both are true, then we’ll use the POST_catalogItemSubscription method of the Amplify Unified Catalog connector
- I used a JavaScript flow-node to set the body of the POST to:
{
description: 'Approved via Custom Subscription Flow',
state: 'APPROVED'
}- The catalogItemId is $.request.body.payload.catalogItem.id, and the subscriptionId is $.request.body.payload.subscription.id. Note that these also come from the webhook payload.
- Publish your API Builder project and get the public URL to the API. Alternatively, you can use ngrok to make your API accessible during development as described in a prior blog post.
My API Builder project can be found here for reference.
Configure Your Agent
As described previously, you need to configure your Amplify Central Discovery Agent to use subscription webhooks and configure your webhook to point to your app that services the subscription webhook event (the API Builder project you just created).
Edit your discovery agent environment file and make sure that CENTRAL_SUBSCRIPTIONS_APPROVAL_MODE is set to webhook and that the webhook URL and authentication headers are set (if required). In my example below, I am pointing to my API Builder project locally on my machine using ngrok and my API Builder project is set to use API Key authentication so, I do need to set an apikey header to the value of my API Key.
# Subscription configs
CENTRAL_SUBSCRIPTIONS_APPROVAL_MODE=webhook

CENTRAL_SUBSCRIPTIONS_APPROVAL_WEBHOOK_URL= https://be15-11-111-111-35.ngrok.io/api/amplifycentralwebhookhandler
CENTRAL_SUBSCRIPTIONS_APPROVAL_WEBHOOK_HEADERS=Header=apikey,Value=7JD........EF1g
Restart your discovery agent if it was already running so the changes will take effect.
Now when your API Consumer subscribes to an API, the subscription request will be approved automatically by the API Builder API.
You can now use this as a starting point for more robust custom API subscription approval workflows that implement your company’s API governance policies.
Summary
In this blog post, we combined the two components used in integrating with Amplify, namely Amplify integration webhooks and Amplify API calls, and created a simple custom Amplify API Subscription workflow in API Builder. This flow will auto-approve any API subscription request. While it’s simple, it leverages the elements that will be used in most integrations so it is a good starting point for learning how to leverage API Builder for Amplify integrations.
In future blog posts, we’ll cover more advanced use cases.
Learn more about Amplify Central Change Notifier.