As a Mobile Solution Expert at ACA IT-Solutions, I’ve been using Titanium to build cross-platform native apps for a couple of years now. When I first tried Titanium, the low threshold amazed me. Using languages from the web (JavaScript, XML and TSS (enhanced CSS)), I’m able to create mobile apps for Android, iOS and Windows in just minutes. In addition to that, the extensibility is just great. You can extend your codebase with ‘modules’ developed in the specific native language (Objective-C/Swift, Java, …).
Within our projects at ACA, we mostly create modules for bringing and/or enhancing existing native SDKs (e.g. Bugfender) to Titanium. And to make that even easier, Appcelerator introduced Hyperloop. Hyperloop allows you to access native code directly, eliminating an extra intermediate module layer. Clearly, you’re backed well for developing mobile apps with Titanium.
But enough talking about the development part. There are some other crucial parts within the mobile app lifecycle, such as testing and launching, we should definitely talk about…
Testing and launching is NOT time-consuming or complicated
Everyone within the mobile world knows that test and launch steps are extremely important. However, they can also be time-consuming and in some cases very complicated. To give an example: if you Google “provisioning profile issue”, you’ll find 13.9 million results. And that doesn’t even include running tests on your codebase, testing on different devices with different screen sizes or preparing an app for a specific environment (DTAP)!
But testing and (test) launching doesn’t have to be this way. In order to prove that it can be hassle-free, I’ll share the advanced mobile app build automation process we set up at ACA with you. This mobile build automation allows us to increase efficiency and lets us focus more on the aspects within mobile we value the most: creating and delivering value for our end users. It also makes it possible for us to prepare multiple tested builds created from analyzed and validated codebases, that are ready to be (beta)distributed to users with the push of a button! So how does it work? Let’s take a look.
Mobile build automation, a high-level overview
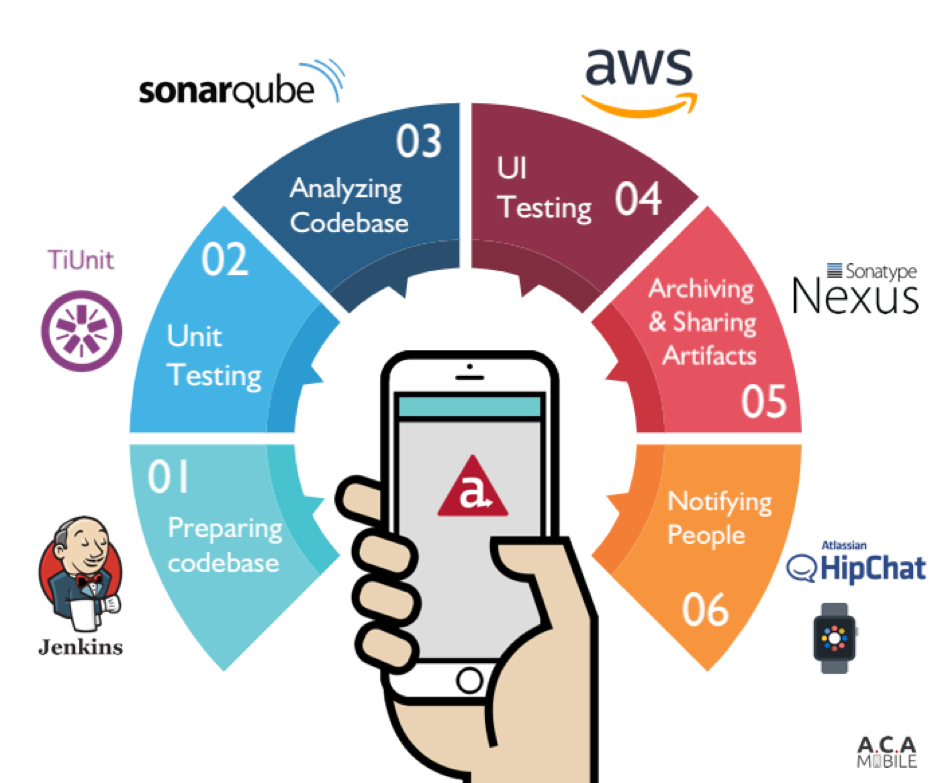
The image below shows a high-level view of the build automation steps our Titanium apps are going through. Based on this image, I’ll go through this automation process step by step.
1. Preparing the codebase
 Our journey starts right after the build process is triggered, typically automatically by a timer (twice a day) or manually by a developer. Our automation server (Jenkins) guides the whole process by triggering a Maven build. Depending on the configuration, the correct environment properties are injected within the Titanium codebase (e.g. backend URL, app version and analytics ID in our config.json). This all happens within our Mac Mini (OS X) we configured as our Jenkins CI Slave. We chose a Mac Mini for several reasons, but mainly because it offers the required mobile tools (especially Xcode for iOS apps) for building apps.
2. Unit testing with TiUnit

Once those variables are in place, unit tests are triggered and run automatically. We rely on TiUnit (which we created) for writing our unit tests. TiUnit, based on Jasmine, allows us to write and run tests insanely fast without having to depend on the Titanium runtime. You can find more about TiUnit on our GitHub. After those tests, a code coverage report is generated. We’re using Istanbul as our code coverage tool.
3. Analyzing the codebase quality
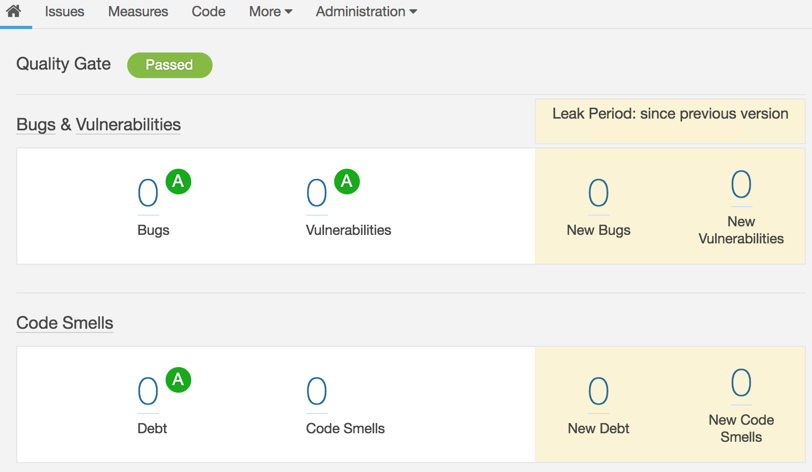
 Along with the code coverage reports, a SonarQube code quality check is performed. SonarQube is a platform for continuous inspection of code quality to perform automatic reviews with static analysis of code to detect bugs, code smells, and security vulnerabilities.
4. UI testing on real devices


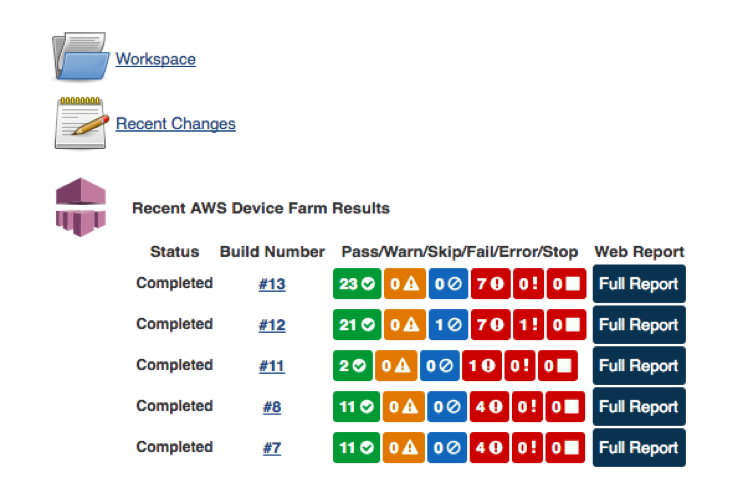
Only when those tests succeed and reports are generated, then the build (bash) scripts trigger the Titanium CLI to build the app (both Android and iOS). Right after the builds are available, they’re pushed to simulators and physical devices for UI testing. Since there are limitations on simulators/emulators (e.g. no iOS camera on a simulator), we integrated with Amazon Device Farm to test our apps on real devices. With this Amazon integration, we can run UI tests and validate the behaviour of our apps on exotic/old Android devices, which is sometimes hard to achieve with emulators. Besides, buying all those Android devices wouldn’t be a healthy option anyway. If you want more information about the AWS Device Farm integration, you can check the AWS developer guide.
5. Archiving and sharing the artifacts

 Once we get our test results from Amazon along with device logs and video/images, Jenkins triggers our build scripts again to initiate the (test) launch. Based on the configuration, development, ad hoc or release/production builds are generated and signed. After the signing, the builds (.ipa / .apk) files are pushed to our internal Nexus Repository Manager for archiving.
If desired, those builds can be also automatically published to our invite-based beta distribution tool for providing apps to users for beta testing.
6. Sending notifications
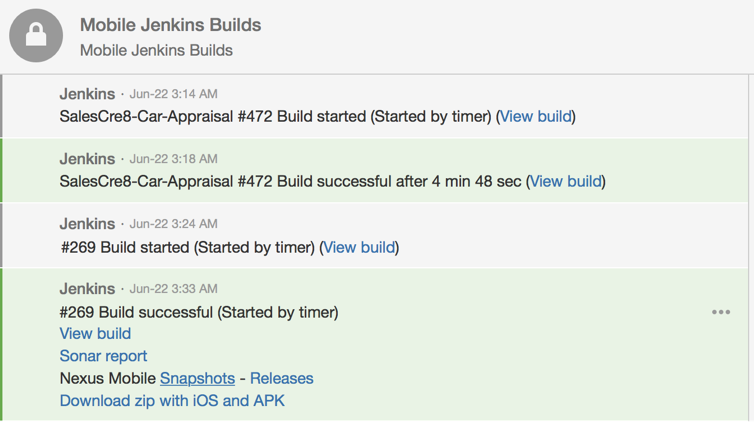
 If all goes well (or badly), our development team is notified by email and/or by an Atlassian Hipchat notification concerning the build status, which can also be forwarded to our smartwatches.
Long story short: the takeaway
As stated above, the test and (test) launch process within mobile development can be time-consuming and, in some cases, very complicated. But it is possible to make it hassle-free. The key thing here is to automate steps that are very time-consuming and error-prone for you (and your company). To help you with this automation, there are a lot of tools out there, each with their own pros and cons. It’s important to find the tools that suit your environment, setup and/or budget. Hopefully, the tools listed within this blog post can help you achieve your own mobile build automation!
There a lot of other interesting points such as building multiple app flavours not covered within this blog post – I’m glad to cover them in a future blog post. If there are any focus points you’d like to see covered next time, don’t hesitate to leave a comment.
Follow us on social