In Part 1, we introduced MQTT for IOT and how API Builder can leverage MQTT to communicate with IOT devices. In this blog post, we dive a little deeper and leverage API Builder and the Axway NoSQL Database to start implementing an IOT Hub. Namely, we’ll cover the following:
- How to handle IoT device connects and disconnects (e.g. due to battery drain, network drops, etc…)
- How to use the Axway NoSQL Database to store IoT device data like connection status and temperature reading
In this blog post, for simplicity, all communication will be from the IoT device to API Builder. In the next post, we’ll show how to initiate communication from API Builder to the IoT device to say, turn on a light. As in the last blog post, we’ll continue to simulate our IoT Device with a Node.js app on our computer.
All files referenced for this project can be found here.
In order for a web app or a mobile app to view IoT device data and status, we can store the device data in the Axway NoSQL database. This is much more efficient than having the web/mobile app keep track of and communicate with each device individually. The high level architecture is shown below:
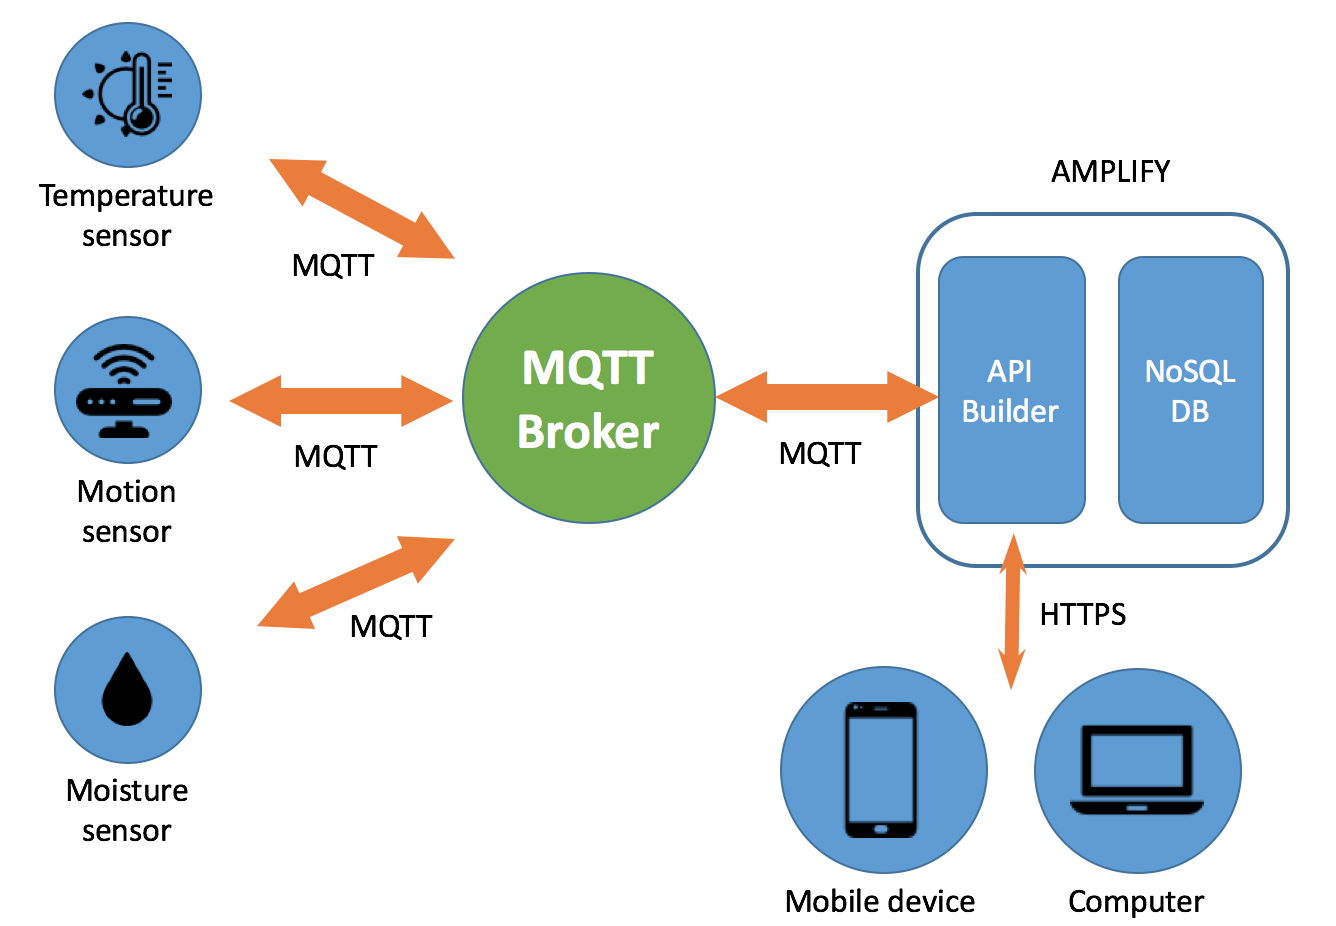
In order to accomplish this, we will need to do the following:
- Program the IoT device to:
- Connect to the Broker with the Last Will and Testament (LWT) properties set (more on LWT shortly)
- Publish a connect message upon successful connection to the Broker
- Send device status information (e.g. temperature reading) as needed
- Create an API Builder model using the ArrowDB (NoSQL) connector to store the IoT device status and data which will also automatically expose REST APIs for the mobile/web app
- Program API Builder to subscribe to topics that the IoT devices will publish on in order to send device data
- Process messages as they arrive and update the device data in the NoSQL Database
You can read more about the MQTT Last Will and Testament (LWT) here, but the main concept is that when an IoT device connects to the Broker and provides LWT information then the MQTT Broker will automatically send a message on a specified topic when the IoT device disconnects from the Broker. Device disconnect can occur for various reasons, such as if the device loses power (battery drain) or if the network connection is lost.
IoT Device
Refer to Part 1 and create a new Node.js project that will emulate your IoT Device. Copy index.js from here.
Note that for this project, we need to install an additional npm called getmac which allows us to get the MAC address of the IoT device. We’ll use this as the IoT DeviceId in our database. To do this, run the following in your Node.js project folder:
npm install --save getmacThis index.js file is also shown below.
Note that you will need to get the CloudMQTT Broker URL info (User, Password, Server Address, Port) and edit the file with this info. This was discussed in Part 1.
var cloudMQTTUrl = 'mqtt://<User>:<Password>@<Server Address>:<Port>';
var mqtt = require('mqtt');
var client;
var deviceId;

require('getmac').getMac(function(err, macAddress){
 if (err) throw err;
 deviceId = macAddress;
 console.log(deviceId);
 client = mqtt.connect(cloudMQTTUrl,
 {
 clientId: deviceId,
 will: {
 topic: 'myhome/server/will',
 payload: deviceId
 }
 keepalive: 60
 });

 client.on('connect', function () {
 message = JSON.stringify({
 deviceId:deviceId,
 temp : 70 + 5*Math.random() -2.5
 });
 client.publish('myhome/server', message);
 });

 setInterval(function(){
 message = JSON.stringify({
 deviceId:deviceId,
 temp : 70 + 5*Math.random() -2.5
 });
 client.publish('myhome/server', message);
 }, 15000);
});
Here is what the code above does:
- Retrieve the Mac Address
- Connect to the CloudMQQT Broker with the following:
- Mac Address as the DeviceId
- Last Will and Testament ‘myhome/server/will’ topic
- Last Will and Testament payload of Mac Address
- On connection to the Broker, publish device data (random temperature value) on the ‘myhome/server’ topic
- Send random temperature value every 15 seconds on the same ‘myhome/server’ topic
Now that our IoT Device is up and running, we need to create our API Builder Project and program it to respond to the messages sent by the IoT Device.
API Builder
- Start with a new API Builder project (see the Getting Started Guide)
- Run npm install mqtt –save from the command prompt inside the API Builder project root folder
- Paste device.js model file in the /models folder. This will create a device model in the NoSQL database to store the device information like connection status, sensor readings (e.g. temp), etc… To keep things simple in this blog post, the device model is simple and shown below and will hold the device ID (deviceId), connection status (isConnected) and the IoT device temperature reading (temp):
var Arrow = require('arrow');
var Model = Arrow.createModel('device', {
    "fields": {
        "deviceId": {
            "type": "string",
            "description": "Device ID (mac address of IoT device)"
        },
        "isConnected": {
            "type": "boolean",
            "description": "Is the device connected? Set by the server"
        },
        "temp": {
            "type": "string",
            "description": "Temperature sensor reading"
        }
    },
    "connector": "appc.arrowdb",
    "actions": [
        "create",
        "read",
        "update",
        "delete",
        "deleteAll"
    ],
    "description": "IoT Device"
});
module.exports = Model;
Note that this will also automatically expose APIs for accessing device data via secure REST API. This can be used by your Web/Mobile app to view device status and data.
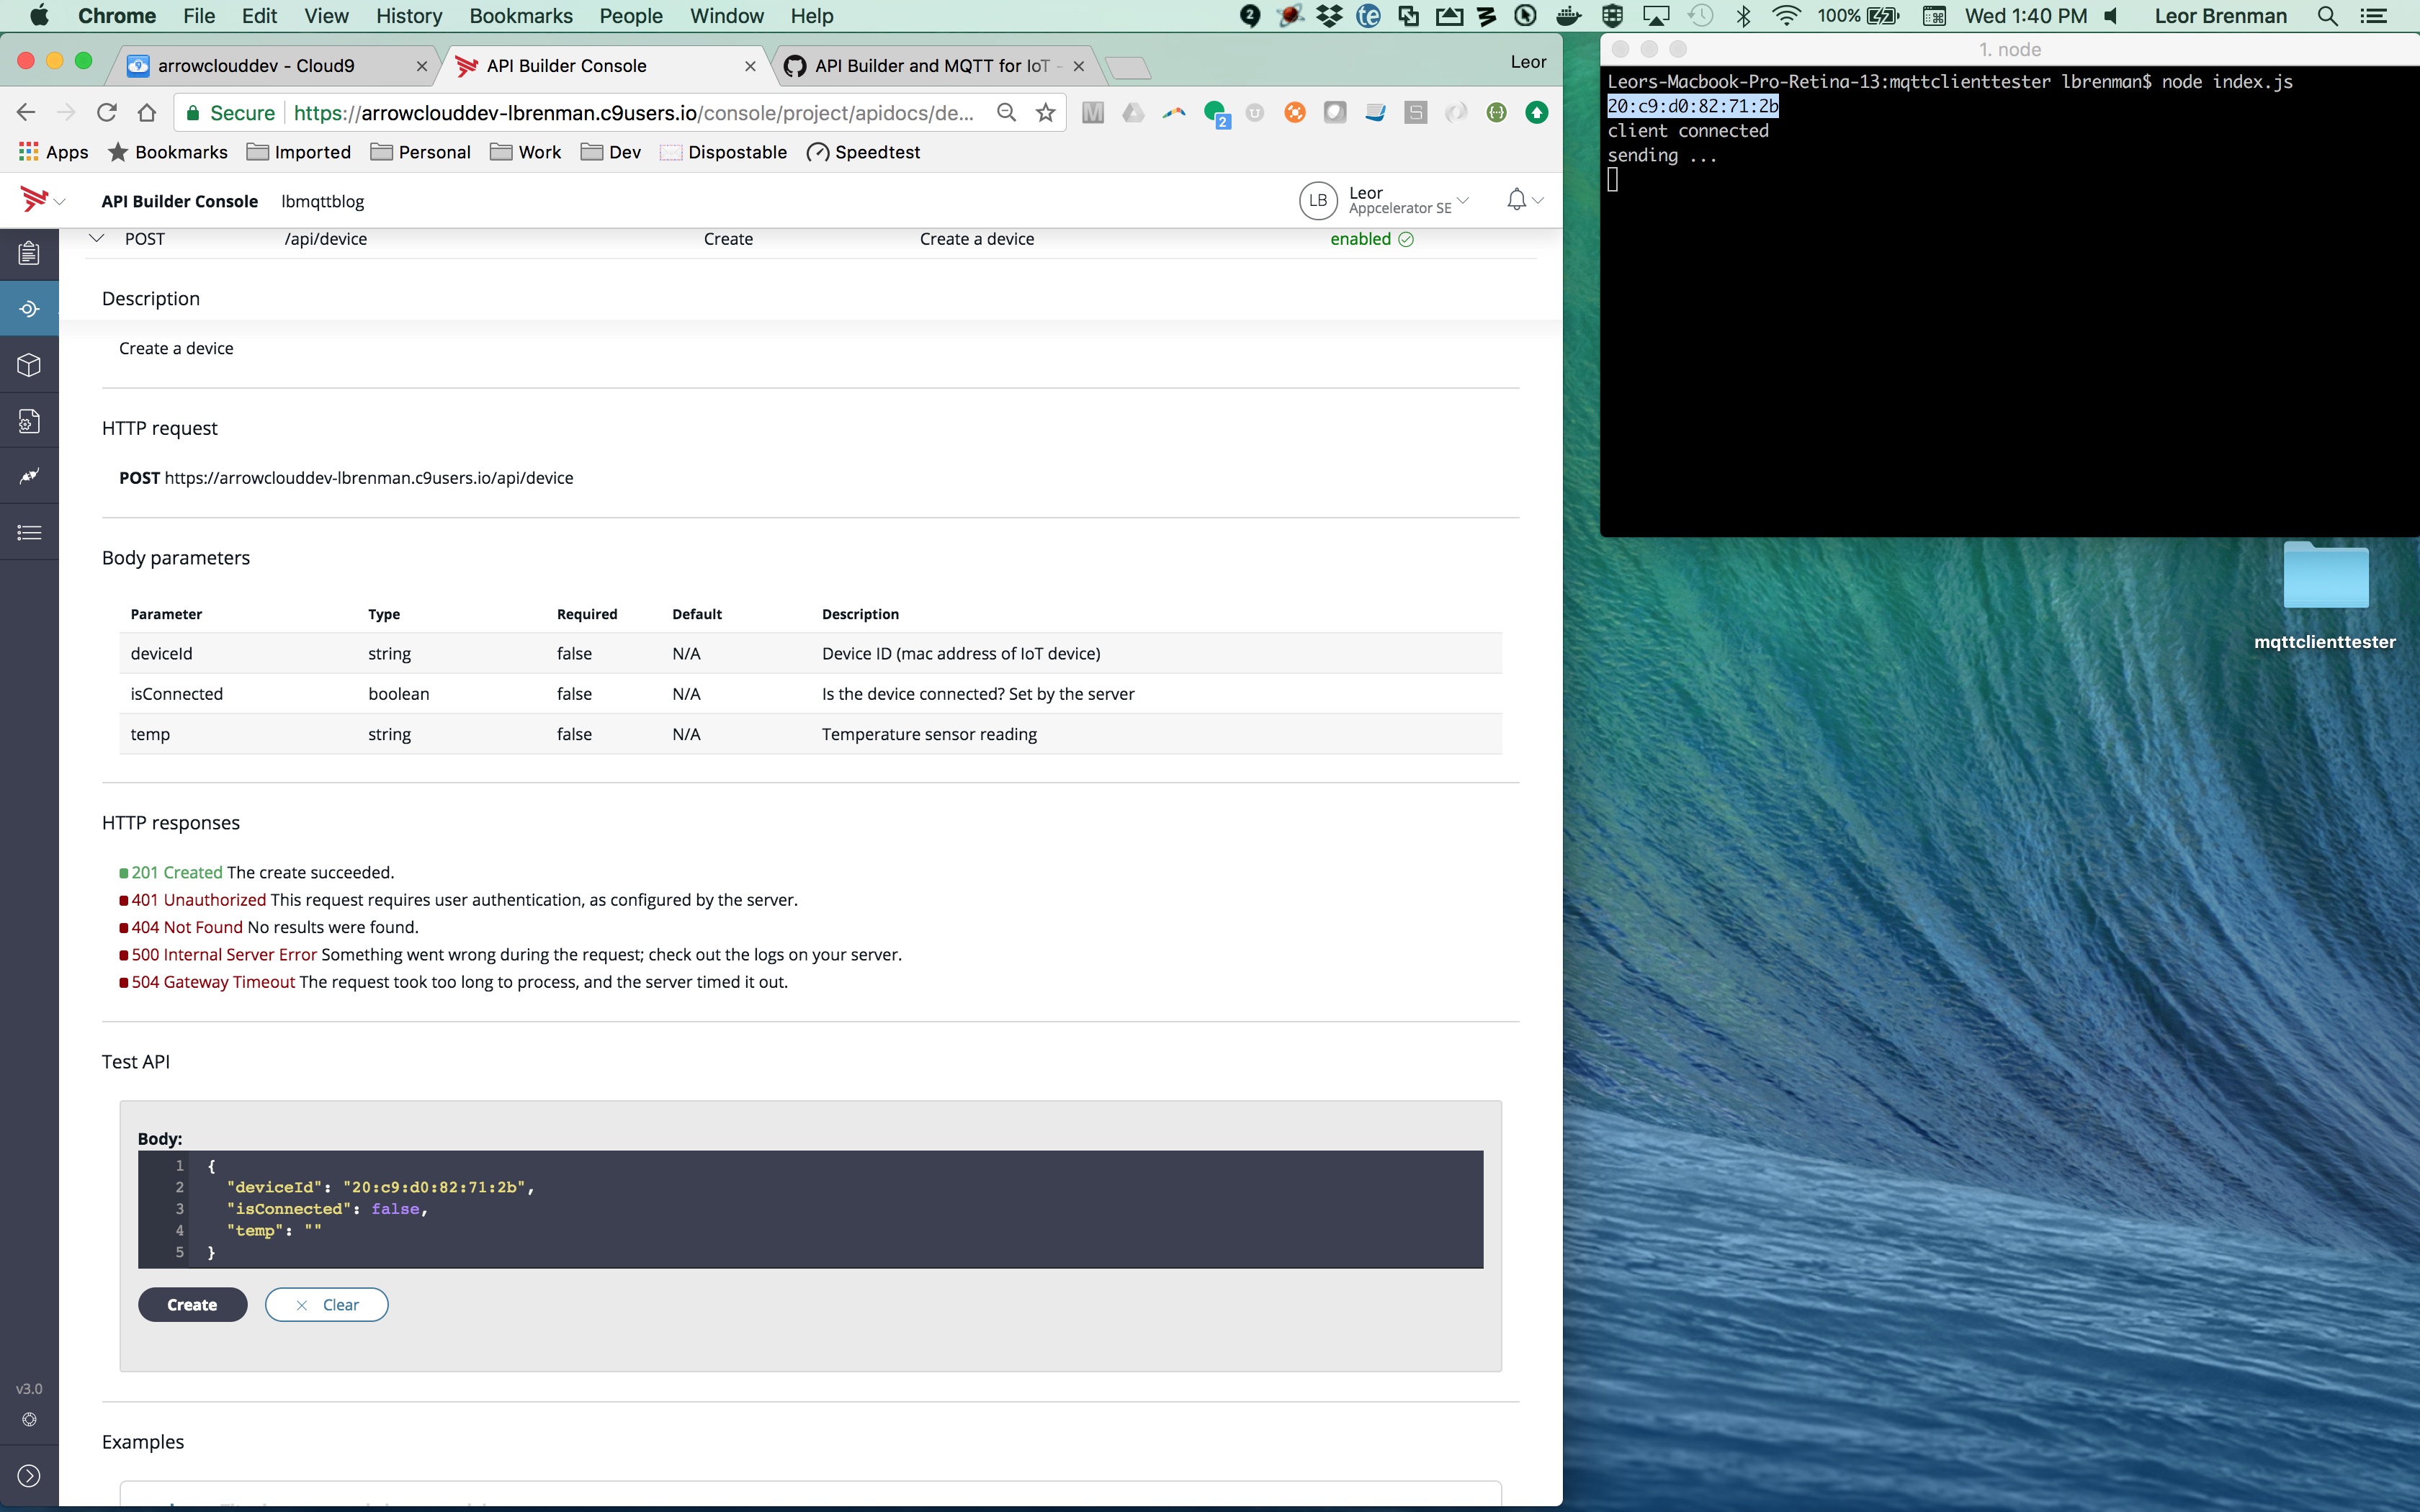
- Run your API Builder project and create an entry for your IoT device using the device API POST. You can use Postman or the API Builder console API tab and click on the POST (create) API. You will need the deviceId for your device. More on this later. If you don’t know the deviceId yet, run the IoT Device code from above and check out the console log since it’s printed in the console. See screen shot below for reference:
Paste the apibmqttutils.js module file in the root folder of the project. This will contain all of our IOT Hub code and keep our project organized. You will need to edit this file with your CloudMQTT Broker information (user, password, server and port). This was discussed in Part 1.
Edit app.js and add the following line to the top of the file below the line that contains server = new Arrow().
var apibmqttutils = require('./apibmqttutils').mqttInit();The code for mqqtInit() is in the file apibmqttutils.js and is shown below:
var client; module.exports.mqttInit = function() { var mqtt = require('mqtt'); var mqtturl = 'mqtt://: @ : '; client = mqtt.connect(mqtturl); client.on('connect', function () { client.subscribe('myhome/server/#'); }); client.on('message', function (topic, message) { handleMessage(topic, message); }); }; This will do the following:
- Require the mutt npm.
- Connect to the CloudMQTT Broker.
- Add event listeners for ‘on connect’ for when API Builder connects to the Broker and ‘on message’ for processing messages sent to the topic ‘myhome/server/#’. The # sign is a wildcard so API Builder will receive messages that are sent on any topic that starts with ‘myhome/server/’. In this example, that covers the LWT message which will be sent on the ‘myhome/server/will’ topic.
- Start your API Builder project as follows:
appc run - Start your IoT Device Nodejs project as follows:
node index.js - You will see something similar to the screen shots below:
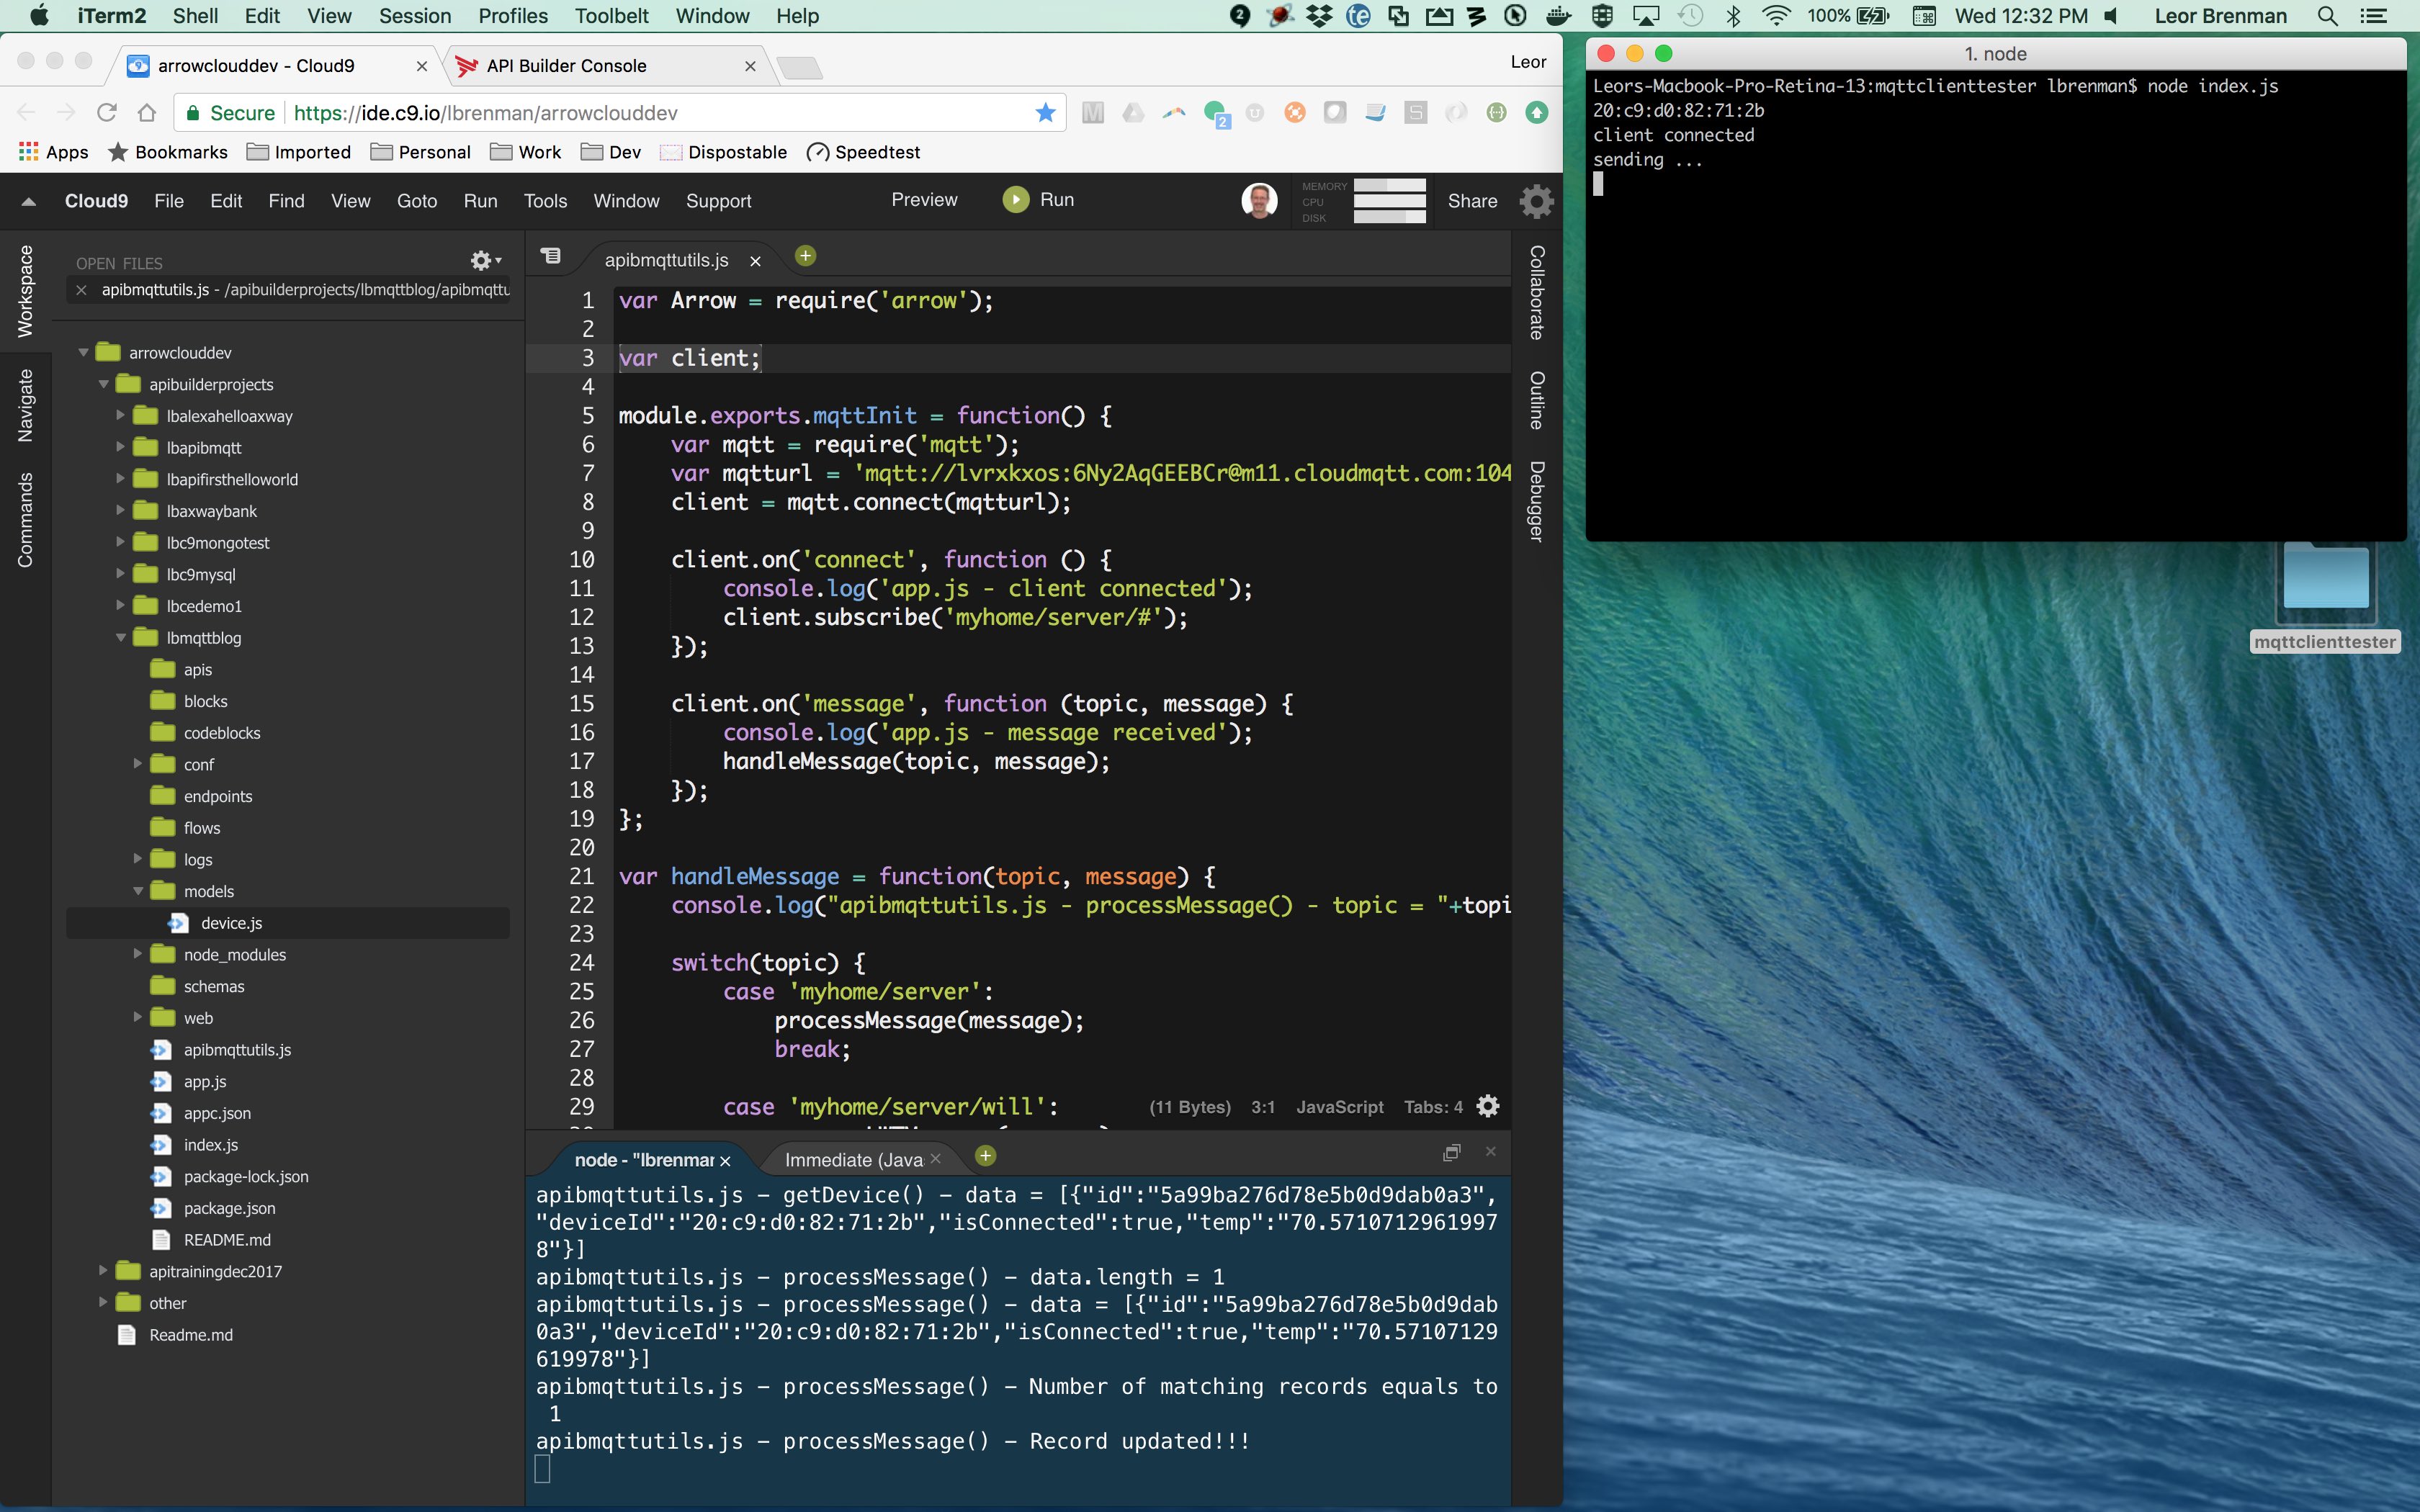
In the screen shot above, you can see the API Builder project, lbmqttblog running in Cloud9 and my IoT Device is running locally on my Mac. Note the IoT Device Mac Address is the first thing printed to the console log on run.
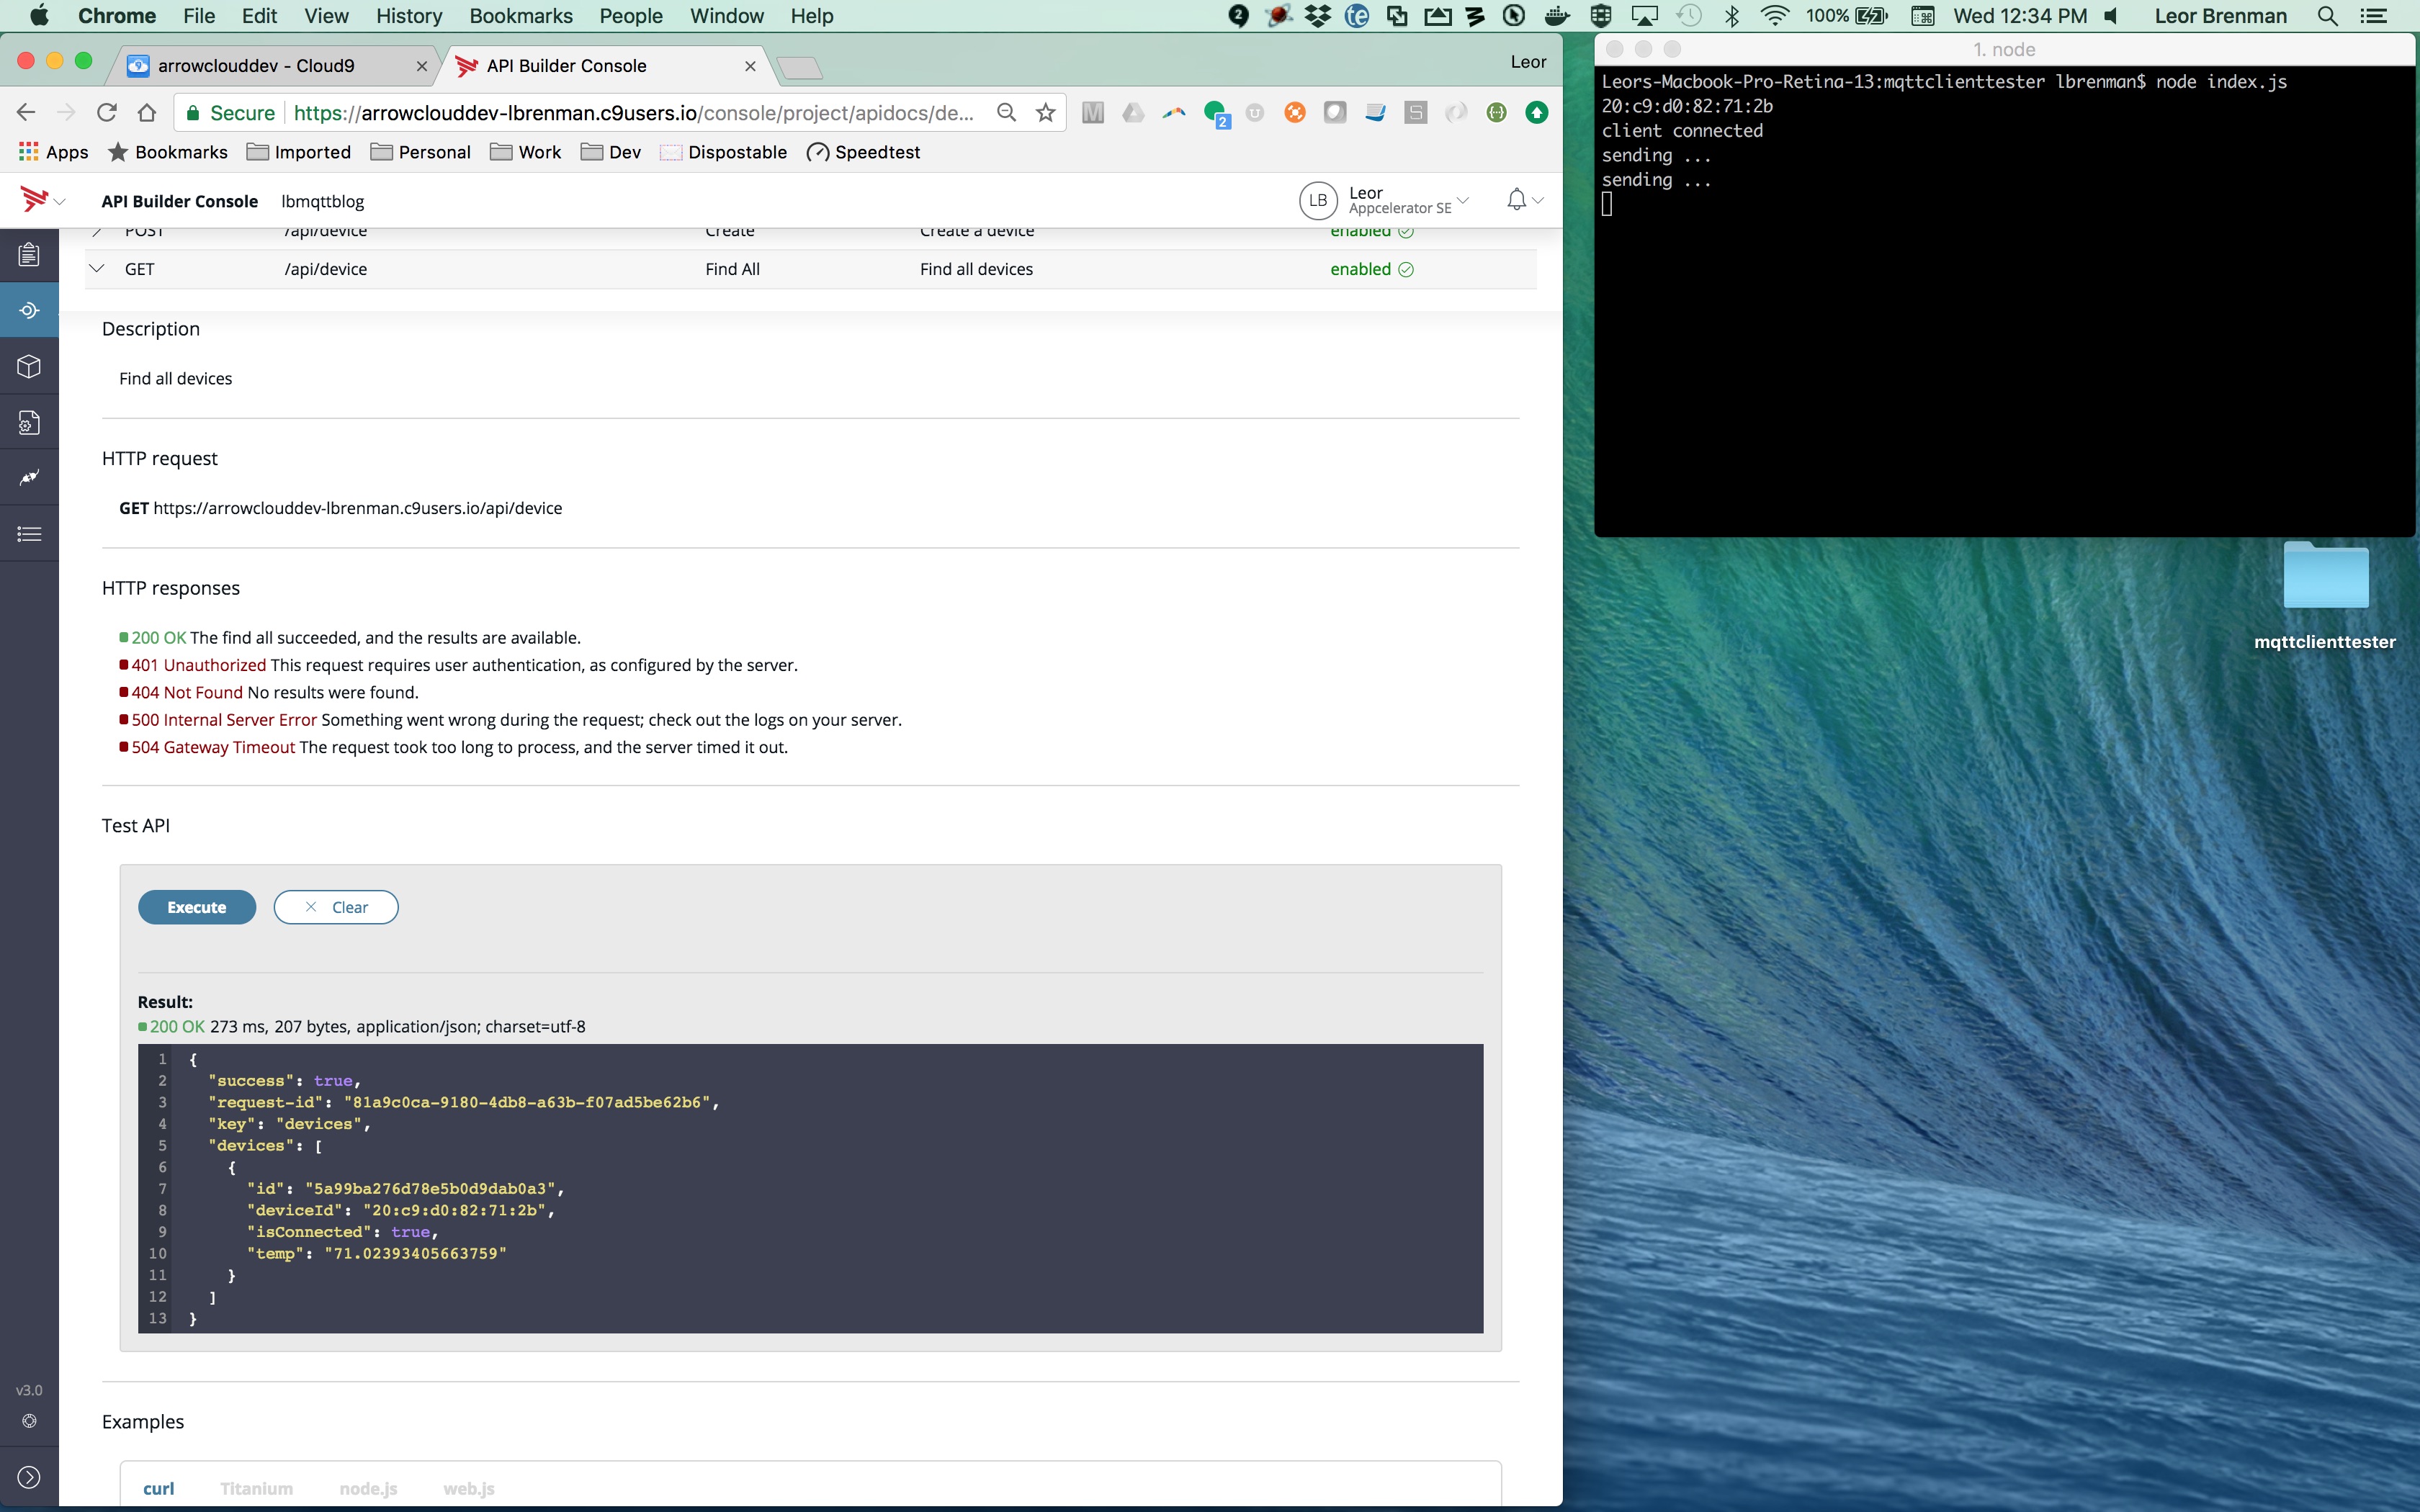
In the screen shot above, you can see the API Builder console. I am executing a REST API GET on the device API to retrieve all the IoT Devices, of which we only have one so far. I can see the temperature reading and the connection status. These were set by API Builder in the apibmqttutils.js module we pasted into our API Builder project above. We’ll review the code for that in the next section.
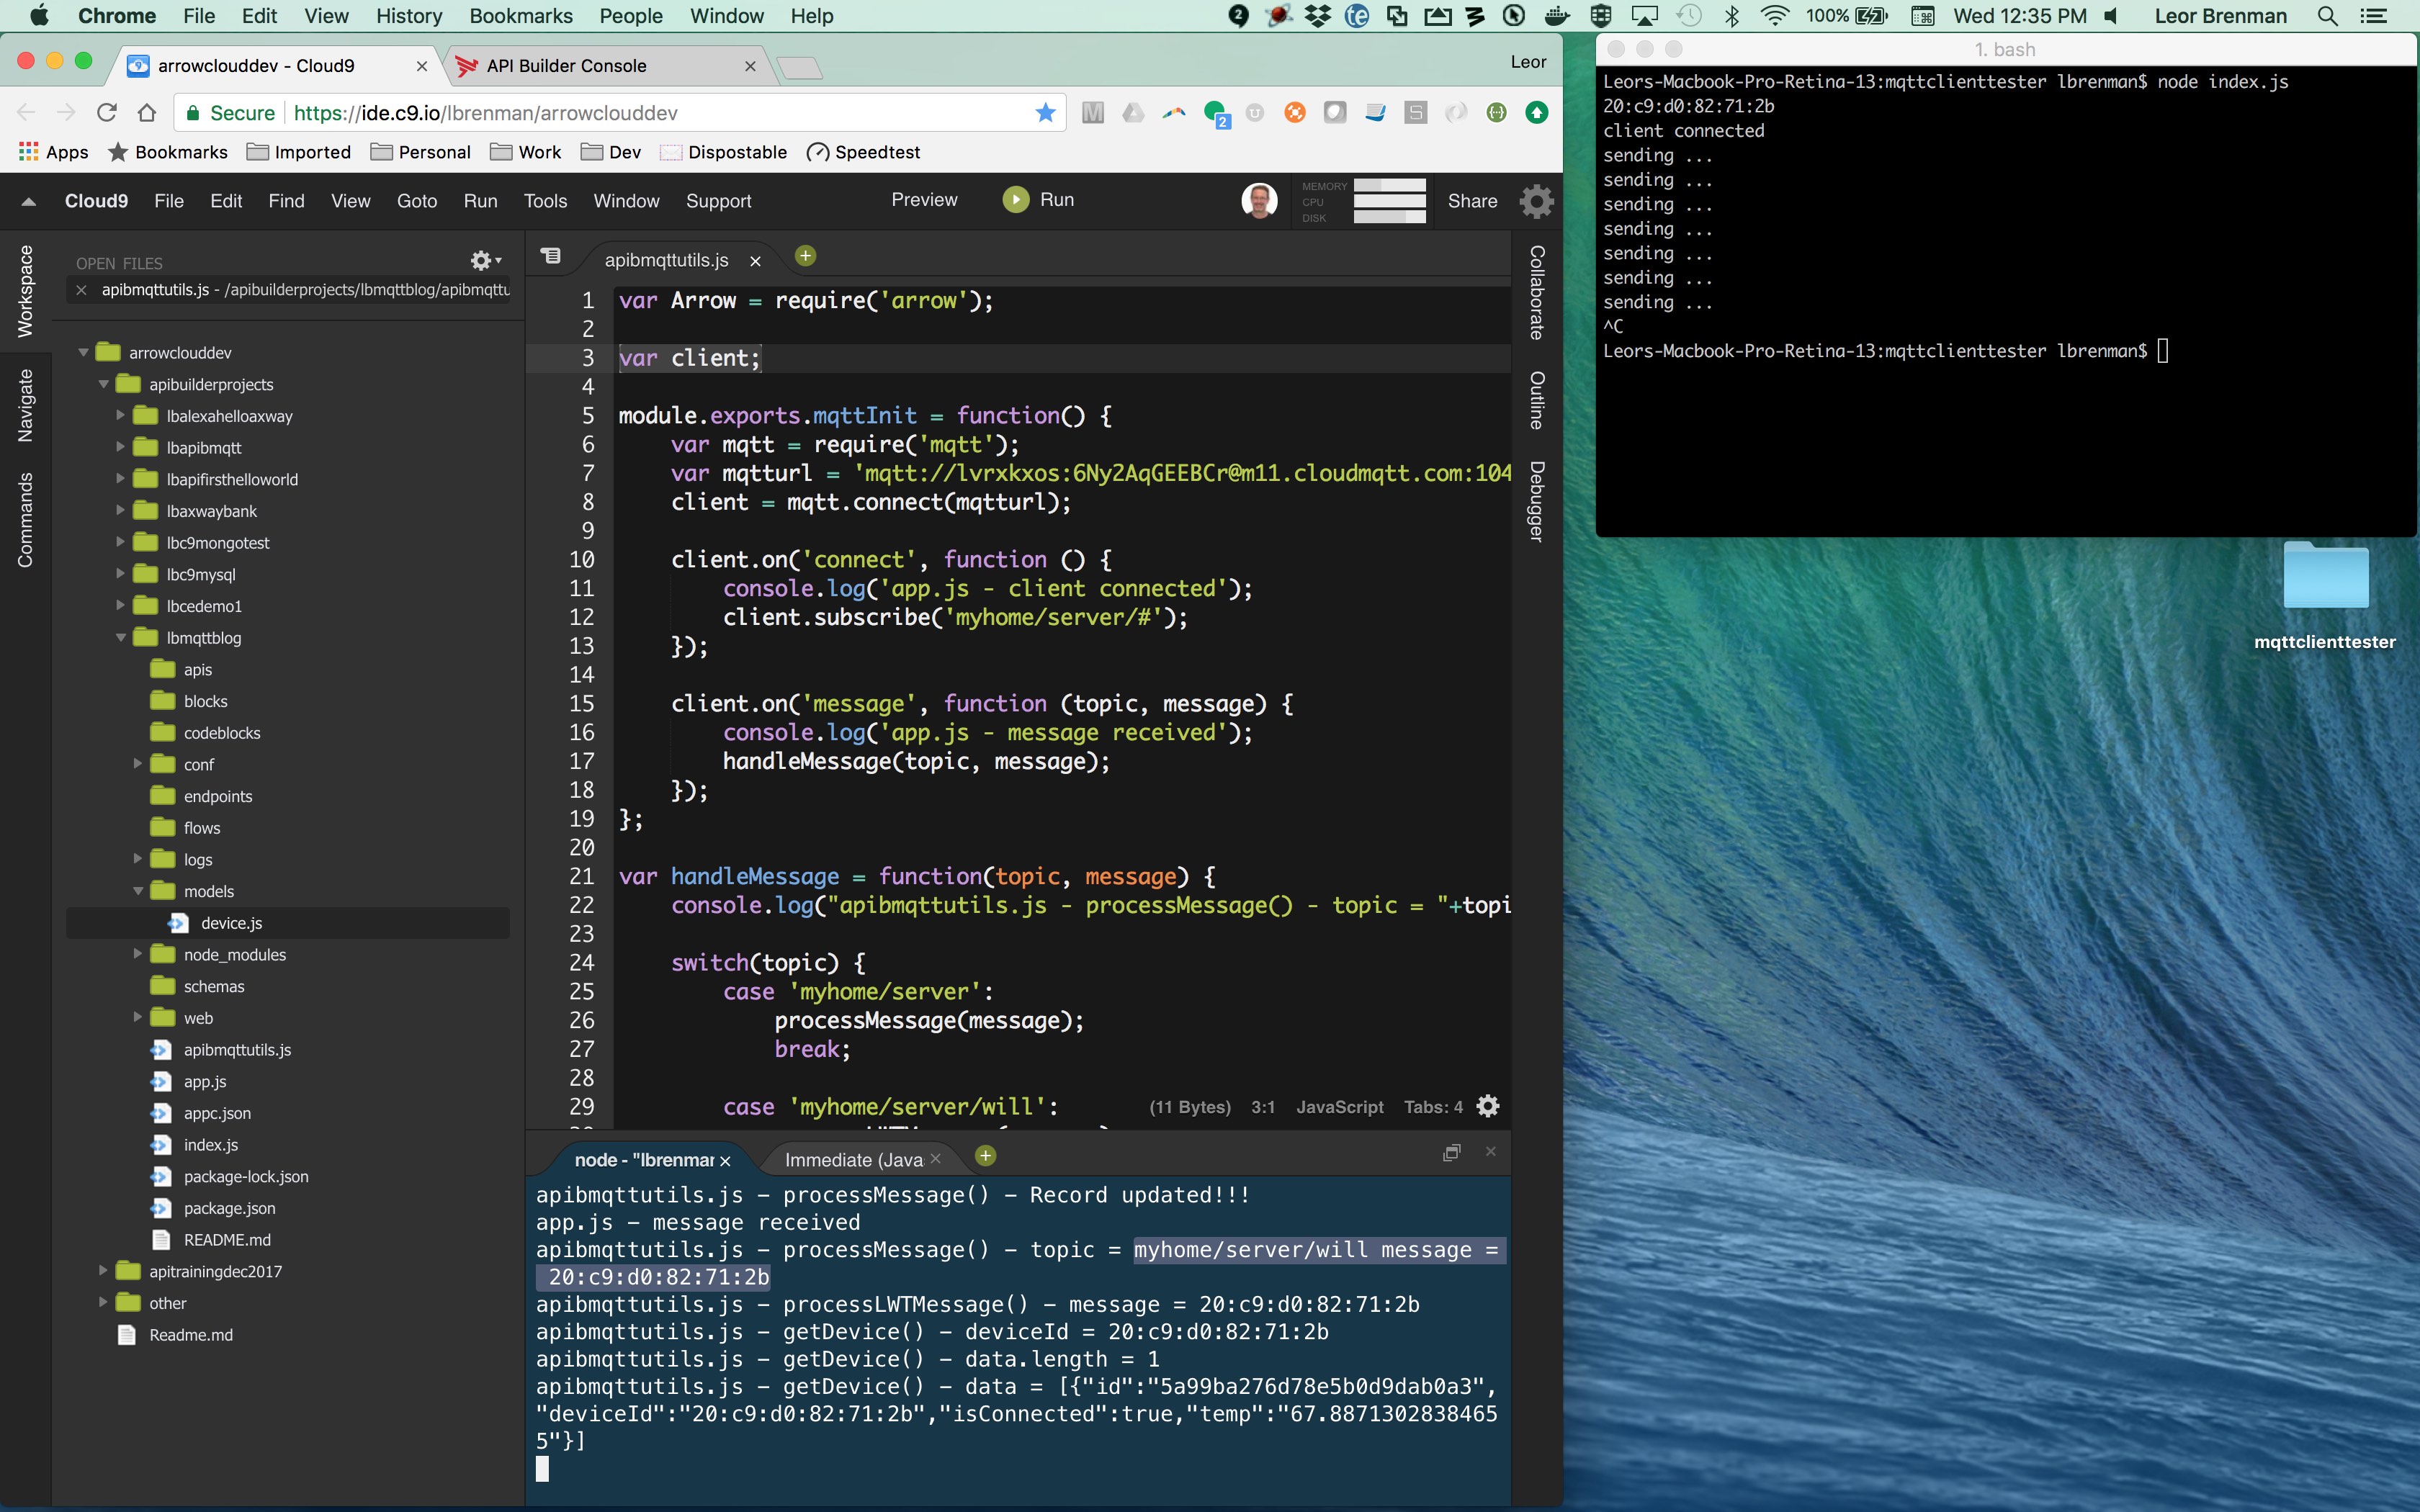
In the screen shot above, you can see that the IoT Device code stopped executing because I pressed control C on my computer. The CloudMQTT Broker detects the lost connection immediately and sends the LWT message payload on the LWT topic. You can see in the API Builder console log that this message is received. As we’ll see in the code shortly, API Builder will basically set the device’s isConnected field to false when it gets this message.

In the screen shot above, we can see that the device status changed and the device is no longer connected.
apibmqttutils.js
apibmqttutils.js contains all the code for API Builder to implement the functionality described in this blog post. Let’s review some of the key components. We’ve already reviewed the mqqtInit() method above, so let’s move onto the handleMessage() method which is called whenever a message is received on any subscribed channel.
handleMessage()
var handleMessage = function(topic, message) {
    switch(topic) {
    case 'myhome/server':
    processMessage(message);
    break;

    case 'myhome/server/will':
    processLWTMessage(message);
    break;

    default: unhandledTopic(topic, message);
    }
};
You can see that the handleMessage() method simply responds to the two different messages we expect to receive. One is explicitly from the IoT Device code on the ‘myhome/server’ topic. The other is by the Broker on the ‘myhome/server/will’ topic and is as a result of the IoT Device configuring the LWT topic and message payload when it establishes a connection to the MQTT Broker. Finally, I’m also handling unhandled topics. This doesn’t do anything but print to the console so I can know if i am sending messages to API Builder that it’s not setup to respond to.
- processMessage()
This method is called when a message arrives on the ‘myhome/server’ topic and is shown below:
var processLWTMessage = function(message){

getDevice(message.toString(), function(data){
if(data) {
if(data.length === 1) {
data[0].isConnected = false;
data[0].update();
} else {
console.log('apibmqttutils.js - processLWTMessage() - error with iot device, exactly 1 device not found');
}
} else {
console.log('apibmqttutils.js - processLWTMessage() - error getting iot device');
}
});
};
The processMessage() method first calls the getDevice() method (which we’ll review below) and then checks the data returned to make sure there is exactly one record with the specific deviceId of the IoT device that sent the message. Then it updates the record using the following code:
data[0].isConnected = true;
data[0].temp = message.temp.toString();
data[0].update();
getDevice()
var getDevice = function(deviceId, callback) {
var model = Arrow.getModel("device");
  model.query({deviceId: deviceId}, function(err, data){
if(err) {
if(callback) {callback(null)};
} else {
if(callback) {callback(data)};
}
});
};
The getDevice() method simply makes a programmatic query of the device database (based on the device’s deviceId) and returns an array of IoT devices. Note that there should only be one record returned.
processLWTMessage()
This method is called when a message arrives on the ‘myhome/server/will’ topic and is shown below:
var processLWTMessage = function(message){

getDevice(message.toString(), function(data){
if(data) {
if(data.length === 1) {
data[0].isConnected = false;
data[0].update();
} else {
console.log('apibmqttutils.js - processLWTMessage() - error with iot device, exactly 1 device not found');
}
} else {
console.log('apibmqttutils.js - processLWTMessage() - error getting iot device');
}
});
};
The processLWTMessage() method is similar to the processMessage() method but it simply updates the device record’s isConnected field to false so a web/mobile app can know if the IoT Device lost connection and/or power.
Conclusion
In this blog post we saw how we can start to build out an IoT Hub based on API Builder and MQTT. We are able to detect connects and disconnects and store device status and data in the Axway NoSQL Database.
In the next blog post in this series we’ll cover:
- How to leverage the Axway MBaaS to send a Push notification to a Mobile Application
- How to initiate MQTT communication between API Builder and an IOT device from an API Builder API
Follow us on social